1
$\begingroup$

The character's file has some actions to control a rig (rigify) this works fine in the NLA but shape keys need to be controlled by a mesh. A setup like this:
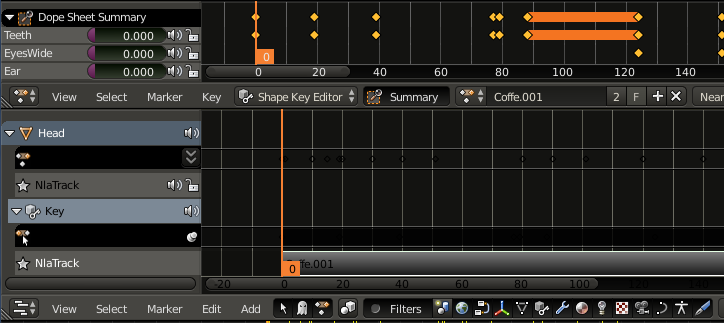
enter image description here

Even the offset (start keyframe) can be adjusted.

The scene which links to the character's .blend has a proxy for the rig, actions work fine. But I don't get the key-track from the above image.

When I add another proxy this time for the mesh instead of the rig another instance of the character is shown. The 2nd instance isn't animated by the rig but shows the shape key animation!

What is the correct way to get a key-track in the NLA?

(This is a follow up of: How can shape keys of a linked object be controlled? but after some reading I focus on the NLA tracks.)

$\endgroup$

3 Answers 3

3
$\begingroup$

I created a .blend file start with the default cube. I gave it a relative shape key and shrunk one of the faces. I then added keyframes at 1 and 31 with influence 0 and 1.0 respectively. That makes the face shrink over time.

I then duplicated the cube with alt-d. Since both cubes have the same mesh, the action is on both of them. I made a single-user copy of the mesh by clicking the [2] button next to the mesh's name.

It still had a link to the action datablock. While there are probably easier ways to do this I went into the NLA editor and used the vv icon to move the action into a track, then I deleted the track.

Now I have one cube with the action, and another cube with no action. I think I am at the point where I can answer your question.

I took the cube that has no action and in the NLA editor I used the menu Add > Add Track to put an NLA track on it. Then I use Add > Add Action Strip and select the KeyAction. This causes the action to be added as a strip in the track starting at the current frame of the timeline (I had my time cursor at 31).

Now I have two cubes, each with its own mesh datablock (although they have identical shape keys) and those shape keys are animated by the same action, but the action occurs at different times, because the strip is offsetted.

Although this may not be exactly what you want to accomplish, maybe it shines light on the relationships between the datablocks and guides you to your answer.

$\endgroup$
2
  • $\begingroup$ Thanks this was my bad, I didn't point out that the characters file is linked from another .blend, within one file it works flawless. $\endgroup$
    – stacker
    Commented Nov 25, 2014 at 20:27
  • $\begingroup$ aw nuts. wiki.blender.org/index.php/Doc:2.6/Manual/Data_System/… actually mentions shape keys in meshes. When I started experimenting with linked objects, I ran into the same problem you did. $\endgroup$
    – Mutant Bob
    Commented Nov 25, 2014 at 22:41
1
$\begingroup$

The idea of adding another proxy for the mesh seems to be correct, it should be noticed that only the instance of rig-proxy performs the bone-based-animation. But both instances do the shape-key animation. The other mesh-proxy instance can be hidden. Both rig and shape-key animation will be displayed .

$\endgroup$
1
$\begingroup$

I was able to kludge up something by rigging a driver from an armature

In the library .blend you have to create the mesh with the shape key and have its value driven from an attribute of a bone in an armature (I used the local Z coordinate of the bone, but this is a matter of taste).

Then you link the mesh and the armature from the library .blend. I'm pretty sure you have to turn the armature into a proxy. After that you can pose the bone and the shape key should adjust. (just understand that bone coordinates are really screwy and to alter its Z coordinate, you might end up animating the Y data_path.)

This technique is derived from one of the animation techniques used to correct for pinching of skin when bones are rotated "too far".

$\endgroup$

You must log in to answer this question.

Not the answer you're looking for? Browse other questions tagged .