23
$\begingroup$

I have been experiencing an issue that once I have a material created and looking the way I want it, I cannot seem to export it correctly with the textures mixed.

I don't know the correct words to use, but in blender I have the material created using the nodes editor, and I have placed two textures inside of there (one for the rock texture and one for moss, my object is a rock). When I export this model and import to Unity (the game engine I am using), I find a materials folder but the material inside of it does not have the textures assigned, it's just a plain white material?

How can I export my material from blender in a way that it will allow me to import it WITH TEXTURES into Unity?

$\endgroup$
6
  • $\begingroup$ Basically, the Unity game engine does not understand blenders materials. I believe that for blender internal it does make an attempt to convert them into Unity materials. Materials for use in Unity should be made inside Unity, blender materials should be used to tell Unity what parts of the mesh have different materials assigned to them. $\endgroup$ Commented Feb 8, 2015 at 17:00
  • $\begingroup$ That said, you can use Blender to make a material, then bake it to an image file (usually using a Direct Diffuse bake). You can then use that as a colormap for your Unity material. $\endgroup$ Commented Feb 8, 2015 at 17:02
  • $\begingroup$ This baking sounds like what I am looking for, how would I go about doing that? :) Specifically, where can I find it in the latest Blender version? $\endgroup$ Commented Feb 8, 2015 at 18:06
  • 1
    $\begingroup$ In addition to Davids answer, you can watch this tutorial: blenderguru.com/tutorials/introduction-baking-cycles $\endgroup$
    – p2or
    Commented Feb 8, 2015 at 20:32
  • $\begingroup$ You might also want to read this for when your model and textures are ready for export. blender.stackexchange.com/questions/19299/… $\endgroup$ Commented Feb 9, 2015 at 14:00

3 Answers 3

25
$\begingroup$

You will have to Bake the material before you can use it in unity. Specifically the color data from the material.
Well what pass holds the color data? That depends on how your material is set up. You might have to bake a Diffuse pass, a Glossy pass, or an Emission pass (those are the three most common passes, but there are 11 total passes).

If you are using a Diffused BSDF, Principled BSDF (non metallic), and Toon BSDF shader then bake a Diffuse pass set to Color.
However the Anisotropic BSDF, Glass BSDF, Glossy BSDF, Hair BSDF, and Velvet BSDF shaders will all output a pure black Diffuse pass. For these you need to bake a Glossy pass set to Color.

If you have an emissive materiel, you will need to use (no surprise here) an Emit pass.

The interesting one is the Principled shader. When set to metallic, it too will be a pure black diffuse pass.


These here are the minimum steps to bake the color of a cycles material to a texture (I'm using a diffuse pass here). You may depending on your UV layout need to create another UV map. Possible to bake texture to new UV map?

  1. With the object in question selected, open the UV/Image Editor and create a new image which will be used to bake to.
  2. In the material nodes add a Image Texture node, select the image you just created and keep it the active node (light yellow outline).
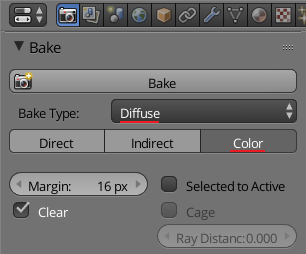
  3. In the Properties Window under the Render tab scroll down to the Bake heading. Change the Bake Type to Diffuse, and choose only the Color pass. Now press the large Bake button.
    Texture Bake settings
$\endgroup$
0
2
$\begingroup$

You can't really export the material with all its nodes etc however there is a way around, but it doesn't make it look as good as in Blender.
First follow the answer suggested by David. Now, once you reached step three instead of baking type to 'Diffuse Color' set it to 'Normal'.

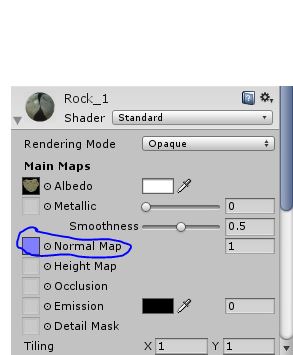
In unity import your mesh then add the texture to it. Now click on your object and scroll down till you see your texture/material. Click on the image near the small texture/material preview then drag your 'normal' image into the 'normal map' section. This should bring in some detail you find when rendering in blender.
material settings for unity

$\endgroup$
-2
$\begingroup$

Well there is definitely a bug report worth making about this but I have a semi okay hacky let-down workaround for your consideration.

Take your model and duplicate it. In edit mode use ALT-S to scale all selected faces maybe -0.05 or whatever is relatively appropriate, maybe less is more.

Replace the material with an Emitter of white like an Area light power/strength of 1.0 sounds right.

Then in your typical cycles texture bake procedure with Combined selected you have to have subsurface turned on or it renders black (which is the bug ~ clearly).

Alas with the subsurface turned on (and only 'diffuse' checked-on as well other then 'selected to active' potentially) you should get even illumination on the baked surface. Since it's a diffused shader no subsurface scatter will be included anyway (I originally have used the beloved unifying Principle Shader... of course).

Remember to turn off all other lights, Ambient lighting, and environment lighting of course (also hide all other object). You can still get shadows if you try, (like I did at first), a large inverted sphere as an area light, or something similar with the environment it's not as good.

I'm thinking a duplicate with no scaling wouldn't work right, but maybe -0.0001 scale factor entered into the tools panel when ALT-s scaling might be right to give no shadow in complex convoluted surfaces that would otherwise pickup more or therefore less light (depending on how you look at it) and have different exposure to the closely light surface. It could also be considered as a desired (AO) 'feature' to set that scaling distance to a desired effect as well.

In my case I wanted to see if I could get a bump map by pumping the RGB through a diffused BSDF node. Can't say I need that with the Normal but I guess this is similar for the texture unless you want to bake some nice appropriate lighting into that.

Anyway I'm still doing some tests on this, with so many possibilities/tweaks. Indirect Off, not using Selected to Active, and therefore hiding the master high res source I baked the normals down to, etc. It seems maybe those other possibilities are not better and this is the best way. I suppose for distance you need to break free from the surface and therefore not be intersecting (zero didn't work as expected) so using a Boolean modifier would help determine more precisely a minimum amount to scale along the normals. You maybe need to reapply smoothing to the duplicate after changing the material.

{My Version is 2.79 in May 2018}

[My thought of how Blender Devs should proceed from my previous comment to the other answer above is, that you want a node that would simply export the texture with the UV mapping interpolation. This may be complicated when trying to move from a high res to low retopologized surface as this baking technique is intended for, so what's being interpolated is maybe different but you can redo the textures from the low poly version instead.]

$\endgroup$
1
  • $\begingroup$ Michael pointed out above you can just use the emit shader to more directly illuminate the procedural texture I had not thought of that. I guess I thought one not to mess with the source, and two emit was for casting light or area lights. Makes total sense to me now thank you for that. TSo you can put the texture through an emit shader then you wanna use Emit for the Bake Type setting when you bake it out like a normal map so it gets the proper UV mapping from a procedural texture.. $\endgroup$ Commented May 5, 2018 at 10:11

You must log in to answer this question.

Not the answer you're looking for? Browse other questions tagged .