2
$\begingroup$

I've been trying to do this all day with absolutely no useful success.

Let's say that I have a model of something simple like a chair. Now I want to add an image of a room for my chair to sit in. What can I do to have that image available in the 3D view while I am editing and positioning the chair in the room image and then creating the final render including both chair and image after editing has concluded?

I've seen mixed explanations of this that either don't work in the latest version of Blender or are incredibly complicated. I'm just afraid that the answer is going to be that Blender is, by default, very complicated for seemingly simple functions.

$\endgroup$
7
  • $\begingroup$ Do you mean you want a simple plane with a texture (image) on it? There are several ways to achieve that but probably the easiest is the 'Import images as planes' addon. $\endgroup$
    – Xtremity
    Commented Apr 18, 2016 at 21:11
  • $\begingroup$ @Xtremity What I want has been described in the question. If additional details are needed to clear up what I want please feel free to let me know. If a simple plane with a texture on it is the simplest/easiest solution to getting what I want then that is what I will try. $\endgroup$ Commented Apr 18, 2016 at 21:24
  • $\begingroup$ @cegaton I can't seem to get that to work or it isn't what I am looking for. Still no image in the 3D view. $\endgroup$ Commented Apr 18, 2016 at 21:31
  • $\begingroup$ Are you in the "Material" or "Texture" Vewport shading mode? I imagine all 3d modeling software applications have a learning curve to overcome. $\endgroup$
    – TTTTTTa
    Commented Apr 18, 2016 at 21:41
  • $\begingroup$ @Xtremity Actually, you got it perfectly right. Just what I needed. Didn't work for me the first few times because no one suggesting to use it mentioned that I would need to turn on texture shading. $\endgroup$ Commented Apr 18, 2016 at 22:00

3 Answers 3

2
$\begingroup$

The most correct * answer is to use the Viewport settings for one, and the Compositor for the other.

In the 3D Viewport press n to open the settings panel. Find the Background Image section, and add an image. You can specify which view you want the image to show up in, including "Camera." That image will be visible in the Viewport.

As for the render, adding a plane can get the job done, but it causes problems that you have to account for. Not the least of which is going out of your way to solve shading issues.

You only need 4 nodes in the Compositor to do this:

  • Render Layer (added by default)
  • Composite (added by default)
  • Alpha Over
  • Image

Nodes

When you open the compositor, there should already be a RenderLayer node connected to a Composite node. Press shift-a and add an Alpha Over node. Drop it on the noodle between the two existing nodes and it should automatically hook up. Do the same thing again, but add an Image node.

Settings

The RenderLayer noodle should go into the bottom slot on the Alpha Over. The Image node should noodle (yes, noodle is a verb) into the top slot. Use the Open button on the Image node to load in the image you want to put behind the render. You might have to turn on "Premultiply" in the Alpha Over node. I always forget which way that needs to go. Lastly, make sure that "Transparent" is ON in the Film section of your Render settings.

* most correct - The method that uses the tools that were designed to solve the given problem and creates the fewest new problems.

$\endgroup$
2
  • $\begingroup$ please add an image to illustrate : ) $\endgroup$
    – user1853
    Commented May 26, 2016 at 19:06
  • $\begingroup$ Good idea! We're having a tornado here, at the moment, though... So it might be a little while before I can get that uploaded ;-) $\endgroup$
    – Matt
    Commented May 26, 2016 at 19:13
1
$\begingroup$

The background image (applied through the Property shelf of the 3D viewport), is visible in the 3D viewport in the specified view. If you want the image visible in a render, you have to apply the image to a plane (either automatically, by using the "import images as planes", or manually, by creating the plane, adding a material, and applying an image texture to the material created. These planes will render (assuming they are set up properly to do so). In cycles, you have to set the material and texture of the image as plane using cycles nodes.

Later Edit, for completeness:

In some other circumstances, though not necessarily the one detailed in the question, cegaton's suggestion,

adding the image as background in the world and setting the texture coordinates as window

is another way to get the background images to render.

$\endgroup$
1
  • 1
    $\begingroup$ or by adding the image as background in the world and setting the texture coordinates as window.... $\endgroup$
    – user1853
    Commented Apr 19, 2016 at 3:25
1
$\begingroup$

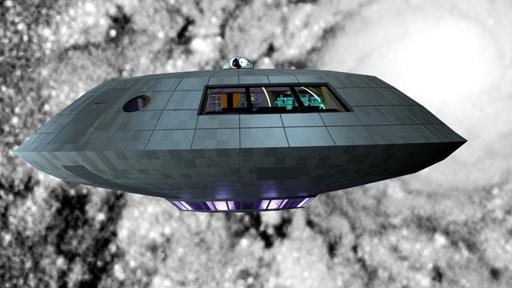
rendered model with a background
In this image I used a galactic photo from the Hubble Telescope, public domain, and textured it to a plane. I can animate the ship across the image. Use a Generated Texture Coordinate along with an Emission Shader set around 1.0 to your Material Output node. This will eliminate unwanted light reflections. Other scenes can be created using a Diffuse BFDS and ambient light, such as a room. With a Diffuse node you can cast a shadow. I like this better than a background image, because it's easier to manipulate with your camera to animate your scene than as a Background which always remains aligned with your camera view.

$\endgroup$

You must log in to answer this question.

Not the answer you're looking for? Browse other questions tagged .