10
$\begingroup$

I'd like to maximize the texture space for a game head model I'm working on.

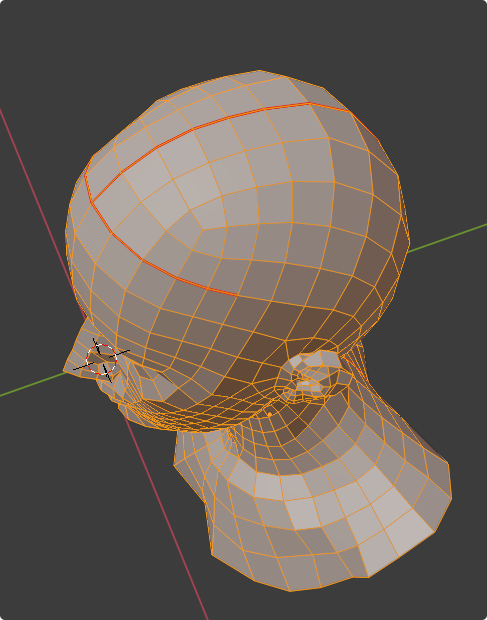
When following the classic approach on how to unwrap a head (adding a straight line from the back and splitting those seam up into two on the top of the head), I get a lot of holes and loose a lot of potential texture space, even when packed properly:
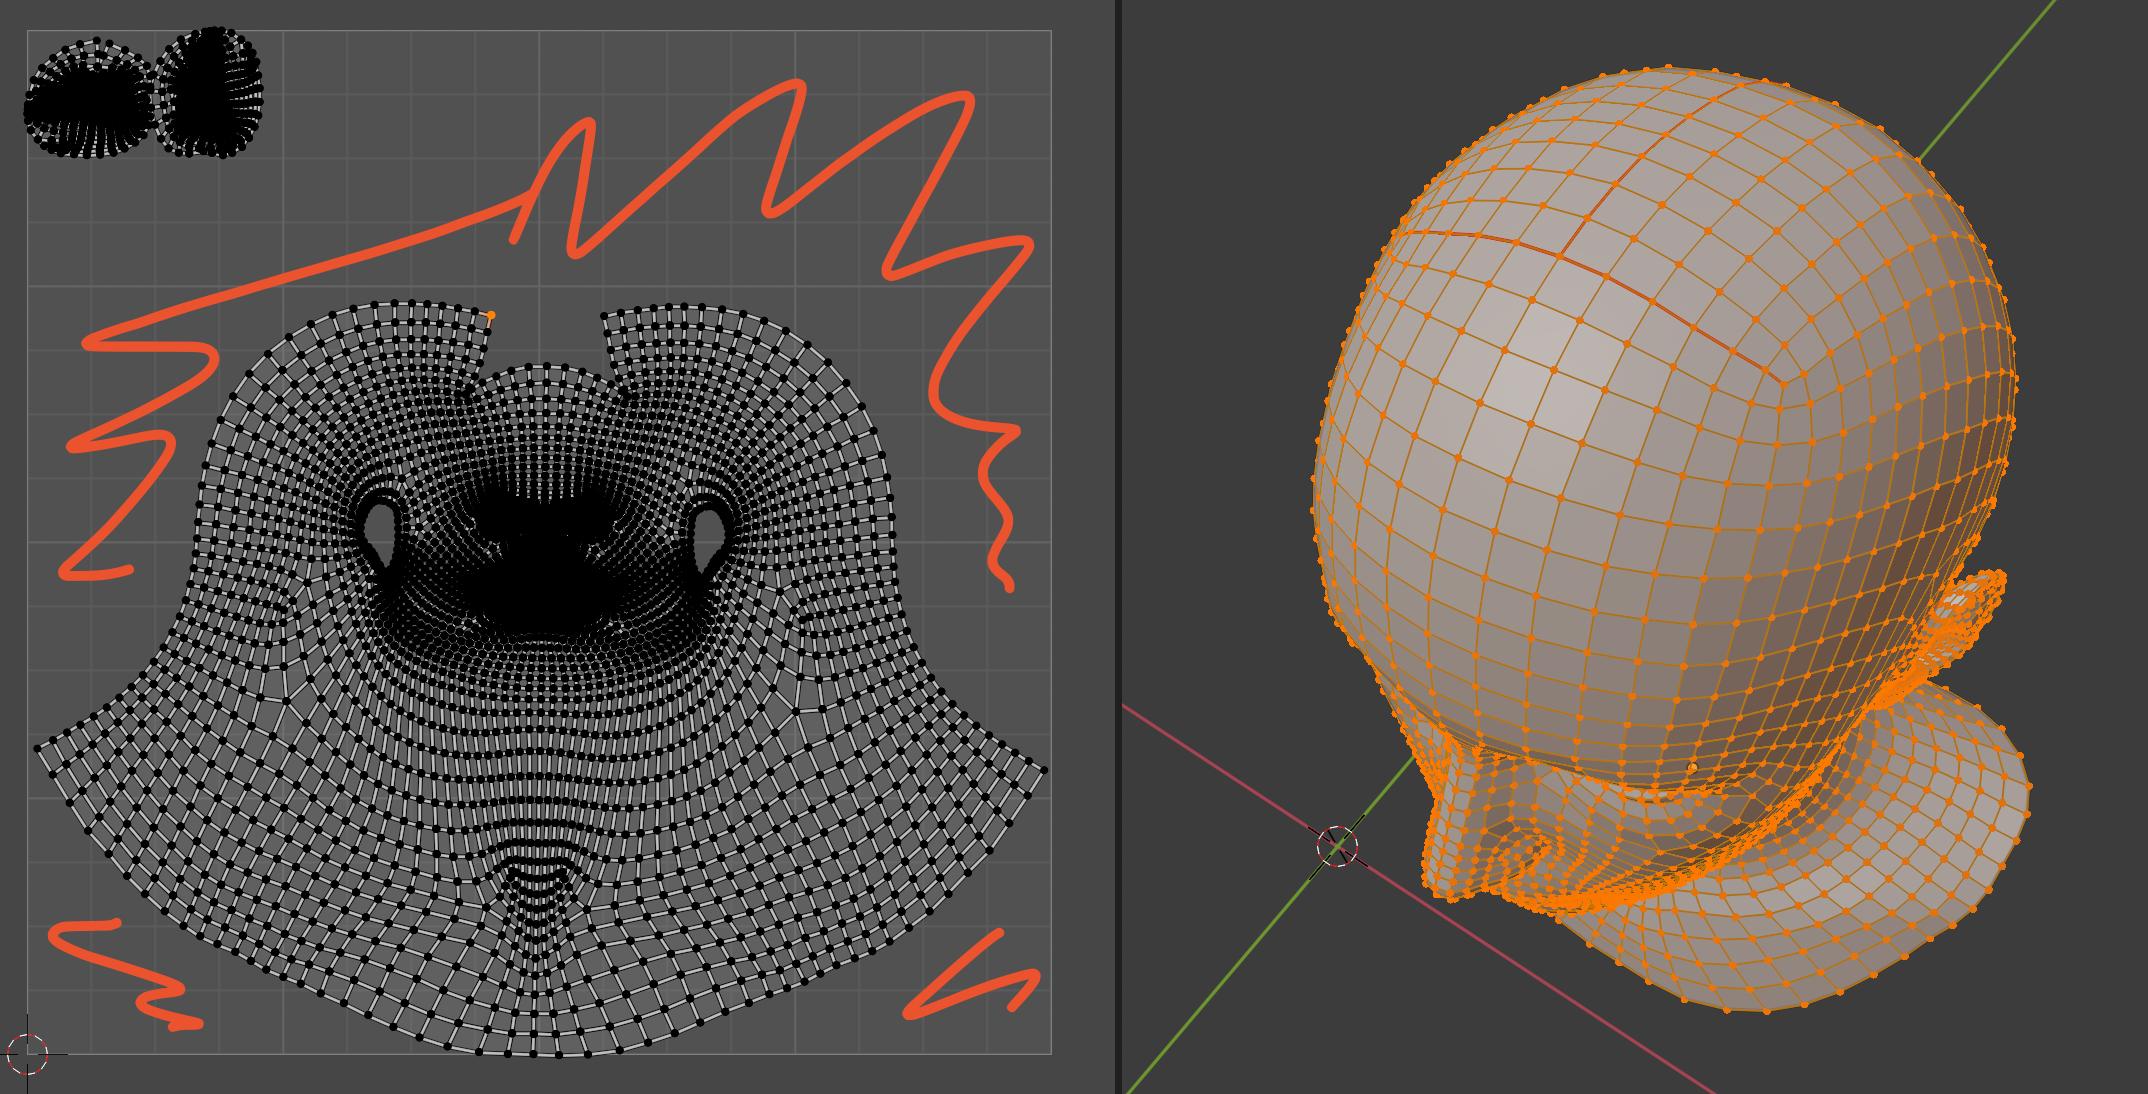
enter image description here Initial test using the female base mesh from https://blendswap.com/blend/22220


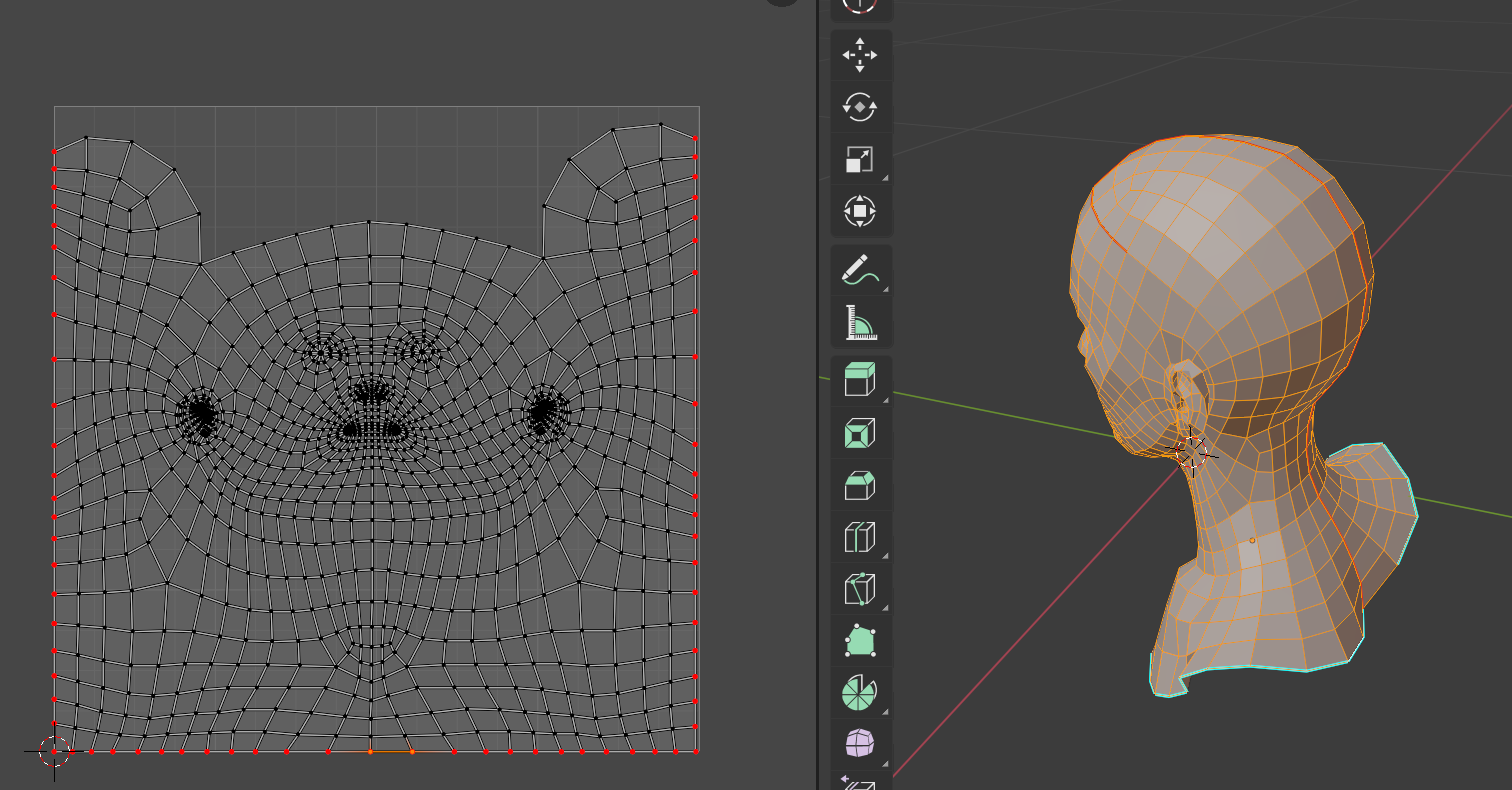
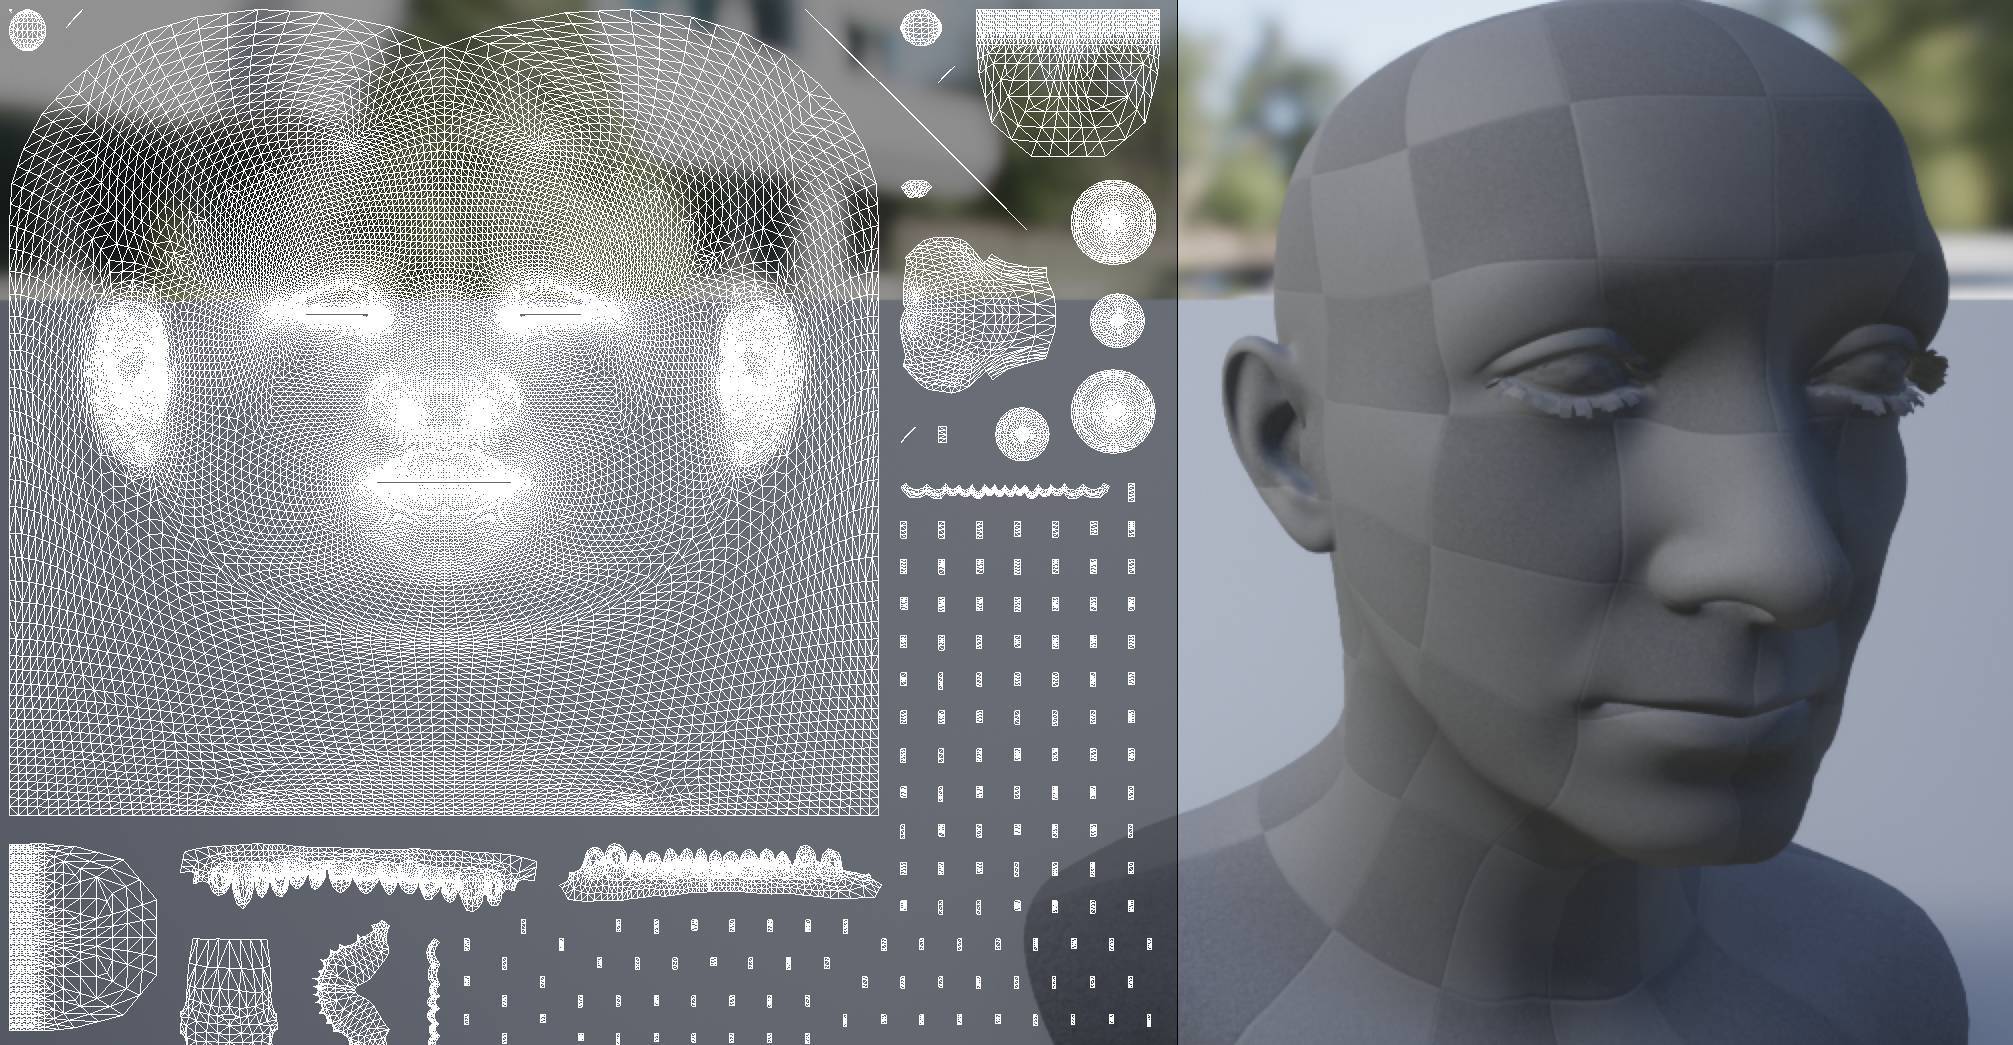
While doing some research I came across Epic's MetaHuman Creator and I've noticed that their UVs are perfectly squared and filling up the entire UV space. They are heavily stretched on the shoulders but that's perfectly fine for a game character:

enter image description here

I already tried to unwrap the head, pin the center verts and run a cylindrical projection which theoretically should produce a similar result. However, the pins does not stay in place when calling the cylindrical projection operator afterwards and the result is a mess.

Q: What's the trick to get a similar type of UV projection for the head and maximize the actual texture space?

$\endgroup$
5
  • $\begingroup$ My immediate thoughts are to either use Proportional Editing to pull the edges out and scale them flat (eg, S, X, 0) or to script some kind of solution to pull the island to the edge of UV space, proportionally dragging anything that's connected. I suppose this might require the edges to be marked in some way so the script could know which bits you want on which edge. $\endgroup$ Commented May 5, 2021 at 16:00
  • 1
    $\begingroup$ Consider something like blender.stackexchange.com/a/93180/15543 find the COG then project minimum bounding circle to square. The conformal mapping for example will be best at center and stretched at extents. Suspect this is reason inquired about about UVBmesh script.. $\endgroup$
    – batFINGER
    Commented May 5, 2021 at 16:28
  • $\begingroup$ Another option is to use 'Pinning'. Select the vertices in the UV map of your original unwrapping along one edge and scale them along an axis to form an evenly spaced line and place them on the edge. Then 'Pin' them. Repeat for other edges. Then unwrap again and the unwrapping algorithm will leave those pinned vertices where they are and unwrap the rest of them taking the pinned positions into account. I guess it all depends on how automated a solution you require. $\endgroup$ Commented May 5, 2021 at 16:37
  • 1
    $\begingroup$ Thanks @RichSedman, good input. I already tried to unwrap the head, pin the center verts and run a cylindrical projection which theoretically should produce a similar result, but unfortunately the pins does not stay in place when running the operator. Also there is no control about the seam of the cylindrical projection, which is quite disappointing. $\endgroup$
    – brockmann
    Commented May 5, 2021 at 22:32
  • $\begingroup$ Thanks @batFINGER I think I get your idea, have to investigate though. $\endgroup$
    – brockmann
    Commented May 5, 2021 at 22:34

1 Answer 1

11
+800
$\begingroup$

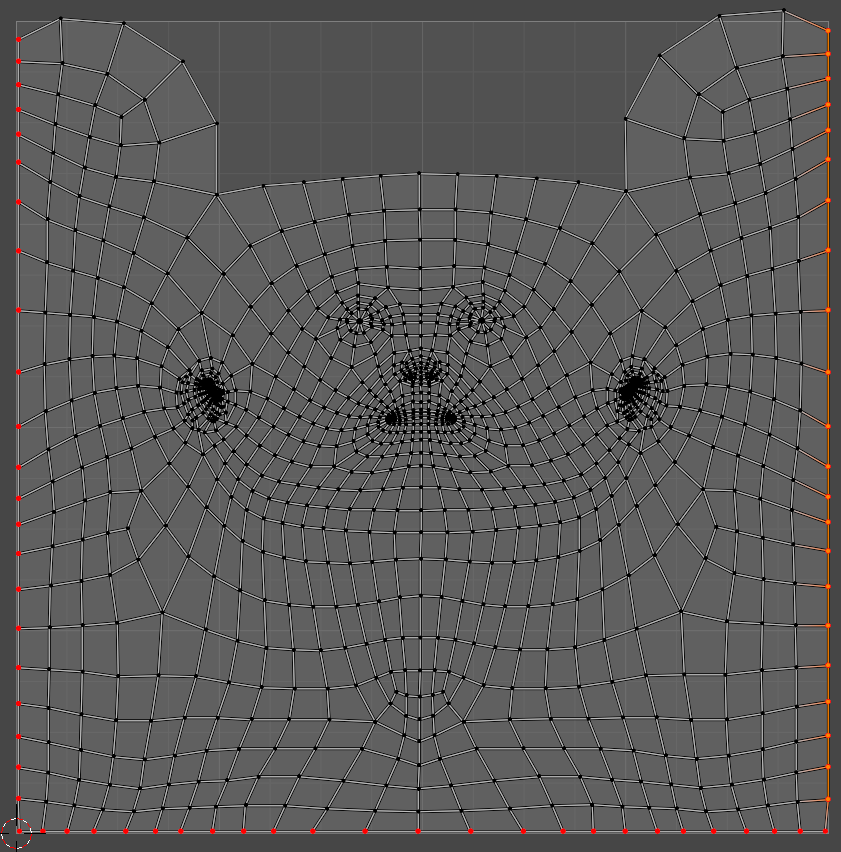
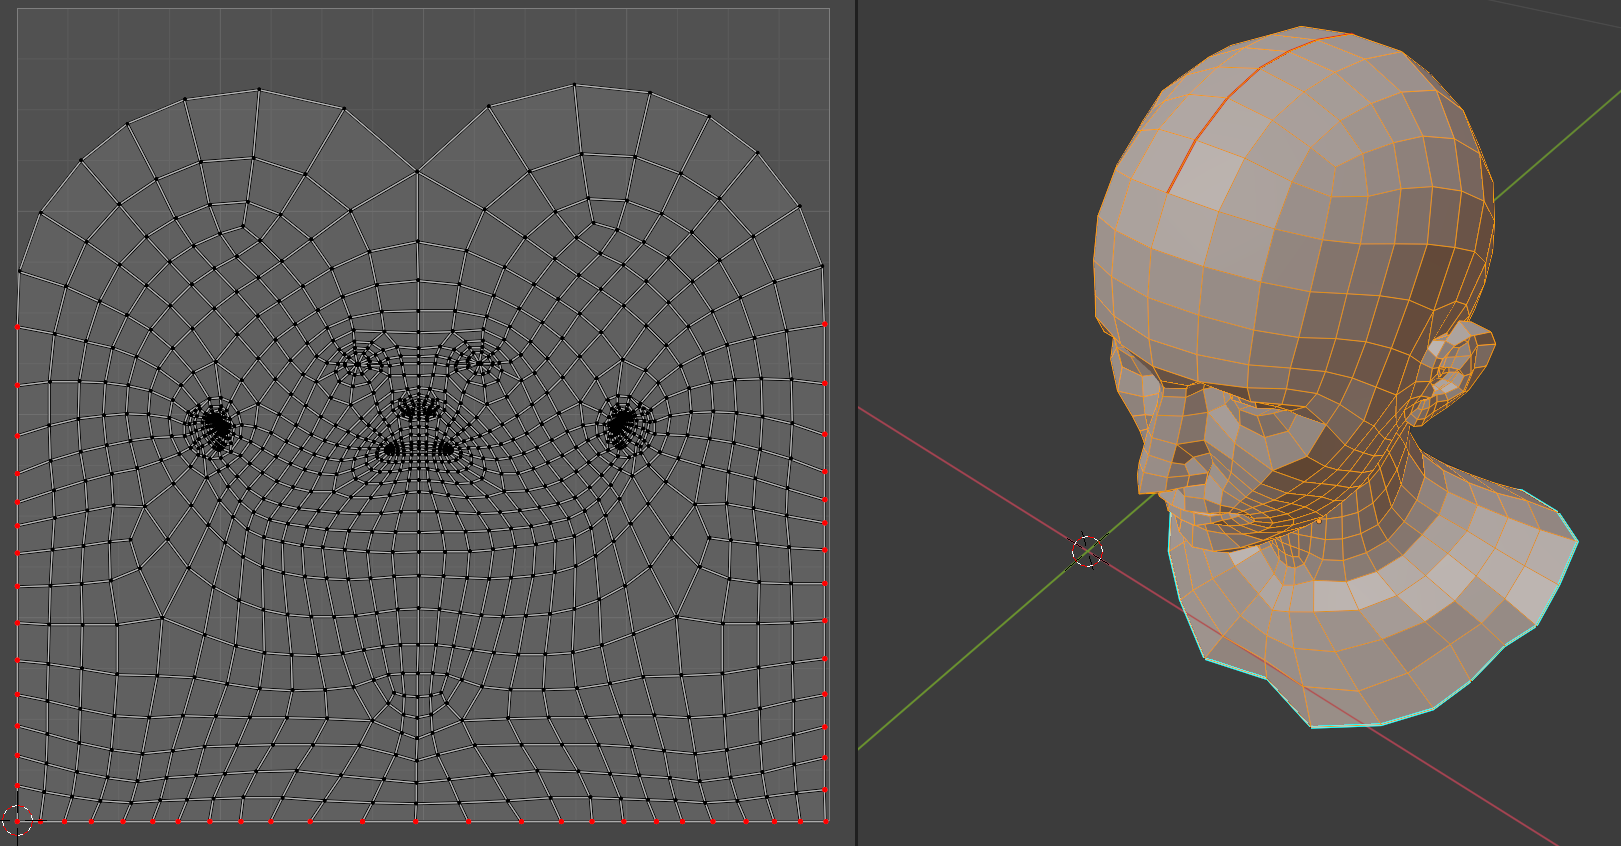
Perhaps something like this would be suitable :

unwrapped

This was achieved manually (but the manipulation of the UV could potentially be automated) from the female base mesh mentioned, using the following steps :

  1. In Edit mode, select the whole mesh and Clear Seams. Mark the back of the head seam as suggested.

seams

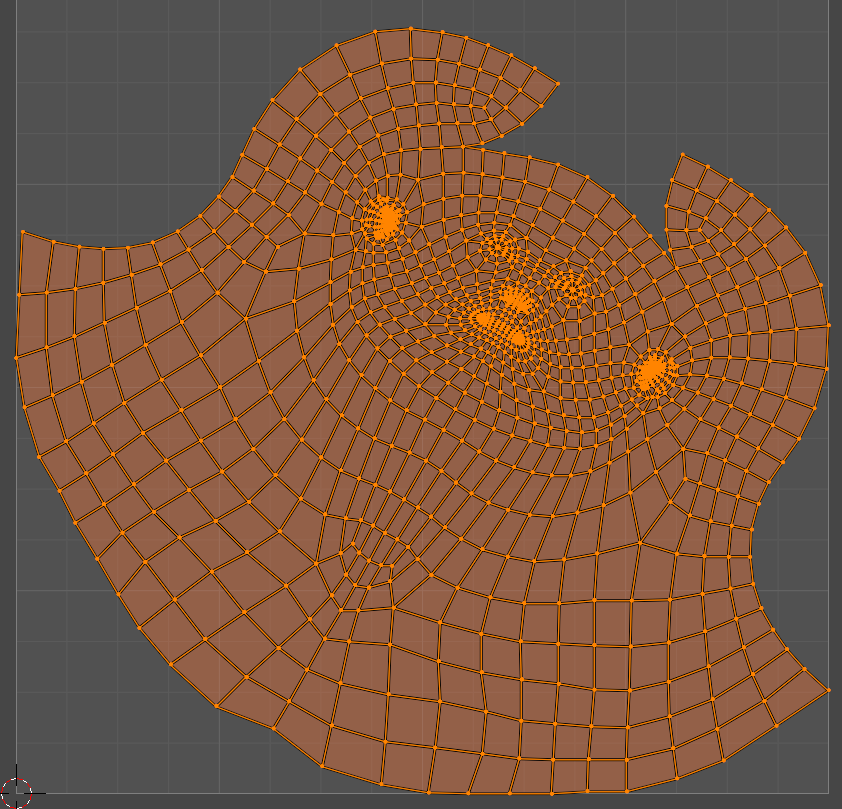
  1. In the UV editor, select all and 'unpin' all vertices (the downloaded mesh already included some pinned vertices). Perform a basic 'Unwrap'.

unwrap

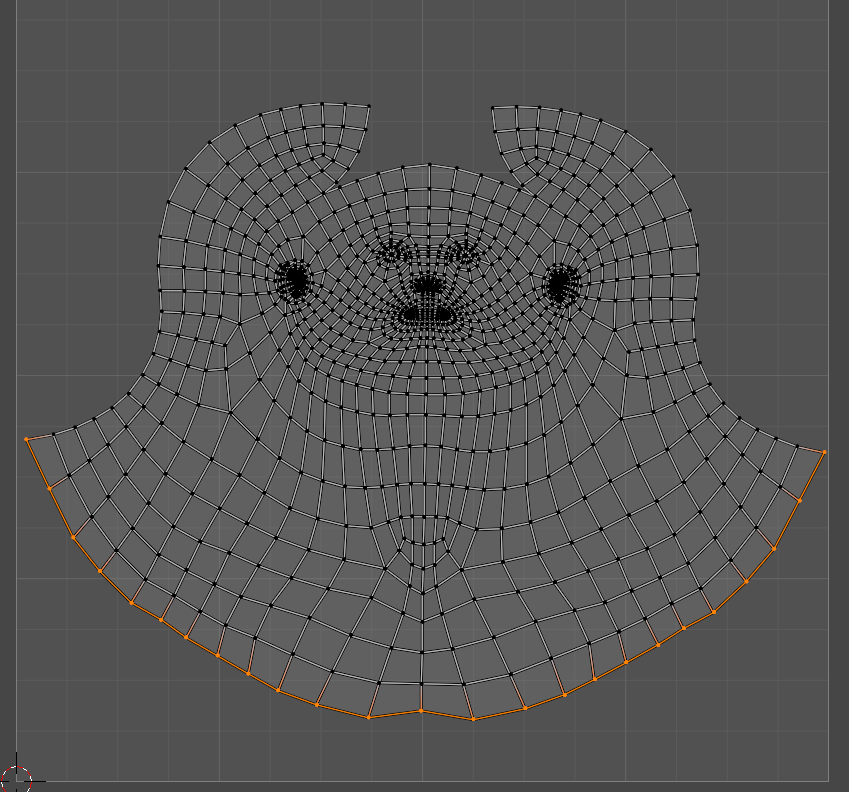
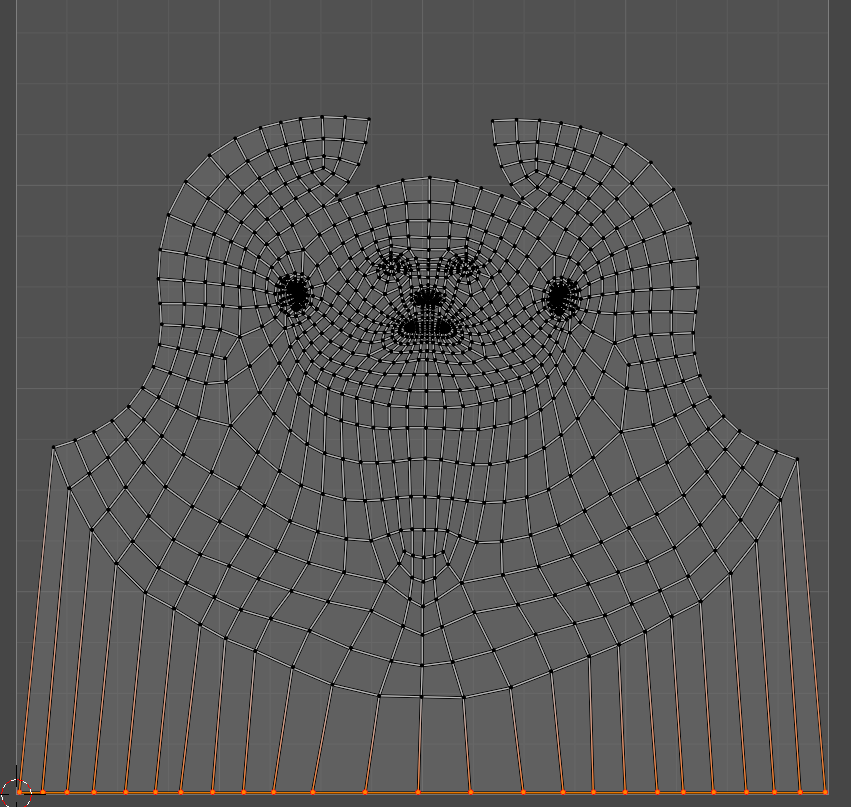
  1. In the UV editor, re-position and straighten the island. Select all the bottom row of vertices.

select bottom edge

  1. Scale to zero in the Y axis (SY0Enter). Move and scale them along the bottom edge of the UV space (G and S). 'Pin' them (P).

position bottom edge

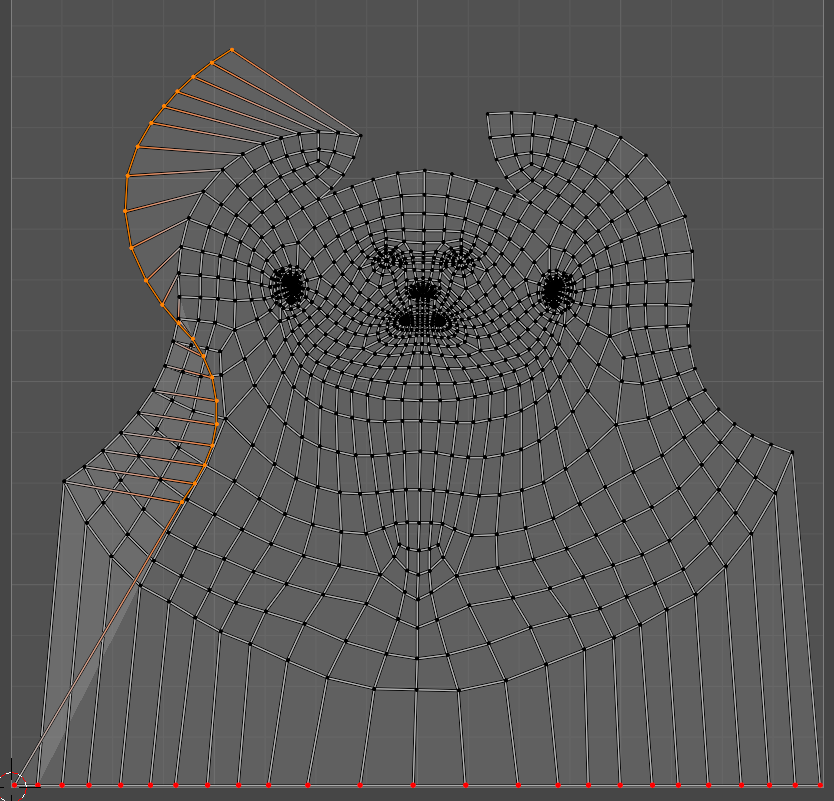
  1. Select the left-hand edge. Rotate them so they are close to vertical.

select side and rotate

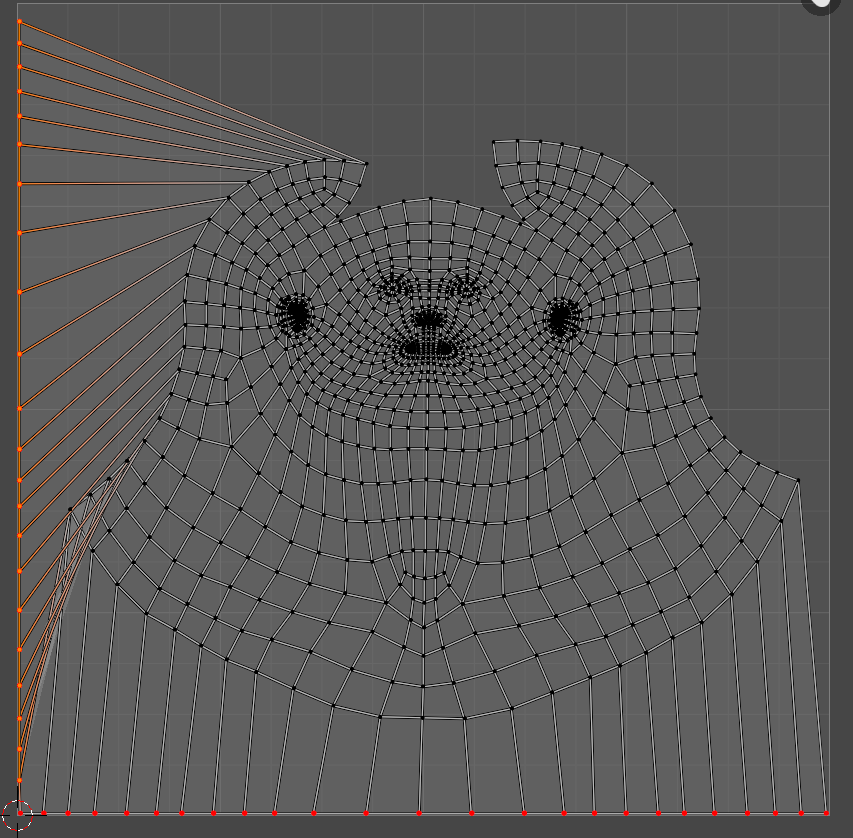
  1. Scale to zero in the X axis. Position, scale and 'Pin' them in place along the left-hand edge of UV space (as for bottom row).

position and pin side

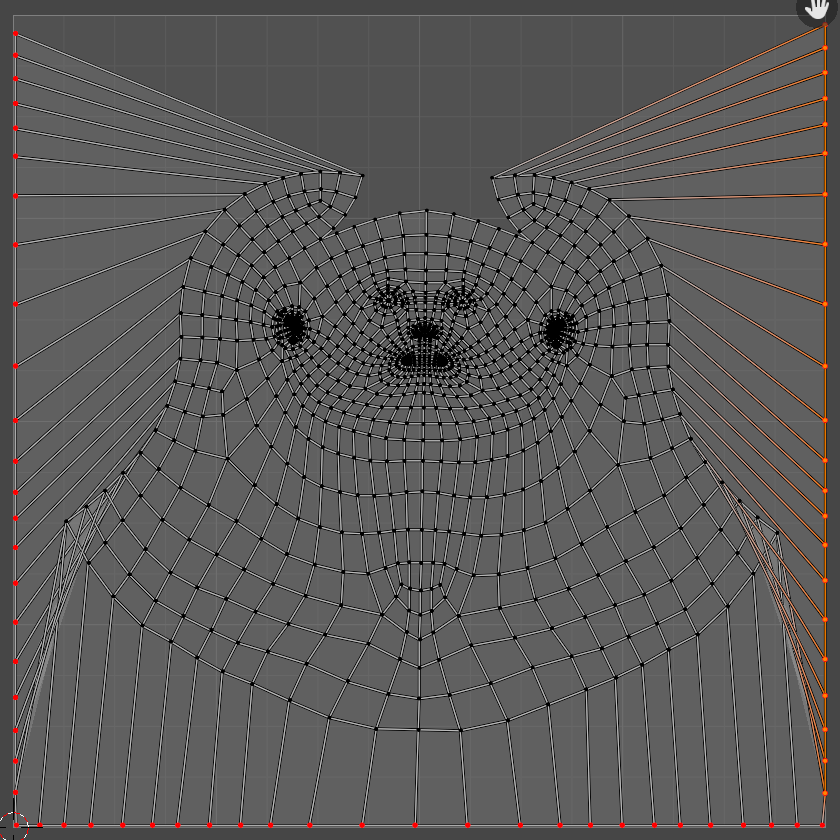
  1. Repeat on the right-hand vertices.

repeat for right side

  1. Perform another basic 'Unwrap'

re-unwrap

It would be feasible to script some of these actions (so you could potentially select an edge of vertices and then have an operator to automatically position and scale them along an edge).

Note that the 'basic' Unwrap function takes account of the 'pinned' vertices, leaving those in position and unwrapping the mesh with those restricted. However, some of the other unwrap functions (such as Cylinder, Cube, Sphere) ignore the pinned vertices and so cannot be used for this.


EDIT: Removing the 'T' from the forehead and unpinning a few vertices down the edge, then Unwrap again produces this - which looks pretty close to your example :

tweaked unwrap

$\endgroup$
3
  • 4
    $\begingroup$ Thanks Rich! Tested the whole day based on your answer. I even get less distortion when pinning the face too and unwrap the other parts over and over again. I think we are pretty close. Automating the process isn't necessary, thanks. Demystifying the process will be perfectly fine. $\endgroup$
    – brockmann
    Commented May 7, 2021 at 17:17
  • $\begingroup$ Fantastic. Glad I could help. $\endgroup$ Commented May 7, 2021 at 17:20
  • $\begingroup$ @brockmann Let me know if there is anything else I can do to improve this answer. $\endgroup$ Commented May 26, 2021 at 21:02

You must log in to answer this question.

Not the answer you're looking for? Browse other questions tagged .