6
$\begingroup$

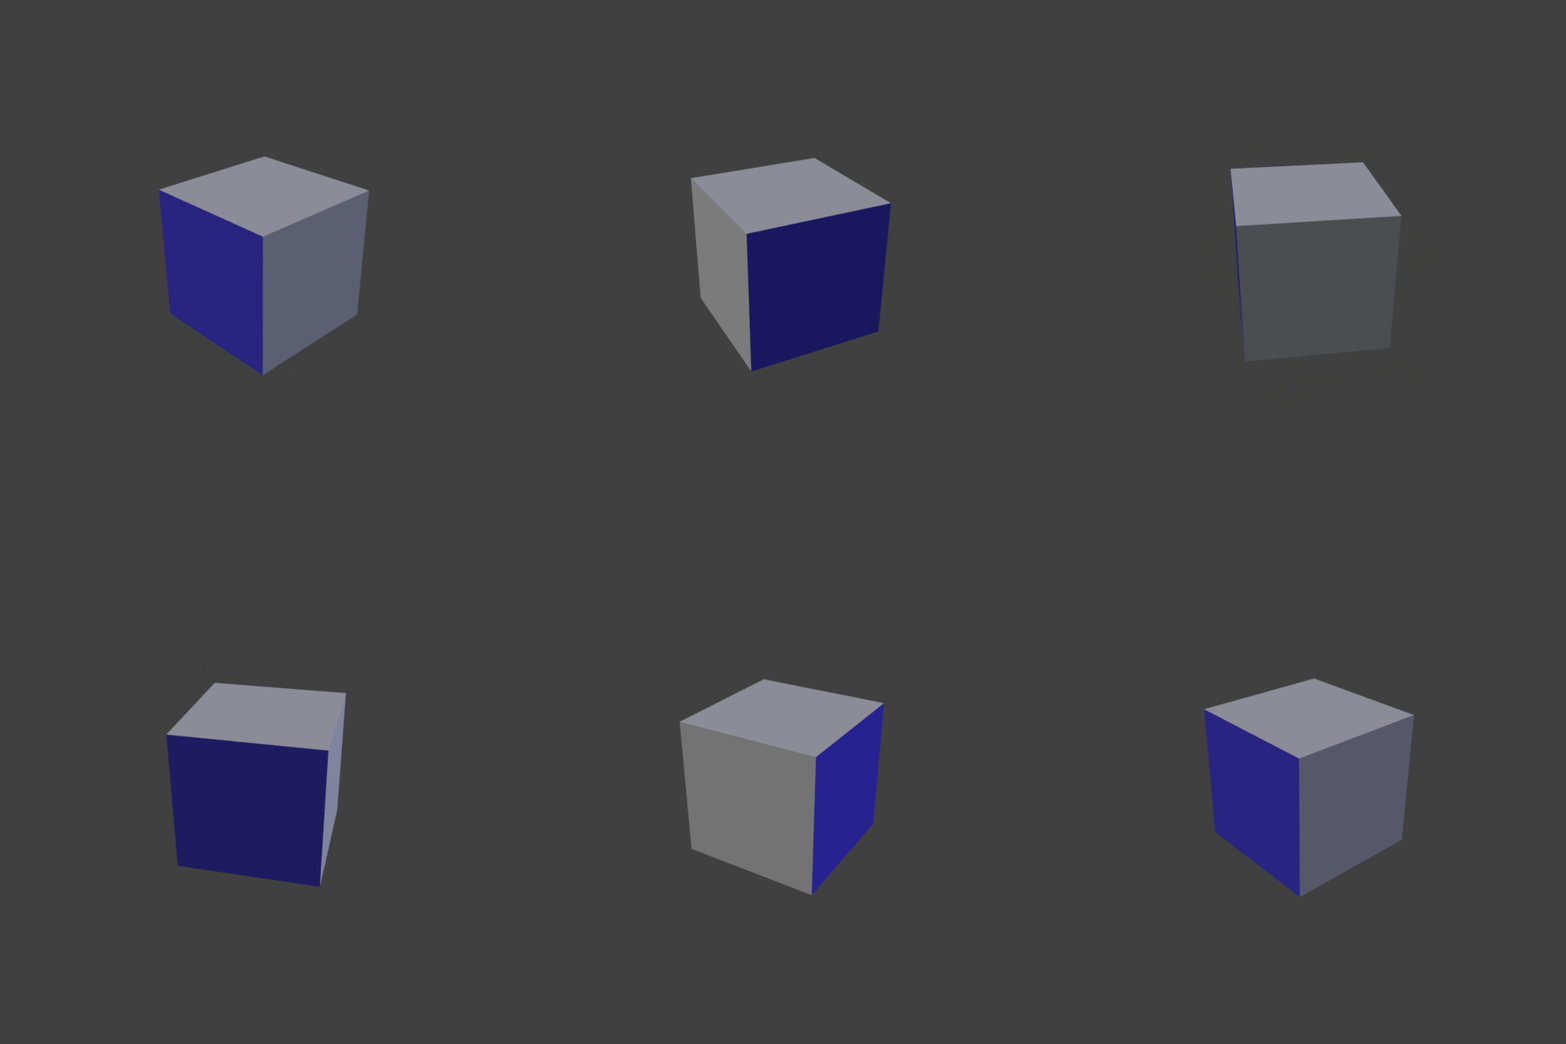
Let's say (for the sake of simplicity) that this cube with two blue sides is my character... The character

and the shape key in question raises a few vertices on top. Shape key example

Whenever the camera views either Blue side, I'd like the shape key to activate regardless of world orientation through the use of a driver. The problem is, I have no idea how to get values I need (or which values I need to begin with) in order to automate this. Principle execution example

TL;DR - I'd like the mesh of a character I have to deform when viewed from the side much like what was done in Land of the Lustrous Land of the Lustrous face deformation example


*Note: While I do have some experience with coding, I've never used python. Layman's terms would be greatly appreciated. Thank you for your time!


UPDATE: In response to @Leander's post

Would it be possible to have this script work with multiple characters on the same camera? Let's say I have character "Cube2" with shape key "Key 2", would simply adding variables like below accomplish this?

import bpy
import mathutils

cam = bpy.context.scene.objects['Camera']
obj = bpy.context.scene.objects['Cube']

# -----------------------------
# Adding Cube2

obj2 = bpy.context.scene.objects['Cube2']

# -----------------------------


def drive_shapekey(scene):
    obj_mat = cam.matrix_world.inverted() * obj.matrix_world

    obj_eul = obj_mat.to_euler('XYZ')
    cam_vec = obj_mat.to_translation().normalized()
    obj_vec = mathutils.Vector((0.0, 1.0, 0.0))
    obj_vec.rotate(obj_eul)
    difference = cam_vec.dot(obj_vec)

    key1 = obj.data.shape_keys.key_blocks["Key 1"]
    key1.value = difference


# -----------------------------
# Adding Cube2 properties and shapekey 2

def drive_shapekey2(scene):
    obj2_mat = cam.matrix_world.inverted() * obj2.matrix_world

    obj2_eul = obj2_mat.to_euler('XYZ')
    cam_vec2 = obj2_mat.to_translation().normalized()
    obj2_vec = mathutils.Vector((0.0, 1.0, 0.0))
    obj2_vec.rotate(obj2_eul)
    difference2 = cam_vec2.dot(obj2_vec)

    key2 = obj2.data.shape_keys.key_blocks["Key 2"]
    key2.value = difference2

# -----------------------------


pre_handlers = bpy.app.handlers.scene_update_pre
[pre_handlers.remove(h) for h in pre_handlers if h.__name__ == "drive_shapekey"]
pre_handlers.append(drive_shapekey)


# -----------------------------
# Not sure if this'll work, but we'll see

[pre_handlers.remove(h) for h in pre_handlers if h.__name__ == "drive_shapekey2"]
pre_handlers.append(drive_shapekey2)

# -----------------------------
$\endgroup$
1
  • $\begingroup$ Drivers might help achieve this $\endgroup$ Commented Jul 14, 2018 at 0:01

4 Answers 4

7
$\begingroup$

This answer targets a beginners level and will include lots of lengthy explanations.

I understand that this answer doesn't utilize drivers as requested, but for this example a simple python script is very easy to produce and maintain, which is why I wanted to add this method.

A slight problem is, that a change of position implies a change of viewing angle with perspective cameras. In the next image there is no difference between both objects orientation, but through the camera, the objects appear clearly at an angle.

enter image description here

I would use a script which check's the camera's and object's transformations on each scene update.

Let's start with a condensed example. Create a camera Camera and a mesh Cube. Then add the Basis shapekey and a Key 1 key, very similiar to the setup in the question.

Paste the following python script in the text editor and click the Run Script button. I have made an effort to document it well.

# import the bpy module, with it we can access the data of the blend file
import bpy

# bpy.context.scene stores the active scene.
# The scene stores a collection of objects, from which
# objects can be accessed directly with their name.
# Get the Camera and Cube by their names and store them
# in "cam" and "obj" variables respectively
cam = bpy.context.scene.objects['Camera']
obj = bpy.context.scene.objects['Cube']

# define a method which will get called on every scene_update
def drive_shapekey(scene):
    # store the transformed obj.matrix in the obj_mat variable
    obj_mat = cam.matrix_world.inverted() * obj.matrix_world

    # print it to the blender console for possible inspection
    print(obj_mat)

    # get the location, rotation and scale from the matrix
    obj_loc, obj_rot, obj_sca = obj_mat.decompose()

    # access the shapekey "Key 1", note that there has to be a
    # shapekey with that exact name
    key1 = obj.data.shape_keys.key_blocks["Key 1"]

    # access the "Key 1" shapekey value
    # here, we assign the absolute value of the objects x location
    # transformed by the inverted camera matrix (!)
    key1.value = abs(obj_loc.x)

# We have to store the method in the scene_update_pre collection.
# First, loop through the collection and possibly remove other
# methods, then append our "drive_shapekey" method. This method 
# will then get called on each scene_update_pre cycle.
pre_handlers = bpy.app.handlers.scene_update_pre
[pre_handlers.remove(h) for h in pre_handlers]
pre_handlers.append(drive_shapekey)

One of the more complex lines is
obj_mat = cam.matrix_world.inverted() * obj.matrix_world

The matrix_world is the global transformation of an object (global meaning with parenting already applied). If a location Vector would get multiplied by an object's matrix it will appear is if moved as a child of the object. By multiplying the object's matrix with the camera's inverted matrix, we get the object's matrix in camera space. This may be a confusing concept. The following gif demonstrates multiplying a position vector with the camera matrix or the inverted camera matrix.
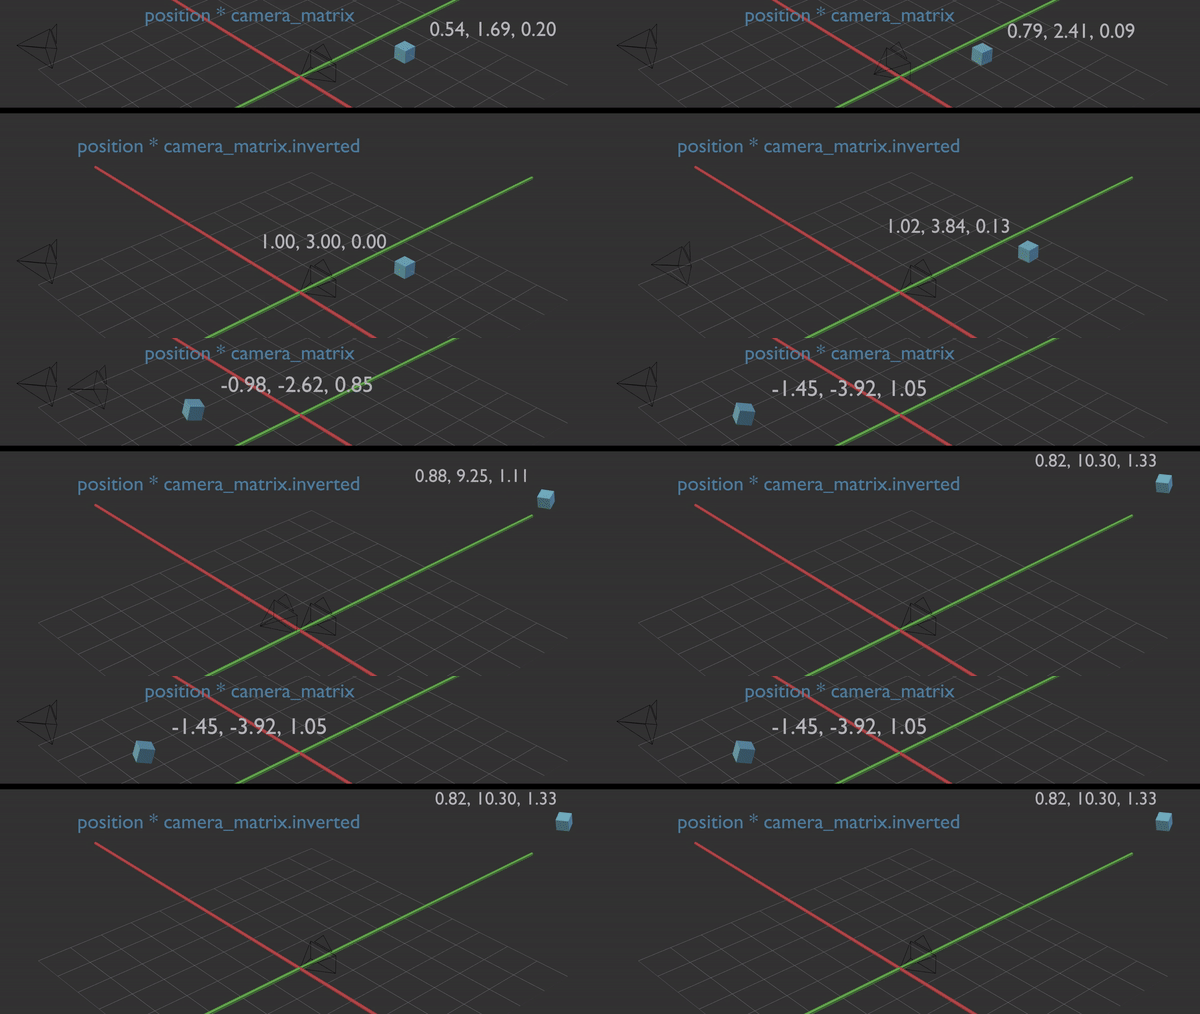
matrix multiplication

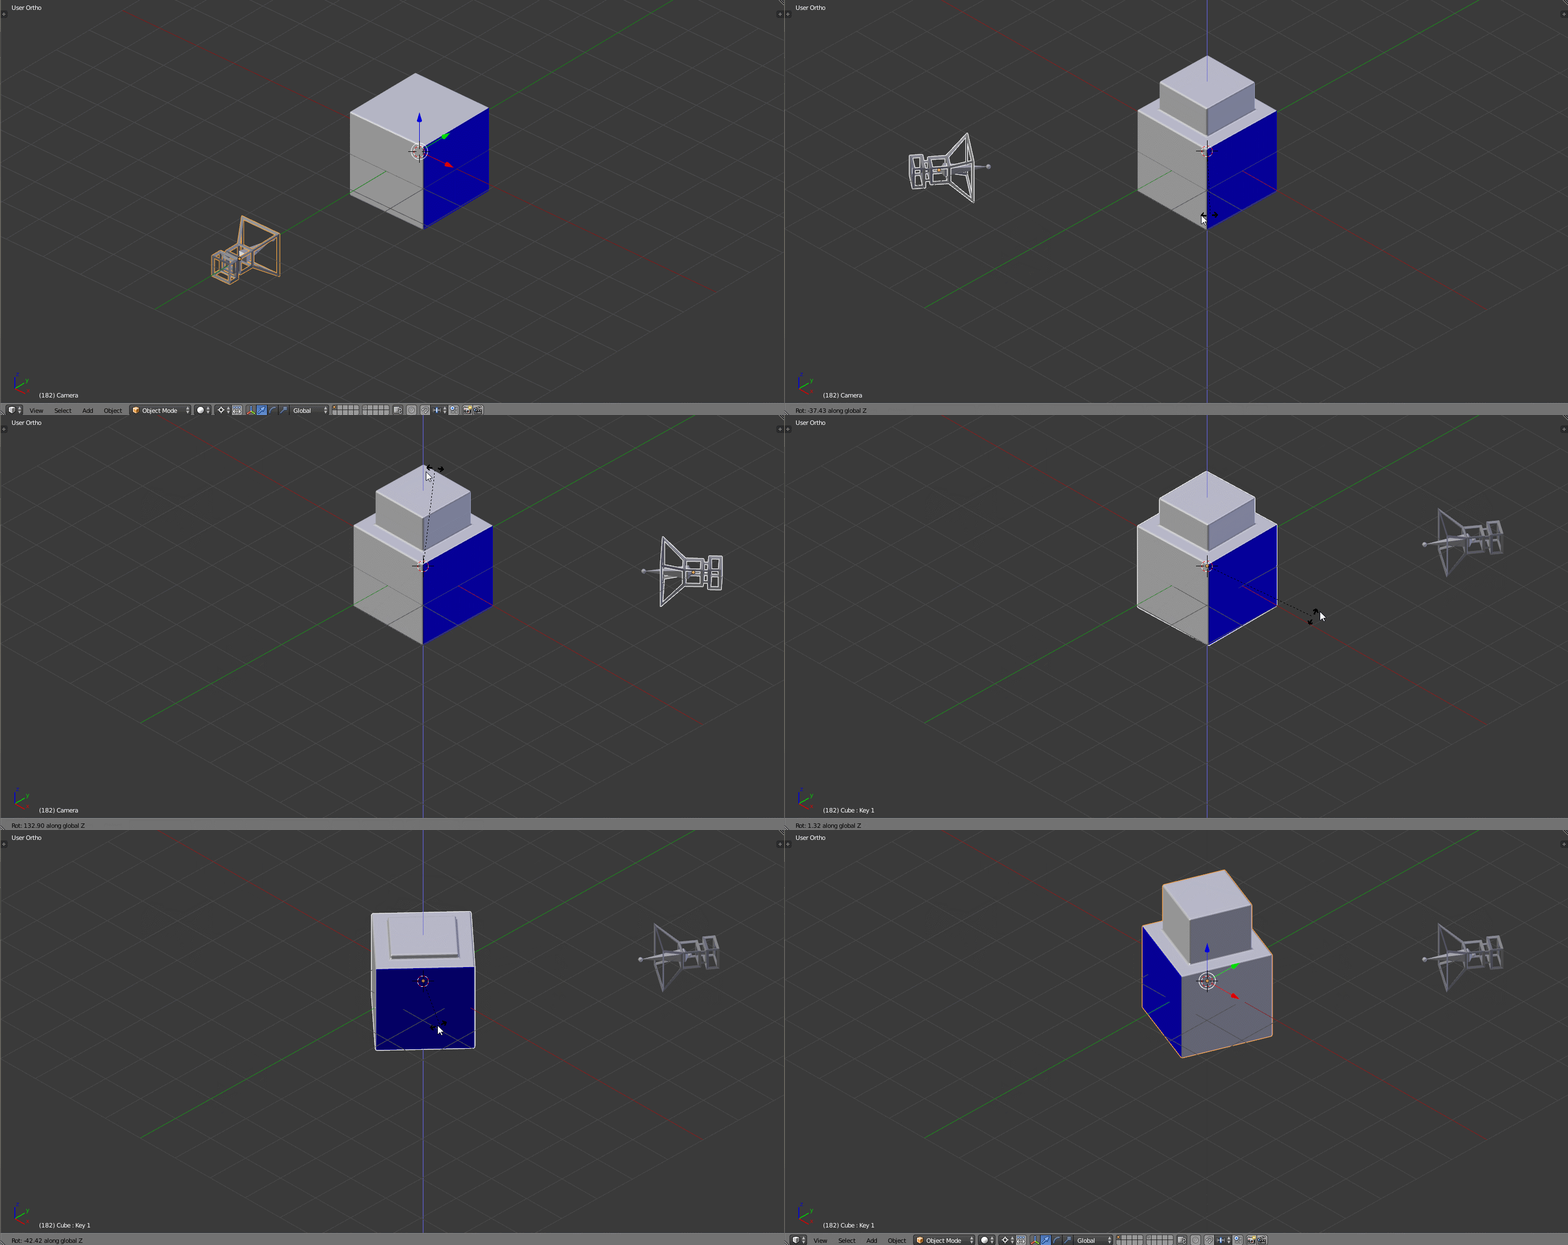
The result of the above script is an interactive handler, which update the shapekey value, based on the relative position between the object and the camera.

enter image description here

In the next step, we'll chose the value, which we want to influence the shapekey: the difference between camera and object orientation. Once we have the object's matrix in camera space, we can ignore whatever values were on the camera, since they have been transfered to the object. Only change the code of the drive_shapekey method and leave the other lines intact. In this sample, we use the rotation value of the transformed object matrix by compared a vector with its rotated counterpart.

def drive_shapekey(scene):
    obj_mat = cam.matrix_world.inverted() * obj.matrix_world
    eul = obj_mat.to_euler('ZYX')

    vec_a = mathutils.Vector((0.0, 0.0, 1.0))
    vec_b = vec_a.copy()
    vec_b.rotate(eul)
    difference = vec_a.dot(vec_b)
    key1 = obj.data.shape_keys.key_blocks["Key 1"]
    key1.value = difference

shapekey driven by rotated vector script
Result of the change in the script.

Now we have to fix the rotational offset of the camera. The shapekey should extend if the camera faces the blue face. We'll compare the (transformed) vectors which we want to align. At the top of the script import the math module as well.
import math
Then turn on the axes on the objects, and choose two axes which you want to align. In my case it's the camera's negative Z (0, 0, -1) and the object's positive Y (0, 1, 0).

def drive_shapekey(scene):
    obj_mat = cam.matrix_world.inverted() * obj.matrix_world

    obj_eul = obj_mat.to_euler('XYZ')
    cam_vec = mathutils.Vector((0.0, 0.0, -1.0))
    obj_vec = mathutils.Vector((0.0, 1.0, 0.0))
    obj_vec.rotate(obj_eul)
    difference = cam_vec.dot(obj_vec)

    key1 = obj.data.shape_keys.key_blocks["Key 1"]
    key1.value = difference

shapekey driven by orientation difference
The difference in initial orientation has been taken into account.

Next we are going to add the positional relation to the script. Previously, we compare a camera related vector, but now we need to compare a camera-object relation vector (on the right side).

camera-object relation vector

In our case, the needed vector pointing from the camera to the object is simply the object's location (normalized). This is because the camera is at (0, 0, 0), since we earlier applied the camera's world matrix to the object and we're in camera-relative space from then on.

Now, the dot product is only 1 if the object is actually facing the camera from any position.

object facing camera enables shapekey

The completed script.

import bpy
import mathutils

cam = bpy.context.scene.objects['Camera']
obj = bpy.context.scene.objects['Cube']

def drive_shapekey(scene):
    obj_mat = cam.matrix_world.inverted() * obj.matrix_world

    obj_eul = obj_mat.to_euler('XYZ')
    cam_vec = obj_mat.to_translation().normalized()
    obj_vec = mathutils.Vector((0.0, 1.0, 0.0))
    obj_vec.rotate(obj_eul)
    difference = cam_vec.dot(obj_vec)

    key1 = obj.data.shape_keys.key_blocks["Key 1"]
    key1.value = difference


pre_handlers = bpy.app.handlers.scene_update_pre
[pre_handlers.remove(h) for h in pre_handlers if h.__name__ == "drive_shapekey"]
pre_handlers.append(drive_shapekey)

As suggest in the comments by batFINGER: Checking for the name in the second line from the end will prevent other handler to get removed.


There seems to be the need to control shapekey on multiple object (as seen in the question's edit). This isn't that difficult if the parameters are properly understood.

The lookup up name in the key_blocks 'Key 1' is simply the name of the shapekey on the object. If your shapekey has a different name, the code should be changed accordingly.

shapekey name

The next codeblock will update the cameraFacingKey shapekey on multiple objects: Cube and otherCube using a single method. It relies on both of them having the same shapekey name. The import and handler statements shouldn't be changed. This code creates python list with a list comprehension. In the drive_shapekey(scene) method it loops over all objects in the objs list.

cam = bpy.context.scene.objects['Camera']
obj_names = ['Cube', 'otherCube']
objs = [bpy.context.scene.objects[name] for name in obj_names]

def drive_shapekey(scene):
    for obj in objs:
        obj_mat = cam.matrix_world.inverted() * obj.matrix_world

        obj_eul = obj_mat.to_euler('XYZ')
        cam_vec = obj_mat.to_translation().normalized()
        obj_vec = mathutils.Vector((0.0, 1.0, 0.0))
        obj_vec.rotate(obj_eul)
        difference = cam_vec.dot(obj_vec)

        key1 = obj.data.shape_keys.key_blocks["cameraFacingKey"]
        key1.value = difference
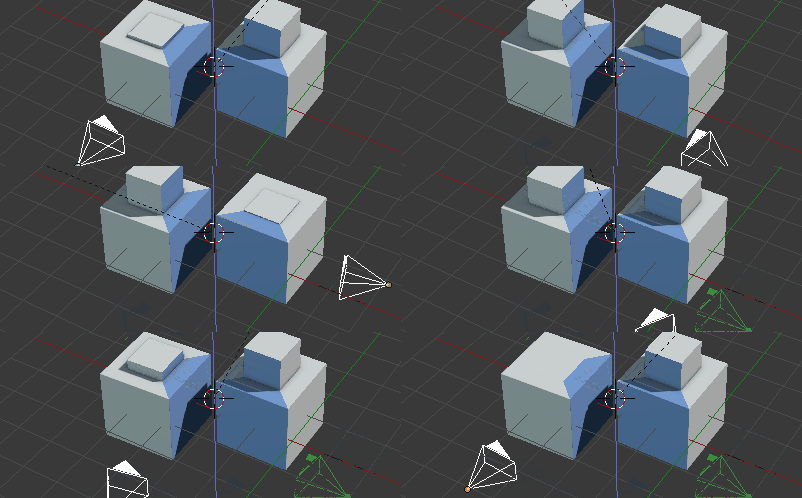
result for multiple shapes driven by camera position

$\endgroup$
6
  • $\begingroup$ ..A truly wonderful answer! Would it be possible, in principle, to do this in a driver, rather than have drive_shapekey called back by the scene updating? I've been trying to work out how much vector maths you can do in driver scripted expressions .. $\endgroup$
    – Robin Betts
    Commented Jul 14, 2018 at 20:28
  • $\begingroup$ @Robin I can't think of a way right now, the script relies on the matrix_world property, which enables it to work even if camera and/or object are in a parenting hierarchy. For a production rig don't parent the camera to anything sounds to restrictive. (I think the driver needs a different workflow.) $\endgroup$
    – Leander
    Commented Jul 14, 2018 at 20:40
  • 1
    $\begingroup$ Very comprehensive. Adding if h.__name__ == "drive_shapekey" will avoid removing other handlers. As is could be pre_handlers.clear() @RobinBetts The use_sellf option of drivers lets you pass the object as self, Henceforth can ref self.matrix_world The above could be rejigged to a driver drive_shapekey(self) with cam = bpy.context.scene.camera $\endgroup$
    – batFINGER
    Commented Jul 15, 2018 at 8:53
  • $\begingroup$ @Leander thanks for the comprehensive answer! It's greatly appreciated. Would it be possible for this script to work with multiple characters on the same camera? Let's say that I have "Cube2" with a shape key named "Key 2" (although I'm assuming if it was named "Key 1", this would still work because of the different path). I've moved around some variables in the code and added the modified code block to the post above. It's probably wrong because all I really did was add "2"s everywhere, but it's worth a shot. $\endgroup$
    – ItsWy
    Commented Jul 19, 2018 at 19:42
  • 1
    $\begingroup$ @ItsWhy Your code example worked as expected. Nevertheless I have added a more pythonic approach and even more clarification for future readers to the answer. $\endgroup$
    – Leander
    Commented Jul 19, 2018 at 21:00
4
$\begingroup$

Using drivers you can get almost every property value from an object, so you could combine them in order obtain the relative orientation between the faces from the mutual object's rotations or position...

I think the easiest way to approach the problem is to take advantage of the Rotational Difference driver variable type, so we don't have to worry too much about the math.

Add an armature with two bones, one constraint to the transformation of the main object and one constraint to the transformation of the "camera" object.

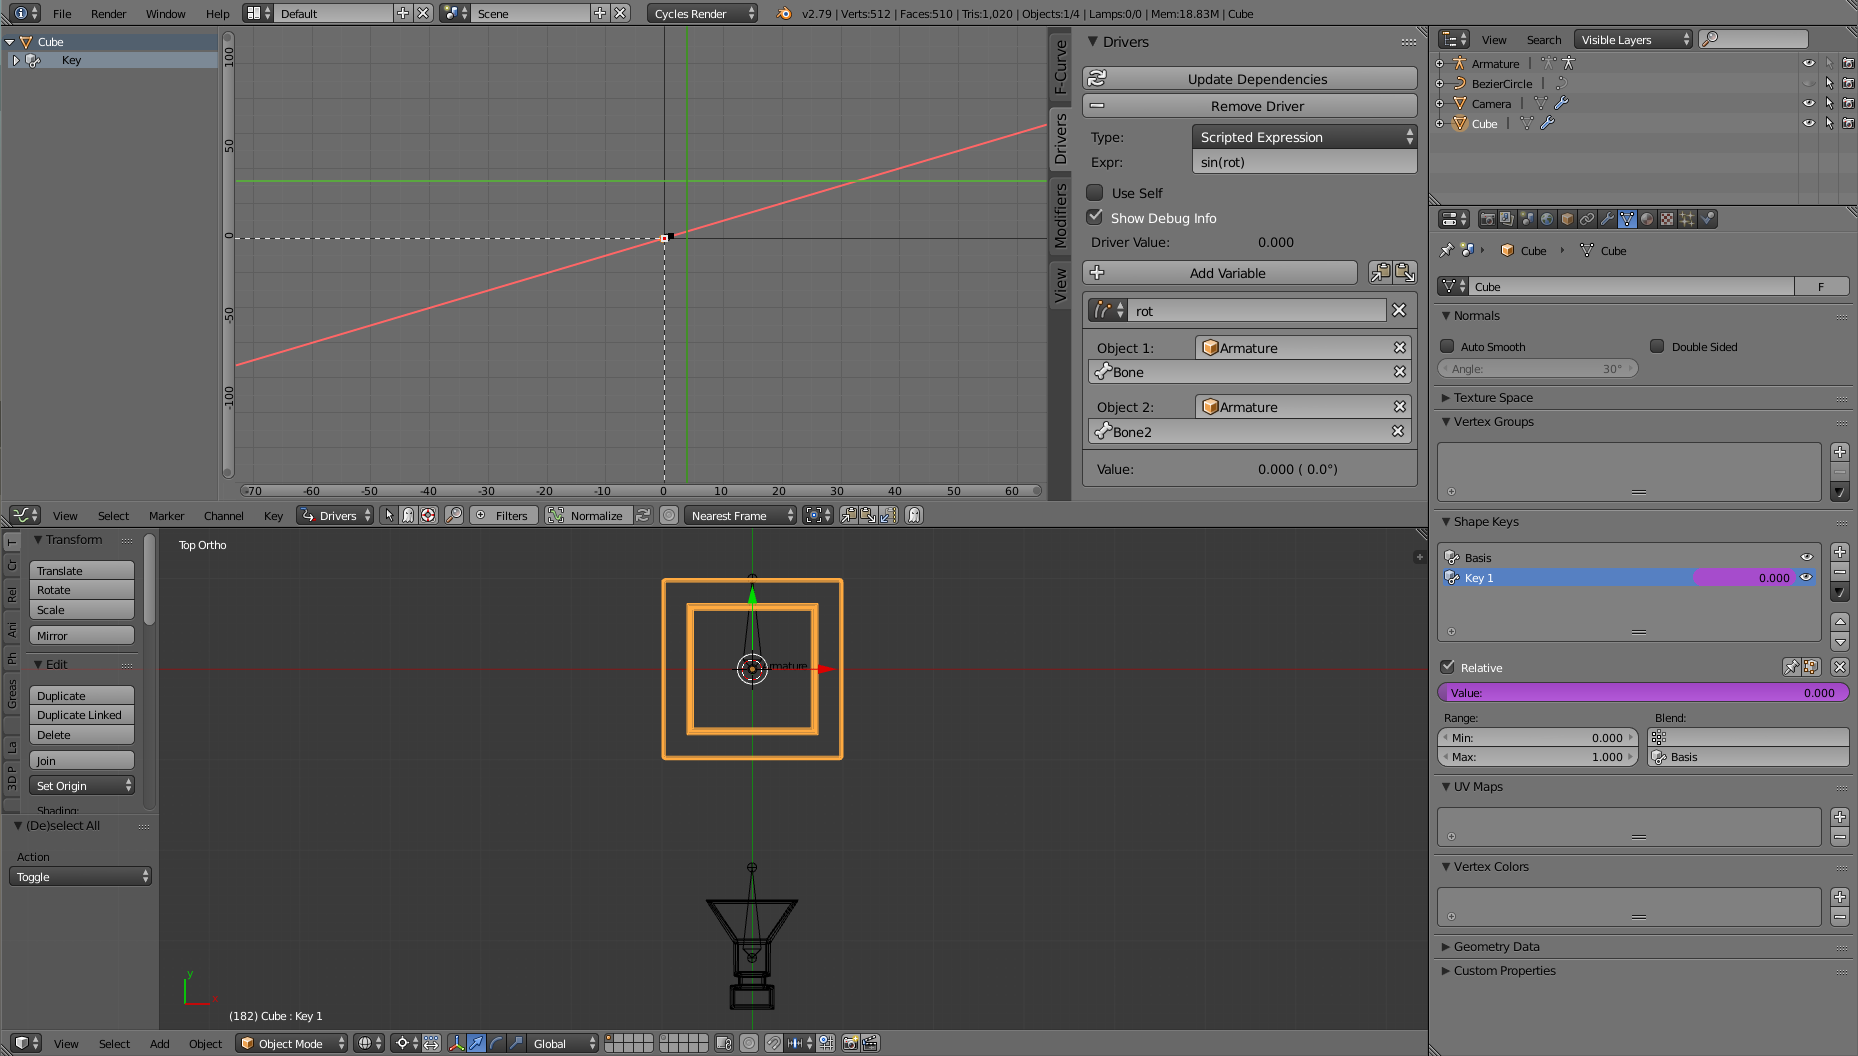
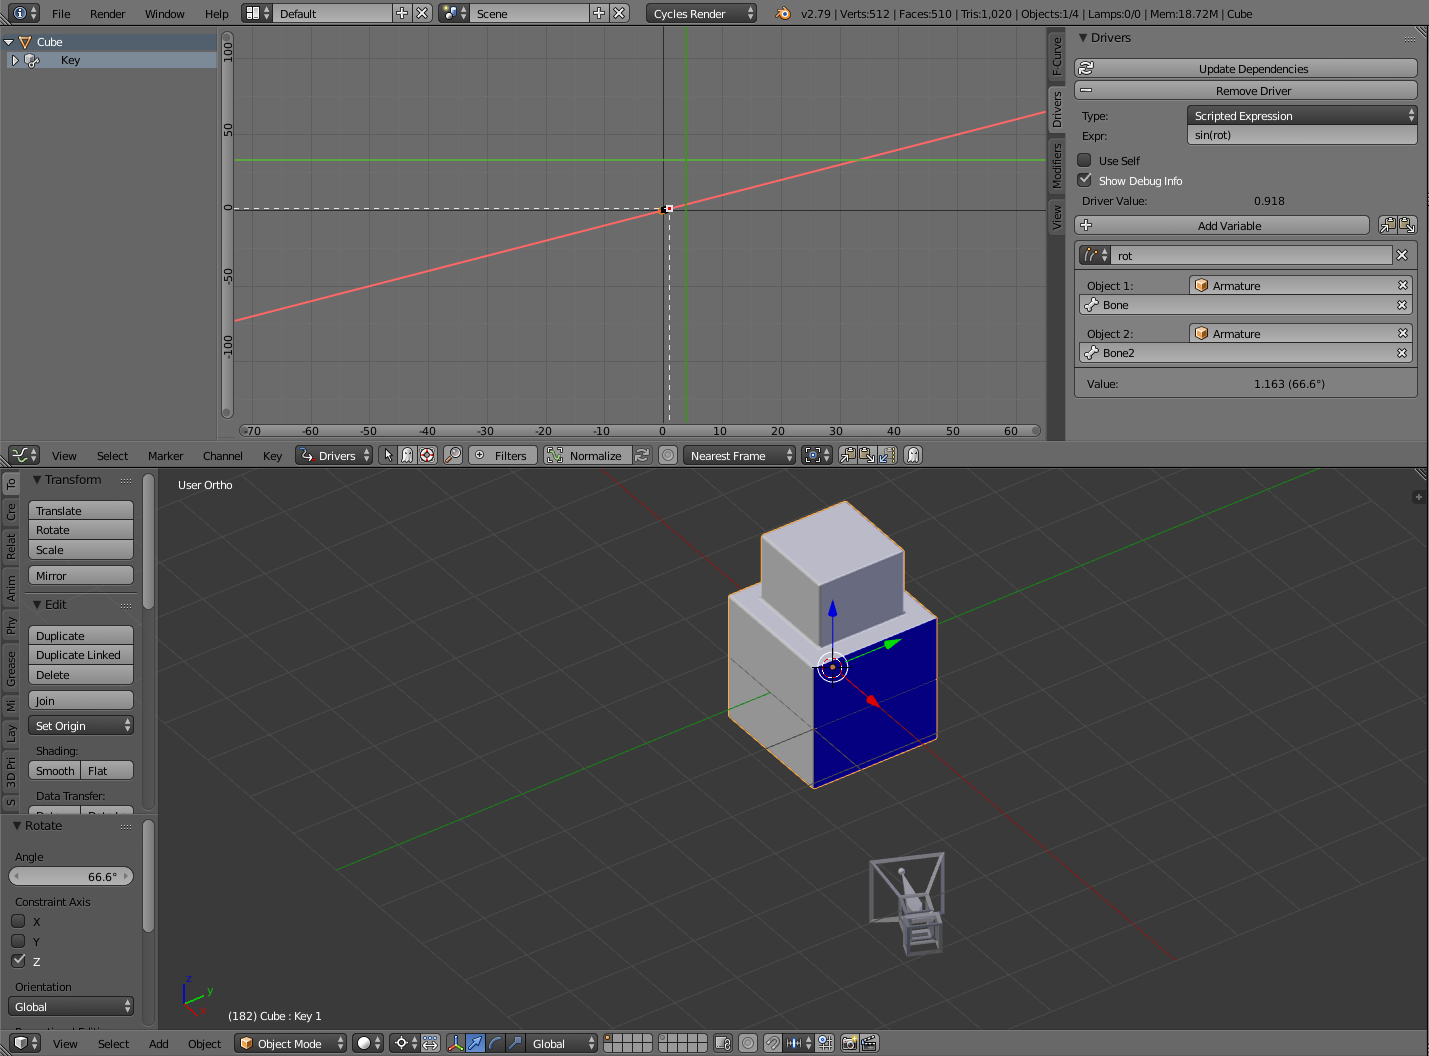
Create the shape keys for the object and add a driver to the Factor value using the sin() function to parametrize the mutual bones rotation values between 1 and -1 like shown below:

enter image description here enter image description here

Here's the setup in action and the blendfile for inspection:

enter image description here

$\endgroup$
2
  • $\begingroup$ Could you add information on how this can be avoided? $\endgroup$
    – Leander
    Commented Jul 14, 2018 at 13:25
  • $\begingroup$ If you are interested in Z rotation only, substitute the Copy Transform constraints with a Rotation constraints for the Z rotation only, @Leander. I used the Copy Transform constraint so It would be visually easier to understand the process, but there is really no need to copy all the parameters. $\endgroup$
    – Carlo
    Commented Jul 14, 2018 at 14:47
3
$\begingroup$

Another driver approach

Using the methods outlined in Left / Right Test Purely checks to see if camera is on left or right of an object, where local z is up and y is forward.

enter image description here
Result where shapekey is a simple 2x z scaling.

Copy the script below, paste in text editor and run script to register the driver.

import bpy

def drive_shapekey(name):
    cam = bpy.context.scene.camera
    obj = bpy.context.scene.objects.get(name)
    if not (cam and obj):
        print("Driver Error")
        return 0
    mw = obj.matrix_world
    loc = mw.translation
    left = mw.to_3x3().transposed()[0] # normal to the plane 
    left = -left if left.x < 0 else left # flip claus    
    d = left.dot((cam.matrix_world.translation - loc).normalized())

    return abs(d)

bpy.app.driver_namespace["ds"] =  drive_shapekey

In the shape key of the object you wish to drive, type in

#ds("Cube")

the hash "#" signals to blender that this is a python driver expression.

enter image description here

to drive that shapekey based on the left or right-ness of the object named "Cube" to the scene's camera.

$\endgroup$
2
  • $\begingroup$ Would this work with multiple meshes on one camera by running the script multiple times with each mesh's corresponding variables and adding a driver for each? $\endgroup$
    – ItsWy
    Commented Jul 19, 2018 at 20:05
  • 1
    $\begingroup$ Not sure I quite get what you are asking. Really only need to run script once to add method to driver namespace, then add driver on other fields as required. Ideally I'd use this on a custom property of the object passing self to the driver rather than name, Then use the custom property as a var in the shapekey driver or other drivers. For simplicity, and because nothing was being modified on object being passed to driver via name. Side note taking out the abs on last line of driver could use max(0, ds("Cube") and max(0, -ds("Cube")) as left / right test $\endgroup$
    – batFINGER
    Commented Jul 19, 2018 at 20:26
2
$\begingroup$

My answer is similar to Carlos. It includes some improvements in order to address issues with the rotational difference driver type, which does not just give a straight angle like I expected :)

Even though I'm doing this with bones, I think that the better way to do this is with a script that measures the dot product between two vectors, and I hope somebody will come along and show us that script. I don't do Python yet myself.

Okay, start by parenting your shapekeyed mesh to an empty or something. We'll call this the global parent. This will help us avoid dependency issues.

Next, create a new armature with 4 bones, located at the center of our cube and parented to global parent. The four bones are baseline and track (root bones), axis and measure (both parented to baseline.) The important things here are the tails and axes; baseline and track need to be coincident with identical roll, and axis and measure need to be coincident with identical roll, in a position orthogonal to baseline/track.

Here's a picture of my armature in pose mode, with an offset copy in edit mode:

enter image description here

Next we need constraints for these. Track bone will track the camera, so we'll give it a damped track (Y axis) to the camera. Axis needs to remain orthogonal to both track and baseline, so we'll do this by giving a locked track on our baseline bone, locking Y and pointing -z to the track bone. Axis bone itself gets no constraints. Finally, the measure bone gets a locked track, locking its Y and pointing its -Z at the tail of the track bone.

What we have here is a pair of bones (axis and measure) where we can measure their rotational difference and be confident that it represents only rotation in a single axis, avoiding problems that come up with using the rotational difference property on bones that might roll. We can safely use the rotational difference property for our driver, but notice that we could as easily use the Y axis rotation of our measure bone-- our axis bone, strictly speaking, is unnecessary, but I think it better demonstrates what it is that's going on.

Time for our driver. We want the shapekey at its maximum when the angle is at 0 degrees (0 radians) or 180 degrees (pi radians), and we want the shapekey in the range of 0-1. You haven't specified a response curve that you'd like from this, so we'll use a sine wave, because that's easy. If we use abs(sin(var)) here, it will give us a smooth curve that behaves as we'd like. Note that the exact driver is visible in the picture above.

$\endgroup$

You must log in to answer this question.

Not the answer you're looking for? Browse other questions tagged .