1
$\begingroup$

Problem

How can I make the fabric stop exactly where the tube thickens and prevent it from continuing its free fall to infinity and beyond

Example

I want the fabric to stop exactly when it reaches this area attachment point
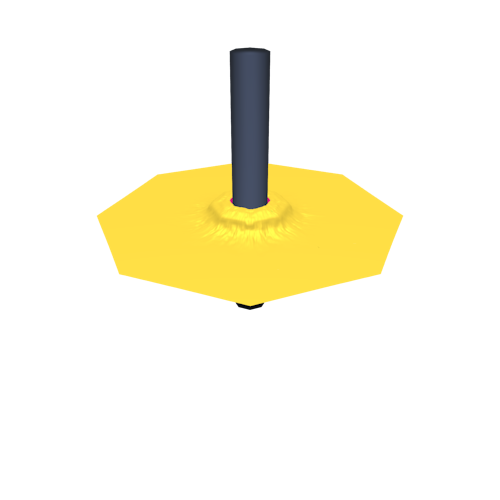
Result of the animation with physics

enter image description here

what should be

expectation

Second Try

Second try settings settings

$\endgroup$
14
  • $\begingroup$ How about an invisible collar that's wider, combined with an invisible floor ? (rigid body->passive) Either that or allowing it to fall until you stop it by keyframing the 'Dynamic' box off. Perhaps a combination of both physics and animation from there? You can always 'freeze' the cloth when it reaches the shape you're seeking, duplicate it even and swap over to that. All suggestions from someone who hasn't tried this I know, but it costs nought to try. ;) $\endgroup$
    – Edgel3D
    Commented Jul 11, 2019 at 22:51
  • $\begingroup$ I ignore the subject hahaha, I have dedicated more to the programming part in blender, that to animate, I'm good at modeling, programming some things that I implement in 279, but they are in C ++ I do not use piton, and I liked that part so I left I'm interested in animation, but now I also want to grow on that side, and be able to valance my BGE project $\endgroup$
    – user58715
    Commented Jul 11, 2019 at 22:56
  • $\begingroup$ how would you do it? give me an example $\endgroup$
    – user58715
    Commented Jul 11, 2019 at 22:56
  • $\begingroup$ I've not used soft bodies except for experimentation, but I do a lot of combination physics and animation, and have 'tripped over' some good solutions that actually eliminate the thorns that prickle us in Blender, ha ha. I'd be happy to answer any specific questions in that area. $\endgroup$
    – Edgel3D
    Commented Jul 11, 2019 at 23:00
  • $\begingroup$ add an image but observe, I have a vague idea of what to do, but I do not know how to set the settings correctly so that this works well $\endgroup$
    – user58715
    Commented Jul 11, 2019 at 23:06

1 Answer 1

1
$\begingroup$

Cloth - You've already found the settings that prevent the cloth falling through the wider section of the cylinder. Your second query, re: stretching at the cloth's aperture...

Edit 17th July 2019 -

No stretch - An alternative solution - (See below for the other)

Scripting might be able to circumvent Blender's physics from stretching the cloth's aperture but to do it from the desktop, it appears only a slight-of-hand workaround will avoid this.

The physics engine starts expanding the hole when it approaches the upper end of the pipe, so why not decrease the diameter of that pipe. The hole will still expand but to a lesser degree.

Next we duplicate the pipe and strip that of all physics and animation so it's only scenery and therefore incapable of influencing the cloth. That's then expanded in the X & Y axis' so it's the same height but fatter.

The original pipe (with physics) is made invisible but will still be seen by the physics engine and affect the cloth as before.

The end result is that the cloth will appear to be a snug fit at all times.

-===============-

Info - The cloth's wriggling is stopped by virtue of a swap with a duplicate of itself that's frozen at the switch-over frame, (the physics modifier applied). Not recommended for beginners. Post production in the VSE would be an easier way to achieve this.

-====================-

The earlier solution/suggestion -

It appears that inserting a hole in the cloth gives rise to unavoidable stretching at the aperture as it approaches the upper end of the cylinder.

A convincing workaround would be to add a mesh (non-cloth) ring or collar with the same material as the cloth. That's then animated so it follows the cloth's descent.

Rather than add a new ring, the original cloth was duplicated and cleared of physics and animation at frame 1.

The outer faces are cut away, leaving the original material in what's left. This should make it easier to match up should the cloth be textured.

$\endgroup$
14
  • $\begingroup$ yea, Yes, I had already thought about that and I already had notion about the stretching of the central ring of the fabric, but I do not understand what you say about the ring I had the basic idea but it is not clear to me, there must be another way where just being a restriction to the vertices of that central ring, and that's what I look for because it's to apply to another simulation of more complex fiches and does not contemplate that addition, it's not bad in fact it's very good, just that it looks more like a patch, you could put captures of the process? $\endgroup$
    – user58715
    Commented Jul 14, 2019 at 1:27
  • $\begingroup$ I also notice that it has a bounce and there should be no rebound, I'm 80% sure that is due to that rigid ring that generates a malicious effect secondary to the simulation, although lack of physical influence on the behavior of the fabric which causes behave like a ball and a little bounce, I have never seen a fabric bounce, even containing elastin! you can see my point $\endgroup$
    – user58715
    Commented Jul 14, 2019 at 1:31
  • $\begingroup$ Observe the ring video - there's no bounce. That's the physics engine doing that to the original cloth and will be due to my settings, they're obviously not tweaked enough. If you can determine which is the 'patch' and which is the ring from a gif file, you've got better eyes than mine! They're using the same material. It was a suggested workaround without knowledge of your ultimate goal. - I'll delete it if you wish. $\endgroup$
    – Edgel3D
    Commented Jul 14, 2019 at 3:15
  • $\begingroup$ no, please, it's very good, just that I've practicad doing this, I already know most of the results, maybe that's why I beat you when I detect something that has already happened to me and I see it, rather what you need to put is the process how to do it so that someone new to you can serve, for example, how you related to what you are doing or what parent and what child $\endgroup$
    – user58715
    Commented Jul 16, 2019 at 11:29
  • 1
    $\begingroup$ Thanks @Blender Blackened Good luck with your project. $\endgroup$
    – Edgel3D
    Commented Jul 18, 2019 at 7:11

You must log in to answer this question.