6
$\begingroup$

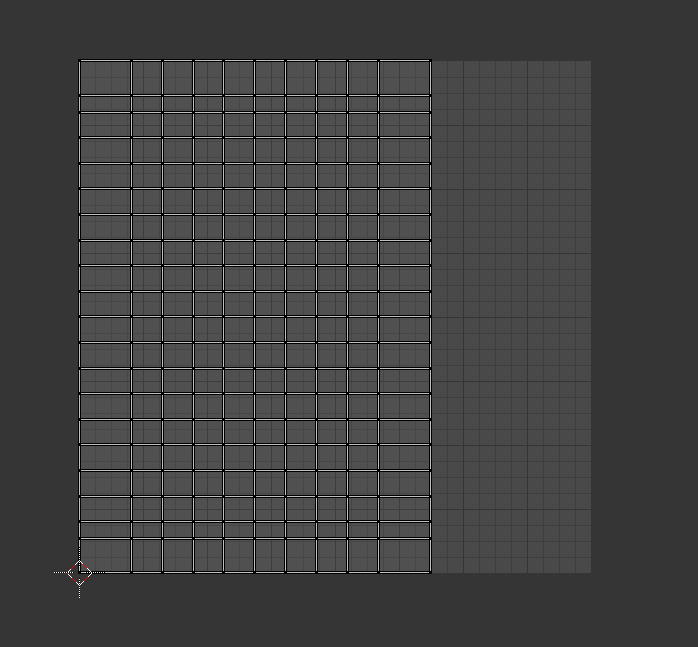
This is my Uv map

enter image description here

My target is to max and optimize my Uv, in particular I would like it matches the whole Uv space. One solution could be scale the whole Uv from x axis and move all until the match will be perfect but, I should watch that corners and slides will match perfectly with the gray square in the background (it looks a "more or less" method).

I'm not sure this would be the best way to achieve the the best result.

My question is: Is there a way to spread the UV all long the UV space, keeping its topology? Any advice? Or, is there a method to fill the gap of the uv space? Can a feature of Blender achieve this?

EDIT My Uv map was created with an unwrap

Thank you so much!

$\endgroup$
8
  • 2
    $\begingroup$ Of course it depends on what your model looks like and the image texture itself, but the real question is: Does it make sense? Maxing out UV space is quite nice but in the end you really want to avoid stretching. $\endgroup$ Commented Oct 6, 2016 at 15:26
  • $\begingroup$ It makes sense because i'm using a seamless texture and i need that my uv map cover the entire uv layout in order to avoid seams. The stretch should be uniform long all the x axis $\endgroup$
    – Fuboski
    Commented Oct 6, 2016 at 15:29
  • 2
    $\begingroup$ That's the "old" way of texturing, thus it makes not much sense to me. The new way would be "painting away the seams". And again - depending on what your seamless texture looks like, uniform stretching along the x axis would still result in non-uniform stretching along the y axis. $\endgroup$ Commented Oct 6, 2016 at 15:38
  • $\begingroup$ That's interesting! Can you link me a tutorial or materials, dealing with this new technique? This could save my life ^^ $\endgroup$
    – Fuboski
    Commented Oct 6, 2016 at 15:43
  • 1
    $\begingroup$ Here's one, but the sound is really awful. youtube.com/watch?v=yHyNEC1739c . 3 Minutes into the video he starts with texture painting using the clone brush. $\endgroup$ Commented Oct 6, 2016 at 15:54

4 Answers 4

4
$\begingroup$

Hopefully your 2D cursor is at the bottom left of your UV layout image area - if not, position it there.

In toolbar area, choose "2D Cursor" as Rotation/Scaling Pivot.

In the UVs menu --> select "Constrain to Image Bounds"

Now select all of the vertices in your UV.

If the island is not flush with the bottom left: grab (G) and move so the edges are flush with the bottom left (the constraint will ensure that you cannot drag the island past the bounds)

Now, scale (S) - you should be able to scale to the image bounds.

$\endgroup$
1
$\begingroup$

Right scaling solution

As far as I know there is no tool for fitting the created UV layout to the whole square. But you can do this: [In the UV-Editor]

  1. select all verticies A
  2. scale your vertecies on the x-Axis by the factor 1.45454545. S + X + 1.45454545
  3. pack the islands Ctrl + P (We do this to center the UV-layout. This makes it independent of where your scaling pivot point was)
  4. if you want, you can choose a margin, so that your map isn't exactly in the corners (F6, then enter something like .333 in the margin field)

Your map should be aligned centered now with no space of the light gray square except the margin left.


Why is the factor 1.45454545?

When you look at the screenshot you can count that 5.5 of 8 (large) squares of the x-Axis grid are filled. So $\frac{5.5} 8 = \frac{11}{16}$. If you want to scale them, so they fit 8 of 8 squares, $\frac 8 8 = \frac 1 1 = 1$, you have to multiply by the inverse, namely $(\frac{11}{16})^{-1} = \frac{16}{11} = 1.\overline{45}$, because $\frac{11}{16}\cdot\frac{16}{11} = 1$.

$\endgroup$
0
$\begingroup$

You can use "Smart UV Project".

  • select object
  • go to edit mode (tab)
  • select all vertices
  • press "U" to unwrap
  • choose "smart UV project"
  • Make sure the checkbox "Stretch the final output to texture bounds" is checked.
$\endgroup$
2
  • 1
    $\begingroup$ This doesn't "keep its topology" as requested by OP. This creates a new topology. $\endgroup$
    – emackey
    Commented Oct 6, 2016 at 15:16
  • $\begingroup$ Yep. Anymway, this works only with smart uv project? If I should use the unwrap for more complex mesh? There isn't a similar feature? $\endgroup$
    – Fuboski
    Commented Oct 6, 2016 at 15:16
0
$\begingroup$

As of Blender 4.0 there's a UV transform tool (⇧ Shift + Spacebar + T). So after selecting UV > Constrain to Image Bounds you can just use that.

$\endgroup$

You must log in to answer this question.

Not the answer you're looking for? Browse other questions tagged .