What would be the material or shaders node set up for a smooth gem in blender cycles engine?
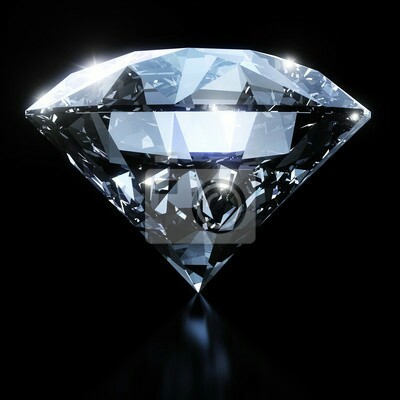
I want a result similar to this image:

What would be the material or shaders node set up for a smooth gem in blender cycles engine?
I want a result similar to this image:

Dispersion is the phenomenon of multicolored highlights you see in most transparent substances, resulting from different colors (light frequencies) refracting at different angles (the prism effect).
Your reference image does not have this, which makes it immediately noticeable as CG. Instead I would suggest by starting with a reference like this one.
Kent Trammell explained this elegantly in a tutorial that was published on CGCookie but has since been removed. The first person to do it was probably Kirado, who shared the node setup.
Here is the basic node setup - note how the IOR values differ:
Taking it further...
After doing some renders with the above setup I felt that the material still looked too dark, so I decided to try mixing it with a plain white Glass Shader in a way that would not interfere with the colorful highlights. The "Is Camera Ray" output of the Light Path Node seemed to work pretty well for this. What it does is takes any area where the RGB summed color is not already reaching the camera, and allows the white (clear) Glass color to shine through just in those gaps.
The IOR of diamond is 2.4175 and the dispersion is .044. So by using these values, as well as a realistic diamond size, we can get something much more accurate. Make sure to apply the scale (CtrlA) of your diamond object if you want the refraction to be as accurate as possible.
Keep in mind that we are still "faking it" by having only three set IOR values (for red/green/blue). But practically speaking this turns out to be totally sufficient.
With gems like diamonds, the cut determines the way the light gets reflected. Geometry plays an important role in the appearance of this material.
A page on diamond.com has diagrams that explain this really well:
Luckily, creating an ideal diamond mesh can be done in Blender in an instant. Just enable the Extra Objects (Mesh) add-on, and it will be an option in your Add Mesh menu.
Now pressing ShiftA in the Viewport gives you new options:
In my example I slightly beveled my diamond, which allowed me to use Smooth Shading instead of Flat Shading. This did away with the angular "CG look", and scattered the light in more directions, brightening the gem. However, it has since been brought to my attention by user Thom Blair III that diamonds are sharp down to the molecular level, so a bevel is not accurate. Consider using Simple Subdivision instead.
An HDRI environment map will provide a more diverse color palette of light for your scene, so consider using one if you want more realistic lighting.
If the environment color is not quite to your liking, either change to a better-suited environment map or adjust the color using a Hue/Saturation/Value Node. In my case the sky was too blue, so I reduced the saturation.
A material like this requires a high sample count for it to look clear (I used 7500 samples!). *Update: With the new Denoise feature you don't need anywhere near this many samples now! Many thanks to Blender's developers.
If the gemstone will be part of a larger scene where other elements do not require such a high sample count, you can keep the gemstone on its own Render Layer to keep render times from becoming ridiculous. (Okay, I mean keep them less ridiculous.)
Setting Clamp Indirect to something like 10 also helps to reduce fireflies.
If you want to adjust the exact color of your gem, or add bloom and streak effects, you can use the compositor to put on the final touches.
An example node setup for compositing:
Before compositing:
After compositing (final result):
Other than trying to fake it in Cycles node-setups, there is always the possibility to use a renderer with built in dispersion and advanced light transport integrators, that provide less noisy and more accurate caustics than cycles. One of those is LuxRender. One of the technologies behind this awesome renderer is called Metropolis light transport, for further reading on this topic, maybe start with the links at the bottom of the wiki page.
This rendering contains only three lightsources (sun & sky, one big softbox). As you can see, you get very nice and crisp caustics, als well as subtle dispersion. I later saw, that my diamond is about two meters big, I guess the dispersion would look even better if I used real word scale.
I let this one render almost 19 hours. It rendered over night so i can't say at wich point it was noise free. This is how it looked after 50 min:
I used the "Bidirectional" integrator, with Metropolis Light Transport, using CPU and GPU together (i5 + 1080ti with OpenCL). The pure OpenCL integrators (GPU only) showed a big difference in the quality of the caustics, I'll need to look into it a bit deeper, to see how I can render this scene GPU-only with the same quality.
For the diamond I used a standard glass material with the IOR preset "diamond", no other adjustments were made to that shader. For suzanne I added a clear absorption volume to a standard glass shader with roughness enabled.
I realise there are artistic motives as well as a desire for realism. This question seems to be calling for some physical accuracy and so some science would be appropriate.
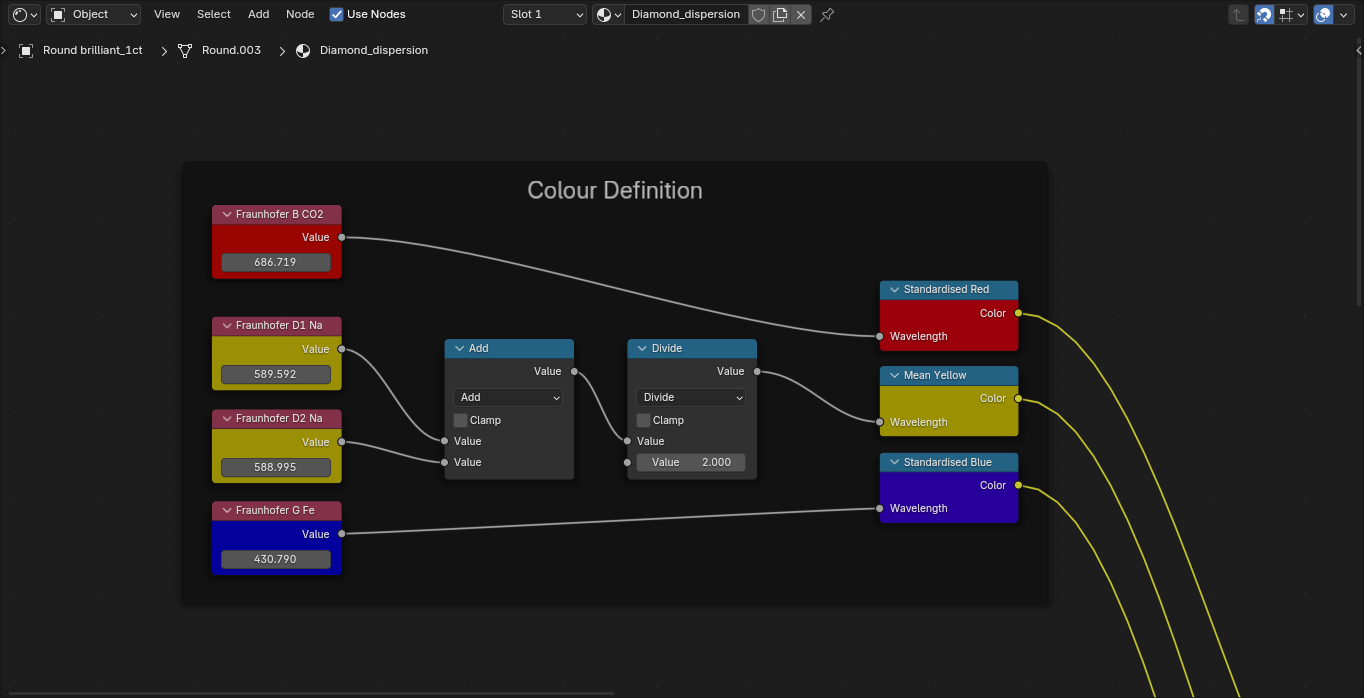
From a realism perspective, it is perhaps important to note that the standardised index of refraction is for light at a wavelength on the Fraunhofer $D$ line (footnote 1). This is a wavelength of 589.29 nm (footnote 2) and is yellow (indeed, close to orange), not green (footnote 3). The $D$ line of Sodium is derived as the midpoint of the two lines $D_1$ (589.592 nm) and $D_2$ (588.995 nm) in the absorption spectrum of Sodium (footnote 2).
Further, there are different methods to determine dispersion with respect to gems and they use different Fraunhofer lines to define the long and short wavelengths (footnote 4). So, while diamond's dispersion of 0.044 can be correct, it is physically accurate only when your long wavelength correspdonds to the Fraunhofer $B$ line (Carbon Dioxide, 686.719 nm, red) and your short wavelength corresponds to the Fraunhofer $G$ line (disputed between: Iron, 430.790 nm; Calcium, 430.774 nm; both violet). See footnote 4 re. dispersion in gemology; footnote 3 re. colour vision, footnote 2 re. disputed wavelength of Fraunhofer $G$ line. Note that the $B$ and $G$ are Fraunhofer's labels for the dark lines in spectral absoprtion patterns, not abbreviatons for blue or green. See footnote 2.
Artists, and many others, have an awesome eye for selecting and matching colours. If we're really honing in on realism though, Blender can help.
Blender's shader node system has a wavelength conversion node to obtain a colour from a wavelength. See footnote 5 for an example.
Afer taking into account the above information, there are still some shortcomings if absolute physical accuracy is desired:
Footnotes
1 Standard wavelength for index of refraction:
"Standard refractive index measurements are taken at the "yellow doublet" sodium D line, with a wavelength (λ) of 589 nanometers."
Wikipedia "List of refracive indices": https://en.wikipedia.org/wiki/List_of_refractive_indices
[2] Fraunhofer lines:
"Line, Element, Wavelength (nm)
$B$, $O_2$, 686.719
$D_1$, $Na$, 589.592
$D_2$, $Na$, 588.995
$G$, $Fe$, 430.790
$G$, $Ca$, 430.774"
Omitting Fraunhofer lines not discussed.
"The D1 and D2 lines form a pair known as the "sodium doublet", the centre wavelength of which (589.29 nm) is given the designation letter "D""
Wikipedia "Fraunhofer lines": https://en.wikipedia.org/wiki/Fraunhofer_lines
[3] Colour Vision:
"Violet: 380–450 nm
Blue: 450–485 nm
Cyan: 485–500 nm
Green: 500–565 nm
Yellow: 565–590 nm
Orange: 590–625 nm
Red: 625–750 nm"
Wikipedia "Colour vision": https://en.wikipedia.org/wiki/Color_vision
[4] Dispersion in gemology:
"In the technical terminology of gemology, dispersion is the difference in the refractive index of a material at the B and G (686.7 nm and 430.8 nm) or C and F (656.3 nm and 486.1 nm) Fraunhofer wavelengths, and is meant to express the degree to which a prism cut from the gemstone demonstrates "fire"."
Wikipedia "Dispersion (optics)": https://en.wikipedia.org/wiki/Dispersion_\(optics\)#In_gemology
[5] Example Blender node network for colours in physically accurate dispersion:
