1
$\begingroup$

As a way of easily blending materials together on a single object, and to allow me to do so on arbitrary parts of the model (without needing to segregate a specific part of the model's UV map or duplicate the material*), I've started experimenting with using vertex painting.

By vertex painting greyscale, I've managed to mix between two textures (on arbitrary parts of the model) by using the greyscale as an alpha for other textures. But, to get more textures, I'd need to be able to use different colors. How can I use this vertex paint color information to drive the alpha channel of various other textures within the material?


If someone knows a better way of doing this process, I'd be keen to know it!


* e.g., putting a dirt patch on a long wall model sharing one texture: doing so would usually change the texture an every repeat of the texture, where vertex painting directly onto it and using that as an alpha for other materials allows me to do only a specific part.

enter image description here

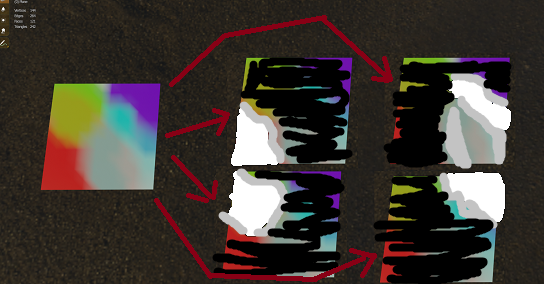
Image here is example of what I mean. The red parts become white, the rest becomes black in the first, the yellow parts become white and the rest white in the second, and so on. These various black and white channels can then be used as an alpha for other textures. However, it shouldn't be limited to just pure red, green or blue, I'd like to be able to mix potentially a dozen materials in one place.

Also, to be able to mix them with varying levels of opacity, could the brightness of the color itself be used to give transparency? In a way, a specific shade of red would be one texture, but a darker red of the same shade would give less transparency to that area of texture, allowing the texture underneath to show through more.

Just my thoughts on what I'm trying to figure out. Again, if someone knows a better way of doing all this, let me know. Thank you.

$\endgroup$

2 Answers 2

1
$\begingroup$

I happen to have a node asset which does just that:

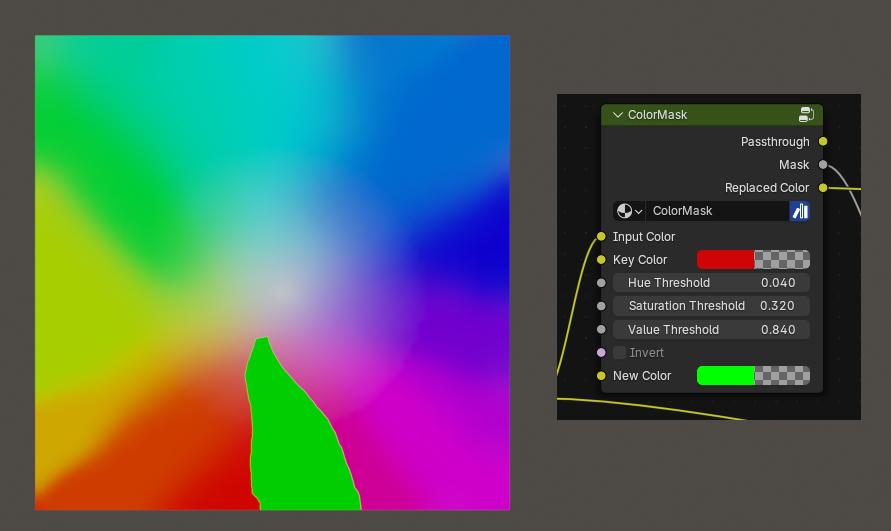
enter image description here

It's based on HOW TO Color Mask in Blender Shader⬅️ No Photoshop Needed! by CDDT Reborn.

It's not perfect, notably when picking a key color close to pure red and expecting it to cross the hue circle counterclockwise. There's probably ways to make this more adaptable but with more options and compute time.

The video explains better than me how to make it, so I will focus my answer on how to use my node asset.

Firstly, download the blend file:

You can either append the node group using the menu file > Append > navigate to the file > Nodetree folder > ColorMask. Or you insert it in your asset browser library.

To use it, either drag it from the asset browser to the shader editor, or press ⇧ Shifta > Group > Color Mask.

Inputs

Input Color Where you plug the image you want to filter a color from.
Key Color the color which you want to key out.
Hue/Saturation/Value Thresholds how much the filtering can deviate from the key color's HSV. Zero would mean only the exact same color is filtered out.
Invert inverts the resulting Mask.
New Color Replaces the keyed out color by a new one. It's mostly useful for seeing the filtering in action while seeing the original image.

Outputs

Passthrough is the input color with no effect, just for convenience.
Mask is the black and white mask with the keyed out color in white and the rest in black.
Replaced Color is the original image with the new color mixed according to the mask.

$\endgroup$
-1
$\begingroup$

Plug it into a color ramp and then make the white color transparent (Set the alpha to 0)

$\endgroup$
2
  • $\begingroup$ Thanks for the suggestion, but doesn't the color ramp only take the 'Value' of the color? I'm trying to use hue instead. $\endgroup$
    – Candle
    Commented Feb 10, 2021 at 20:03
  • 1
    $\begingroup$ @Smail Then use Separate HSV node to pass the Hue to the color ramp. $\endgroup$ Commented Jun 8, 2021 at 21:11

You must log in to answer this question.

Not the answer you're looking for? Browse other questions tagged .