5
$\begingroup$

I started out with the default cube. I went into edit mode and moved the two top, rear vertices up a bit. That's the two positioned in the positive Y-direction. Go to face select mode and select the top face. Press E to extrude and drag up just a little. You now have a "birdbox" with a nice roof. I want to have that nice angle in the front end of the roof (negative Y), but I want to have the top, rear end (positive Y) of the roof aligned with the rest of the rear wall. Using S Y 0 on the two rear faces distorts the roof.

Normally when creating roofs like this I also select the front and two side faces (3 faces total) of the roof and use Alt E then Esc, Alt S, drag to create "overhang".

Is there a way to slide the top, rear end of the roof until it lines up with the rear wall?

This is just one example, but I find myself often wanting to either move or extrude until it lines up with other geometry.

The above example can be solved by creating a double roof (mirror) and then delete one half later, but that is not really interesting. I hope there is some modeling trick I have missed.

$\endgroup$
0

2 Answers 2

5
$\begingroup$

You'd need a combination of custom transform orientation and snapping tool, but the workflow is reversed a bit:

  1. Slant the top face any which way (by moving some vertices upwards, etc.),

  2. Extrude the face along main axis, in this case vertically,

  3. With the new face still selected, set it as the new transform orientation by pressing + button to the right of 3D View > Navigation menu > Transform Orientations group's dropdown menu, or pressing CtrlAlt-Spacebar.

  4. Set the Snap Element to Vertices, its selection menu accessible through 3D View header > snap elements dropdown menu, or by pressing CtrlShift-Tab.

  5. Using the manipulation widget oriented to the slanted face, select and move any vertices of the new face,

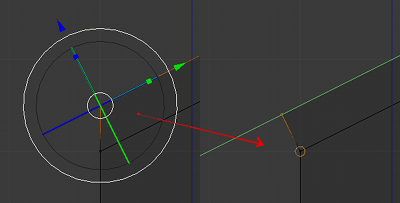
  6. If you translate the vertices this way, and snap them to a vertex below, it will be aligned along the slant of the face:

    image

I use this workflow because it's easier to move and align along a slant, than align along a main axis while moving along a slant.

$\endgroup$
3
$\begingroup$

Another way is to use Vertex Slide:
Select edge then use ShiftV and then hold Alt to allow extend mode.

The only problem is that there is no way to snap it so you just need to make the best match that you can and align it afterwards.

$\endgroup$

You must log in to answer this question.

Not the answer you're looking for? Browse other questions tagged .