1
$\begingroup$

Hello Blender Community,

I am working on a project that involves simulating a push-broom scanner in Blender. A push-broom scanner is used primarily in remote sensing applications and captures a linear array of pixel data at a time, making it particularly useful in situations where the scanner is moving rapidly over a scene, such as in satellite or aerial imagery, as shown below:

enter image description here

I attempted to simulate this process by creating a perspective camera with very wide but narrow dimensions, like 1500x4 pixels, and used an animation to move the camera over the scene. I render each frame of the animation as a separate image file. I attached the blender file here:

After this, I stitched these 400 individual scan lines together to form the final scan result, using the following Python script:

import os
import cv2
import numpy as np

# Your directory path
dir_path = "/your/directory/path/here"

# List to hold all images
images = []

# Loop over all files in the directory
for i in range(1, 401):
    # Generate the filename
    filename = "scanline_" + str(i).zfill(4) + ".png"
    filepath = os.path.join(dir_path, filename)

    # Read the image
    img = cv2.imread(filepath, cv2.IMREAD_COLOR)

    # Check if the image is loaded correctly
    if img is not None and len(img.shape) == 3:
        # Select only the first two row
        first_two_rows = img[0:2, :, :]

        # Average the rows to get a single row
        avg_img = np.mean(first_two_rows, axis=0)
        avg_img = np.expand_dims(avg_img, axis=0)

        # Append the single row to the list
        images.append(avg_img)

    else:
        print(f"Error reading the image: {filepath}")

# reverse images in the list to get the correct order, otherwise the image would be flipped.
images = images[::-1]

# Vertically stack all images to obtain the final image
output = np.vstack(images)

# Optionally resize the image to correct for errors in the animation (step size, etc.)
# output = cv2.resize(output, (output.shape[1], 500), interpolation=cv2.INTER_CUBIC)

# Write the output image
cv2.imwrite(os.path.join(dir_path, "output-line-camera.png"), output)

If you are planning to use this script, please note that I am using Python 3.10 and opencv which can be installed using pip install opencv-python and numpy which can be installed using pip install numpy.

The script generates this image, which is pretty much what I expected:

enter image description here

Although this method works to some extent, it is significantly slower than I expected, as rendering each line of the image as a separate frame and then stitching them together seems to be time-consuming and computationally expensive. Additionally, the overhead of repeatedly starting and stopping the rendering process for each frame seems to contribute to this inefficiency.

I am seeking a more efficient approach to this problem, ideally something that would allow for the rendering of multiple lines (or even the entire image) at once without the need for post-render stitching.

So far, I haven't found any built-in features in Blender that seem to be designed for this kind of task, and my searches on this site and elsewhere have not turned up any suitable solutions.

Any suggestions for how I might be able to simulate a push-broom scanner in a more efficient manner in Blender would be greatly appreciated.

Thank you for your help.

Additional Note:

Some people in the comments have raised the question how a push-broom camera operates and how the result image would be different from rendering a single image with orthographic camera, so I would like to elaborate on this:

A push-broom scanner captures one line of pixels at a time as it moves across a scene (please also take a look at the blend file I attached), with each pixel in the scanner's sensor array corresponding to a different point in the scene. These sensors are usually paired with a lens system to focus light from the scene onto the sensor array.

Unlike a single image from an orthographic camera, a push-broom scanner can create a unique type of focus effect and perspective distortion due to the continuous motion and line-by-line capture method. While an orthographic camera captures the entire scene at once from a single point of view, a push-broom scanner's point of view changes throughout the scanning process. Please take a look at the following image which is capturing the same scene using a perspective camera:

enter image description here

And here is one image of the scene rendered with an orthographic camera:

enter image description here

Also note: As shown in the .blend file, the captured data (objects in the scene) are not moving.

$\endgroup$
4
  • 2
    $\begingroup$ It might be helpful to people trying to help you if you uploaded an example blend file to the site blend-exchange.com and add that link in the question. $\endgroup$
    – Rick T
    Commented Jun 13, 2023 at 4:36
  • $\begingroup$ also a link to a push broom scanner would be helpful. You want help, right? so if i were you, i would make it as easy as possible for those, who help you for free in their free time instead of letting them google on their own. This would attract far more people - and as you can see - until now - you attracted no one to your question. $\endgroup$
    – Chris
    Commented Jun 13, 2023 at 5:16
  • $\begingroup$ Is the captured data moving? (i.e. the dark blue pixels are an update of changing input, the light-blue lines are a record of the last dark-blue sample) $\endgroup$
    – Robin Betts
    Commented Jun 13, 2023 at 6:23
  • $\begingroup$ How do these scanners work? Does the array of sensors have a lens? How is the result different from rendering single image with orthographic camera? Can you show us the desired result of an image? $\endgroup$ Commented Jun 13, 2023 at 6:53

1 Answer 1

1
$\begingroup$

You can get all kinds of weird funky "camera sensor" effects by baking completely glossy material.

enter image description here

enter image description here

Here is the blend file:

You probably want to disable shadows for the baked object and also you should keep color management in mind. I don't think baked textures use the same color management settings as render by default. I would choose 32-bit float option, when creating the image

enter image description here

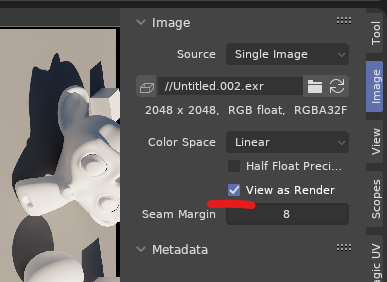
And then after baking it can be saved as 32bit EXR containing untouched data from render and then you can hit that View as Render checkbox in the image viewer to view it as a render:

enter image description here

$\endgroup$
10
  • $\begingroup$ Thank you for your suggestion. I am trying to understand how the baking of a completely glossy material could help simulate a push-broom scanner effect. Could you please elaborate on your idea? Specifically, how would this technique allow for the capturing of individual lines of a scene as a push-broom scanner does? I appreciate your time and any additional information you can provide to help me understand this method better. I am particularly interested in whether this approach could improve the efficiency and reduce the rendering time. I am looking forward to your further guidance. $\endgroup$
    – beyse
    Commented Jun 13, 2023 at 10:25
  • $\begingroup$ You can use any object as a camera then(as a camera sensor of any shape). It bakes the surrounding scene according the UV map of the object. I have no idea how those scanners work, but if you have an array of light sensors and then some sort of lens, it will produce some sort of perspective, but since every line is captured only when it moves, there would be no perspective(or maybe different perspective?..) in that direction. If you don't care about any perspective, then use a simple Orthographic camera. $\endgroup$ Commented Jun 13, 2023 at 10:34
  • $\begingroup$ I just noticed, you talk about that in the edited question. So, I think this is exactly what you need. You can simulate a lens by curving the object so it takes light from multiple directions in one axis, but only from directly below in another, like the scanner would. You can also have the object extend physically in your scene in a path the scanner would move in. I don't know how this would work with a scene that is not static though... $\endgroup$ Commented Jun 13, 2023 at 10:44
  • 1
    $\begingroup$ Thanks, I understand better now and this gives me a new line of thought. Is my assumption correct: baking onto a flat plane result in an orthographic projection? If that's the case, I assume we might be able to adjust the surface's geometry and curvature to simulate the desired effect. However, I noticed that the example images you provided appear somewhat distorted (first image, bottom right). Is this a typical outcome of this method? How can this be avoided? $\endgroup$
    – beyse
    Commented Jun 13, 2023 at 10:50
  • 1
    $\begingroup$ Thanks! The example was very useful in understanding this method. I realized that an alternative "camera" or rather image capturing device can be crafted and by being very careful and thoughtful about the geometry of the surface, I was able to recreate the desired result with a greatly reduced render time. However, there are some limitations compared to a standard blender camera, like depth of field for instance. Also it seems a standard camera is much easier to control. I was actually hoping to find an approach that would allow me to render images from several cameras at the same time. $\endgroup$
    – beyse
    Commented Jun 13, 2023 at 19:42

You must log in to answer this question.

Not the answer you're looking for? Browse other questions tagged .