8
$\begingroup$

How can I round the position of all vertices in a mesh to a certain decimal accuracy, to e.g. reduce file size. 32 bit precision is not always necessary. Is there a function built in to do this?

VERTEX 0 -0.36867856979370117

to -0.3687

or even better -0.37

$\endgroup$
1

2 Answers 2

6
$\begingroup$

This is quite easy to achieve but it won't affect Blend filesize - vertex coordinates are held as 32-bit float values. Rounding to a limited number of decimal places will not affect the number of bytes needed for each vertex. However, if you were to export the mesh to another format (eg, XML, CSV, or other human-readable format) then it could potentially reduce the size of the file considerably as you suggest.

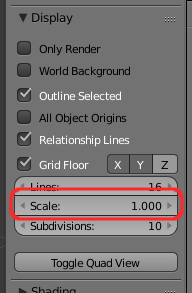
To achieve this, open the 3D-View properties panel (N) and set the Display grid Scale to the desired precision - ie, if you wanted to round to 2 decimal places (eg, 1.23) then set it to 0.01.

Display properties for grid

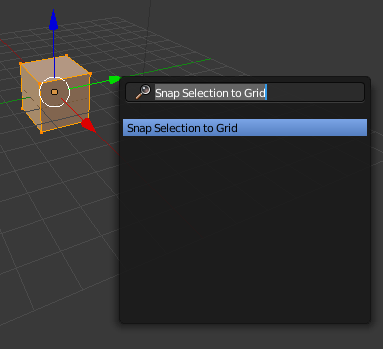
Then, in Edit mode, select vertices you want to change (or all with A) press Space and type Snap Selection to Grid. This will snap the selected vertices to the grid specified in the Scale property.

snap to selection


At later releases of Blender (eg, 3.6.0) the user interface is significantly different. The same options are available but they are accessed in a different way.

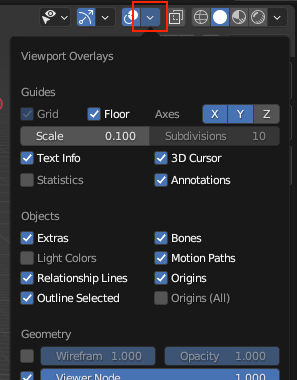
For the 'Scale' option for the Display Grid, this is now accessed via the View Overlay drop-down, as shown below :

View Overlay

To bring up the list of operators you now press F3 and can type 'Snap Selection...' as before.

run operator

$\endgroup$
2
  • $\begingroup$ can you confirm if this still works for the latest blender version 3.6? cuppajoeman claimed it doesnt and added a new answer for latest version. sorry didn't test it yet. $\endgroup$
    – Harry McKenzie
    Commented Oct 23, 2023 at 11:50
  • 1
    $\begingroup$ @HarryMcKenzie There have been some quite radical user interface changes to Blender over the years but, generally, all the same functionality exists, but is accessed in a slightly different way. This does mean that some of these answers are now out of date but the Blender user interface is so much more user-friendly now (IMO!). I've updated my answer to include a description of how to access those functions in the new user interface. $\endgroup$ Commented Oct 25, 2023 at 6:17
1
$\begingroup$

Rich Sedman's answer no longer holds for latest versions of blender, here's an updated answer.

Free Camera

Notice that in blender in the top left of the viewport there is text that says User Perspective (Local) when rotating the camera freely. Note that in this mode the grid lines stay the same no matter the zoom level.

When operating the camera in this fashion, we should follow Rich's answer with a few modifications. The grid scale value is now stored in the overlays dropdown to the left of the viewport shading options.

After selecting our vertices, they can be snapped using Shift-S > Selection To Grid.

Orthographic Camera (aka locked to x,y,z camera)

In this camera mode when you zoom in and out, the grid changes, when the grid changes there is text in the top left of the viewport explaining what has happened.

For example if we zoom in a bit and the grid "resets" we should see the metric changes from Meter to 10 Centimeters, which means that between any two consecutive grid lines there is 0.1 distance.

In this new metric if we select our vertices and use Selection To Grid then we can snap our vertices to this grid level (0.01), in this way we can snap to whatever resolution we need by zooming (in/out) a certain amount.

Comparison

If you have an entire scene you want to quantize, I recommend using the free camera method

For local quantization use the orthographic camera to avoid having to change the grid scale value back and forth.

$\endgroup$
0

You must log in to answer this question.

Not the answer you're looking for? Browse other questions tagged .