6
$\begingroup$

How would I go about animating the modeling process of a model? I can keyframe location, rotation, materials, etc. just fine, but not deleting faces from the model or modifiers as they are used, or hiding faces. What would be the best way to approach this?

To be clear, what I am wanting to do is animate the transformation of an object from a primitive to a complete model smoothly. A picture of a simple model as an example is below, I'd like to animate the entire process with each detail between steps 1-6 (scaling, deleting faces, modifiers being added and applied) and visible to the camera.

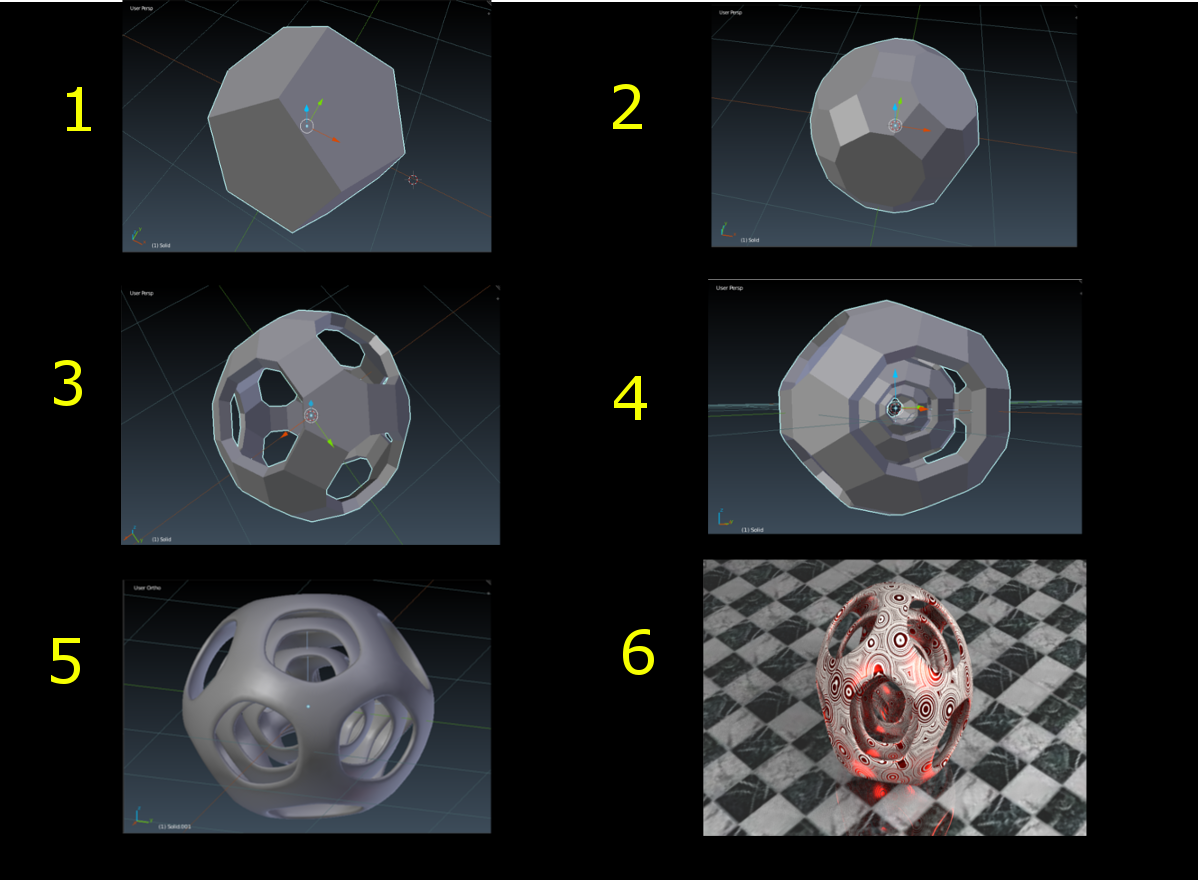
enter image description here

$\endgroup$
3
  • 4
    $\begingroup$ Screen capture? $\endgroup$ Commented Feb 29, 2016 at 4:20
  • 4
    $\begingroup$ I think you should better define what kind of animation you are looking for, or the question risk to be too broad. Try to describe what should bee seen on the screen, or link something similar. $\endgroup$
    – Carlo
    Commented Feb 29, 2016 at 11:30
  • $\begingroup$ I often set up a special camera which I think will show the entirety of the completed model, then repeatedly render and reload the file in a separate blender instance (while simultaneously working on the file in the first blender instance). The resulting saved renders can then be assembled into a video in the VSE. $\endgroup$
    – gandalf3
    Commented Mar 1, 2016 at 3:03

4 Answers 4

2
$\begingroup$

You could try saving your model at various points that you'd like to show, and then import/link them all into one file, and keyframe their visibilities in that file.

  1. Get all your objects into one file. Import them if you don't think you'll need revisions.
  2. Select the object you'd like to show first. Get to frame 1.
  3. Hit the "Eye" icon in the outliner to make the object invisible. Keyframe that object's visibility. (Hit "I" on the eye icon in Outliner).
  4. Advance to frame 2, make the object visible again, and keyframe it again.
  5. Advance however many frames you'd like this object to be visible. Let's say 24 frames. On frame 24, keyframe the visibility again. Then on frame 25, turn the visibility off, and keyframe it.
  6. Open up a NLA window, select that object, and press the 'down' arrow to push the action onto the stack. That just enables the NLA to manipulate actions.
  7. Load up your other objects, and load them into the NLA editor. Just keyframe your un-keyed objects to get them to show up.
  8. Select another object's track, and from the NLA menu select Add >> Action. Select the action from the first object you keyed.
  9. Repeat step 8 with the other objects.

Hopefully that makes sense to you. To see a rough idea of this setup, check this out: http://pasteall.org/blend/40878

$\endgroup$
1
  • 3
    $\begingroup$ Please add some more details to your answer as to how the OP can actually do this. $\endgroup$
    – PGmath
    Commented Mar 1, 2016 at 0:02
0
$\begingroup$

I would use OpenGL Render Image, very much like the other answer here, except that you would be using a lot less space (png at same res always, instead of a growing mesh size).

Be sure to save your images with sequence numbers, then pull the image sequence in as a movie of type 'image sequence', and render out the movie (image as plane add-on would be great here, but so is the VSE).

$\endgroup$
0
$\begingroup$

Take a look at the Build modifier. It will animate a mesh, building it up one vertex at a time. It does unfortunately not offer any control on the order in which vertices appear, though...

$\endgroup$
3
  • 1
    $\begingroup$ Could you please flesh out this answer so it is easier for newer users to follow your suggestion? $\endgroup$
    – J Sargent
    Commented Mar 1, 2016 at 1:31
  • 1
    $\begingroup$ Taking into account the latest edits to the original question, I don't think this would hold any merit as it is now clear this is not what the OP was after. With this new information I rather tend toward deleting my answers now... Then again, other users might stumble upon this question only based on the headline because they were looking exactly for this... $\endgroup$ Commented Mar 1, 2016 at 1:40
  • $\begingroup$ Go ahead and leave them, if it becomes necessary to remove them then someone will yet you know :) $\endgroup$
    – J Sargent
    Commented Mar 1, 2016 at 1:43
0
$\begingroup$

Another approach could be to use a texture as a mask and animate that. E.g. use a checker texture and scale it so your entire mesh "fits" into one of the squares. Use that texture as a Fac input for a Mix shader that blends between a transparent shader and your actual material(s). Then animate the texture's position via a mapping node.

$\endgroup$

You must log in to answer this question.

Not the answer you're looking for? Browse other questions tagged .