I believe based on the comments, that you should be able to do the following.
It may get slower, but let's try:
- Make a copy of the surface you have
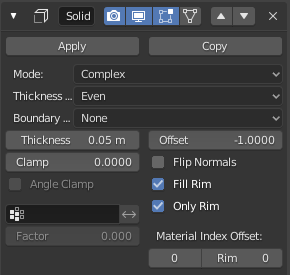
- Add a solidify modifier to the copy and set the modifier up like this:

- The thickness can be small, as we only need one extra (the lower) loop going around to produce the thickness.
- If you apply the modifiers now, it will leave you with only a thin rim.
- Go in edit mode (vertex) and select the bottom loop with Alt+LMB
- Now you can press G twice and move all the points up to end up on the upper vertices, confirm with LMB (makes sure the border will be straight).
- Right after that press G, followed by Z to move the vertices down a good bit.
- They are still not flat, so to fix that, press S, then Z and finally 0 to flatten them on the Z axis.
- Now move them down as much as you need your thickness to be.
- All you need to do now, that the lower loop is placed, is to press F and fill the bottom with a face.
- Now you should have 2 objects, the surface build with the displacement, and the new bottom part build from the rim of the solidify modifier.
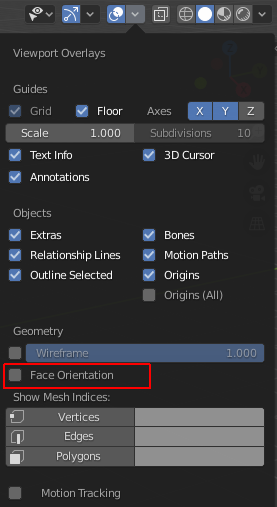
- It should fit perfectly with each other, but make sure to check the normals, easy to check if you enable "Face Orientation", the border and bottom should be blue.

In case the objects need to be joined for the 3D printing, you have 2 options.
Apply all modifiers and join the meshes with a final Alt+M Merge by Distance, to clean up double vertices.
(keeping the modifier version) Select the upper part, then the lower part by holding Shift, the upper part should be the active one, the lower selected but darker. Then press Ctrl+J to join both. The result will be that the lower part now also get's deformed by the displacement modifier of the top part, for that go in edit mode and select only the lower part by selecting a vertex and then pressing L. Now generate a Vertex Group and click on Assign. Back in the displacement modifier, select the new vertex group in the corresponding field and then click on the double arrow button beside it to invert the group. Once you go out of edit mode the lower part should be back to how it was before the joining. Finishing the object only needs one more modifier. Add the weld modifier and the object should be clean without doubles.
I hope it's not too confusing, but i tried to add an as non-destructive version as possible.


