11
$\begingroup$

I need to render a 3D density plot of custom mathematical functions as part of a scientific visualization. I've seen some demos and it seems that Blender is capable of volumetric rendering. My question is then: how can I do that?

I see that in the Material tab there's a Volume button which turns on volumetric rendering. Then I can choose a Voxel Data file. Cool. But there are a couple of problems I encountered:

  1. None of the file formats (bvox, raw) seems to have any color information, only the density (which I consider to be somewhat like the "alpha" value – am I right?). So how can I supply the color information for my density plots? I need to have a color assigned to each pixel, not just transparency/density. You can think of it as a temperature distribution in which each point in space has assigned a colour, red = hot, blue = cold etc.

  2. I need to be able to animate this density plot inside Blender by controlling some parameters for the function. So it cannot be just some static data from a file – the data has to be generated on the fly inside Blender (I'm thinking of using some Python scripting) and change in accord with the current animation frame.

  3. The function is quite complicated and the formula can change depending on the selected parameters, so I guess scripting is the only option. As long as I can use math libraries from Python, I guess I can handle the math part. I just hope that Blender is able to handle the rendering part for me, by passing the coordinates of each point in space through my function and generating the voxel data.

Is this possible to do in Blender at all? Or should I use something else?

After a quick look through Blender's Python API I found these classes:
https://docs.blender.org/api/2.79/bpy.types.VoxelDataTexture.html
https://docs.blender.org/api/2.79/bpy.types.Image.html
which seem to be somewhat related to the problem I'm trying to solve. Am I right?
If this could be used to set the voxel values on the fly with a custom math function (by setting the image.pixels property, I guess?), then what's left is the colors and changing with the animation. Any ideas of how this could be done?

Edit:
OK I think I figured out how to handle the voxel colours: turns out I can plug a texture node as the colour. So the only problem now is how to generate this texture procedurally from my custom function in the script that returns an RGB value for the given XYZ coordinates, kinda like the built-in procedural textures (e.g. Voronoi, Noise, Checker etc.) do.

$\endgroup$
5
  • $\begingroup$ Yup, special functions may be involved. The so called "math nodes" are a huge overstatement, they're more like "simple arithmetic nodes" at most. And they won't suffice for sure (otherwise I'd use them long ago), especially that the function I need may be composed differently depending on the parameters (associated Legendre polynomials etc.). $\endgroup$ Commented Feb 5, 2018 at 10:30
  • $\begingroup$ This won't be a problem, though, as long as I can use external math libraries from Python. The problem is more on the Blender side: supposing I already have the function that can take coordinates and return the colour values and "density", how can I tell Blender to use it for volumetric rendering? (Especially the colours.) $\endgroup$ Commented Feb 5, 2018 at 10:33
  • $\begingroup$ OK I figured out that I can use a texture for the colour input. It works fine with the built-in procedural textures (Voronoi, Noise, Clouds etc.), I can see the different colours in the volume. But how can I use my own 3D procedural texture generated from the script instead of these built-in ones now? $\endgroup$ Commented Feb 5, 2018 at 12:58
  • 1
    $\begingroup$ Using external math modules in Blender isn't much of a problem, though depending on your installation it may take some work. Using 3rd party Python modules has some info on that. I know for a fact the SciPy works well, and other libraries should work equally well, as long as the python version for which they're built matches Blender's Python interpreter. Frustratingly, I'm not sure how to get python to interact with shaders the way you need, though never frustratingly enough to actually dig deeper into it. $\endgroup$
    – user27640
    Commented Feb 5, 2018 at 16:38
  • $\begingroup$ As I mentioned, I've occasionally been frustrated by not being able to use Python in shaders. I've dug a little deeper, and it seems you're out of luck. Python can in fact be used to create custom nodes, however those are basically just node groups limited to combining pre-existing nodes. blender.stackexchange.com/questions/67487/…. Next option would be writing new nodes in C/C++ creating a custom build of Blender. The math, however, is limited to CUDA's math library. docs.nvidia.com/cuda/cuda-math-api $\endgroup$
    – user27640
    Commented Feb 7, 2018 at 22:37

1 Answer 1

8
$\begingroup$

If the available Maths nodes aren't up to the job of creating your required procedural volumetric you can use OSL to create a new shader node to generate your volume. OSL is based on C/C++ syntax and a wide range of maths functions are available (including vector maths, noise generating functions, etc.).

See Blender Manual - OSL, OSL Github, OSL Language Spec within Github

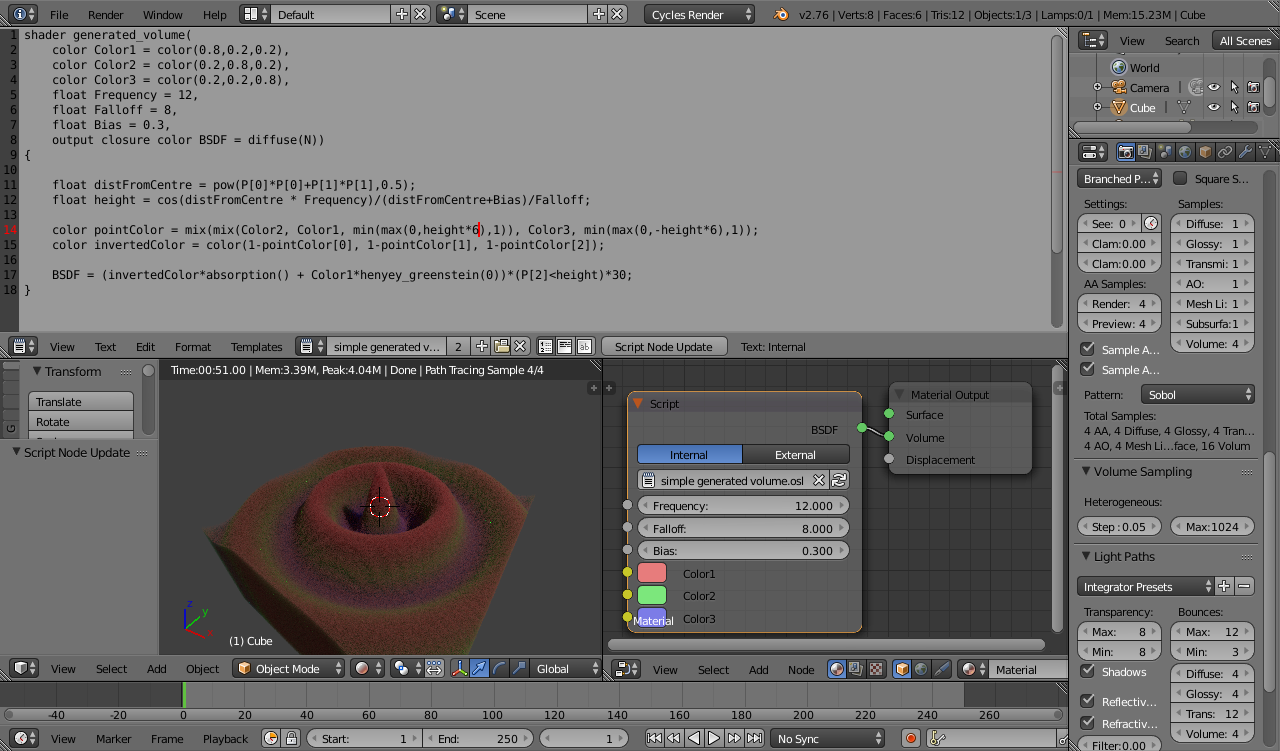
To demonstrate this in action, ensure you have a version of Blender that has been compiled to support OSL - if so you'll have the option to enable Open Shader Language on the main Render properties panel. Enable Open Shader Language and paste the following code into a new Text Editor block named 'simple_generated_volumetrics.osl' :

shader generated_volume(
    color Color1 = color(0.8,0.2,0.2),
    color Color2 = color(0.2,0.8,0.2),
    color Color3 = color(0.2,0.2,0.8),
    float Frequency = 12,
    float Falloff = 8,
    float Bias = 0.3,
    output closure color BSDF = diffuse(N))
{

    float distFromCentre = pow(P[0]*P[0]+P[1]*P[1],0.5);
    float height = cos(distFromCentre * Frequency)/(distFromCentre+Bias)/Falloff;

    color pointColor = mix(mix(Color2, Color1, min(max(0,height*6),1)), Color3, min(max(0,-height*6),1));  
    color invertedColor = color(1-pointColor[0], 1-pointColor[1], 1-pointColor[2]);

    BSDF = (invertedColor*absorption() + Color1*henyey_greenstein(0))*(P[2]<height)*30;
}

In the Node Editor, add a Script node and set the text to the newly created text block. This should automatically compile the OSL and the node should be updated to include new input/output sockets as defined in the OSL code. Connect the BSDF output to the Volume of a Material Output node.

Assign the material to a Cube (or other mesh to act as the volumetric domain) and this should produce a result similar to the following :

result

The above example is produced by calculating the distance from the origin and generating a Cosine wave based on this distance, scaled by the distance. The colour of each pixel is determined by the height and mixed between the three input colours. Obviously the calculation can be amended to whatever you desire.

Note that in my example I amended some of the render settings to get better results. In particular, I swapped to Branched Path Tracing (with increased Volume samples), reduced the Volume Sampling Step to 0.05 (lower values give sharper results but at the expense of render time), and increased the Volume light path bounces to 4.

The 'surface' itself is created using a combination of Volume Absorption and Volume Scatter (henyey_greenstein) to simulate a rough diffuse surface - similar to that used in Give this mesh a uniform thickness on all the tubes and unions

Note also that the ‘30’ at the end of the ‘BSDF =...’ line represents the ‘solid’ density and this could be similarly varied throughout the volume, depending on your requirements (for this I just used it to demonstrate a generated solid volume).

$\endgroup$

You must log in to answer this question.

Not the answer you're looking for? Browse other questions tagged .