8
$\begingroup$

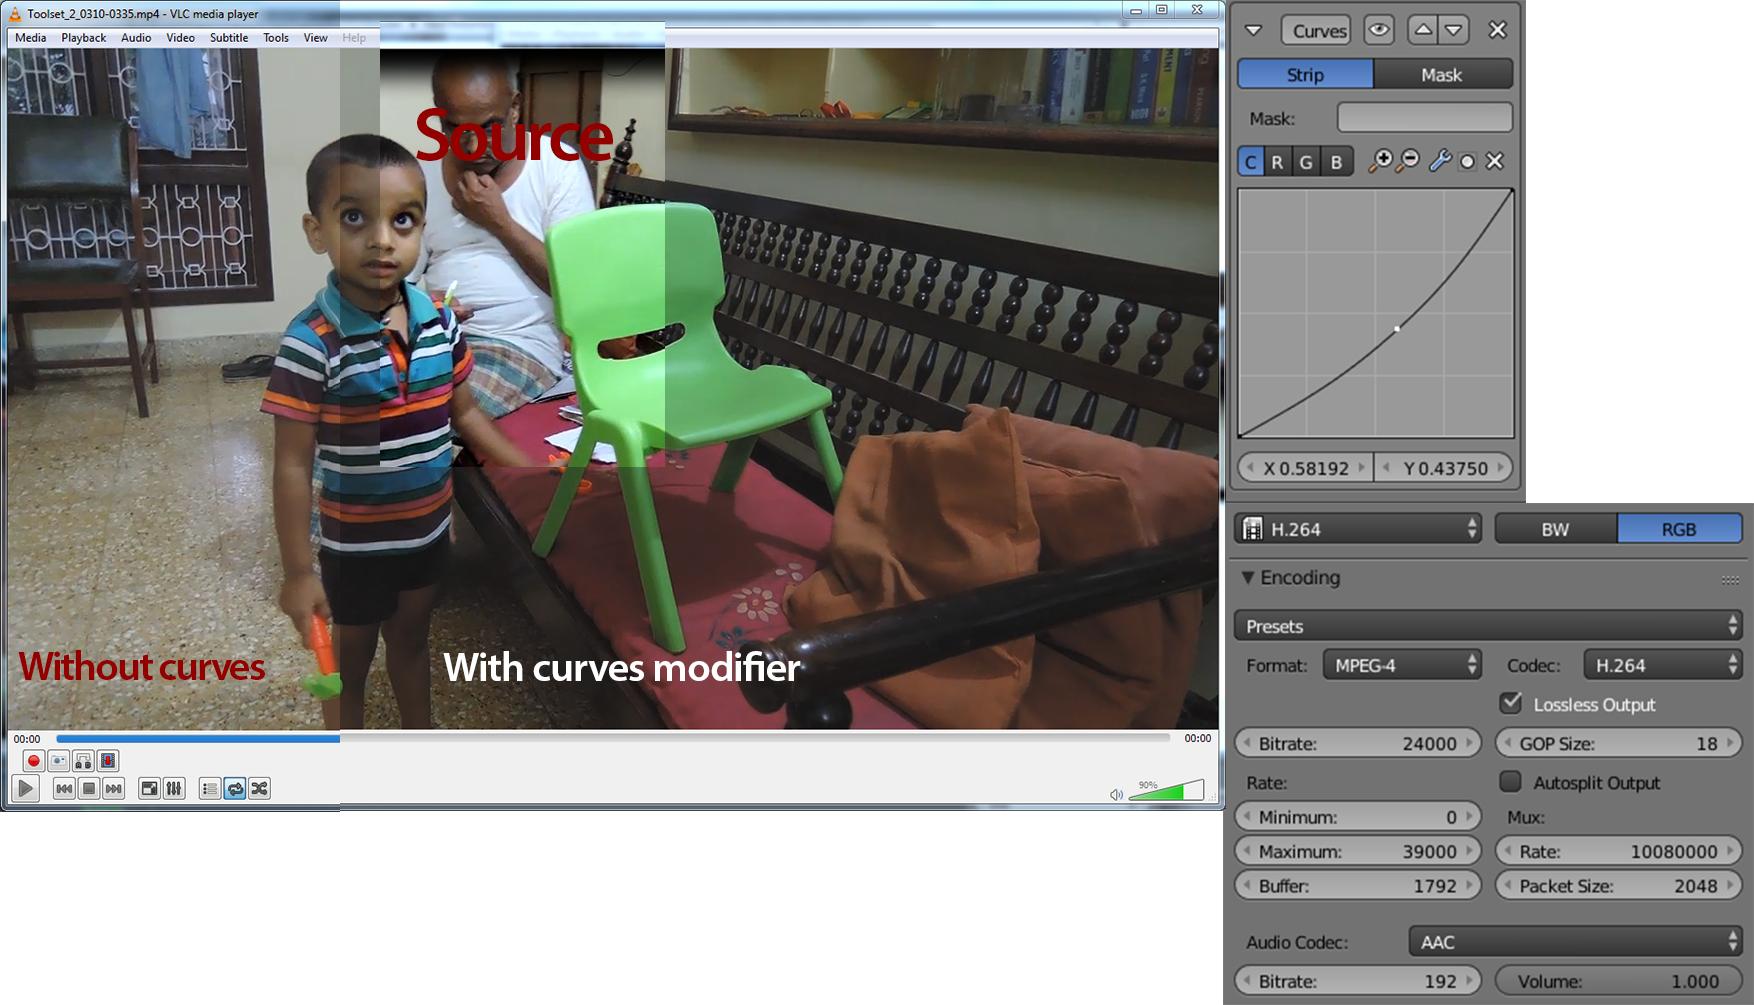
I am editing a video(MOV format) shot on Nikon coolpix. And i want same quality output, but an MP4. I tried with fallowing settings and curves modifier But it just darkens the image and not improves the colour saturation. In the screen shot i have overlaid with and without curves modifies and part of the source footage screenshot and my export settings.

How can i match source colours?

enter image description here

Source Video Details

Format                                   : MPEG-4
Format profile                           : QuickTime
Codec ID                                 : qt   2007.09 (qt  /niko)
Overall bit rate                         : 8 419 kb/s
NCDT                                     : NCTG

Video
ID                                       : 1
Format                                   : AVC
Format/Info                              : Advanced Video Codec
Format profile                           : Main@L4
Format settings, CABAC                   : Yes
Format settings, ReFrames                : 1 frame
Format settings, GOP                     : M=1, N=8
Codec ID                                 : avc1
Codec ID/Info                            : Advanced Video Coding
Bit rate                                 : 8 282 kb/s
Width                                    : 1 280 pixels
Height                                   : 720 pixels
Display aspect ratio                     : 16:9
Frame rate mode                          : Constant
Frame rate                               : 29.970 (30000/1001) FPS
Color space                              : YUV
Chroma subsampling                       : 4:2:0
Bit depth                                : 8 bits
Scan type                                : Progressive
Bits/(Pixel*Frame)                       : 0.300
Stream size                              : 315 MiB (98%)

Color range                              : Full
Color primaries                          : BT.709
Transfer characteristics                 : BT.709
Matrix coefficients                      : BT.709
$\endgroup$
7
  • 2
    $\begingroup$ Do you have a short clip in mov format which you could provide to us? $\endgroup$
    – aliasguru
    Commented Aug 4, 2016 at 4:34
  • 1
    $\begingroup$ Perhaps its a mistake of gamma parsing. Quicktime variants are notoriously hard to get the gamma right. $\endgroup$
    – 3pointedit
    Commented Aug 4, 2016 at 10:50
  • $\begingroup$ Are you actually trying to get better saturation, och do you use the curve to try to work around saturation changes introduced by the re-encoding? $\endgroup$
    – user27640
    Commented Aug 6, 2016 at 2:39
  • $\begingroup$ 1: You could make better curves to achieve the desired result. Make brights brighter and darks darker, somethink that look like this (but starting from (0, 0) and ends at (1, 1)): docs.toonboom.com/help/harmony-12/premium/Content/Resources/… But this is only a workaround. $\endgroup$ Commented Aug 8, 2016 at 10:57
  • $\begingroup$ 2: Cloud it be that there is color profile mismatch (Adobe RGB, sRGB, Generic RGB, etc)? Maybe you have to simply assign (not convert) the color profile to the exported video. If Blender allows to choose between color profiles, use the same for importing and exporting as the source file already has. $\endgroup$ Commented Aug 8, 2016 at 10:59

2 Answers 2

4
+50
$\begingroup$

Marks to @3pointedit for likely getting close to the answer. The rest appears to be a stream of complificationingeering.

In all likelihood what you are seeing as “saturation” is actually a byproduct of an incorrect curve. The source of the problem is likely that your “source” reference analysis was being decoded incorrectly. Where that is entering the chain is going to be tricky as heck to diagnose.

Any codec is transformed to the YCbCr domain. In doing so, the RGB values should remain (quantization errors aside) very close to your source file RGB.

I can see that the “Source” file looks much more contrasty, which suggests to me that your player you are evaluating the material in is likely not decoding your footage correctly.

Any transform from RGB to YCbCr is typically done to the specification, which stipulates a broadcast range scaling. This scaling changes the 0-255 RGB values to 16-235 and 16-240 range on the YCbCr planes respectively. Those scaled values are, assuming players behave correctly, scaled back to their proper positions on decode.

What I suspect is happening is that the original “source” decoder is likely assuming, absolutely incorrectly, that your Nikon footage is broadcast scaled and chopping off a significant range of values and scaling the remaining values. This ends up making your image much more contrasted, as well as being incorrect.

DSLRs and some pocket cameras introduced a nonstandard “full range” YCbCr encoding which uses the full 0..255 range of the YCbCr stream. Sadly, many decoders decode it incorrectly, and you end up seeing hyper-contrasted images. See that “Range” tag in the data dump? Frequently too, the decoder will use the wrong set of luminance coefficients to decode the footage, which results in colour skew.

There are also a plethora of other areas where an encode to decode chain might go wrong. I outlined some of those tricky steps in another answer here.

Best advice is to check your source footage decode in a few different players. I suspect that, while potentially not perfect, the FFMPEG libraries Blender is using are trying to give you the full range of your shot’s data, as it is decoded from the raw YCbCr values. The result will be a slightly flatter image with much more dense data, which ends up being much more optimal for grading and a better resultant image.

All of that said, how to match a look?

Creative grading is most optimally achieved using a nodal system, frequently non-realtime. Assuming the guess above is correct, you can figure out what portions of your footage you intend to use and grade them in the compositor. It will be a little tricky because of some colour things that are beyond the scope of this answer, but should be achievable. Try an ASC CDL node with a slight increase in Power, and possibly a very slight decrease in Slope.

Bottom line is that there is a better than average chance the decode you are seeing in Blender is closer to the intention of your source stream than what you are seeing in Random Video Player. Test against VLC, FFPlay, or even the free version of DaVinci Resolve.

Your curve is not delivering the result you appear to desire because you have applied a simple arc to it. What it sounds like you are wanting is a subtle ‘S’ shaped curve that rounds off the lower left to a hump towards the upper right.

$\endgroup$
1
0
$\begingroup$

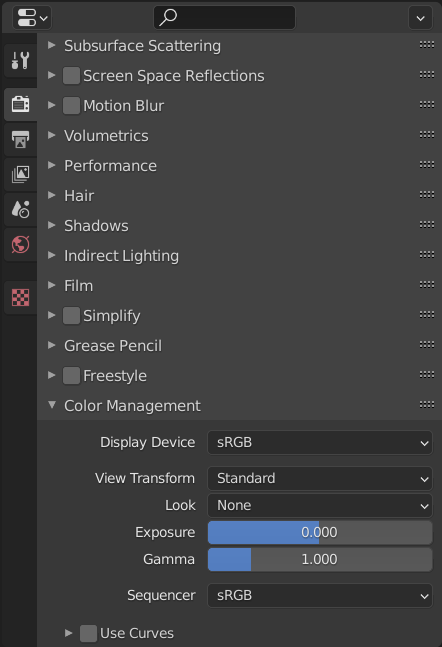
I think this is either caused by having the "Filmic" filter set - make sure View Transform is set to Standard:

enter image description here

Or it's some issue with BT.601/BT.709 colour spaces - there's a good article about that mess here.

$\endgroup$

You must log in to answer this question.

Not the answer you're looking for? Browse other questions tagged .