0
$\begingroup$

I am trying to bind a Rigify Pitchipoy rig to my human mesh. I want to use Automatic Weights to bind, but keep getting the "Bone Heat Weighting: failed to find solution for one or more bones" error. I have already researched this and have also found the precise area of my mesh that is causing the problem.

It is a very dense area with many veritices. If I delete this area from the mesh, the Automatic Weight works perfectly.

My question is, can I somehow omit/hide/mask this particular area of vertices from the automatic weight process? I want it to believe this area don't exist when it runs, as if I had deleted it. And then I can manually paint that area afterwards.

I am using the latest version of Blender. Would appreciate any help a lot! :)

$\endgroup$
2
  • $\begingroup$ Not sure there is no other mean, but: make a copy, delete the unwanted parts on the copy. Parent with auto weights. Now select the copy, shift select the original and ctrl+shift+T, and choose vertex groups. Finally, on the operator panel, choose "all layers" as source layers $\endgroup$
    – lemon
    Commented Apr 2, 2017 at 14:17
  • $\begingroup$ I have solved it myself, but this sound like a method that could work as well. Thanks for adding it! :) $\endgroup$
    – Peter
    Commented Apr 2, 2017 at 14:27

2 Answers 2

1
$\begingroup$

UPDATE: I have found a workaround that seems to solve the problem. I don't know if there is a smarter way, but I'll post it for anyone else with a similar issue.

  1. I selected all the vertices that made up the problematic area, pressed P and separated by "Selection".
  2. I then select my mesh (which is now separated from the problematic vertices), go to Weight Paint mode and then do Automatic Weights binding.
  3. After weighting process is complete, I select the seperated mesh, then shift-select my main mesh and do Ctrl+J to join them again.
  4. Then I go back to weight paint mode and click the bone nearest to this area and manually paint it so it follows the rig.
  5. Finally, I manually merge (Alt+M) EACH INDIVIDUAL vertex at the points where they were cut/separated.

This solved the problem, and it even kept the shape keys I had in that area from being destroyed, since no vertices was added or removed by doing this. If anyone have a smarter method, I would still love to hear it!

$\endgroup$
0
0
$\begingroup$

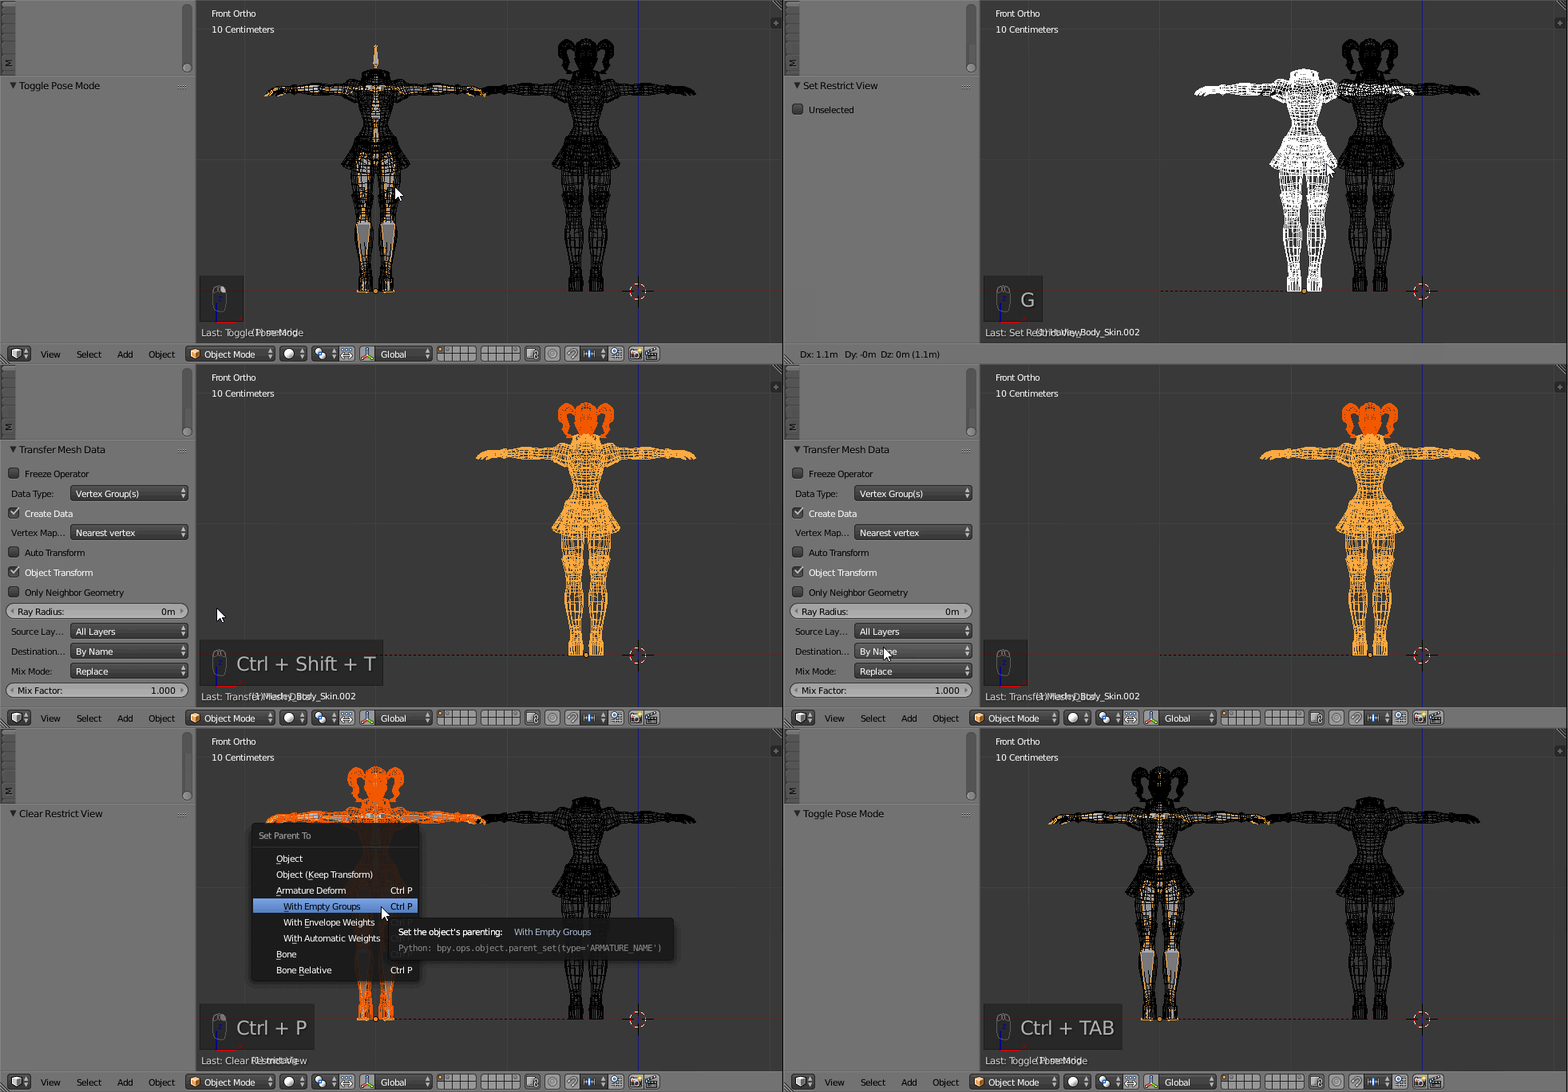
Let's say this is the head which causes a problem.

Here on the left, I have a rigged character, with no head. On the right, the full character you want to rig.

  • Place them at the exact same position
  • Select the target mesh and shift select the copy (we'll use a data transfer which works from active to selected)
  • Now use CtrlShiftT and choose "vertex group"
  • On the operator panel, make sure that "nearest vertex" is the option (in your case), then for "source layer" choose "all layers" and for "destination layer" choose "by name".

This will copy the vertex groups from the copy (which is active) to the original (which is selected).

Now simply parent it with "empty groups":

enter image description here

$\endgroup$
2
  • $\begingroup$ Wow, thanks for that detailed answer. This looks like a more clean and simple way around it than what I did. Will this method automatically merge the vertices between the head and the neck? $\endgroup$
    – Peter
    Commented Apr 2, 2017 at 15:50
  • $\begingroup$ There is no merge to do here. The original model is not modified except that it gets the weights of the copy... but surely, here the head is not weighted $\endgroup$
    – lemon
    Commented Apr 2, 2017 at 15:53

You must log in to answer this question.

Not the answer you're looking for? Browse other questions tagged .