I always struggle when trying to create a floor plan or furniture. How do I model using exact measurements.
-
$\begingroup$ If someone more experienced could elaborate on those tips: blender3darchitect.com/2008/07/… (shortcuts, maybe a few images) for recent version. $\endgroup$– stackerCommented May 24, 2013 at 10:52
-
1$\begingroup$ I think the (beginner) tag is meta, these are frowned upon for sites like these. Don't use any 'user' or 'question' level tags. $\endgroup$– iKlsRCommented May 24, 2013 at 13:44
-
1$\begingroup$ rab3d.com/tut_blender.php contains a tutorial which walks you through the creation of a (to scale) 608 bearing. While written for blender 2.49, the precision modelling guide is also worth a mention: rab3d.com/tut_blen_precision_guide.php $\endgroup$– ExilythCommented May 24, 2013 at 20:14
7 Answers
The absolute first step is to set the real-world units in the scene tab. This will make Blender's arbitrary units relate to something you can actually measure, like feet or meters.
Lines/Edges that Follow an Axis
You can click on a vertex, press E to extrude, press X, Y, or Z to choose the direction, then type in 1 and hit Enter. This will produce a line of length 1 (scene units) in that direction.
Lines/Edges at Arbitrary Angles
If your line needs to be at an angle, and you know how long it needs to be, then you could:
Create an edge with that length. Position the 3D cursor on one of the vertices of the edge.
Set the pivot centre to be on the 3D cursor. (important)
Rotate the edge: (select the edge, hit R, hit (X,Y, or Z for axis) and type in the angle to rotate on that axis) , then Enter to finalize
Rinse and repeat until all axis of that edge are dealt with.
Extruding Edges/Faces
Edges and Faces can also be extruded and knowing how to do it can save you a lot of time:
- select an edge or face, hit E and choose an axis using X,Y, or Z and type in the distance, then Enter.
- Faces will start to extrude along their normal if no X,Y, or Z direction is given.
Directly entering coordinate values (global / local)
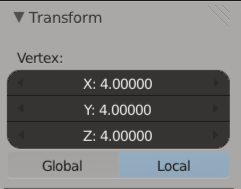
Get familiar with entering exact coordinates into this box. (found on the right hand panel, the N-panel). In Global mode when you change the position of a selected vertex using those fields then the coordinate will be relative to the world origin (0,0,0). When in Local mode the coordinate will be relative to the origin of the Object.

-
$\begingroup$ If the math is easy enough - also going X then Y is a possibility $\endgroup$– JNFCommented May 24, 2013 at 11:04
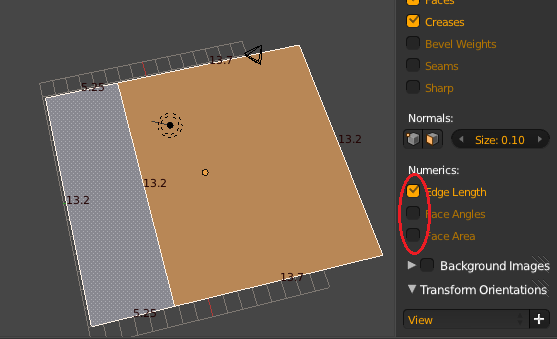
After some research I found that there are options in in the transform panel (N) named Numerics. When Edge Length is ticked the exact measure is displayed in the viewport.

-
2$\begingroup$ This only works in the mesh editing mode right? $\endgroup$– HRJCommented Jun 13, 2013 at 16:39
-
$\begingroup$ @HRJ Yes, the edge length is only shown in Edit mode. The value is also in object-space -- meaning, if you scale your object and go into edit mode, the edge length will still be the same. To measure world-space edge length you need to apply scale (Ctrl + A) (similar to "Freeze Transforms" in Maya). $\endgroup$ Commented Aug 28, 2018 at 10:33
Along with the default 'in Blender' tips already posted, there are several scripts/addons you can use to assist you too. The website Blender3DArchitect has alot of content tuned to this.
The addons are..
- EdgeTools (for 2.63 at the time of writing)
Edge Tools is designed to bring some CAD-style edge-based modeling tools to Blender. These tools are predominately inspired from several tools found in CATIA's "Geometric Design" workbench.
- Caliper
This addon incorporates the basic Caliper functionality of creating an object which displays the distance between 2 points in Blender’s 3d space and can be rendered. Then this functionality can be expanded with more detailed measurements and live updating.
-
3$\begingroup$ I also wrote tinyCAD VTX (does: extend edge towards, project towards edge, and intersect edges) and also tinyCAD X ALL (does: intersect all selected edges) $\endgroup$– zeffiiCommented May 27, 2013 at 17:22
-
$\begingroup$ I just tried your tinyCAD VTX, zeffii, and I have to say it is awesome. It's just what I was looking for, but didn't even realize it. Nice work! $\endgroup$– JasonCommented Aug 28, 2013 at 17:48
-
$\begingroup$ The link to Caliper seems to be broken, I can't download from google code archive without some kind of user (with no obvious way of getting one) $\endgroup$ Commented Dec 13, 2017 at 8:16
-
1$\begingroup$ @DanielVestøl Link has been updated, thanks. $\endgroup$– iKlsRCommented Dec 13, 2017 at 8:39
To add to the other answers . . .
Another thing that you can do to help you model accurately is to use a unit system other than the Blender unit system. You could use the metric or imperial system. Doing so helps you to remember what distance means.
For example, instead of seeing 13.63 when using the BU system, you'll see 13m 63cm if using the metric system, and 44' 22" if using the imperial system.
more info here: https://blender.stackexchange.com/a/258/14
This is still a big problem in my world (CAD + BIM + CNC/CAM), and Included in this is a mix of metric & imperial.
So I have just learned to get practical about it.
For metric cases, its pretty easy, because default Blender units equate to meters.
AutoCAD for instance truly takes on a "None" unit, and if you model in inches or mm you just keep track of the 25.4 scale factor.
As far as this goes, I use these experiences to give me two major different answers inside the context of Blender.
- I often import what I call a "Tape Measure Mesh" (I will explain it further down the page).
- I also often model in my own psuedo-imperial system within Blender, get my whole scene done, then apply a global scale factor to it. Most of the time, I can get away with this method because coordinate systems are linear. Better yet for me, many times I don't have to care, because Blender is just the final resting place for the geometry.
Method #1:
For the first method that I mentioned ("Tape Measure Mesh"), Here's how I go about using it:
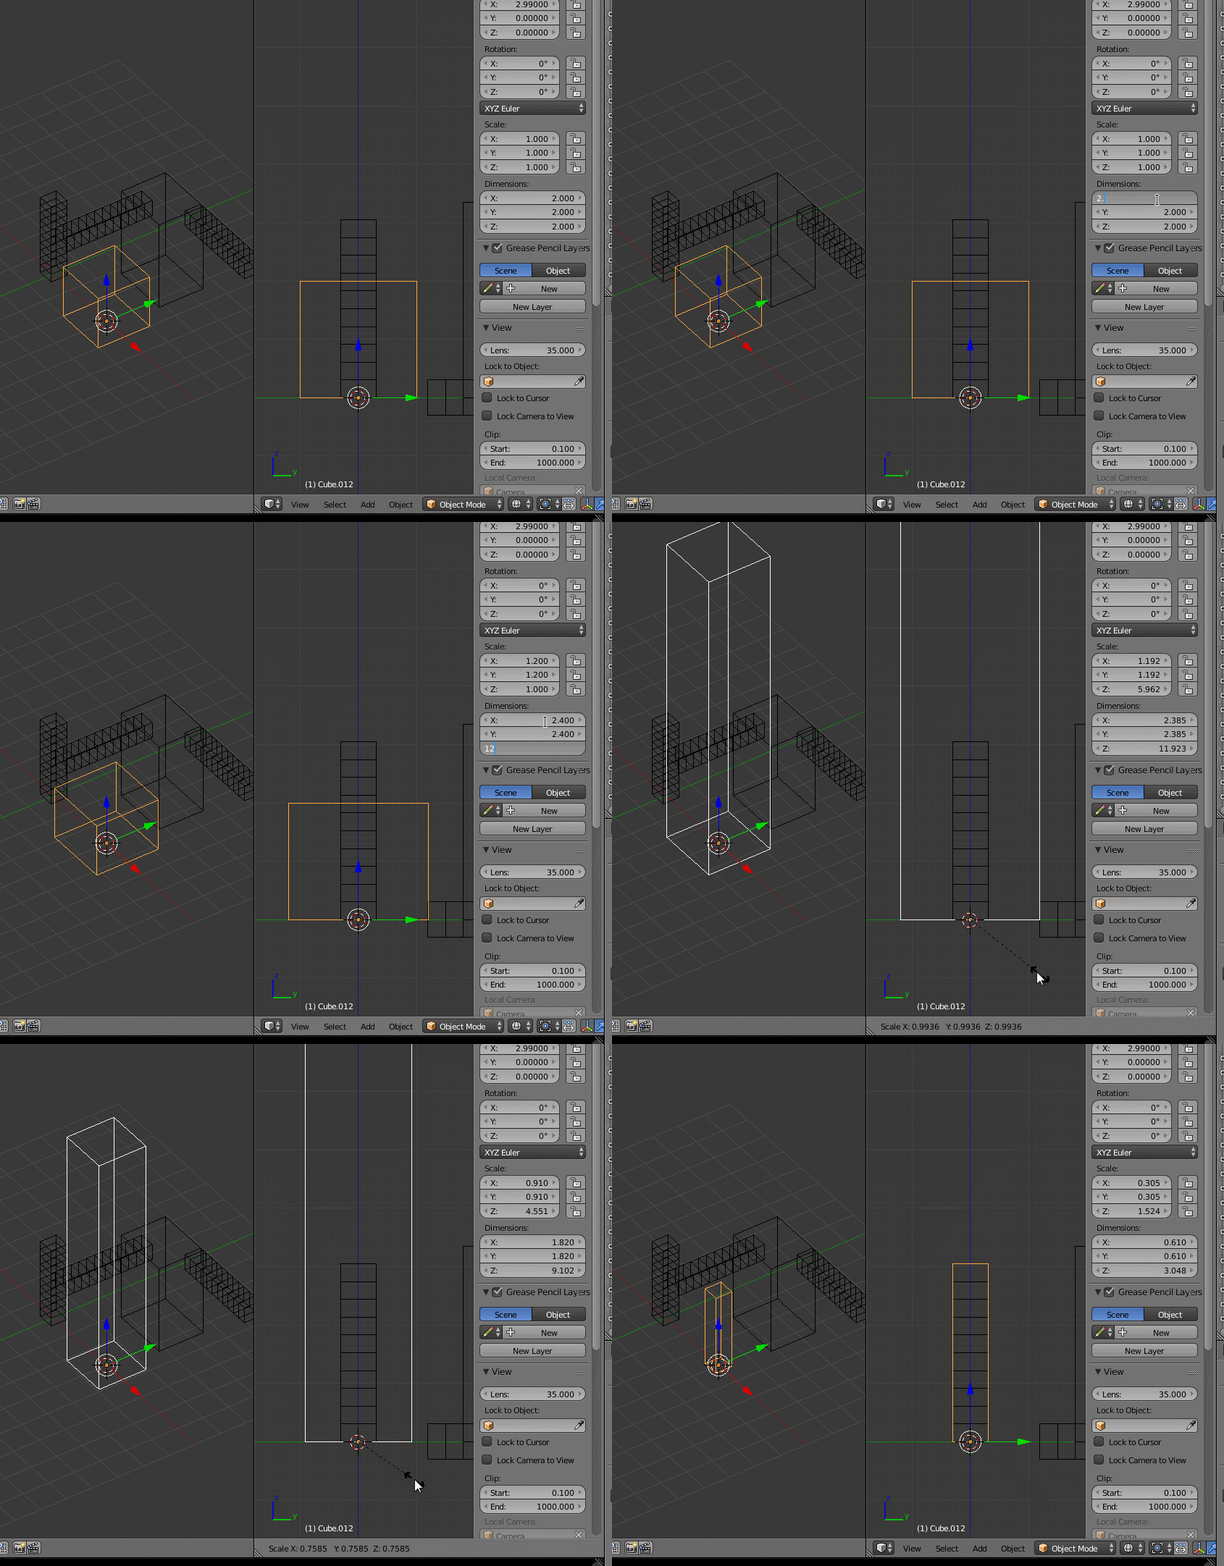
- I Model a Large Column (A cube or circle scaled up the Z-Axis) to a known amount. Luckily for me, Blender makes this part easy, because I can just enter the math directly into the Dimension Fields: Here is what I enter
- Starting with X & Y - I Enter: 24*25.4/1000
- For Z - I Enter: 12*25.4/1000
Here's how the breakdown of what I am entering looks like (lets look at them all):
For X & Y my first number is my desired unit in imperial inches (24).
The scale factor from inches to mm is exactly 25.4 so we multiply this.
Because a mm is 1/1000 of a meter and the Blender units are in meters we divide by 1000.
So the format is always as follows:
[known unit in inches] * 25.4 / 1000
So now looking at my Z Value I'm changing the dimension to 1 Feet tall (1*12 = 12inches):
12*25.4/1000
Next:
I Apply the Scale to this Column mesh: Ctrl + A >> S.
I Enter Edit mode with this mesh selected using TAB,
I then add Loop Cuts to this mesh (specifically 12 of them). I do this by placing my mouse cursor over about the mid point of one of the four edges that run up and down the Z-Axis of the column mesh, and hitting Ctrl + R >> 1 >> 2 >> ENTER >> ENTER.
I then change my snap to Ctrl+Shift+Tab and Selecting Vertex on the menu that pops up. I personally Just hold Ctrl to temporarily activate snapping when I'm dragging, but if you wish to toggle it on and off use Shift+TAB.
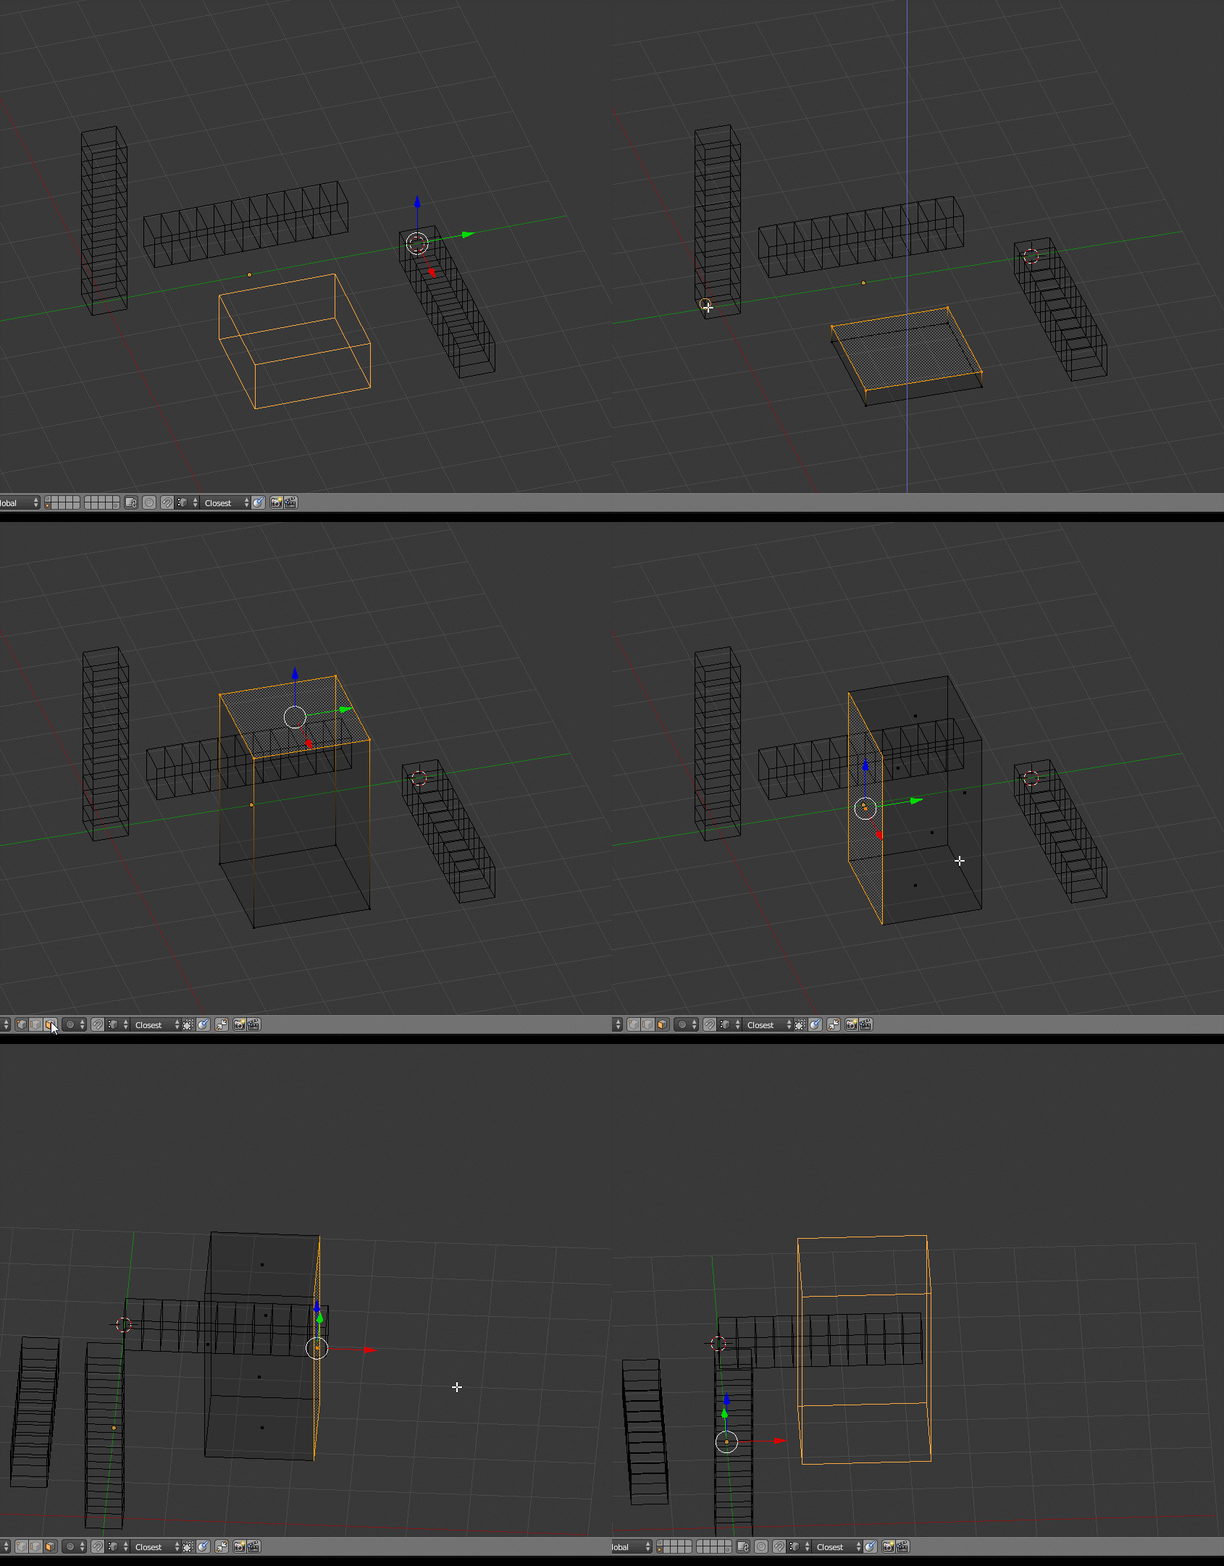
The result is that I have a 1' Long mesh that I can snap to all the way down to 1" increments. Then I can Copy/Array them on top of each other for what ever height/width/depth I need.
I then Also copy this mesh and rotate them to lay down parallel to each of the horizontal axis' (X & Y) So I can snap my widths and depths of objects as well.
Here's what this method looks like:
Method #2:
Most times I use this because, I know that I can always globally scale all of this when needed.
NOTE: there is a drawback to this method!!! If you change the scale all of your objects globally later, your material scales may not automatically keep up, so keep this in mind and be careful. (This will largely depend on what kind of input coordinates you are using in your materials).
The easiest thing for me to do is to work in a decimal inch system, with one minor difference.
The difference here is that I move the decimal place over one.
So 1-1/2" would normally be 1.5 - In Blender I just enter it in at: 0.15
For 1-1/16" normally: 1.0625 - Blender: 0.10625
For 1'7-5/8" normally: 19.625 Blender: 1.9625
And so on...
The reason for sliding the decimal back 1/10 is because it keeps the default scene/camera comfortable without clipping, until you just get too big, but hey we all deal with that anyway when our scenes get large, and we adjust our camera's and views accordingly.
This method just allows me to work like I'm used to (in inches), without trying to line up to some mesh rig, or worry too much about the nuances of this while I'm modelling.
To apply the global scale when you are done, the formula used in method one is ever so slightly modified. It is as follows:
10 * 25.4 / 1000 = 0.254
To apply it, select all by using A then use S then type in: 0.254 >> ENTER.
Here's what the result of this looks like:
-
$\begingroup$ One note-worthy mention for method #1 here. You can create these in a file that keeps all of your standards and turn them into a group. That way when you need to use it in a new model you can use Shift+F1 >> Select Groups >> Pick your Group Name - to append it into your active file. Once its inside your active file move the instance of it to a hidden layer, and add group instances of them as needed through the Add Menu. $\endgroup$ Commented Apr 8, 2017 at 8:02
-
$\begingroup$ If Group instances bother you, or hinder the snapping, you can always use Ctrl+Shift+A to 'Make Duplicates Real'. This will cause any instance that you did this to, to act just like when you originally created them. Just delete the Empty Objects they were attached to to clean up. $\endgroup$ Commented Apr 8, 2017 at 8:09
I know this discussion is old, but had similar problem, needed exact distance between a copied object and its original. Its possible to add operators (+,-) to existing position value.
Note: I am using the latest Sensei Format plugin, but operation most likely work without the plugin (have not tried that)
- Set Units (Metric)
- Go to local mode
- Select object to copy
- Press D to copy
- Right-Click to exit move operation
- Press N for properties
- In the location properties panel you need (x,y,z) add an
+or-operator to the existing value, and will calculate the exact position between two objects. - Eg:
44mm-10mm> press Enter
Hope this helps someone.
First determine your units in Properties panel > Scene > Units.
Use Grab or Extrude with x,y,z constraint and type your measurements and validate. You can also type in the transform panel of the properties shelf (3D window) but most of the time it is slower and less practical.
Use the snap tool in the 3D window header. Snap to increment can be really useful.
Like in real drawing, it can help and speed to draw construction lines. Sometime you can hijack some tools:
Use grid object as a template and snap.
In the special menu <W> use subdivide or merge at center to find some point.
The measure panel is more useful to check measurements than to draw exactly.


