2
$\begingroup$

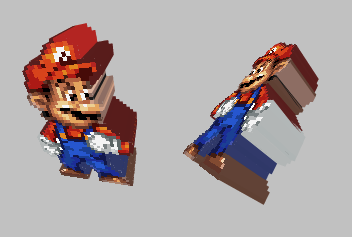
I'm trying to create something like a 2d sprite:

sprite

I want it to be extruded for 3d printing in sandstone, but the textures are not showing up.

This is Blender Render, not Cycles. It opens fine in Meshlab but when I send the zipped .obj with the .mtl to Shapeways, it shows as untextured 3d shape.

First i made the flat plane, textured it and then extruded as individual face (Alt+E); after that I exported .obj with .MTL. Later on i tried VRML, X3D with zipped image and some other ones but they don't show up on Shapeways, only the shape shows up. MeshLab opens them as textured.

Texture path is set to relative and texture pic is zipped together with the exported 3d file when uploading to Shapeways.

This is an example of how it needs to be, the sides need to look like they have been extruded, stretched from the extruding on the Z axis. When I extruded the textured flat plane the texture also become extruded on the sides and that is the look I need..
This is an example, not the real model i'm trying to make but the idea is the same I guess. http://rg.to/file/9ef90eb82a896fe65986664923fcfcbf/box.blend.html Thanks

$\endgroup$
2
  • $\begingroup$ Did you try recalculating normals (Ctrl+N with all selected) and in texture settings choosing Image or Movie type of texture instead of None ? $\endgroup$
    – Mr Zak
    Commented Feb 13, 2016 at 17:05
  • 3
    $\begingroup$ Also please use blend-exchange service for uploading your files (specifically for this site); it provides possibility to download file without waiting, entering captcha and stuff. $\endgroup$
    – Mr Zak
    Commented Feb 13, 2016 at 17:39

1 Answer 1

2
$\begingroup$

Exporting with textures is sometimes finicky for 3D Printing. There is a helpful 3D Print toolbox addon that makes the process much easier and more reliable. Try using it.

I also have a tutorial to do exactly what you are trying to do in your project. It uses a script I wrote. You can get it here

Here is the tutorial on YouTube or follow the written steps below

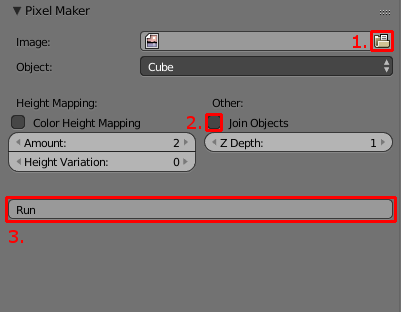
Install the addon, then pick an image. Images should be less than 100x100 pixels, so scale it down if necessary. Then make sure to check Join Objects to make sure each cube is connected. Then run the addon.

Addon UI

If you want it taller, all you have to do is either change the Z Depth value in the addon or scale the object in edit mode after the script runs.

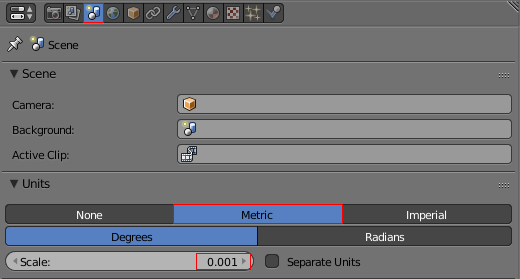
Now we need to set the scale of the object so we can get reliable printing results. To use millimeters, change to Metric and set the Scale to 0.001

enter image description here

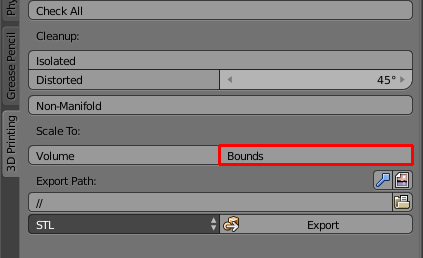
Then you need to name your object and install the 3D Print Toolbox addon. It comes shipped with Blender, so search for it in the User Preferences. Once it is installed you need to click the bounds button to set the scale. Enter the size you want.

Toolbox Bounds

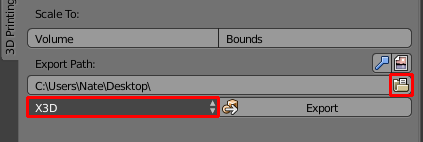
Then all you have to do is export and upload to Shapeways! It is important that you choose X3D to preserve the colors.

Export

$\endgroup$
2
  • $\begingroup$ Thank you Mr Zak and Zachman. I watched your tutorial on youtube and about the sprite extrusion and I saw that you used the 3d printing toolbox to export the texture with the model, I used the same tactics and it worked! I didn't used the sprite add-on but it looks great, thank you again and all the best. Alex $\endgroup$
    – user21806
    Commented Feb 14, 2016 at 6:37
  • $\begingroup$ @user21806 Make sure to accept the answer so other people are more likely to find this if they run into the same problem! $\endgroup$
    – doomslug
    Commented Feb 15, 2016 at 15:52

You must log in to answer this question.

Not the answer you're looking for? Browse other questions tagged .