7
$\begingroup$

Most tutorials on camera tracking tell you to change the View Transform from Filmic to Standard. In the documentation it says Standard is "Often used for non-photorealistic results or video editing where a specific look is already baked into the input video."

This sounds good for the camera-tracked video footage but not for any 3D elements you then add into the scene afterward.

If I understand Andrew Price's video "The Secret Ingredient to Photorealism" then I should be trying to get the dynamic range and the middle grey value of my render to match that of my tracked video footage.

How do I go about doing this? It sounds like changing from Filmic to Standard just ignores the problem?

I suspect the answer involves a year of study of the nature of lighting! I've already looked at this Blender SE answer from @troy_s and both Creative Shrimp's filmic tutorial and Blender Guru's one (both of these cover filmic when it was still an externally developed plugin).

But I just got lost in the details and didn't come up a clear set of steps I should take for matching renders to tracked footage.

Is this something that's probably beyond the hobbyist or is there something slightly more clever that I can do than just switching to Standard?

$\endgroup$
3
  • 1
    $\begingroup$ Actually, Filmic view transform applies color transformations to your image while the Standard output it "as is". The reason most of the tutorials recommend you to change to Standard is that you don't want your footage's colors to be altered (it's the case when you do video editing or camera tracking). But when it comes to renders from 3D scenes, you want to keep that at Filmic as it gives more physically accurate results. I don't know any way of "limiting" the transform to just your render so may be the solution is to render the 3D scene separately and then compositing it afterwards? $\endgroup$ Commented Jan 10, 2022 at 10:37
  • $\begingroup$ I was wondering about this too. I.e. can you resolve things in the compositor? Render your 3D scene with filmic and then somehow combine it with the footage. It sounds reasonable (to my amateur ears) but I couldn't find any information about how I should go about doing this, i.e. what nodes are needed to get the two inputs (render and footage) matching from a dynamic range perspective. $\endgroup$ Commented Jan 10, 2022 at 12:19
  • 1
    $\begingroup$ You can export your render layers as separate images then combine it in a different file's compositor (with no color transform). You won't need to match the dynamic range, you will just need to do basic color match. $\endgroup$ Commented Jan 10, 2022 at 13:00

1 Answer 1

5
+50
$\begingroup$

mqbaka was right about exporting and combining them in a different file or scene. From my experience in VFX, this is the best way I've learned to go about it:

  1. Have your scene tracked, modeled, lit, etc. to match your background footage, with the desired color space for the 3D scene alone. Filmic, Filmic log, whatever works best. Don't worry if it affects the color of the background footage during playback, because next you will...
  2. Render your 3D scene without the background footage, just the 3D scene with transparency, to an image sequence or video file. An EXR can keep it less lossy and preserve the raw values.
  3. Create a new scene in your file (or make a separate file entirely). Import your background footage and your render as nodes in the compositor. Keep the scene color space in Standard (doing the default VFX or Video Editing files does this for you). In the compositor, if you use images or image sequences, you can set the color space for each one (movie node doesn't have this, but the image sequence node has an option for movie files anyway) - the default Linear works for renders, but tweak as needed so colors match what you expect.
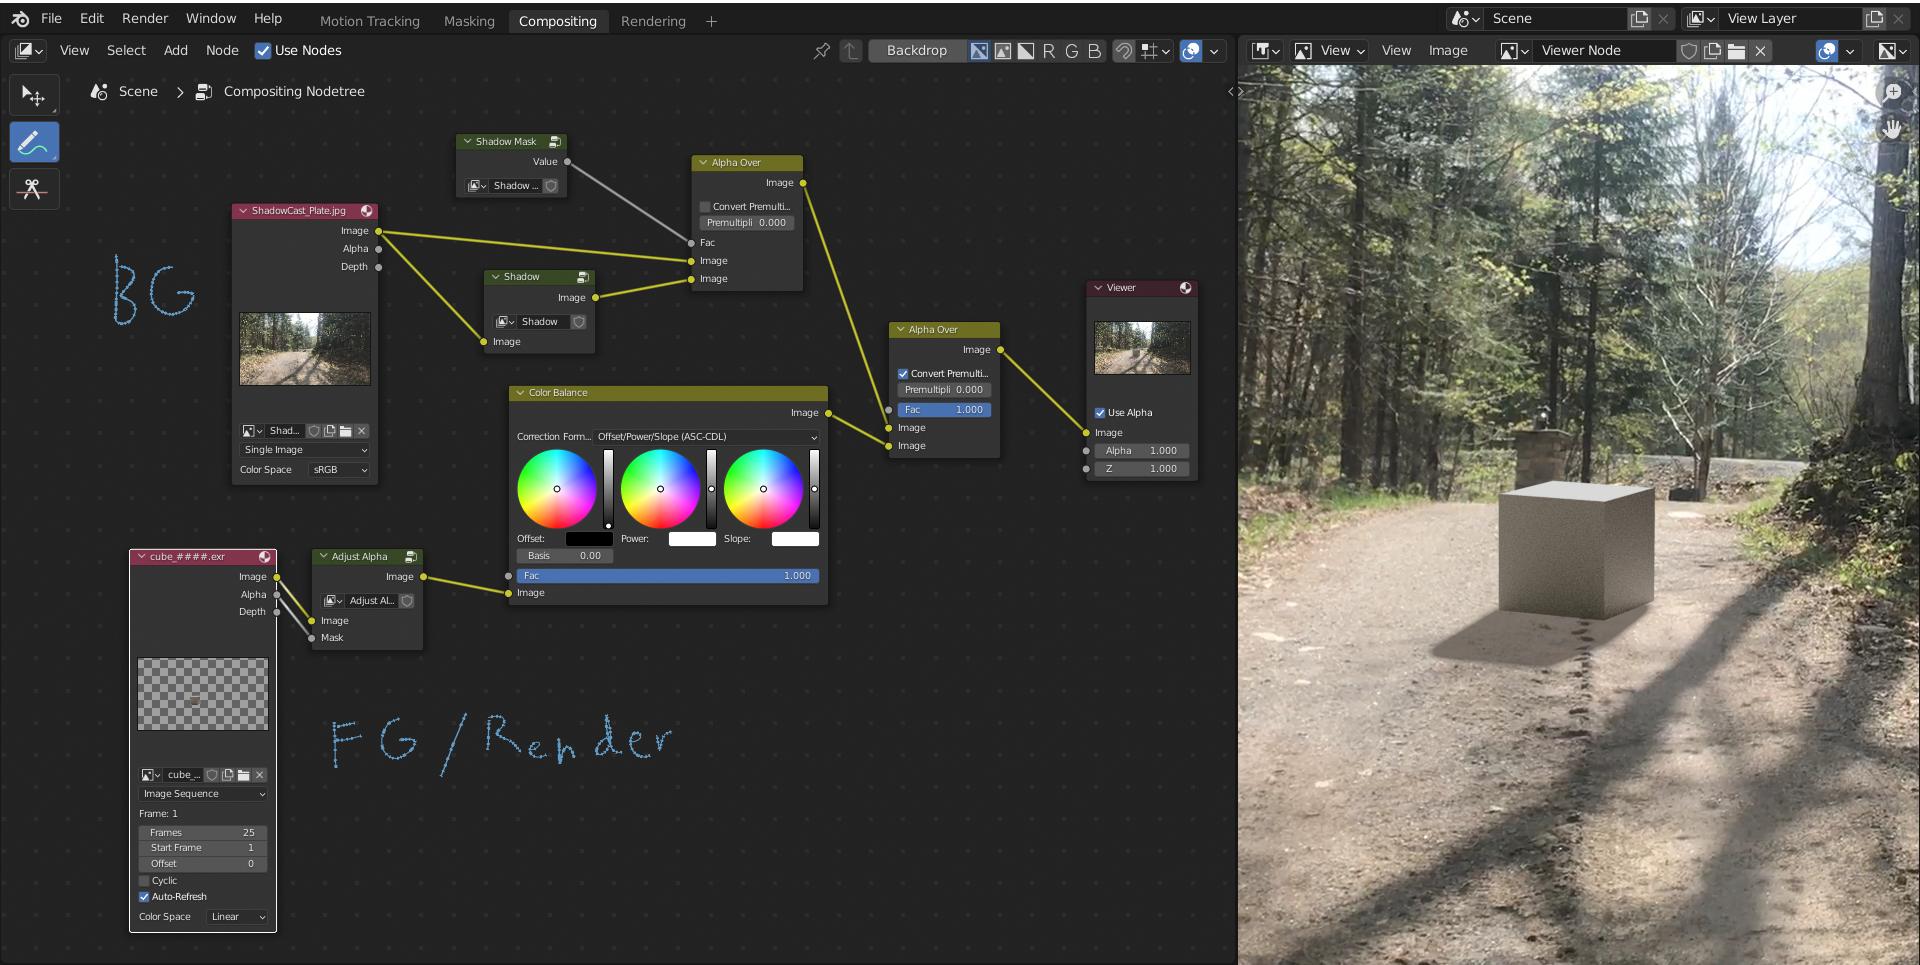
  4. Do color matching so the render's color range matches your background. Determine what in your render should be "white" and "black" compared to your background image/video's color space. I recommend using the color balance node with the mode "Offset/Power/Slope (ASC-CDL)" as it doesn't assume your image's color space. There are some nodes that assume a 0-1 color space (some of the blend modes of RGB mix node, for example), so keep that in mind when compositing.
  5. Merge your layers together via Alpha Over, setting Premultiply when necessary.

Blender seems to encourage to keep it all in at least separate scenes, if not separate files (similar logic when integrating a 3D scene into the video editor). So keep your main 3D scene in Filmic or whatever you need the render's space to be in, and then composite it separately so you can keep the color space.

Edit: an example was requested, examples files courtesy of Compositing Academy. The color grading is already in the files, but I added the Color Balance node for reference. I grouped/hid the non-relevant nodes.

Foreground and Background mixed with alpha over

$\endgroup$
6
  • $\begingroup$ Super - this is beginning to look exactly like what I wanted to know. Sorry to be a bit slow but this bit in step 3 stumps me... "In the compositor, you can set the color space for each individual file". So you're saying I can have two Movie Clip nodes (one for my original footage and one for my rendered frames) and specify different color spaces for each? I don't immediately see how to do this. I suspect I've misunderstood - could you include an example screenshot of the minimal set of nodes involved? Apologies for asking for yet more detail after you're already long answer. $\endgroup$ Commented Jan 13, 2022 at 18:54
  • $\begingroup$ It seems to me that one could set View Transform to Filmic but then render it out to PNGs or whatever and at that point choose to bake in the sRGB color space (or whatever the color space was used in my video footage)? Then when I pull in those rendered-out frames again in the compositor, my original footage frames and rendered frames will be in the same color space. But you seem to be suggesting something else in step 3 - "in the compositor, you can set the color space for each individual file" - but I don't see how one does this setting of color spaces? $\endgroup$ Commented Jan 14, 2022 at 8:46
  • $\begingroup$ Or is it simply that I can use Movie Clip nodes each with its own color space and Blender will combine those together into the color space of the current scene? In which case, there's no active setting of the "color spaces for each individual file" on my part. Sorry if I've completely misunderstood. $\endgroup$ Commented Jan 14, 2022 at 8:50
  • 2
    $\begingroup$ Oops, I realized that movie nodes don't have the color space option - I was looking at the image and image sequence nodes that do. But the latter has an option for movie files. Updated my answer. $\endgroup$ Commented Jan 14, 2022 at 19:41
  • 1
    $\begingroup$ Super - thanks for the nodes screenshot. $\endgroup$ Commented Jan 17, 2022 at 18:04

You must log in to answer this question.

Not the answer you're looking for? Browse other questions tagged .