10
$\begingroup$

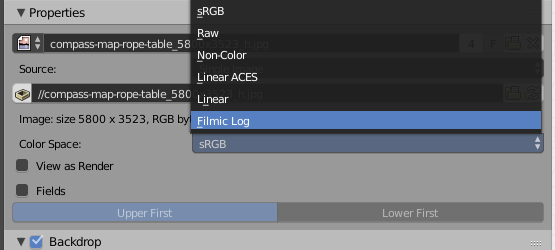
I want to compose 3D-model over image, and I use filmic to get more suitable result. But I want the background image to remain in the original colors. So I try to use this setting:

enter image description here

but it haven't setting "look" ("high contrast", "low contrast", ets..) here, so color changes..

How to solve this?

Of course, I can save my render and compose it with jpg-image in different place - no problem here, but my question is about how to make it in place. It will give ability to control colors in filmic color space and see the results immediately.

UPD: image is from image node:

enter image description here

UPD2:

you can't really convert a display referred image to the scene referred domain; the information has been permanently lost

Ok, but how to make the colors at the output looks close to the original?

UPD3:

This filmic version is from daily build.

$\endgroup$
7
  • $\begingroup$ That looks like you’re setting the color space for the image texture, not your scene. Your image is likely stored with sRGB color data. The option you’re look for is, not surprisingly, in the scene tab. $\endgroup$ Commented Jun 15, 2017 at 14:24
  • $\begingroup$ @LukasValine no, image is from image node, look at my update of question. $\endgroup$
    – Crantisz
    Commented Jun 15, 2017 at 14:27
  • 1
    $\begingroup$ A saved jpg will already have an applied color space. Interpreting sRGB color data through filmic will just distort the image. At least as I understand it. $\endgroup$ Commented Jun 15, 2017 at 14:34
  • $\begingroup$ You could render in one scene with Filmic enabled, and composite in another with Filmic disabled. $\endgroup$
    – Mentalist
    Commented Jun 16, 2017 at 3:39
  • 5
    $\begingroup$ As per the answer offered, you can't really convert a display referred image to the scene referred domain; the information has been permanently lost. Try to find scene referred sources. $\endgroup$
    – troy_s
    Commented Jun 16, 2017 at 11:53

4 Answers 4

4
$\begingroup$

Since Blender 3.3 :

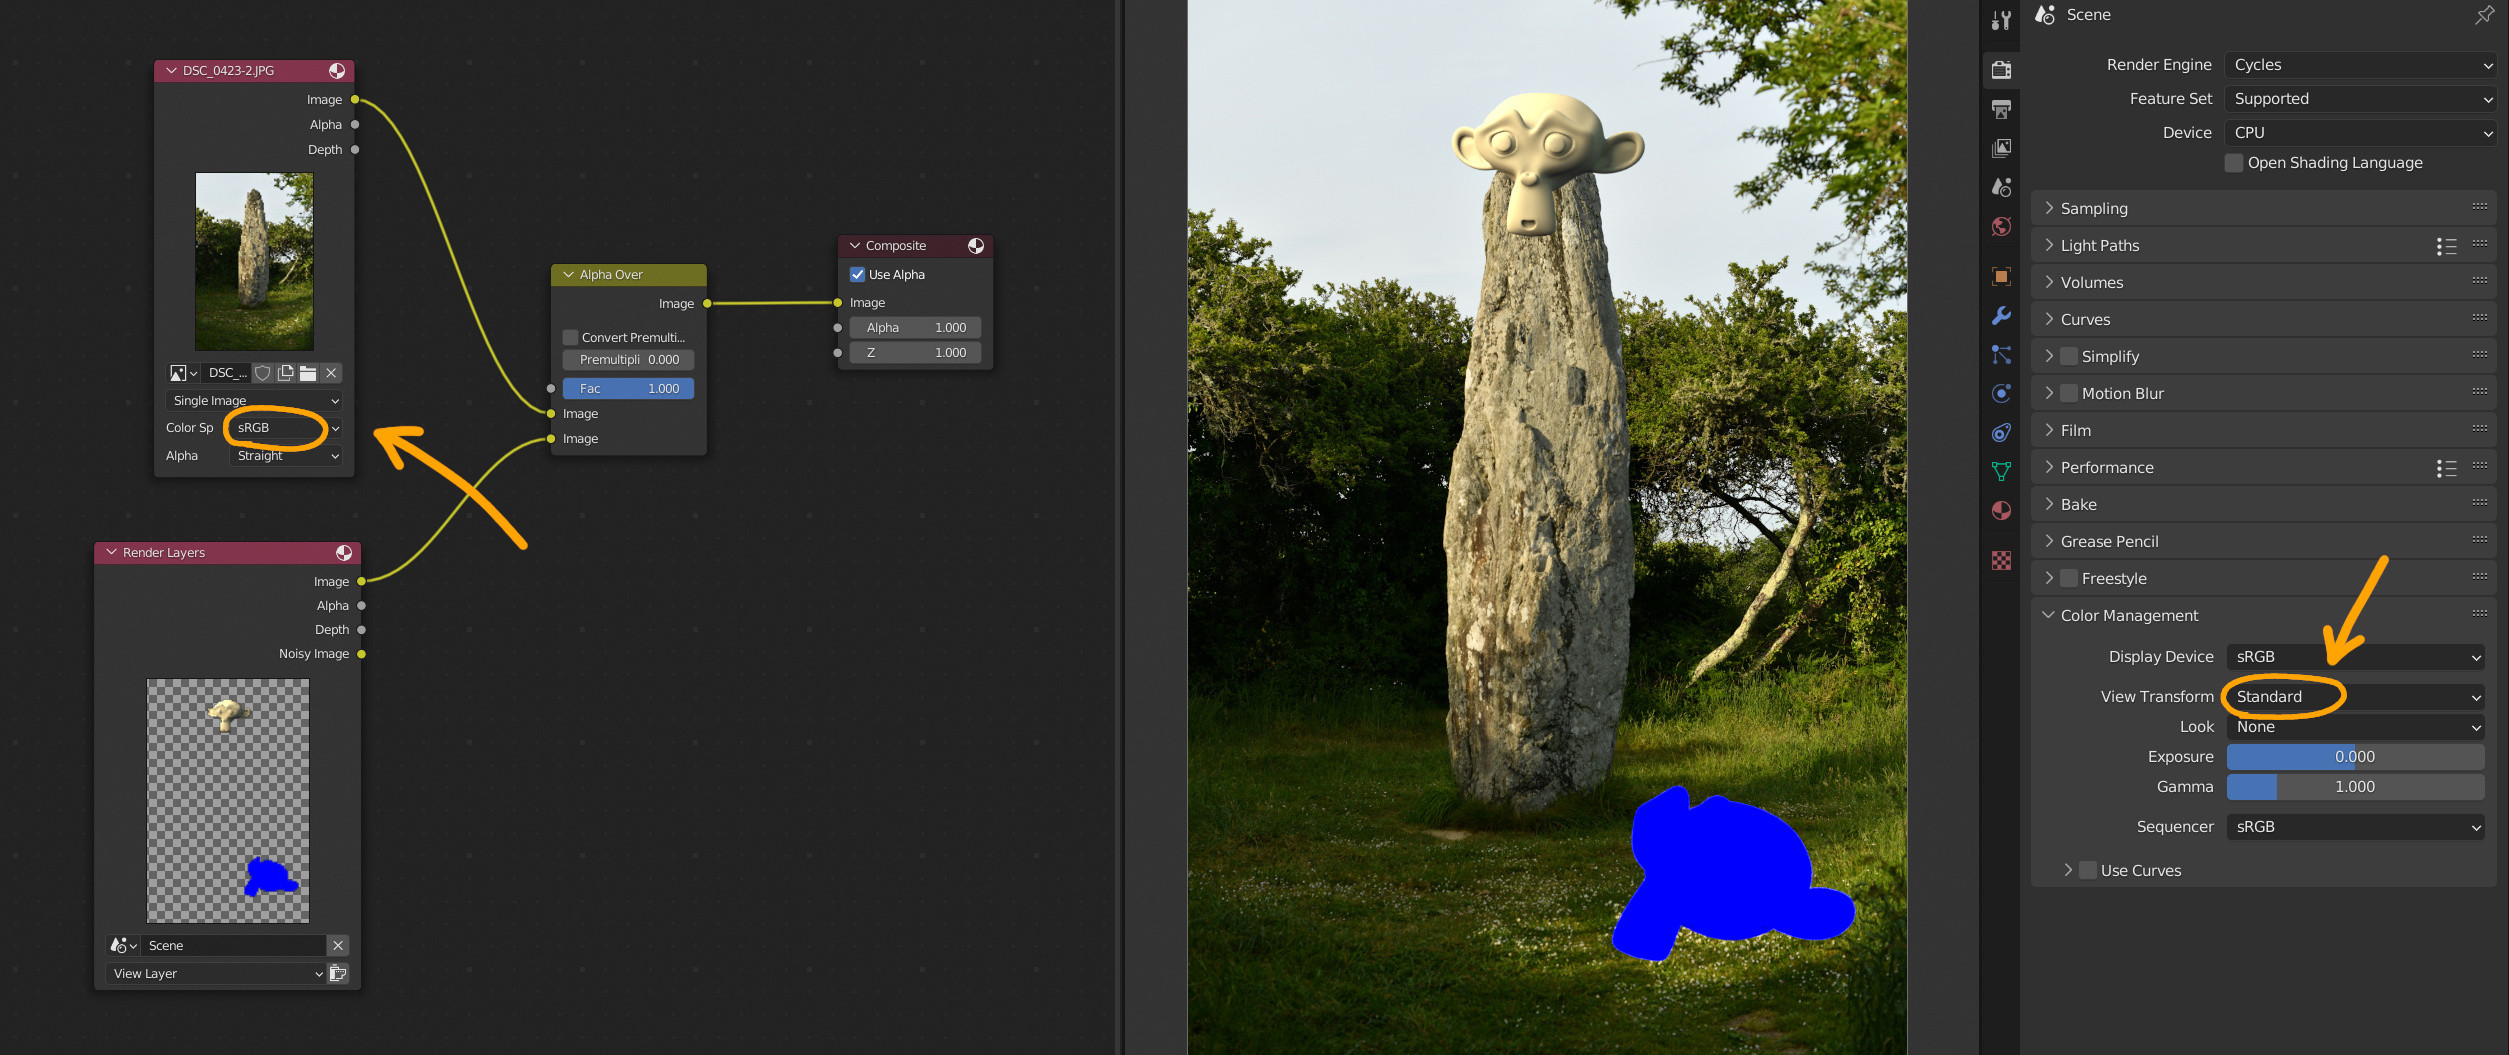
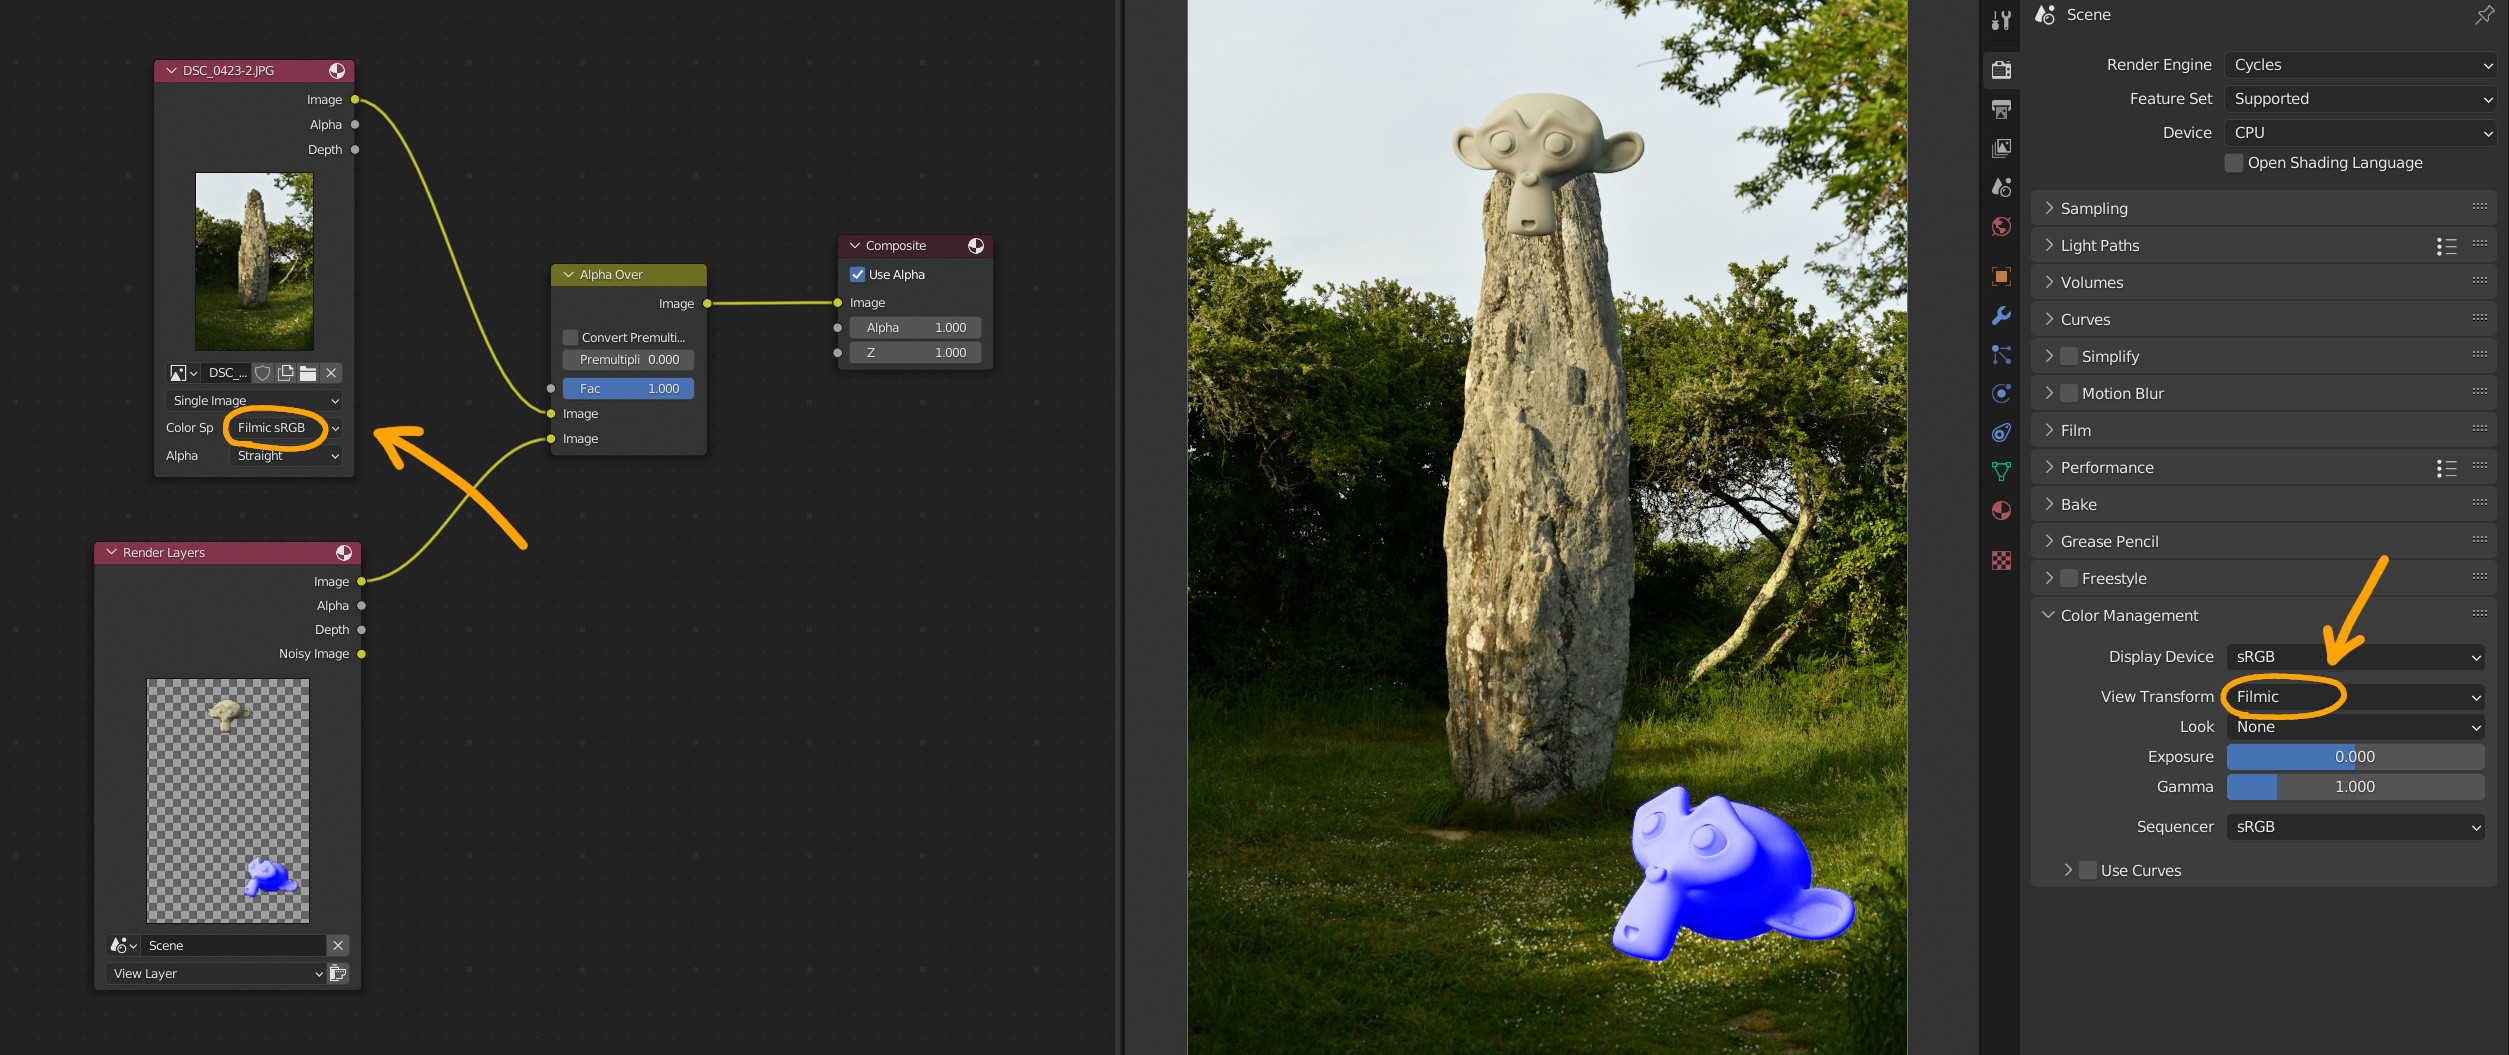
We now have a Filmic sRGB color space for image nodes so it's now possible to superimpose a Filmic 3D render to an sRGB image.

Here's a render with sRGB everywhere: sRGB render setup

And here it is with Filmic. Note how the background image is unaffected, yet the Suzanne heads clearly use Filmic (the blue one is here to demonstrate the desaturation of bright surfaces that Filmic applies): filmic render setup

Note:

This works for image nodes in both the compositor and the shader node editor, so you can get the composite render directly in the viewport.

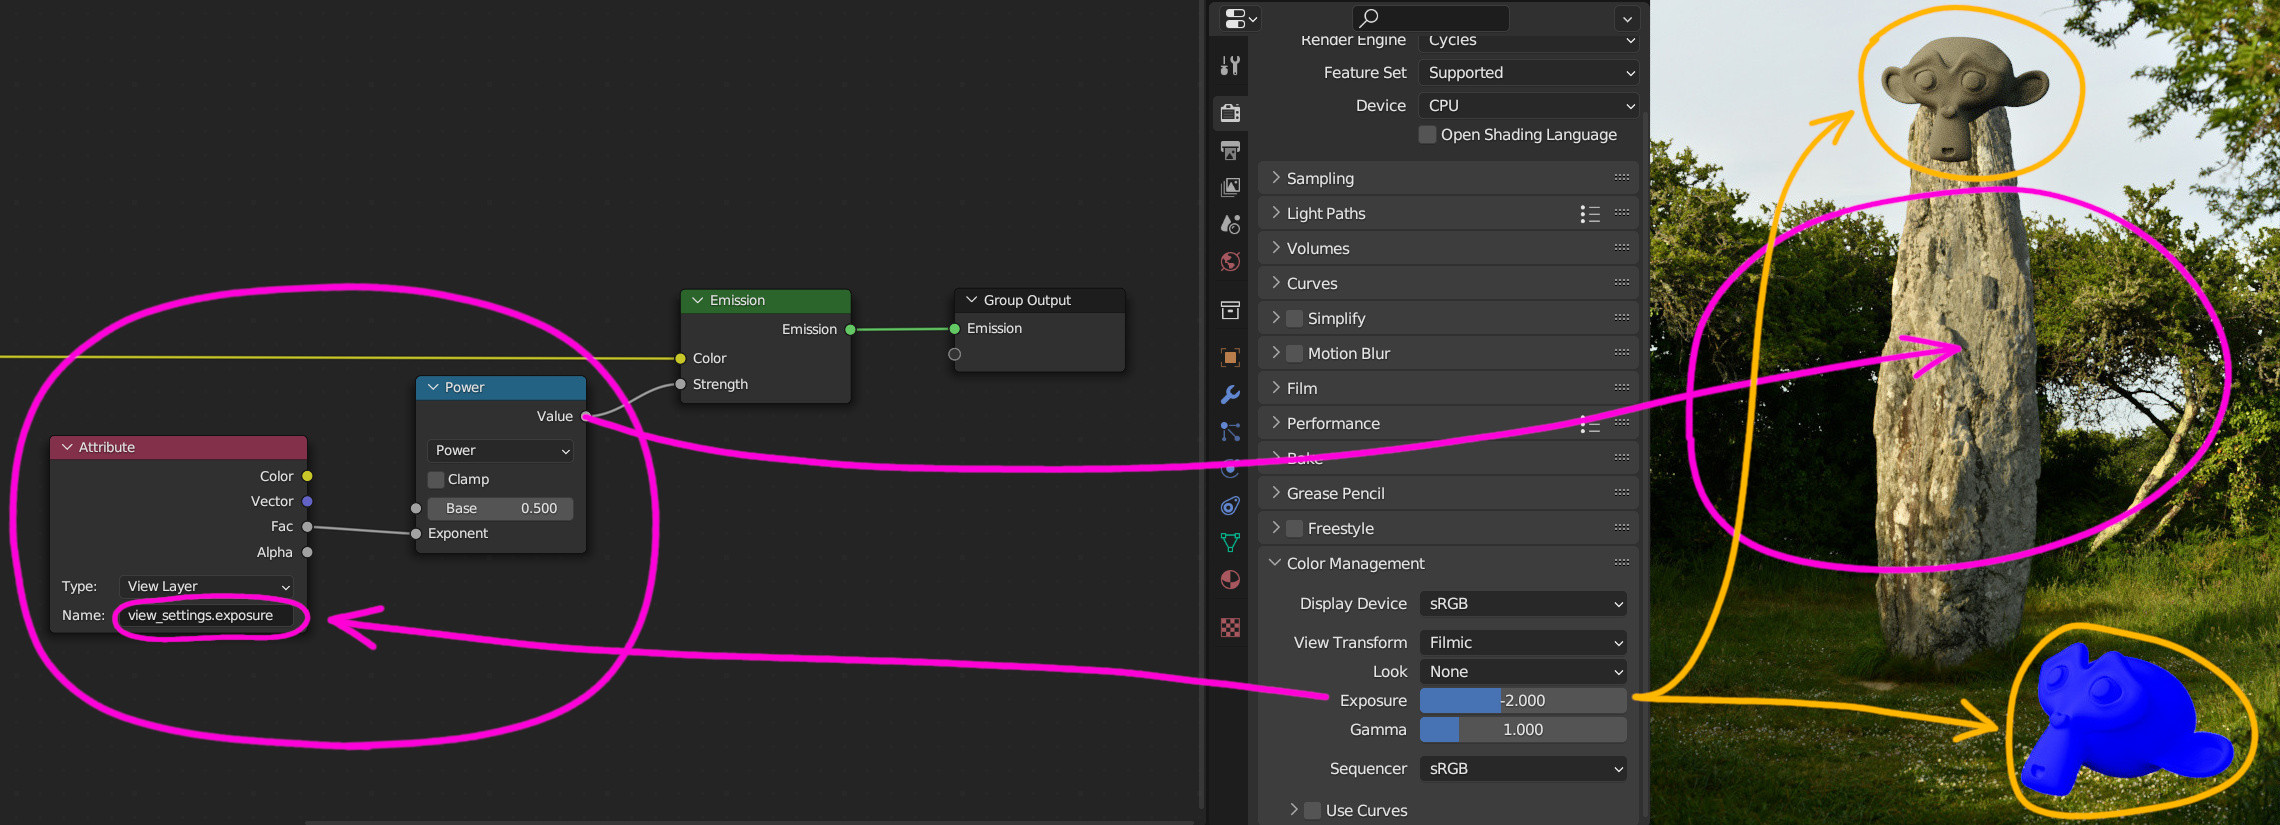
Also, since 3.4 :

If you change the exposure, you can keep the background image (or any emission shader) unaffected by the exposure change with this simple node setup : exposure compensation setup

$\endgroup$
3
  • 1
    $\begingroup$ I edited my answer because the Blender 3.3 release made it much simpler. $\endgroup$ Commented Sep 8, 2022 at 8:49
  • $\begingroup$ Thank you so much for explaining this with easy to understand images! $\endgroup$
    – 3pointedit
    Commented Aug 14, 2023 at 10:55
  • $\begingroup$ You're welcome. I just edited my answer again because since Blender 3.4, you can compensate the exposure without the need for a driver. $\endgroup$ Commented Sep 4, 2023 at 14:30
9
$\begingroup$

Some good information in the other answers, but I am not sure they specifically address your interchange needs.

So, to start, I would encourage every reader of this to use full or half EXR. That will preserve the image state, and all of the data.

If you can't use EXR, and need to store in a device referred / display referred format, you will require at least 10-12 bit depth at a minimum for a log encoded image. Given that DPX support in Blender is horrifically broken, I would encourage you to choose 16 bit TIFF, and save with "Filmic Log Encoding Base", and no contrast curve.

You are welcome to preview the work using the curve, but if you intend to save the image for further work and manipulation, and you are unable to utilise half float (16 bit) or full float (32 bit) EXRs, a pure Filmic log encoded 16 bit TIFF will preserve a majority of the data for further manipulation. Remember that one cannot save a log encoded image at 8 bits per channel and recover scene referred values adequately.

When loading the images within Blender, select "Filmic Log Encoding Base" for your TIFF images at 16 bits per channel. This will assert that the imagery is transferred back to the scene referred domain correctly. For EXRs, the default "Linear" is correct.

Hope this helps.

PS: Heed the advice and download Filmic from the official GitHub. If you see ACES in there, it is wrong.

$\endgroup$
6
+50
$\begingroup$

I'll try to answer simply but even for me it's not. But what you try to do isn't possible. (see the edit 1 for the answer of your problem)

1st, prerequisites:
In our world light is linear, but we didn't see it linear, the eyes make it looks with more contrast (what we can call a transfer curve).
Your display (let's say a computer screen) have it's own transfer curve (for technical historical reason), so to see a picture close to what we see in real life (a linear light interpret non linear by the eyes) we need to bake a transfer curve "inverse" of the display one to bring the image a linear signal to the eyes.
At this stage it's a bit confusing, let's make it simple:

Real life: Linear light --> non linear interpretation by the eyes

sRGB image: non linear (transfer curve of sRGB) --> linear ("inverse" transfer curve by the screen) --> non linear interpretation by the eyes.

CG: Scene referred linear image (what Cycles calculate internally)--> non linear (ex: filmic+high contrast transfer curve) --> linear ("inverse" transfer curve by the screen) --> non linear interpretation by the eyes.

It's a bit simplified but what's important to understand here is that the eyes need to recieve a linear image, like in real life eyes recieve linear light but we don't see it linear.
One more important things is that each of the above have their own transfer curves (eyes, screen, filmic, sRGB, APN, smartphone... they are all different).


If you set up a color space to filmic for an image in 8bits sRGB .jpg that you don't know how it was manipulated, you try to see informations that were lost in the compression + you're mixing transfer curves.

You must look filmic in two parts.
1st, the filmic itself, that is a LUT which compress values to be in 0/1 range in a logarithmic way (transfer curve). So, the end result is a nonlinear image.
2nd, the contrast looks which modify the transfer curve shape.
There is one more caracteristic with filmic, the desaturation of the high value colors.

I'll see if I've made mistakes or forgot something in what I've said, and will correct them if it's the case. Don't hesitate to tell me if I'm wrong or need more informations.


Edit 1: Sorry I've understand a bit more your problem and have more infos.

When you try to compose your image with your final render you need to remember that filmic in the color management is aim for linear scene referred images and is applied at the very end of the chain, so your image that is composed with the linear render will have filmic conversion too. But your image is an 8bits sRGB .jpg and must be threat as a sRGB EOTF.

What you need to do is save your render with filmic and all compositing but without the background, and after that compose your render with the background image both in sRGB for image colorspace and color management view in sRGB, no more color transformation at this stage since you are in 8bits.

This is the problem when you work with both linear scene referred data and display non linear data.

Hope I've all understood this time.

$\endgroup$
5
  • $\begingroup$ Of course, I can save my render and compose it with jpg-image in different place - no problem here, but my question is about how to make it in place. It will give ability to control colors in filmic color space and see the results immediately. $\endgroup$
    – Crantisz
    Commented Jun 25, 2017 at 22:17
  • 1
    $\begingroup$ So report to my first answer, it's not possible. Remember Filmic is applied at the end of the process, after all the compositing nodes. So, what you try to do is, compose and match 2 images with different color spaces by applying the same transformation on both. It's black magic. To change a color space you need a lut, and a 16bits image minimum which you know the original transfer curve, you couldn't do it via nodes. Sorry there is no other solution if you only have an 8bits display referred .jpg $\endgroup$
    – Mareck
    Commented Jun 25, 2017 at 23:57
  • $\begingroup$ @Crantisz the problem is that blender does not have a way to create separate paths to work with different color transforms. All output is passed through the transforms set in the Color Management settings. A set of OCIO nodes would be necessary to be able to combine sources from different color spaces together.. or at least some form of node to set LUTs, Blender does not have such tools (other compositing apps do, like Natron, Fusion or Nuke...) So your best bet is to render and save using log encoding, and combine later either in blender's compositor or using some other compositing app. $\endgroup$
    – user1853
    Commented Jun 26, 2017 at 1:58
  • $\begingroup$ That's why I whant to convert jpg sRGB to filmic, instead of using different color spaces in same scene. I can't understand, why is it impossible? I can convert from RGB to YUV or CMYK and backwards with some loss of color information, why I can't convert from sRGB to filmic same way? And if the settling that I showed in post doesn't do this, what does it do? $\endgroup$
    – Crantisz
    Commented Jun 26, 2017 at 5:20
  • $\begingroup$ @cegaton it would be nice to have such tool in Blender, unfortunately it's not the way Blender takes, in the 2.79 there isn't the possibility to save an image in filmic log encoding without look contrast. I reported it as a bug but it's intentional. Crantisz looks like it's the time for you to go deeper in the topic of color spaces, color management... First try to understand what is 8bits/16/32, why 8 bits is a format that can't be modified anymore: blender.stackexchange.com/questions/46825/… $\endgroup$
    – Mareck
    Commented Jun 26, 2017 at 18:53
3
$\begingroup$

You seem to have an older version of the Filmic LUTs. You can update those from the github page - https://github.com/sobotka/filmic-blender

That won't resolve the conflict however. The Filmic LUTs will linearise the render data, but the image is (probably) sRGB with a 2.2 gamma curve.

To match the render you should composite with a similarly linear image. If you made the photograph you can do that relatively easily. If not it will be difficult to match the wide dynamic range of the render(scene referred data) with the non linear, clamped 0 - 1 sRGB image (display referred data).

Do keep in mind though, when compositing with the linear data (image and render) you will be able to work with all the advantages of the Filmic LUTs, so your final image may still look a little different.

$\endgroup$

You must log in to answer this question.

Not the answer you're looking for? Browse other questions tagged .