1
$\begingroup$

This will be my first post on here since this is my first time using Blender. I honestly just got into it because I wanted to convert a piece of clothing from one game to another. I did find other threads on similair topics, but they all seemed to be talking about much simpler meshes than this one.

I've gotten as far as to load the right mesh in with an object (a human body in this case) to get around. I've run into a few issues.

  1. It is just a hassle to pull out all the vertices out one by one, and it tends to create unevenness since it all depnds on me being acurate enough with my mouse
  2. Even after pulling out the vertices properly around a certain area, it still leaves some of the lines in between to got through the object. I do not know how I could round out those lines so they will fit around the object properly.Otherwise I'm forced to pull the vertices out so far that the clothing looks blocky and bloated.

I figured an easy solution would be if there was some kind of option that just said "fit this mesh around this object as best you can" but I suppose that it will not be that simple. I would be open to any solutions you may have, so please help if you can.

Thanks in advance

EDIT:

$\endgroup$
3
  • 4
    $\begingroup$ You should probably add detail on what kind of meshes are you working with and what your desired result should look like. $\endgroup$
    – Lynx095
    Commented Jul 9 at 15:25
  • 1
    $\begingroup$ I am not certain tbh. A clothing mesh? It has six lines coming form each vertex. How can I tell what mesh it is exactly? $\endgroup$
    – user193093
    Commented Jul 9 at 15:41
  • 2
    $\begingroup$ As far as my desired result goes, I just want the clothing seen here to fit around the body in as fitting a way as possible. $\endgroup$
    – user193093
    Commented Jul 9 at 16:15

1 Answer 1

5
$\begingroup$

You can get pretty far by just using a shrinkwrap modifier, followed by a smooth mod. After that you'll need to fiddle with the frilly bits to get them to align with the form-fitting stuff, but that shouldn't be too hard.

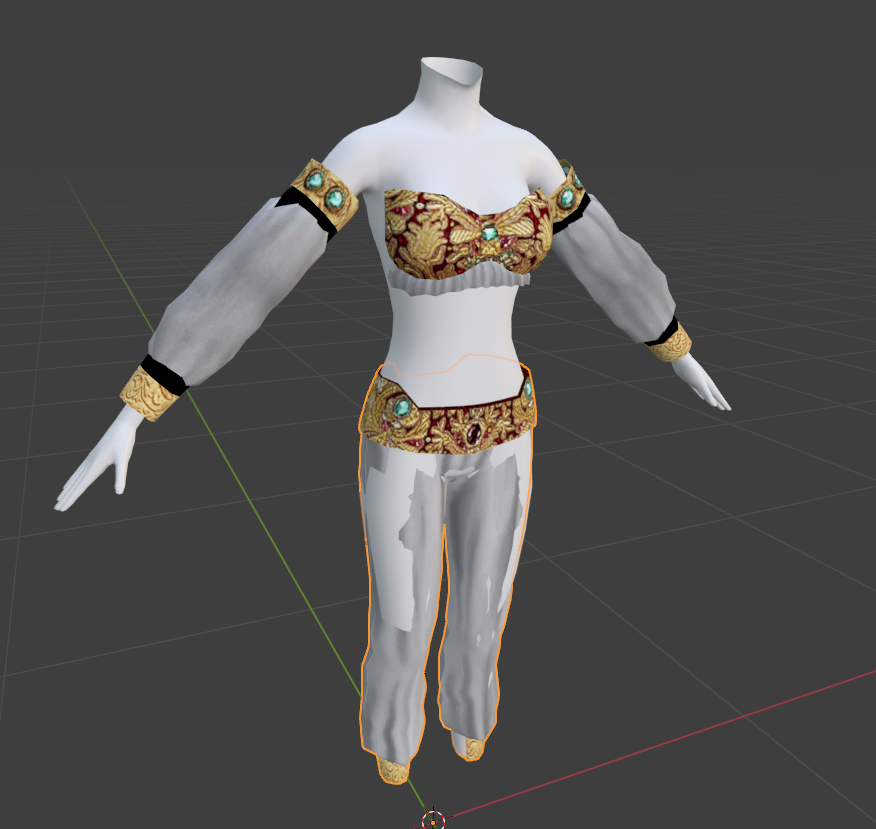
Before ill-fitting clothes

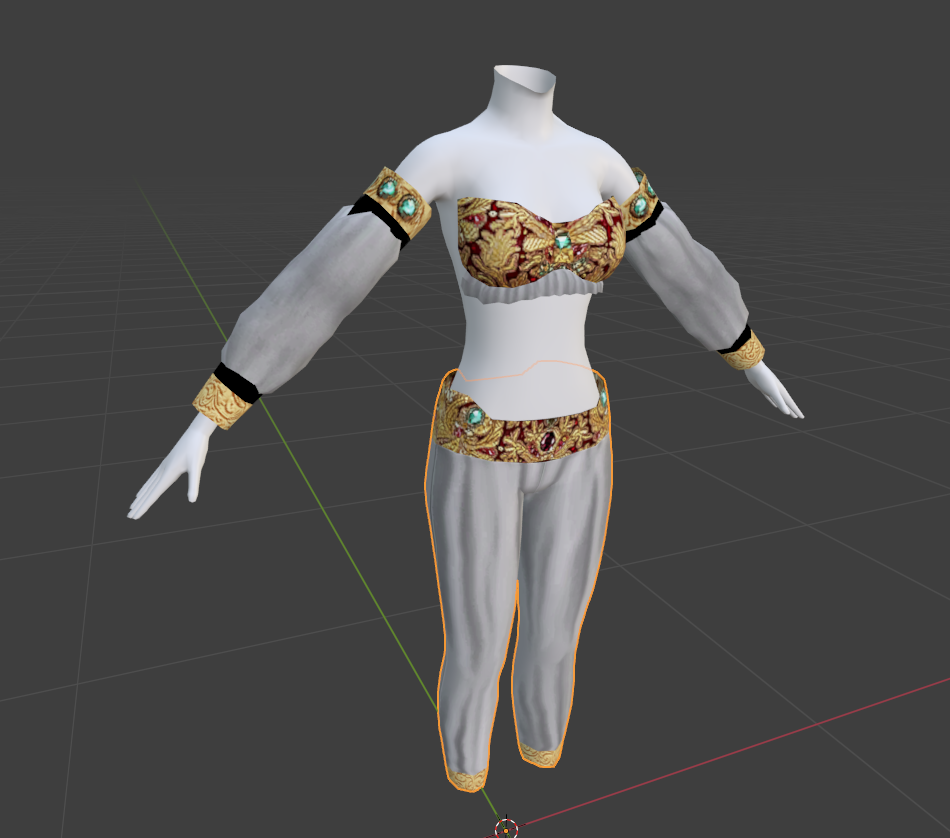
After better fitting clothes

I also put a Weld modifier in front of it all because the clothing pieces aren't "sewn" together. There is a way to actually do cloth sim "sewing" like you would in Marvelous Designer. Here's a quick primer on it if that's what you wanna do. Not strictly necessary tho.

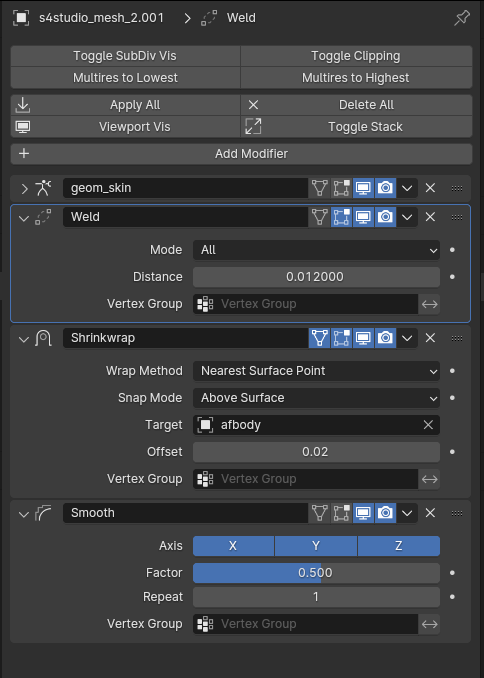
Modifier stack:

Weld, Shrinkwrap and Smooth Modifier stack

$\endgroup$
5
  • 2
    $\begingroup$ Wow, this helps a lot. I'm almost tempted to jus ask you for the result you made, but I do want to be able to replicate the process myself. Lol. Thanks for this. I guess that means I'll just need to learn how to use the modifiers. $\endgroup$
    – user193093
    Commented Jul 9 at 17:37
  • 1
    $\begingroup$ Awesome, if this works then make sure to accept the answer so the question gets removed from the "Unanswered Questions" tab. $\endgroup$
    – Jakemoyo
    Commented Jul 9 at 17:38
  • $\begingroup$ I will. I see though that you added a geom_skin modifier.. Is this relevant, because I can't find it in the default modifiers at least. $\endgroup$
    – user193093
    Commented Jul 9 at 17:45
  • $\begingroup$ That was there already when I downloaded your file. I think it's an armature modifier from the meshes having been rigged? Not sure tho. $\endgroup$
    – Jakemoyo
    Commented Jul 9 at 17:49
  • 1
    $\begingroup$ Oh really? Must be added by the blender sharer then somehow, because it isn't in my original file. I seem to also have trouble selecting the target for the shrinkwrap. I can't select af_body it seems.. EDIT: wait, I used the object to modify, that explains it. I can see the geom_skin here too $\endgroup$
    – user193093
    Commented Jul 9 at 17:54

You must log in to answer this question.

Not the answer you're looking for? Browse other questions tagged .