1
$\begingroup$

This is my character - I modeled, textured, and am now attempting to rig him. I previously knew Maya, but because of budget switched to blender. He is fully rigged using rigify, however because his eyebrows sit over his eyes - I'm not quite sure how to actually rig them for animation.

His holster is also confusing me. I did not attach it to the rig because I know as he twists his body it will get messed up - how do I avoid any stretching/pull in that area? I'm a beginner when it comes to blender's terminology, so please forgive my ignorance. In maya I could add clusters to the model to move pieces around that didn't work well with the rig. I cannot for the life of me figure out how to do this in Blender. I know there is a hook modifer, but I can't figure out how to get it to follow the rig. (was thinking about using hook modifiers for eyebrow manipulation).

I appreciate any help! If you have any links to videos that cover this - that would be awesome. I've been scouring the internet but I feel my particular situation might be unique enough to not be covered.

Thanks a bunch,

Em

$\endgroup$

1 Answer 1

0
$\begingroup$

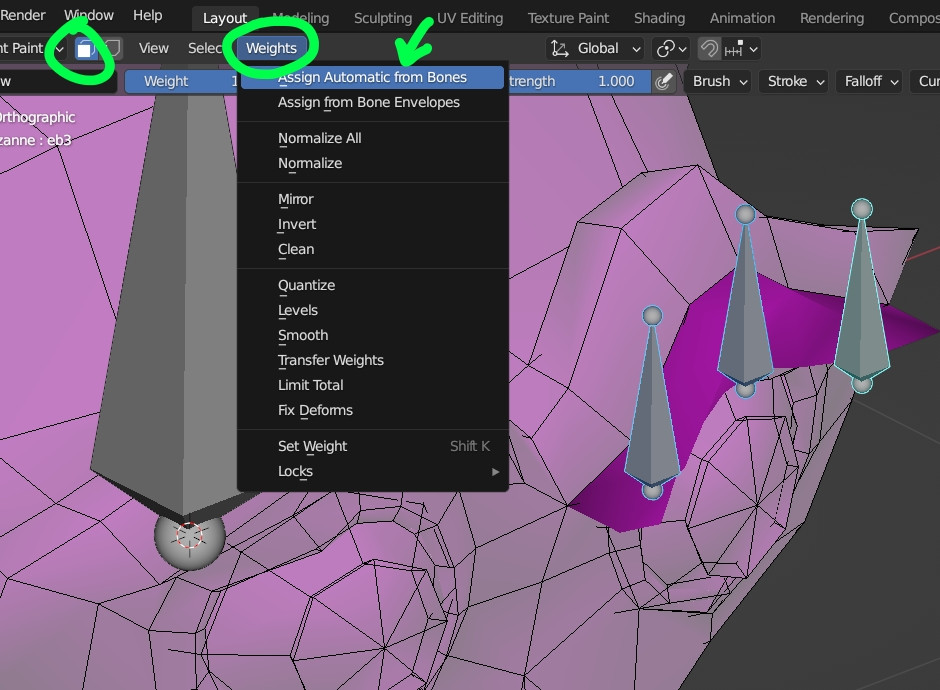
For the eyebrows you can create 3 bones that are parented to the head bone, keep them selected in Edit mode, switch to Object mode, select your object, in Edit mode select your eyebrow's faces, make sure that they have not been assigned to any vertex group, if they have remove them from any group, switch to Object mode, select your armature, shift select your object, switch to Weight Paint mode, enable the Paint Mask option, then go into the Weights panel and Assign Automatic from Bones:

enter image description here

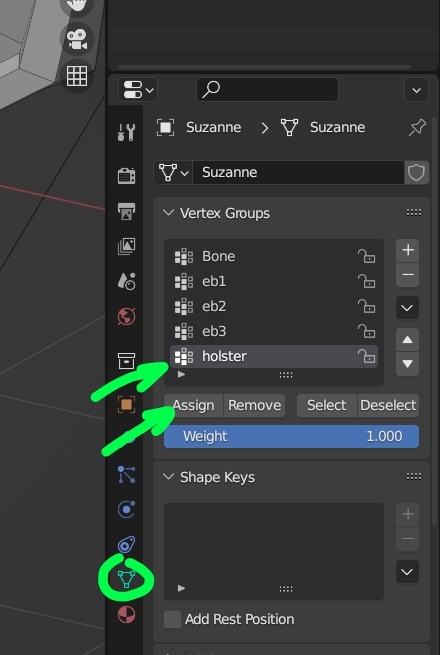
For the holster, create a bone that will be the controller of the holster, give it a name (like Holster) parent this bone to the first spine bone (or to any other adequat bone), select the vertices of the holster, make sure that they have not been assigned to any vertex group, in the Object Data panel > Vertex Groups list, create a new vertex group that has the same name as the bone (Holster) and click on Assign:

enter image description here

$\endgroup$
4
  • $\begingroup$ After changing to the paint weight option and enabling paint mask, the option to Assign Automatic Weights with Bones is grayed out. $\endgroup$
    – NewArrival
    Commented Mar 15, 2023 at 19:32
  • $\begingroup$ Could you please share your file? $\endgroup$
    – moonboots
    Commented Mar 15, 2023 at 19:43
  • $\begingroup$ I got it to work - sorry. I reversed the parenting - how silly. Appreciate your help Moonboots! $\endgroup$
    – NewArrival
    Commented Mar 15, 2023 at 19:53
  • $\begingroup$ Oh ok great ;) ... $\endgroup$
    – moonboots
    Commented Mar 15, 2023 at 20:01

You must log in to answer this question.

Not the answer you're looking for? Browse other questions tagged .