6
$\begingroup$

Hello blender community.

Could someone please let me know how to fix this issue? I have one material for the whole face and a different one for the lips. there's a noticeable edge that I want to get rid of. I just want it to have an ease fade instead of a sharp edge.

what's the best way to go about this?
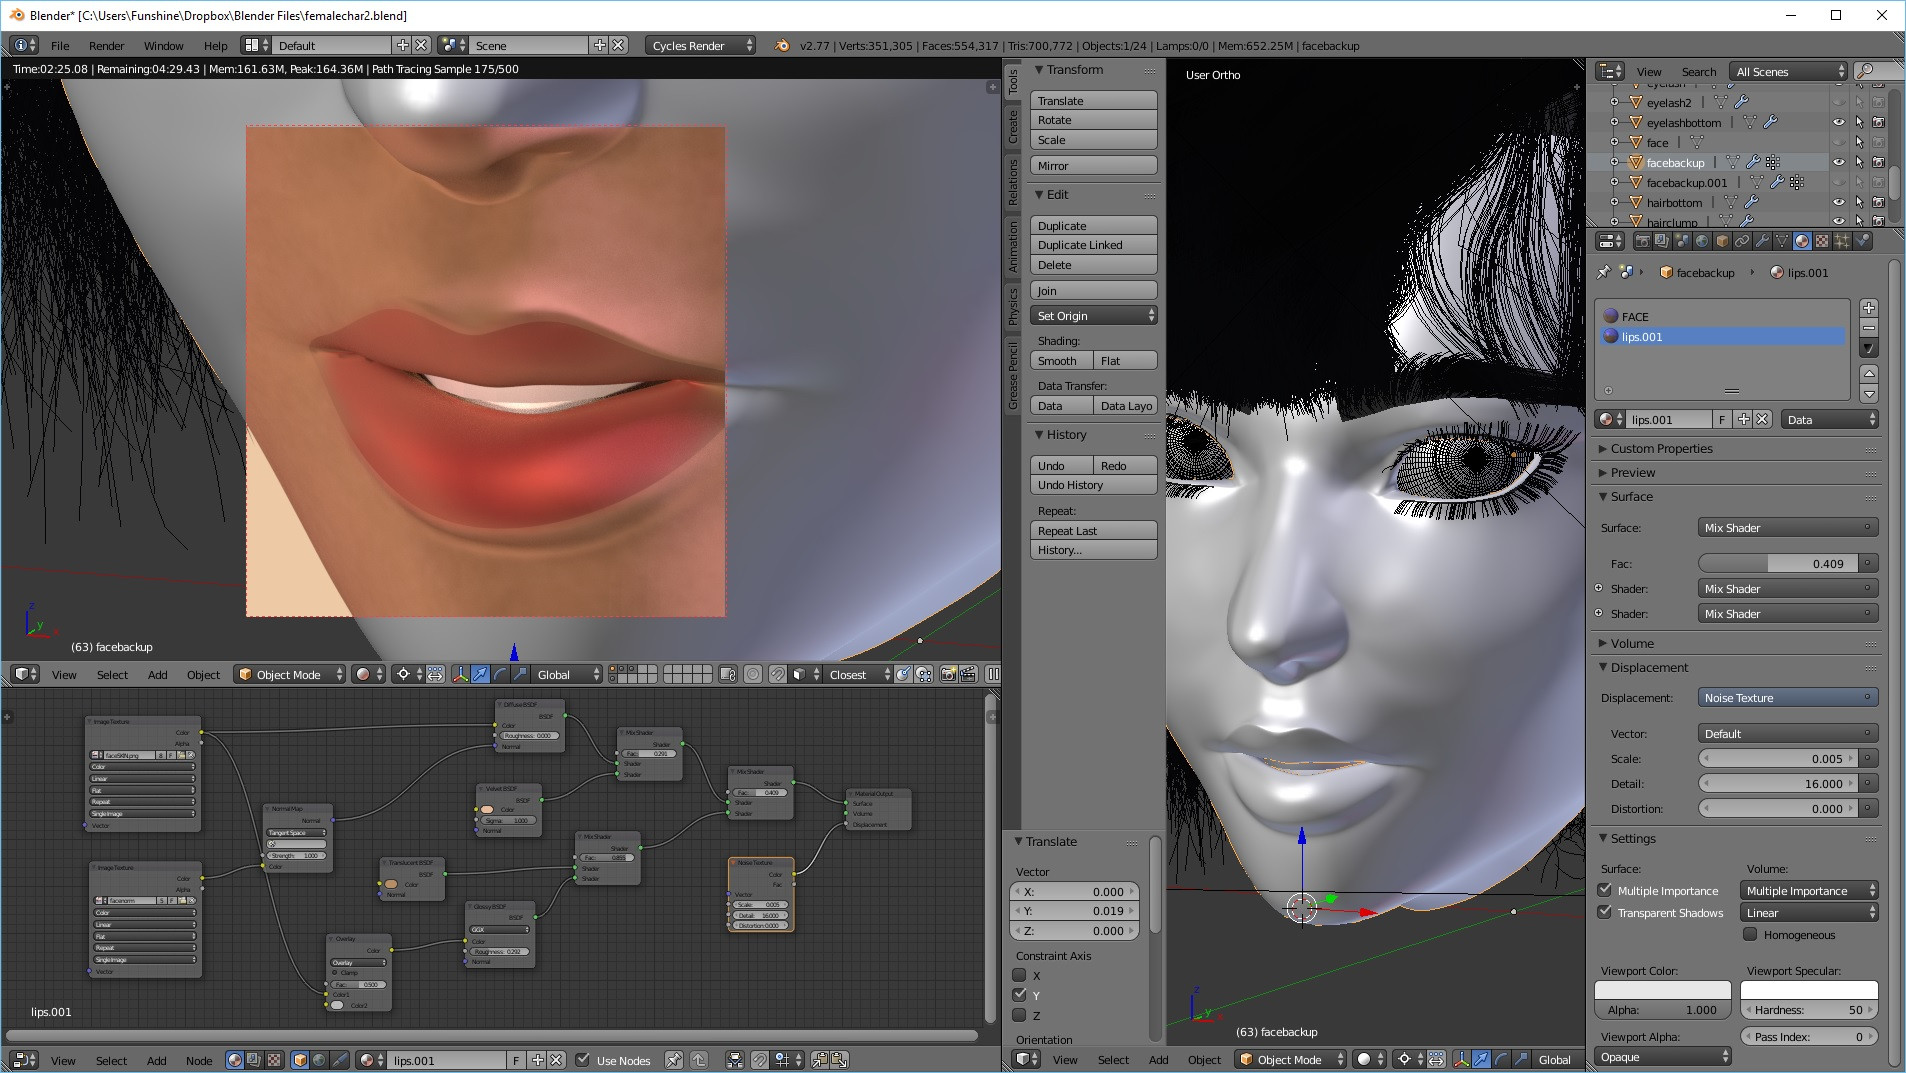
enter image description here Thank you in advance!


Finished Update

I wanted to give an update on how it was fixed with @hexbob6 and @Lemon 's help.

figured out how to do the fade material technique and here's how

I needed two textures. One is the actual colored version and the 2nd is the black and white masked version. Hexbob6 described very well on the process here: Cycles Emit Light from area on Texture

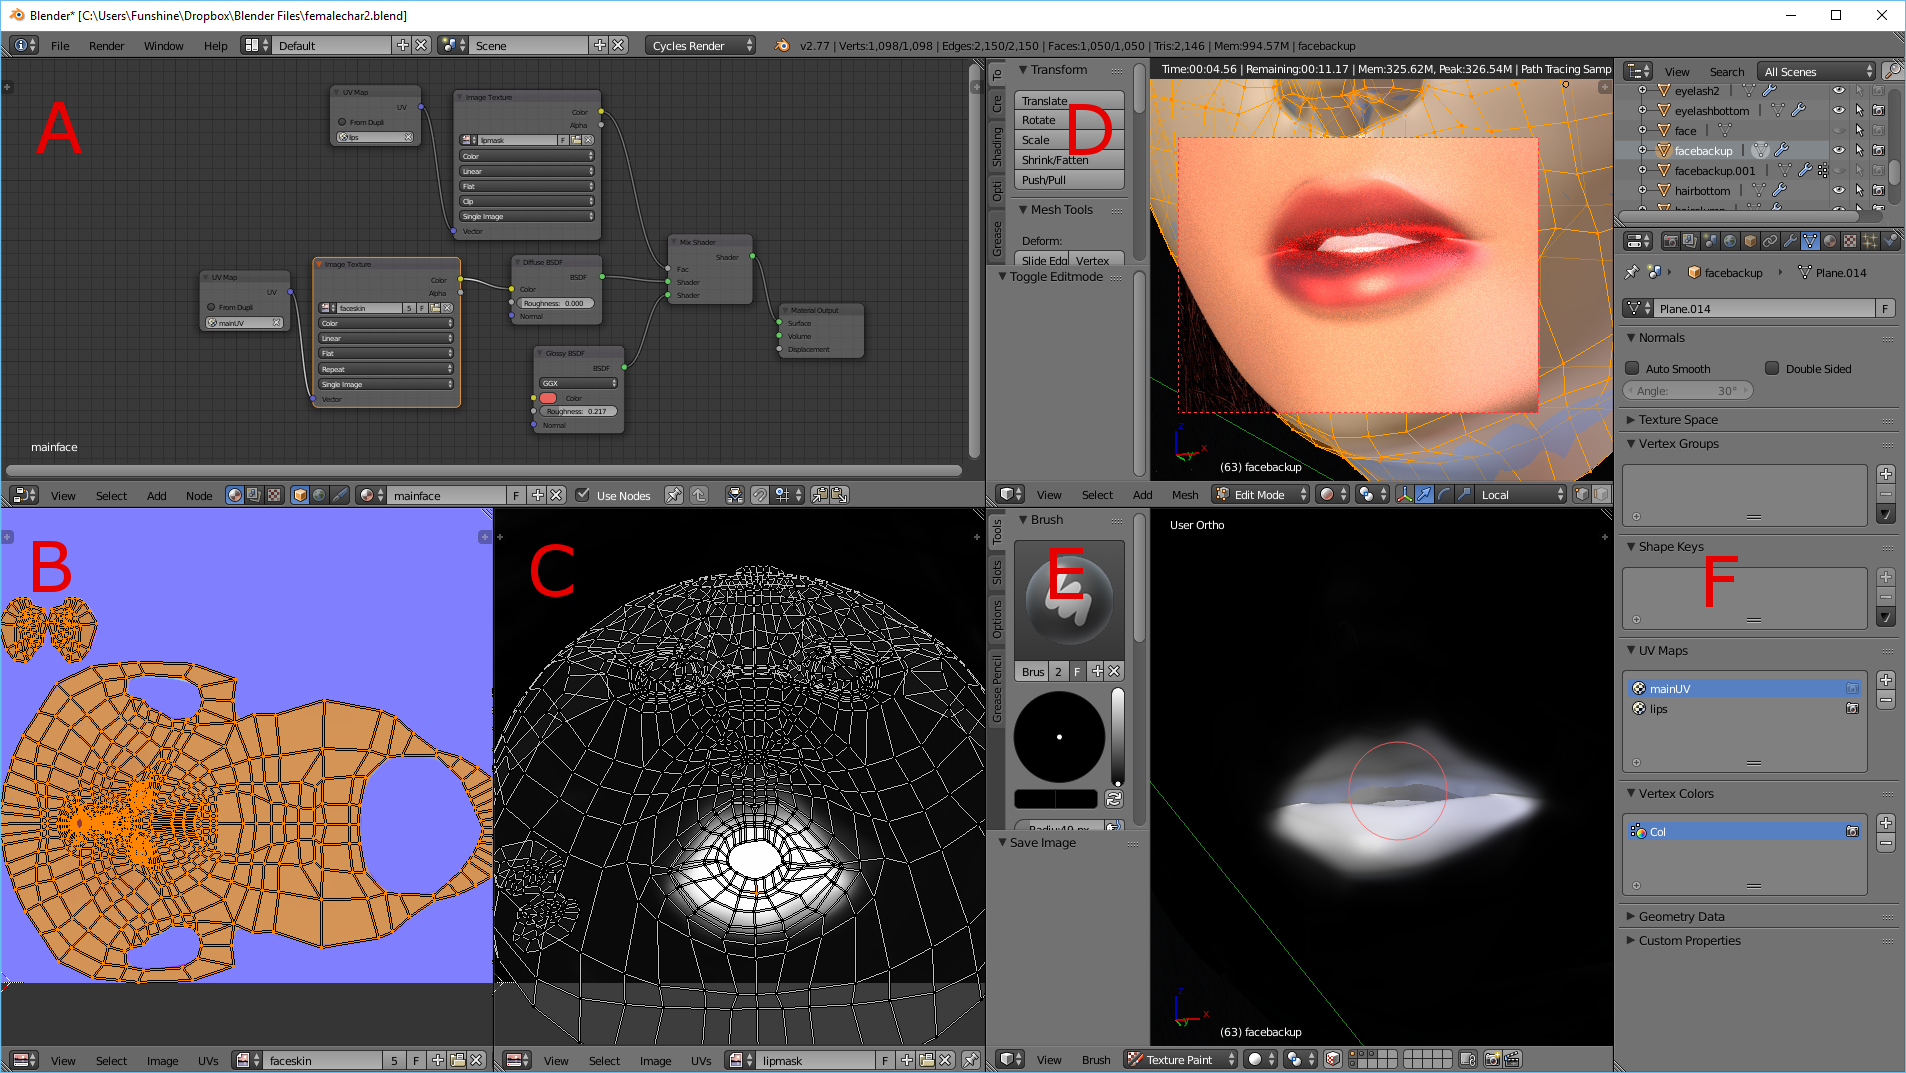
A: The node process on how to do it.

  1. The B/W masked texture is going to be connected to the Fac of the mixed shader along with its UV coordinates. Make sure the image is on clip instead of repeat.
  2. the 1st shader is going to be the black part of the B/W masked texture. An important thing to note is if you have a texture already for the object, be sure to connect the other UV coordinates!
  3. the 2nd shader will be the white part of the B/W masked texture.

B: This section is the UV layout called "mainUV" where all the color goes.

C: This section is the B/W masked texture to focus on the lips.

D: Just the render view

E: Best way to texture something is to be able to see it in 3D view and texture paint.

F: Just showing that there are two textures to keep track of. One is the main UV and the 2nd is to focus on the lip.

That was it. Once again thanks to those who replied and helped me figure this problem. In the process I learned other things that I didn't know about blender even though I've been using it for years.

$\endgroup$
3
  • 1
    $\begingroup$ I'm guessing you've assigned the lips material to a selection of vertices on the mesh. It make be better to use a painted texture mask to achieve what you're asking? Basically a B/W mask that determines if a part of the mesh is one shader(s) or another by being plugged into the Fac input of a Mix shader... blender.stackexchange.com/questions/33101/… might be relevant? :) $\endgroup$
    – Hexbob6
    Commented Jun 18, 2016 at 2:54
  • $\begingroup$ Hello Hexbob6. Thank you for the tip. I tried both of the replies on the link but unfortunately that's not what I'm looking for. I just want the glossy material to fade to the background material instead of a sharp edge. The link is very useful and will use for future use. Thanks again for your reply. $\endgroup$ Commented Jun 18, 2016 at 3:32
  • 1
    $\begingroup$ No worries PepperAddict, glad you got it solved- the final update is looking really nice! :) $\endgroup$
    – Hexbob6
    Commented Jun 19, 2016 at 23:28

1 Answer 1

6
$\begingroup$

A mesh face cannot be assigned to several materials. So you'll need to "incorporate" one of the material nodes into the other.

For convenience I have set face nodes/shader and lip nodes/shader each in a dedicated nodes group. That allows to use them both in your face or lips original materials. Doing so, imagine that 'as if' these nodes groups were replacing your initial materials.

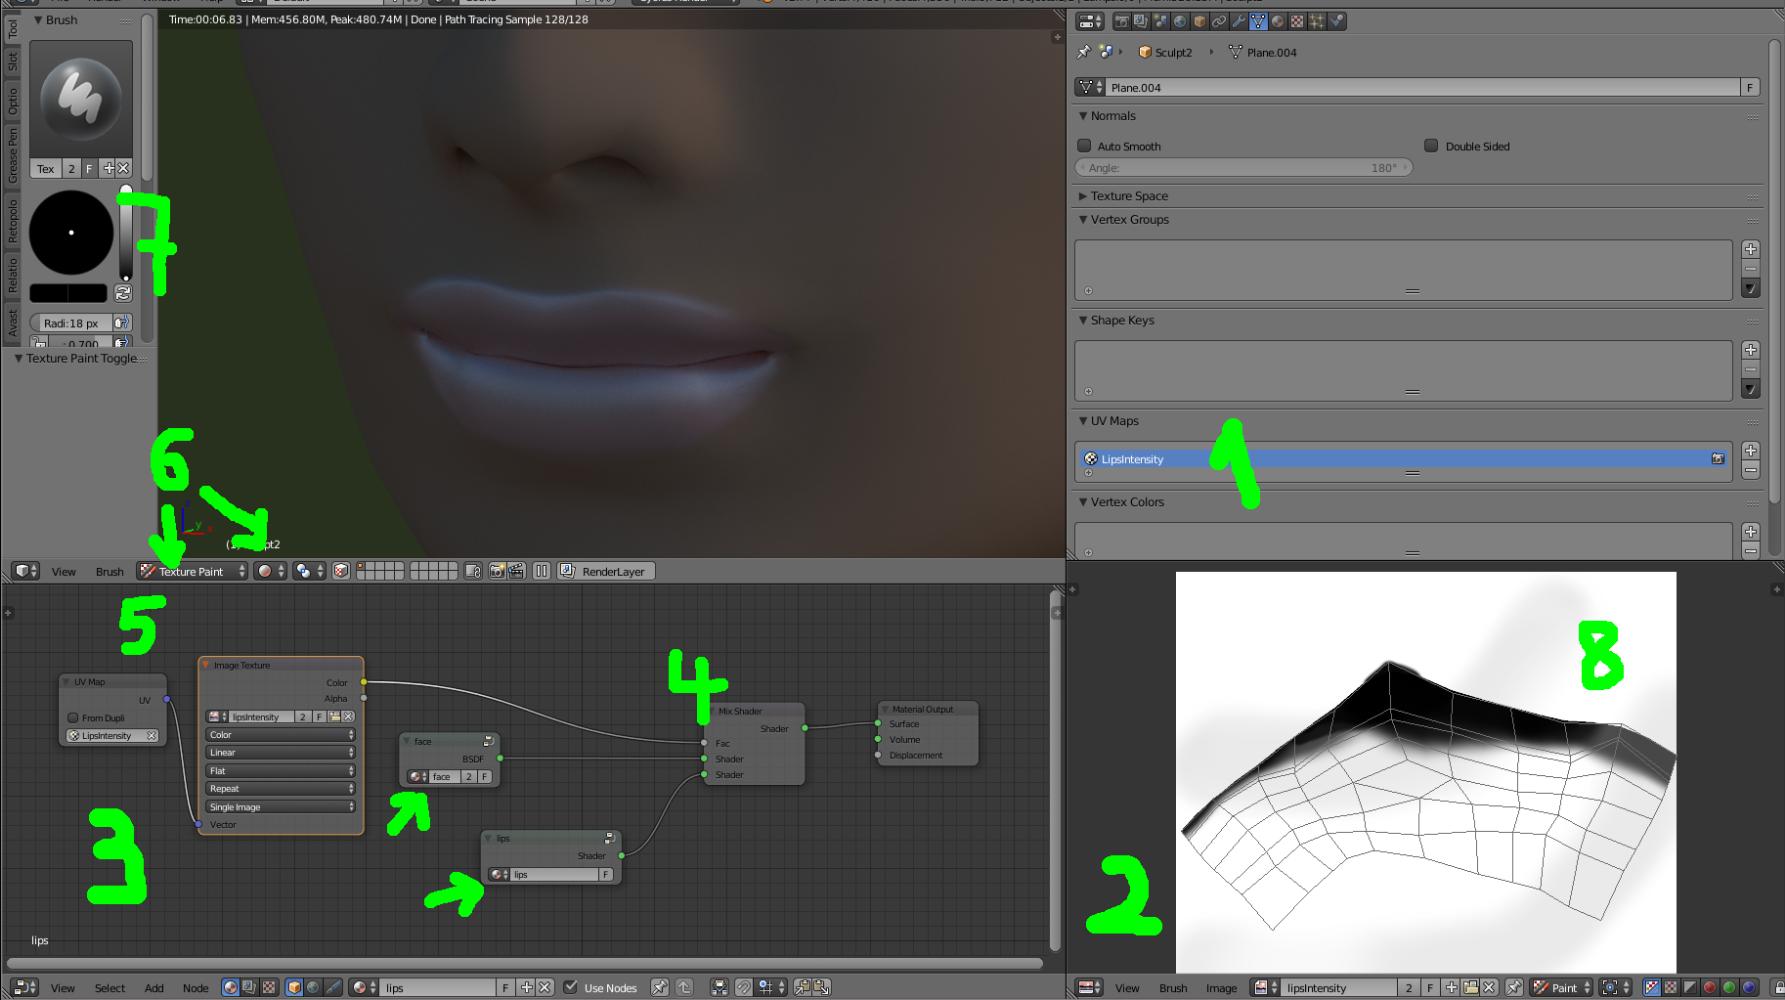
Now select you lips faces and one ring more around. And assign these faces to a new UV map (called 'LipsIntensity' in the screen capture (1)).

Create a blank image (2).

Put your original face and mouth nodes respectively in a node group (select and group all the nodes except the output for each). So that you can reuse them (mainly the face shader) in the lips material (3 and arrows). Now mix them so that the mix (4) factor is driven by the texture you added and itself based on the 'LipsIntensity' UV map (5).

Now go in the 3D view (6) and in texture paint mode and rendered mode. Make sure that your are painting on the 'LipsIntensity' texture (look at 'Available paint slots' in the 'Slot' panel of the texture paint mode).

Now simply paint in black over the lips, with a relatively large brush in order to obtain the ease you want (7 / 8).

enter image description here

$\endgroup$
7
  • 1
    $\begingroup$ Hi, you should add one other possibility which is using vertex paint as a mask, if you want to go fast and your topology is good, it can do the trick without having to UV unwrap, and it can blur in this mode too. It works pretty well for lips and eyelids for example. $\endgroup$
    – tynaud
    Commented Jun 18, 2016 at 10:57
  • $\begingroup$ @lemon thank you so much for your reply. I learned so much and that is exactly what I want! I couldn't get it to work could you please help me further? $\endgroup$ Commented Jun 18, 2016 at 15:16
  • $\begingroup$ I created two node groups for testing. One for just a diffuse second for just the glossy I created the main material to attach them like you have it. I created a new UV map to focus on the lips and I painted it like you have it and made everything else black just to keep it out of the picture. I inserted a screen shot of the changes I made. Please let me know what I did wrong. i.imgur.com/Es5bTge.jpg $\endgroup$ Commented Jun 18, 2016 at 15:18
  • 1
    $\begingroup$ @PepperAddict, I cant see why... Perhaps, because I used a specific UV map for the lips/glossy intensity ? On your picture I cant see where is the "lipadip" texture regarding to "lipintensity" UV map $\endgroup$
    – lemon
    Commented Jun 18, 2016 at 15:38
  • 1
    $\begingroup$ @PepperAddict. I am not able to change the UV maps on your blend file to do the same as in mine (mine involves only the lips in the lipsIntensity UV map). A workaround : use one UV map for all and add another textures (based on the same UV map) for the black/white/gradient texture driving the mix shader. $\endgroup$
    – lemon
    Commented Jun 18, 2016 at 18:19

You must log in to answer this question.

Not the answer you're looking for? Browse other questions tagged .