0
$\begingroup$

When I need to remove a section of an object in Blender, I use the Boolean Difference Modifier. This removes the shared volume and leaves new faces on the object to cover the 'hole'.

Until today.

I've clearly done something accidentally to my object as now when I use the Difference Modifier, it still removes the volume but it doesn't create the new faces on the object. It just leaves a gaping hole where I can see into the inside of the object.

What have I done wrong to cause this and/or how can I get the intended functionality back? I've created a new object from scratch in a new file and the modifier works perfectly so it's something I've done to this particular object.

I read that I'd maybe created a 'negative shape' but trying Ctrl+N didn't help. I've also tried the Solidify modifier but either it didn't help or I didn't use it correctly.

Thank you.

$\endgroup$
5
  • $\begingroup$ I suspect you may mean Shift-N to recalculate normals rather than Ctrl-N but I think we'll need to see your Blend file to check. You can share it via blend-exchange.com following the instructions there to copy the link on that page. Then edit your question here and paste the link into it. $\endgroup$
    – John Eason
    Commented Feb 10 at 22:48
  • $\begingroup$ Thanks John - file added. I'm trying to cut a hole in the object using the cylinder but with the hole retaining an inside wall around the hole. For some reason this object doesn't want to add the inner wall. Previous efforts have been fine so I don't know why this object is different. $\endgroup$
    – RobertyBob
    Commented Feb 10 at 23:03
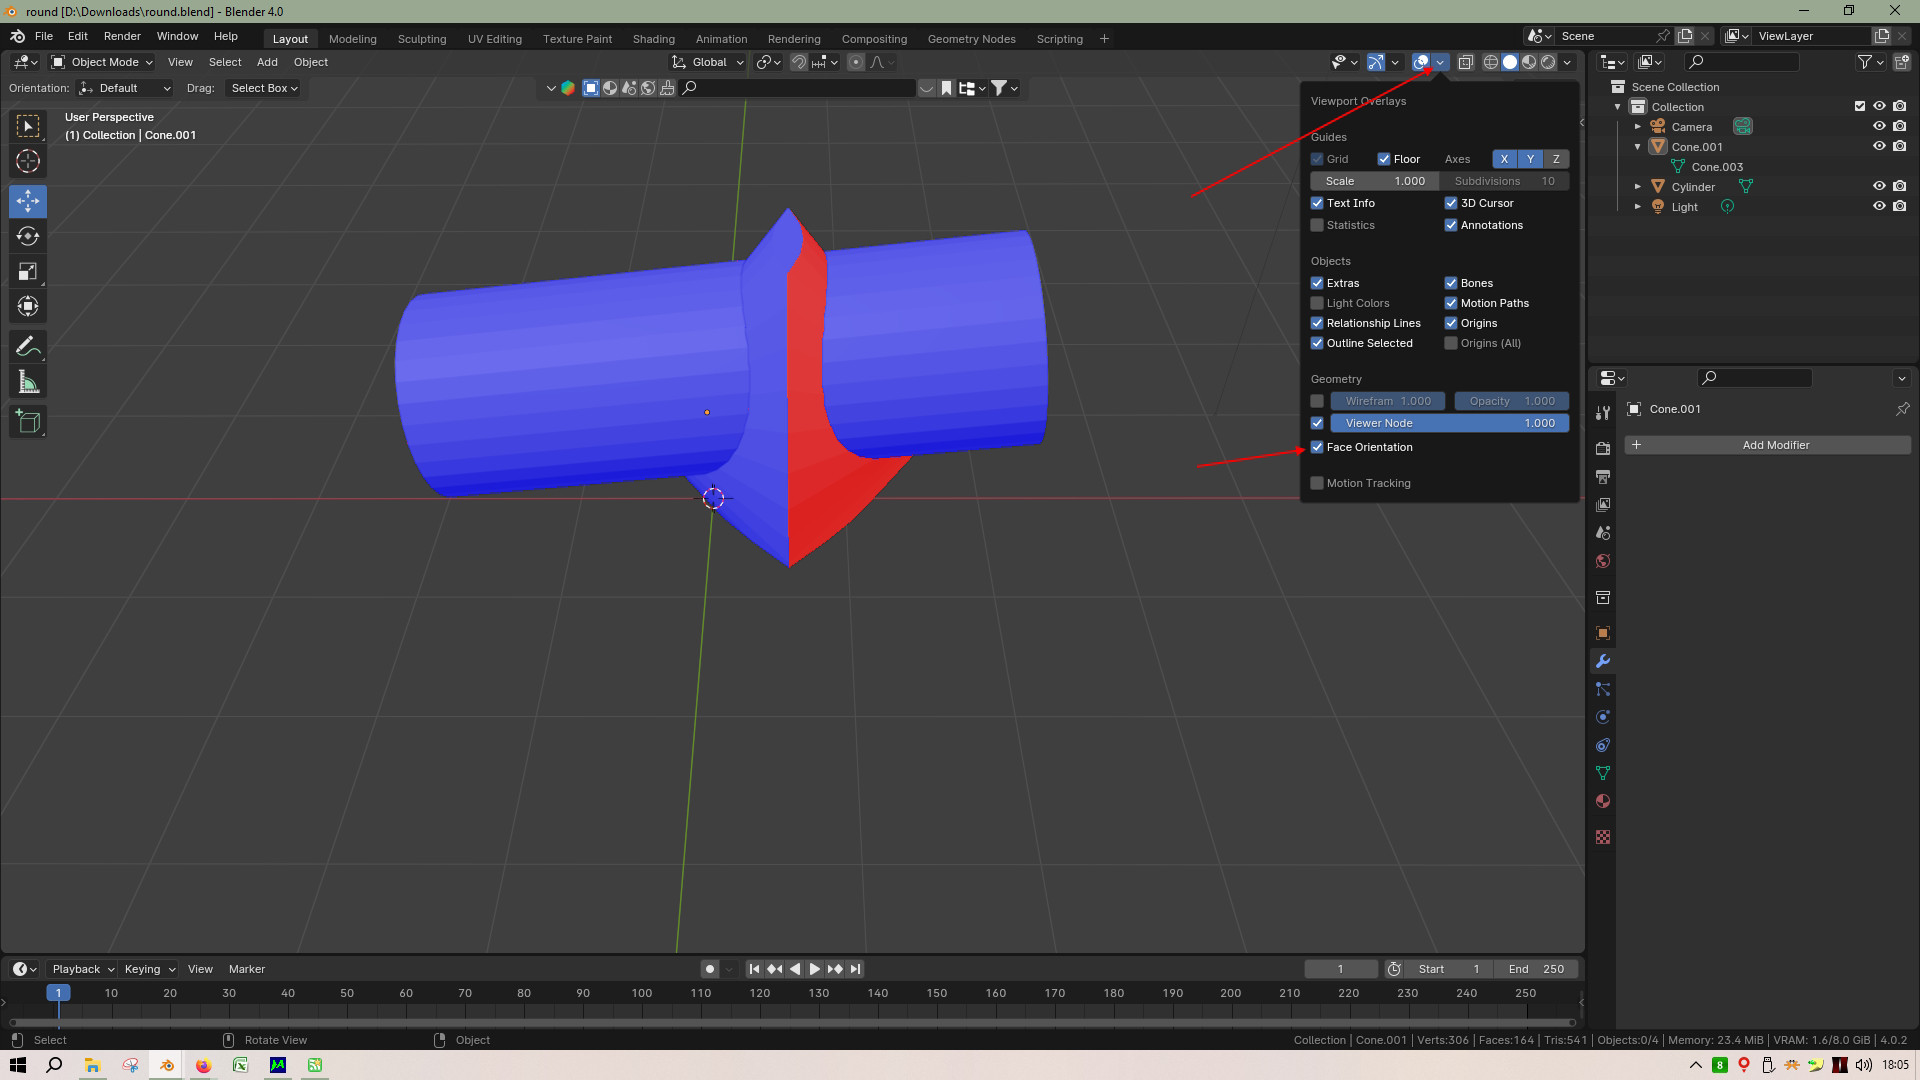
  • $\begingroup$ Have you already applied the modifier on the file you've uploaded? If so, that's why I'm getting strange results! However, the 'double-cone' shaped object has inverted normals on one half of it which wlll certainly cause problems. Hit F3 and type "Face orientation" and you'll see that half is in blue (correct) and half in red (inverted). Select that object, go into Edit mode. Select All and then use Shift-N to recalculate. You'll probably have to rebuild it and use the Boolean again though to get the correct result. $\endgroup$
    – John Eason
    Commented Feb 10 at 23:48
  • $\begingroup$ Many thanks John - appreciate the assistance. The 2 halves were made using Duplicate and Mirror so I guess that creates inverted orientations. I think I didn't quite undo enough steps as removing the cylinder doesn't leave a complete shape so I'm going to start again but your suggestion of fixing the face orientation seems to work. If you add that as a solution I'll mark it as accepted. $\endgroup$
    – RobertyBob
    Commented Feb 11 at 16:44
  • $\begingroup$ Ok. Solution added as an answer. $\endgroup$
    – John Eason
    Commented Feb 11 at 18:15

1 Answer 1

0
$\begingroup$

One half of the Cone object has the Normals inverted. You can see this by turning on the Face Orientation overlay either by hitting F3 and typing in Face Orientation or from the Viewport Overlay menu. The inverted faces are shown in red.

enter image description here

Go into Edit mode with the cone selected, select All then hit Shift-N to recalculate the normals.

The supplied Blend file has already had the Boolean modifier applied so the Cone object will need remodelling first.

$\endgroup$

You must log in to answer this question.

Not the answer you're looking for? Browse other questions tagged .