2
$\begingroup$

I use the Compositing workspace in Blender 2.8 to overlay images with grease pencil objects. (Alpha Over node taking an image as the first input and the View Layer as the second input.)

When I create those objects or move them around in the Viewport, I would like the Backdrop (which shows the objects on top of the background) to update and reflect those changes. However, it doesn't until I hit F12 to render :( Is there a way to solve this?

Furthermore, I make use of keyframes to fade in the objects. Is it possible that the backdrop listens to changes of the current frame and updates accordingly to display only those objects that have a positive opacity at the corresponding point in time?

Maybe I am just doing it completely wrong - in that case, please point it out ;) I'm still very new to Blender.

$\endgroup$
1

2 Answers 2

4
$\begingroup$

[EDIT: added second way, easier method]

So, you want immediate feedback since you want to draw something on top of an image. There are 2 ways:

  1. Draw while having background image activated on your camera (while also in camera mode obviously):

    Select your camera, go to the Camera properties, check the Background Images, then Add Image, then open file manager icon and select the image you want.
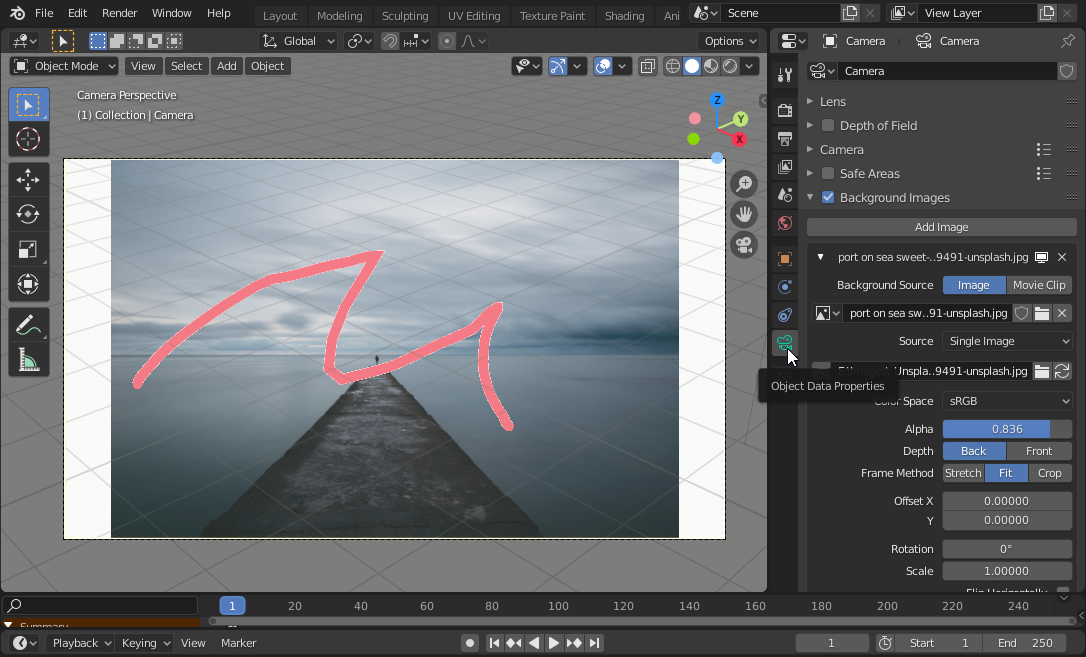
Background image on camera Tweak the settings of the background image, it's straightforward and you can see the result on your camera. Note that the default frame method is actually stretch, but I change it to fit to show you the white gap on the sides of the image from the camera since the dimension output is not the same as the image.

This background image is only reference, so you still need to composite the image and render output in compositor, next step is make sure you know what you're doing around the image size difference (if any) in the compositor.

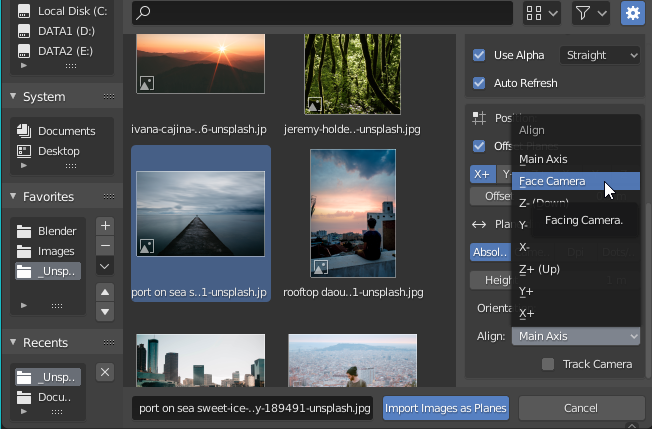
  1. Import image as plane (bundled add-on): enable this add-on first (if you haven't already) from Preferences > Add-ons > search "import image", check to enable.

Now there will be new option: Add > Image > Images as Planes. If you have selected the image, change the settings first: Material Settings: Shadeless, Align: Face Camera. this way you don't have to rotate the plane to match the camera. setting for Import image as plane
Now, match your image size with the output dimension: scale the plane until its 2 sides match one of the camera width, then adjust the Y accordingly.
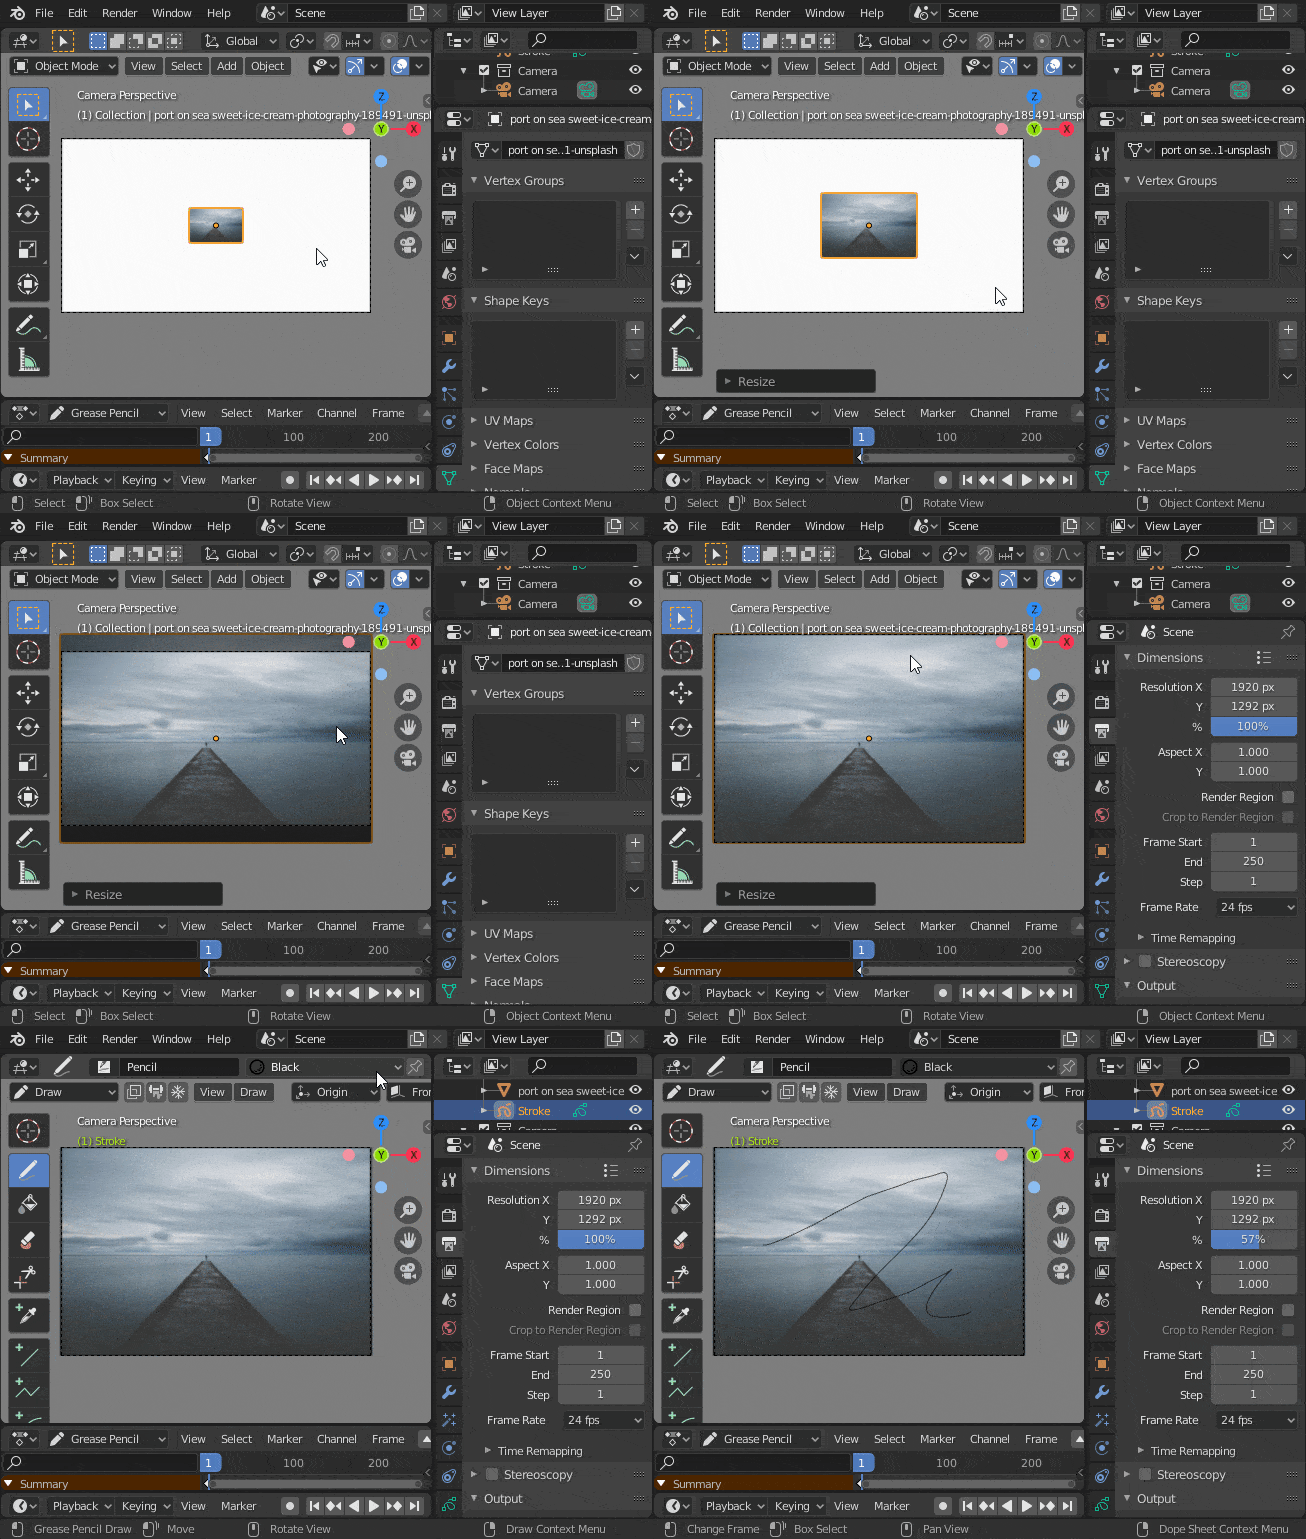
demo of how to match the image with camera or even better PRO TIP: if you don't know the image ratio, or the image is too big and you want just smaller size for the render output, you can input math into the input field. For example, if the image is 3687x2142 px (landscape), but you only need lower than 1500px for the each side, you can input 3687/3 in the X resolution, and 2142/3 for the Y, resulting in 1,229 x 714 px.

$\endgroup$
5
  • $\begingroup$ Wow, thank you so much for the camera trick! :D When I render from the Layout workspace the background is not rendered. Is there a checkbox or something to switch the background on in the render? (in order to eliminate the need for entering the compositing workspace and adding nodes there...) This would be very convenient ;) $\endgroup$
    – yogabonito
    Commented Mar 26, 2020 at 16:15
  • 1
    $\begingroup$ This background image is just for reference, so you do still need to composite your render and the image in the compositor. BUT now that my brain is clearer than before, you can actually just IMPORT an image as a plane with shadeless material. My bad XD $\endgroup$ Commented Mar 26, 2020 at 16:43
  • $\begingroup$ This sounds extremely promising! :) I found the "import images as planes" add-on but how do I adjust the camera to only see the plane without gaps or cropping the image? (Image and output are the same size.) $\endgroup$
    – yogabonito
    Commented Mar 26, 2020 at 17:50
  • $\begingroup$ @yogabonito I added GIF for the demo, hope it helps. also i recommend you edit the title of the question into something like "how to draw grease pencil on top of an image easily", so people in the future not expecting this to be about compositing. $\endgroup$ Commented Mar 26, 2020 at 19:41
  • $\begingroup$ Thank you for your hard work @lintang_biru! Very much appreciated! :D $\endgroup$
    – yogabonito
    Commented Mar 26, 2020 at 21:50
2
$\begingroup$

I am no expert, but this is to help you about some fundamental things: Compositing is just like using Photoshop to edit your render output. Regarding your question of whether it's possible to update the compositor wihout rendering (F12): 1.) Yes, if you don't change the scene 2.) No, since you said you want to update the compositor after changing scene. Why so? When you move objects in the scene, or changing the scene in any way, Blender has to calculate lights, material, etc again to produce correct render output, right? So it's impossible to update the compositor without rendering again if you make changes to the scene. Now, I don't know how complex your 'compositing' is, but do you know that you can just use the 'rendered mode' first to see how the scene looks like, then if your scene is done, then you can move on to compositing them.

Is it possible that the backdrop listens to changes of the current frame and updates accordingly to display only those objects that have a positive opacity at the corresponding point in time?

Yes, you just have to be in the correct frame and hit render, so it's actually back to the explanation above, since changing an object visibility/opacity is changing the scene, you have to update the compositor by rendering again at the frame that you want

$\endgroup$
2
  • $\begingroup$ hmm, actually my composite is reeeaaally simple. Only an image with some grease pencil objects over it - no light source involved in the whole scene. Is there another way to get immediate feedback as to where on the background I am drawing? +1 for taking your time, thank you :) $\endgroup$
    – yogabonito
    Commented Mar 26, 2020 at 15:01
  • $\begingroup$ My bad, I was skimming your question and missed the real problem of what you really want. I'll add another answer with screenshot. $\endgroup$ Commented Mar 26, 2020 at 15:16

You must log in to answer this question.

Not the answer you're looking for? Browse other questions tagged .