25
$\begingroup$

This will be a pretty complex question, many areas will be connected to it but it is for sure focused on one main problem. I'm not sure is it possible without heavy scripting and I didn't found anything on this topic elsewhere. So off we go.

Abstract:

I want to mix colors from different objects on collision.

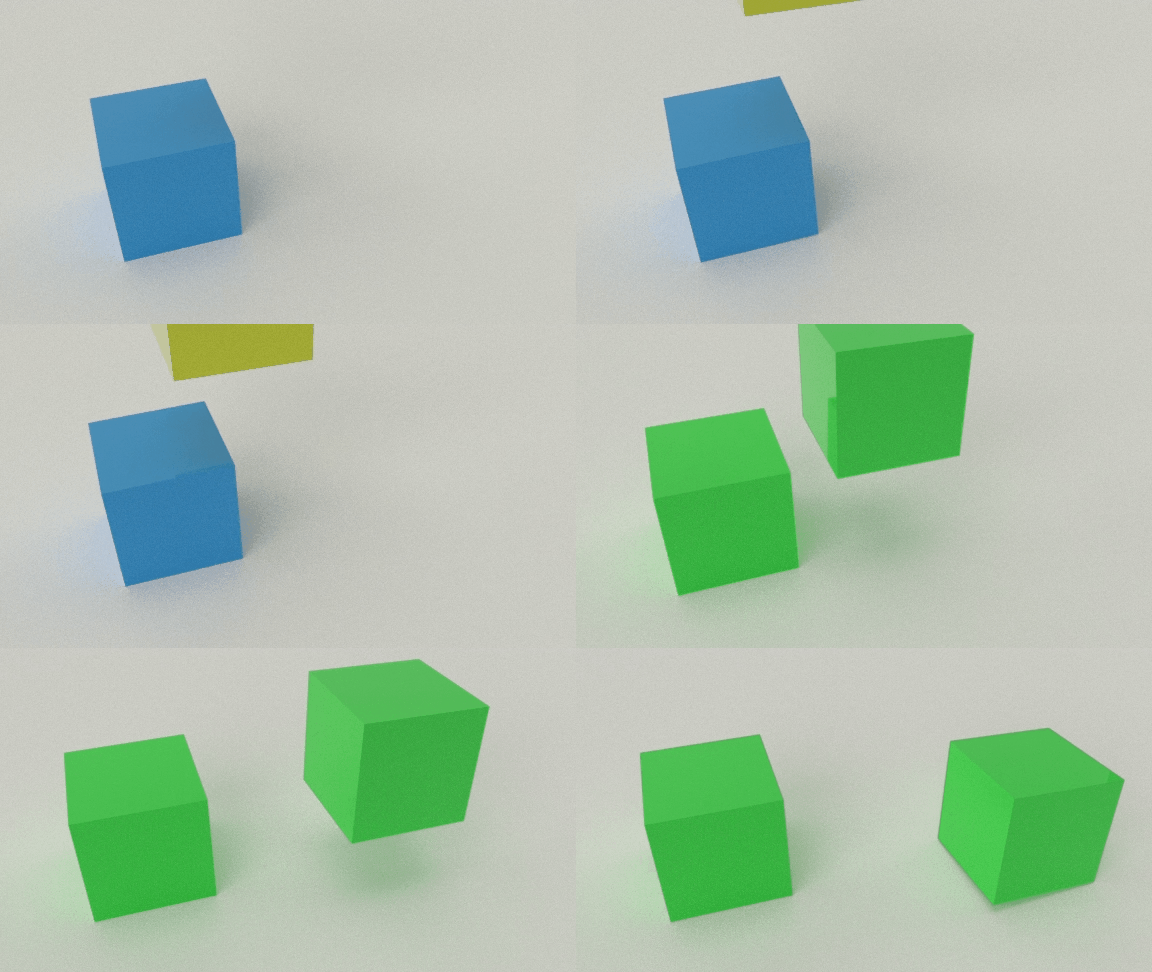
Example. One cube is blue, second is yellow. Boom! Both are green.

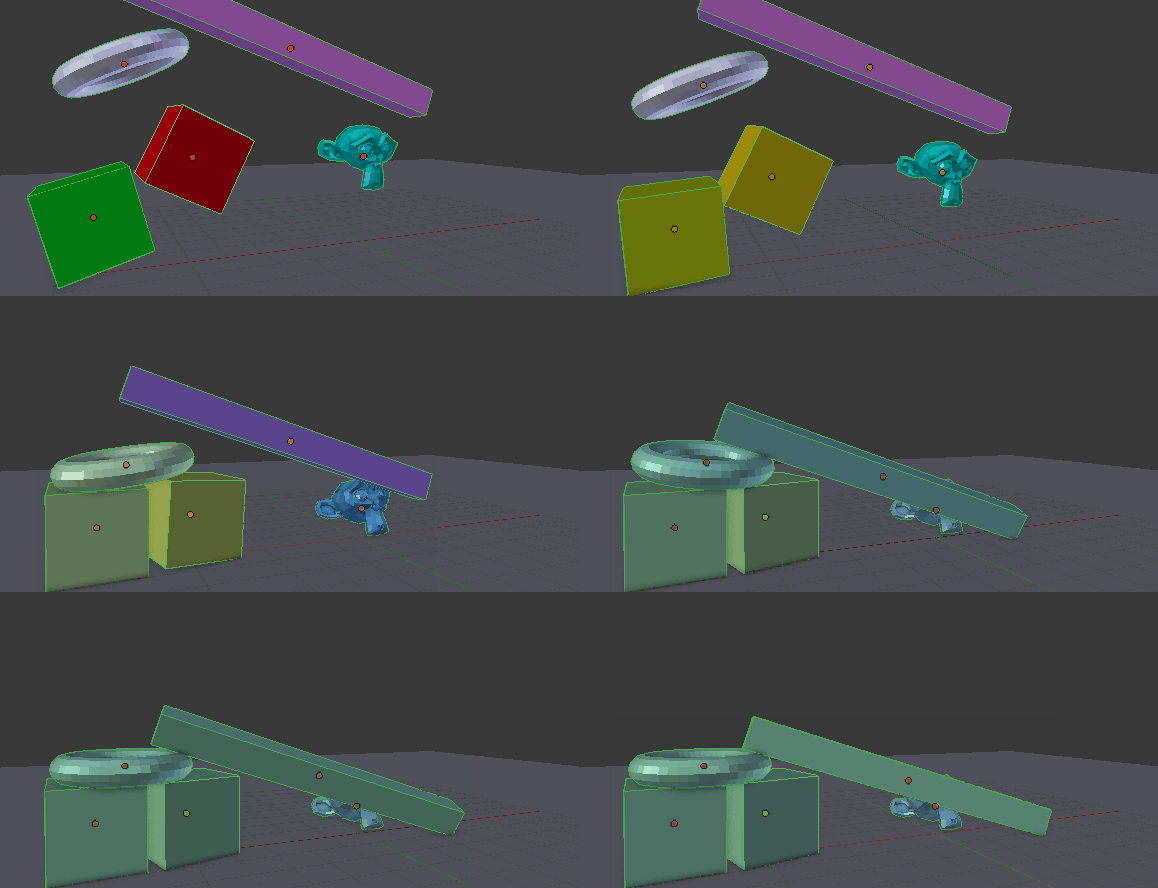
I've made this little simulation:

Cubes

Going deeper:

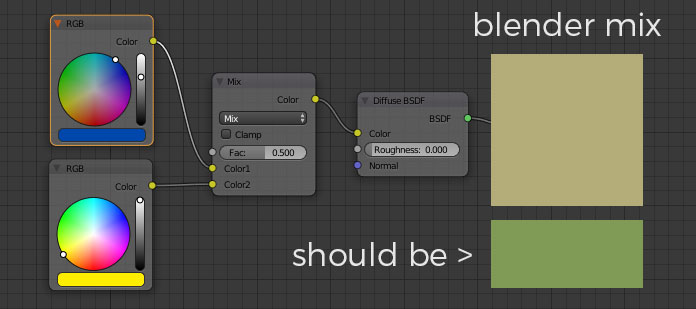
I think that the best option would be making material with RGB node, then, after taking color from another object mix them with MixRGB as below:

Color_mix

As you can see first problem is that Blender isn't mixing colors as it should, but let say it's close enough and leave it for now as is.

Second one is scenario with many objects. Using same approach will give us enormous amount of nodes - by adding another Mix and RGB. Replacing one color on the other hand doesn't give us proper mixing.

Solution for second problem could be making one RGB node from mixed values and waiting for another hit.

Wrap this up:

If there is any logic behind it, it could probably works like that:

  1. Get RGB values of both objects.
  2. Detect collision.
  3. Mix values and replace existing RGB node value with new one.
  4. Wait for another hit.

Advanced usage:

You may ask: "What you want to do with this dummy?" and my answer is:

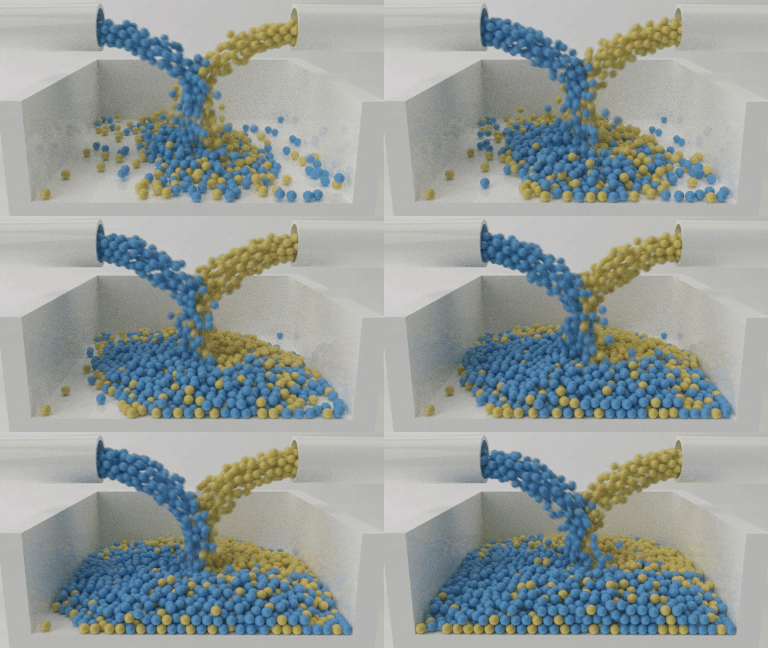
spheres

Molecular Script from Pyroevil.

In this script there is collision system so (as far as I know about Python scripting like Jon Snow) it will be matter of adding color change thingy to this. Or I'm just delusional.

It will be great thing to mix particle collision systems colors. It could open new way to simulate fluids. If it's possible to transfer particle color values to IsoSurface in CubeSurfer or any other mesher possibilities will be endless (nooo, it's just for pouring blood to milk).

Blend file:

Here is my blend file if somebody wants to play with it (Molecular Script needed).

$\endgroup$

4 Answers 4

26
+100
$\begingroup$

Using Animation Nodes

Updated for Animation Nodes 2.0!

Method with the Molecular Modifier and CubeSurfer below!!!

Another way to do this is using @Jacques Lucke's Animation Nodes addon. Here is the final result:
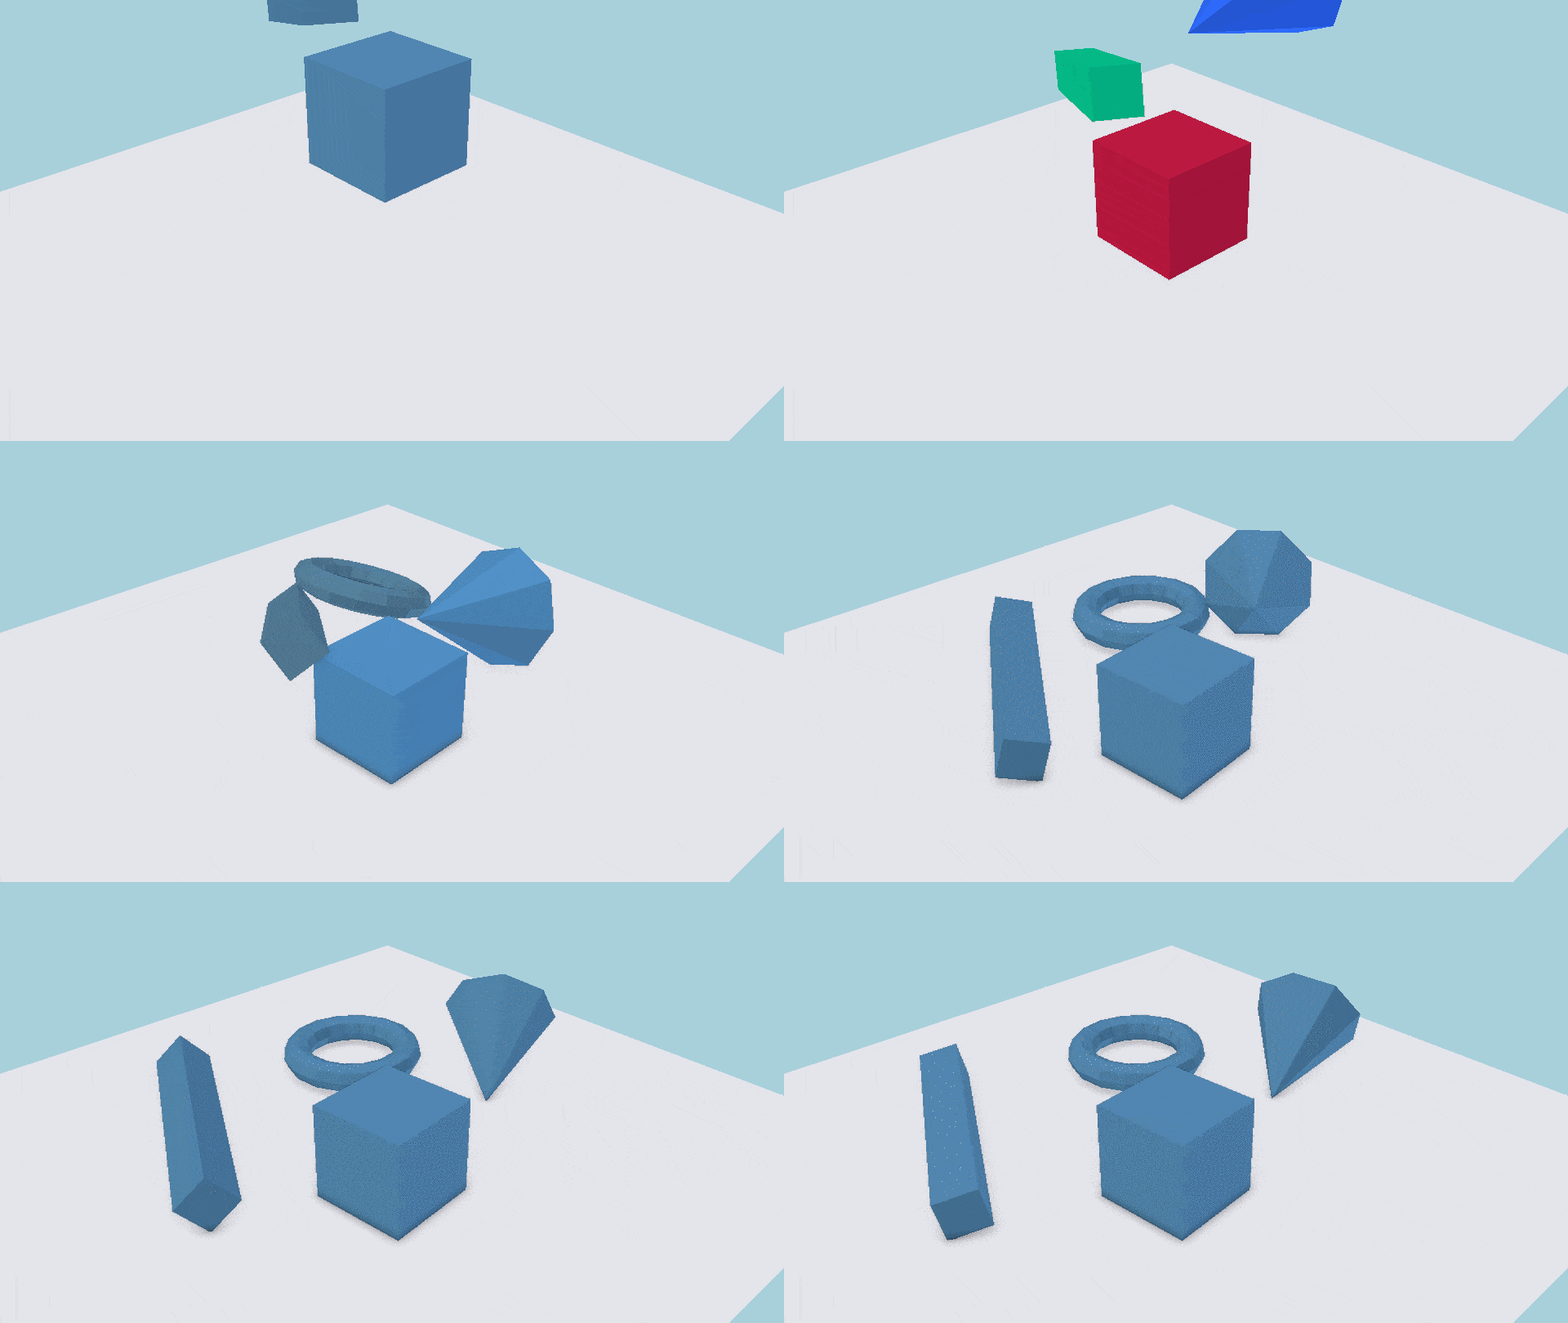
enter image description here

And here is a picture of the node setup:
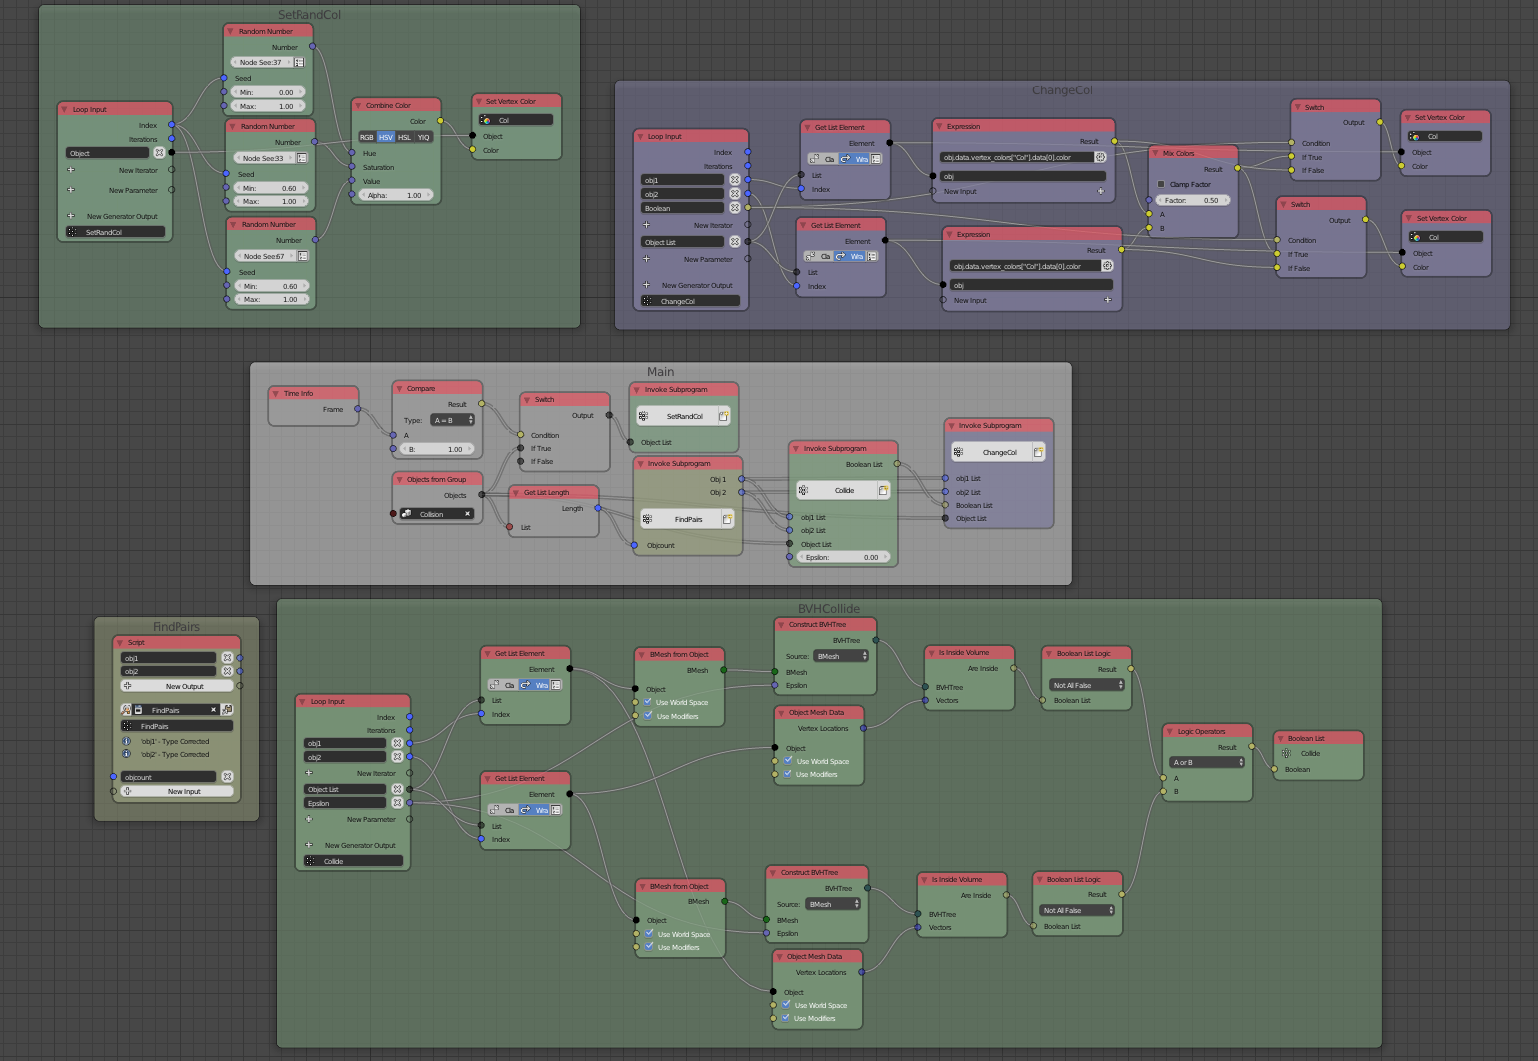
enter image description here

This is done with a Rigid Body Simulation and Vertex Colors. After installing Animation Nodes (linked above), we can get to work.

1. Setting Up the Scene

First, we have to set up our Rigid Bodies. Add a ground plane, and under the Physics tab of the Properties Editor, click on Rigid Body and uncheck Active. For every object that we want to actively collide, click on Rigid Body, but leave Active checked.
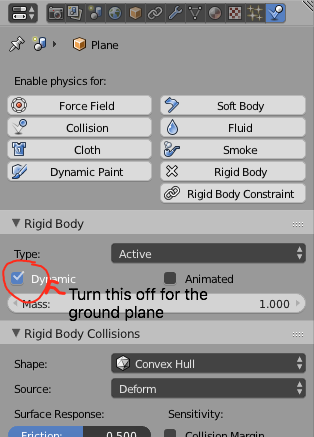
enter image description here

In addition, under the Mesh tab of the Properties Editor, add a vertex color by clicking the + button under the Vertex Colors panel. Since we have to do this for every object, we can save ourselves some typing by leaving the default name, Col.
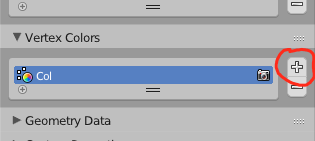
enter image description here

The last thing we have is give it a material. Call it whatever you want, and then create the following (Cycles) NodeTree:

enter image description here

This can be modified as needed, as long as the vertex color is still a part of the nodetree.

Repeat the above for all of the objects you want to mix color, giving the the same material, or just duplicate the one object. Finally, select all of the objects you want to mix colors and group them together (Ctrl + G). Don't forget to name it, either in the T panel or by hitting F6.
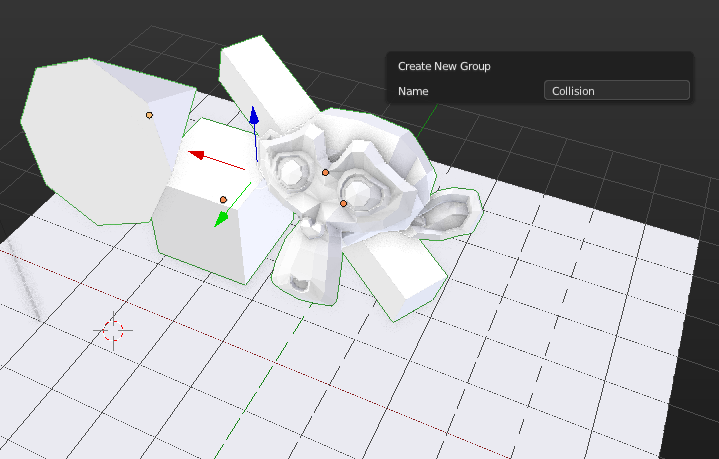
enter image description here

The scene is set up now. Let's dive into the Animation Nodes!

2. Creating the Nodetree

In the node window, click on the Animation Nodes. Add an Objects From Group node (to add a node, either press Shift + A and find the node, or press Ctrl + A to search for it). Select the Group.
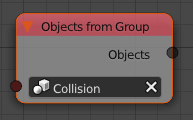
enter image description here

The first thing we want to do is to assign random colors to each object on Frame 1. Let's create a subprogram to do that. Add a Loop Input node and name it SetRandCol. Press the + button next to New Iterator and type "Object List". Set up the following nodes:
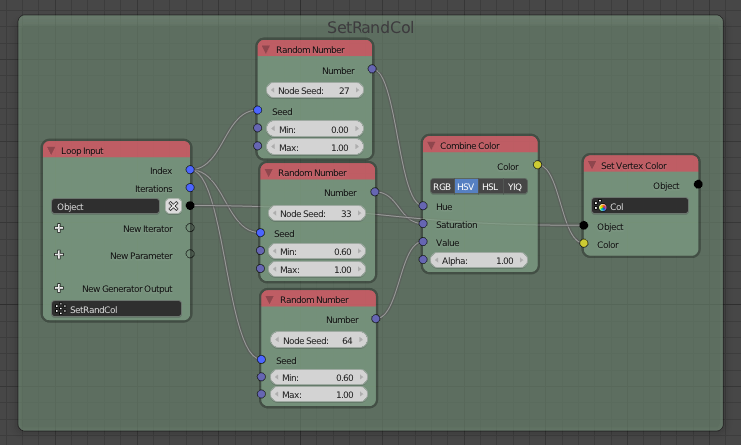
enter image description here

To activate the loop, add an Invoke Subprogram node, select SetRandCol, and plug in the Object list. It should take effect immediately.
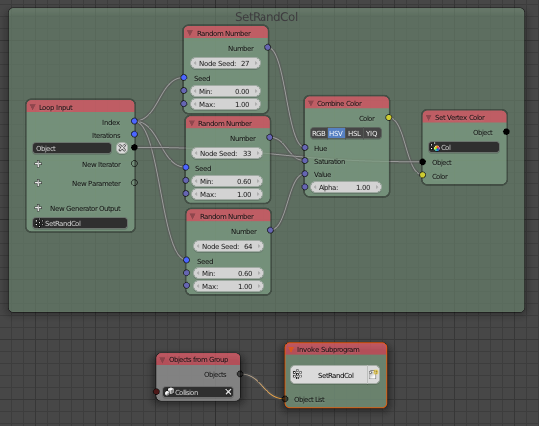
enter image description here

We don't want this to happen every frame, though. Just the first. Add these nodes to make it only work on Frame 1:
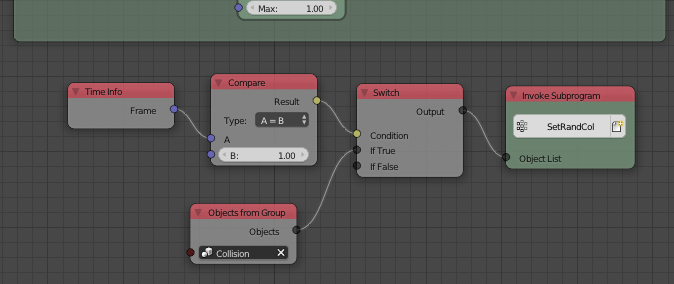
enter image description here

Cool. The next step is to calculate all of the different pairs of objects we will have to check collision against. We could do this with nodes, but it is faster to just use a short script. First, add a Get List Length node and plug in the Object list. Next, add a Script node and name it FindPairs. Press the + button to add a new script. Use the buttons to add 1 input (an integer) and 2 outputs (integer lists). Name them as follows:
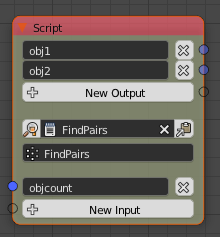
enter image description here

In a Text Editor window, open the FindPairs script and paste the following:

obj1, obj2 = [],[]

for i in range(0,objcount):
    for j in range(i,objcount):
        if i != j:
            obj1.append(i)
            obj2.append(j)

To use the script, add an Invoke Subprogram node and select the "FindPairs" option. Plug the Get List Length node into the script node. obj1 and obj2 are all the pairs of objects (i.e. index 0 goes with index 0, etc).
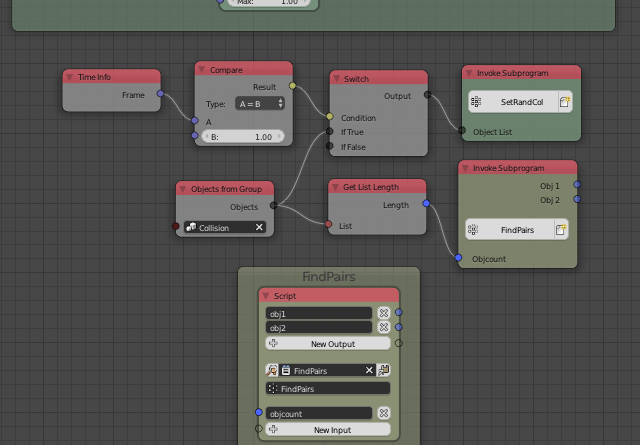
enter image description here

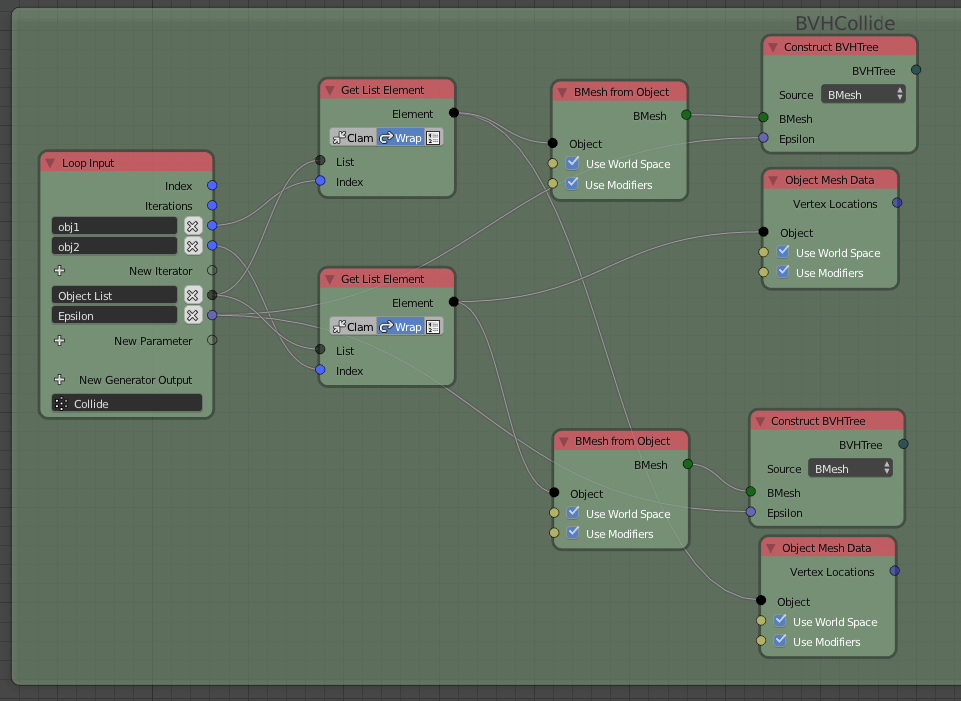
The next thing to do is to create a loop that checks every pair for collision. We will do this with the Is Inside Volume node. Create a loop the same way we did the first time. Name it BVHCollide. Give it two "Integer List" iterators (named obj1 and obj2), an "Object List" parameter, and a "Float" parameter named Epsilon.
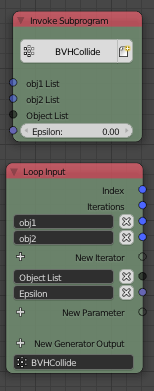
enter image description here

Add these nodes:

enter image description here

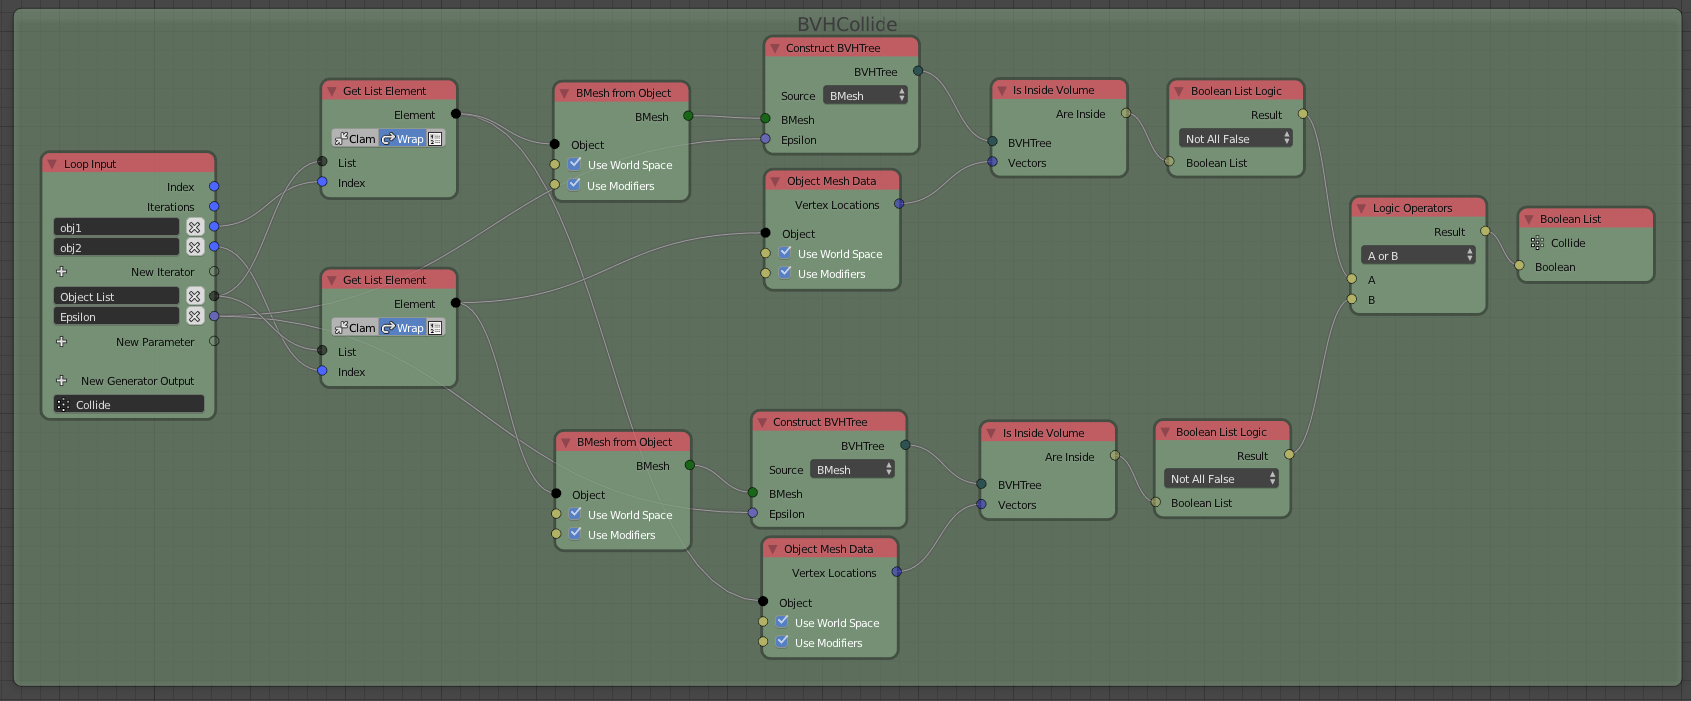
Next, we need to check for collision between the two objects. We'll use the Is Inside Volume node. After we check for collision, we'll combine our data to get a single boolean value for whether or not the two objects intersect:
enter image description here

The Epsilon parameter determines how far outside the loop the BVH node will look. Usually a super-low, non-zero value will work, like 0.0002. The last thing to do is to change the color of the objects. Add one more loop:

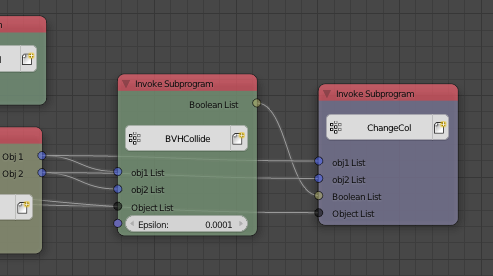
enter image description here

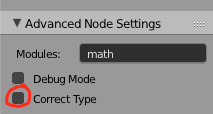
In the Advanced Node Settings dropdown of the N panel for the Expression nodes, be sure to uncheck "Correct Type":
enter image description here

Finally, invoke this last loop, and your simulation should work!
enter image description here


Blend File (requires Animation Nodes):


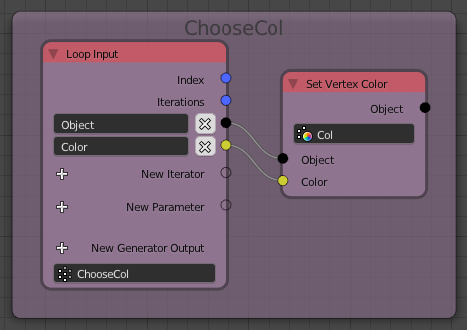
If you want to set the color manually, you can create this loop. Just provide it a list of colors with corresponding indices to the list of objects:
enter image description here


Incorporating the Molecular Modifier

Incorporating the Molecular Modifier has a similar workflow to the Rigid Body Method. Begin by setting up a Molecular simulation. Here is mine:
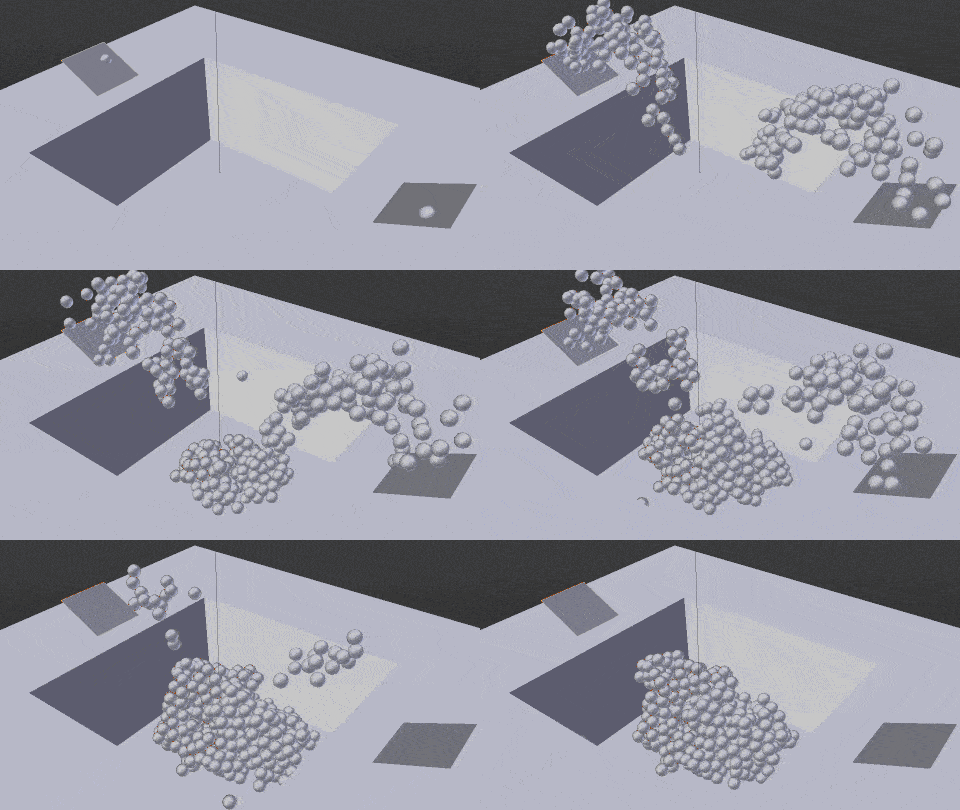
enter image description here

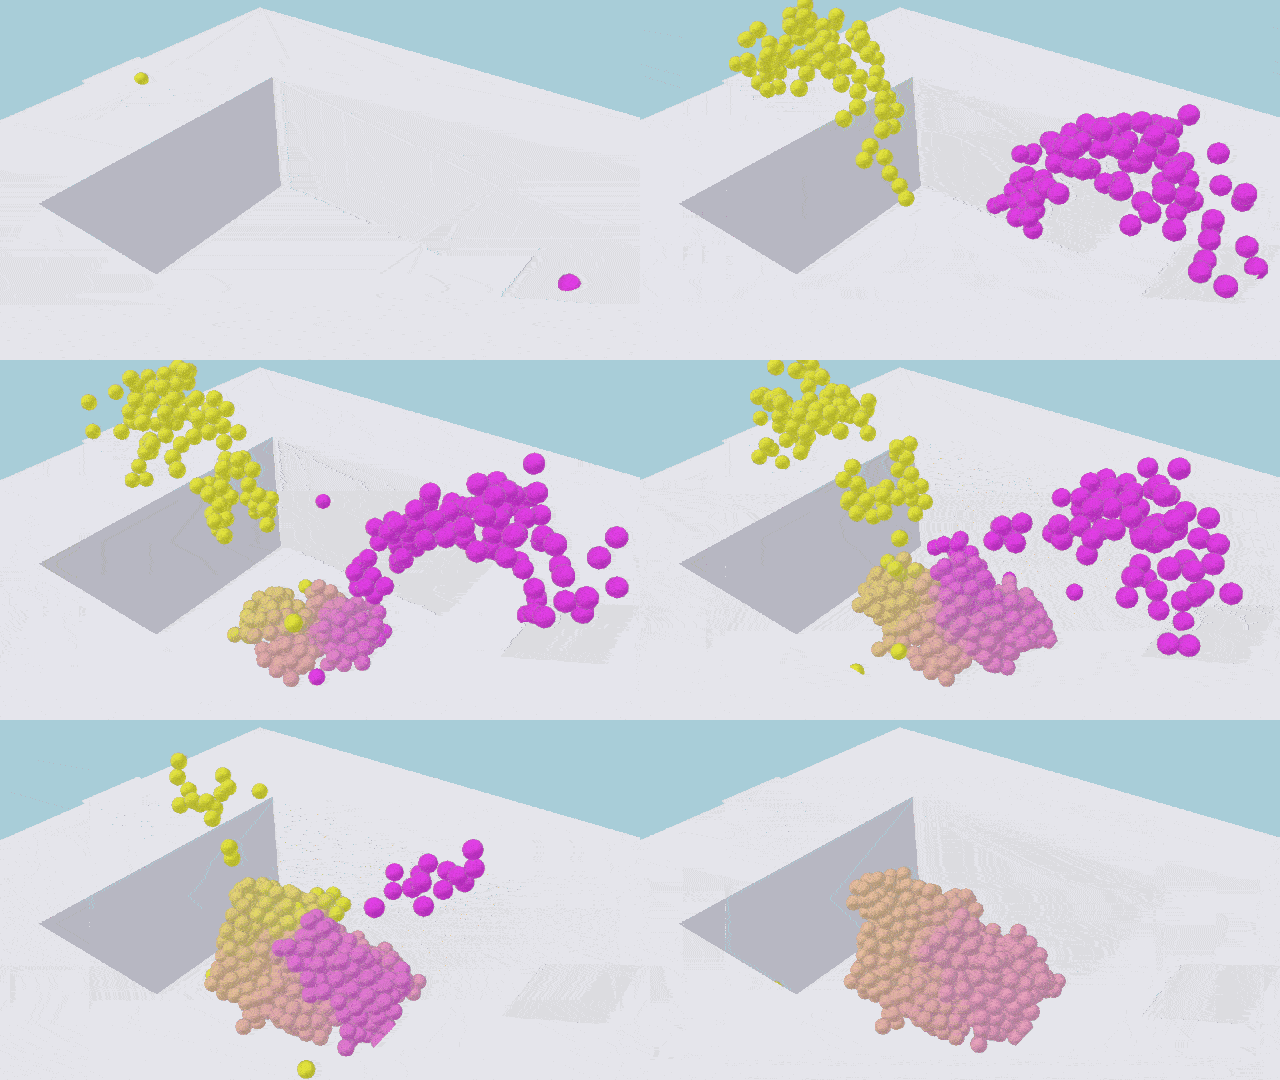
Here is the final result:

enter image description here

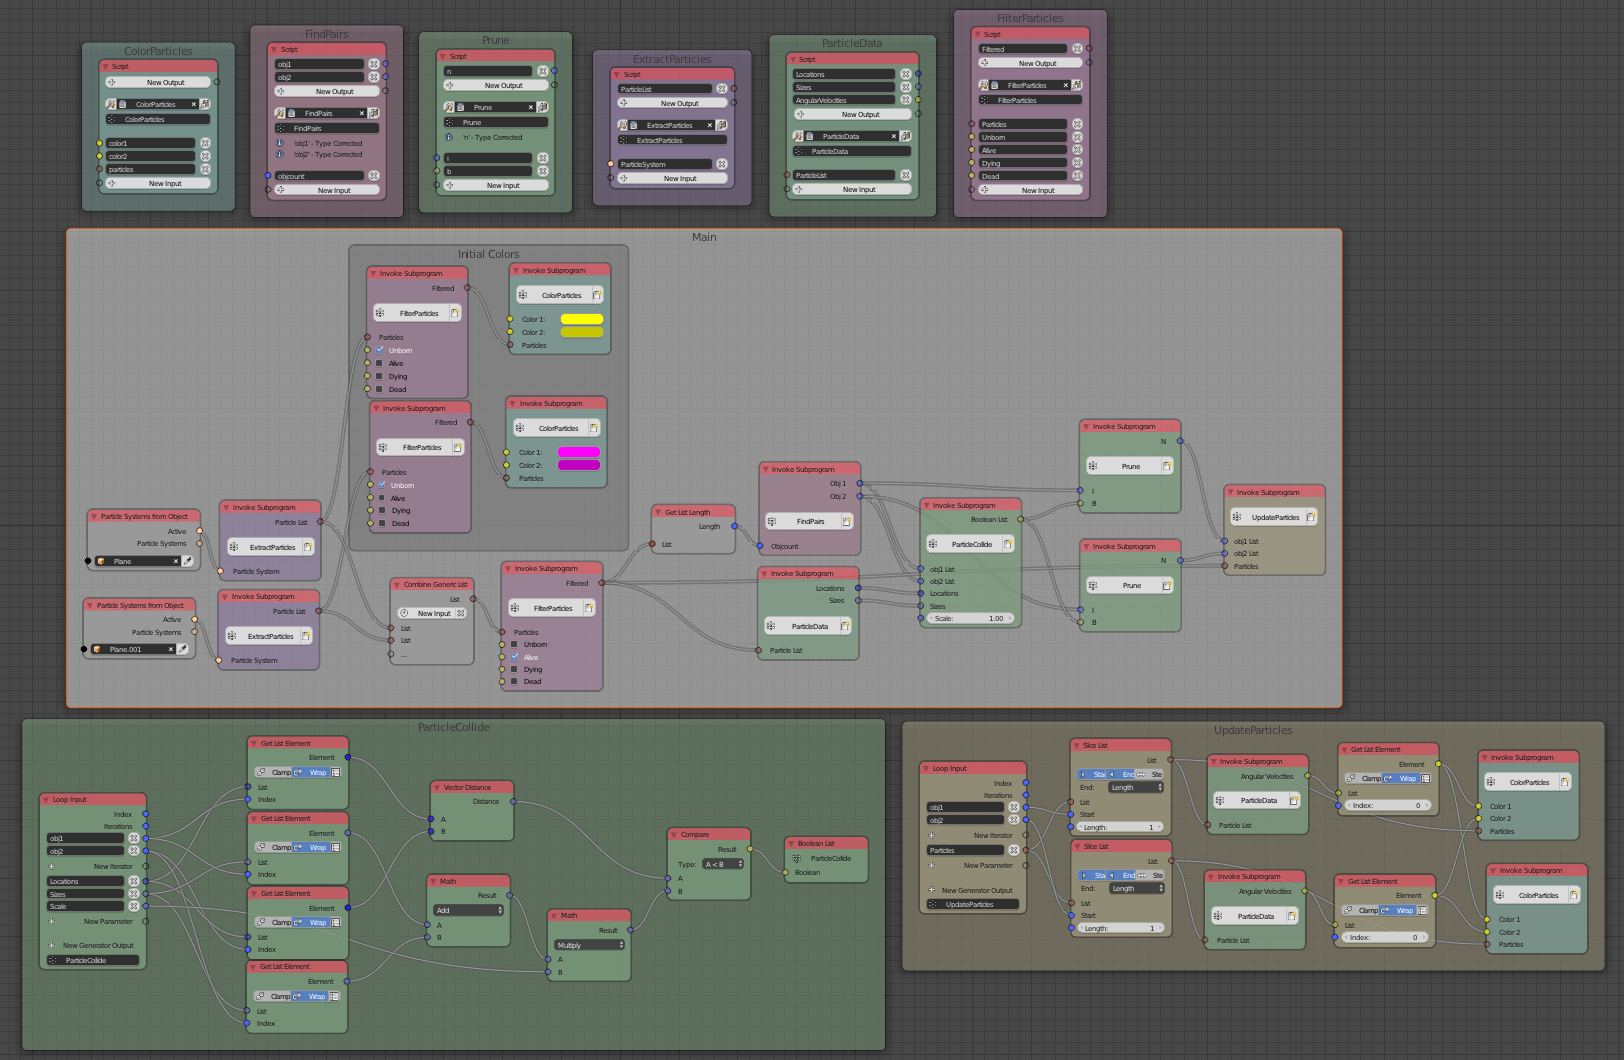
Node setup:

enter image description here

After setting up the molecular simulation, we can work on the coloring. To color the particles, we are exploiting a feature of the Molecular Modifier: since the entire simulation is baked with its own physics, the particles never rotate and therefore never use the Angular Velocity attribute. We will store our colors there. Set all of the particles to render as an Icosphere object and give the Icosphere this material:
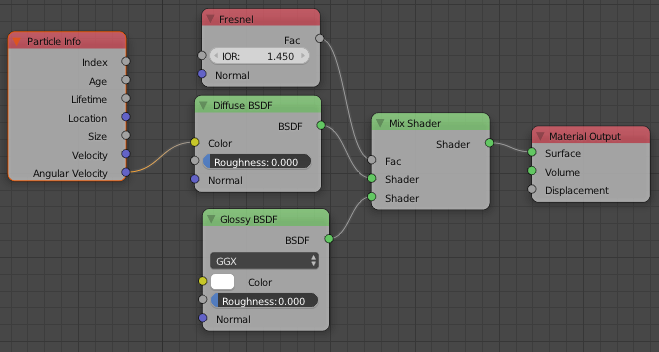
enter image description here

Now lets get into Animation Nodes. Unfortunately, in Animation Nodes 2.0, the Particle datatype has been removed. The most efficient way to get around this is to create our own in Python. First, let's create an Extract Particles node. Add a Script node, and give it Particle System input and a Generic List output. Name the List ParticleList. Create a new script file and paste in this code:

ParticleList = []

for p in ParticleSystem.particles:
    ParticleList.append(p)
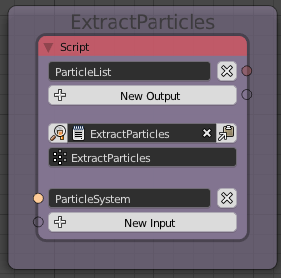
enter image description here

Next, we need a Filter Particles node. Add another Script node, and give it a Generic List input, four Boolean inputs, and a Generic List output. Name them as follows:
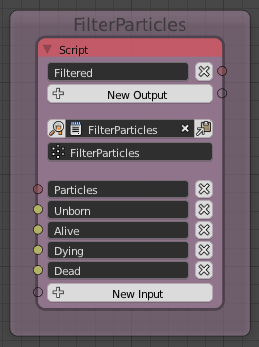
enter image description here

Here is the script:

Filtered = []

for p in Particles:
    if Unborn:
        if p.alive_state == 'UNBORN':
            Filtered.append(p)
    if Alive:
        if p.alive_state == 'ALIVE':
            Filtered.append(p)
    if Dying:
        if p.alive_state == 'DYING':
            Filtered.append(p)
    if Dead:
        if p.alive_state == 'DEAD':
            Filtered.append(p)

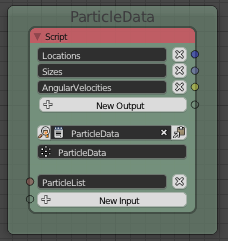
Last, we need a Particle Data node, to get information from the particles. Add another Script node, and give it a Generic List input, a Vector List output, a Float List output, and a Color List output. Name them as follows:
enter image description here

Here is the script:

Locations, Sizes, AngularVelocities = [],[],[]

for p in ParticleList:
    Locations.append(p.location)
    Sizes.append(p.size)
    AngularVelocities.append(p.angular_velocity)

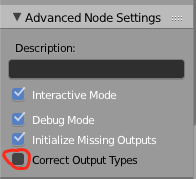
For some reason, Animation Nodes doesn't like us using a Color List to store vector data, so disable Correct Output Types in the Advanced Node Settings panel of the N sidebar for the Script Node:
enter image description here

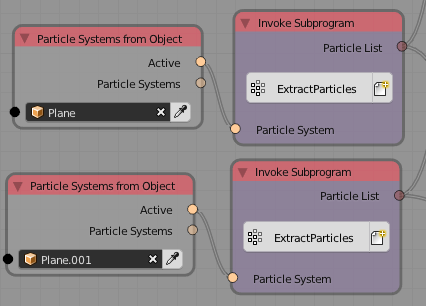
Now that we have that set up, we can get on to coloring the particles. For each of our particle emitters, add a Particle Systems from Object node. Add one of our ExtractParticles nodes for each Particle System:
enter image description here

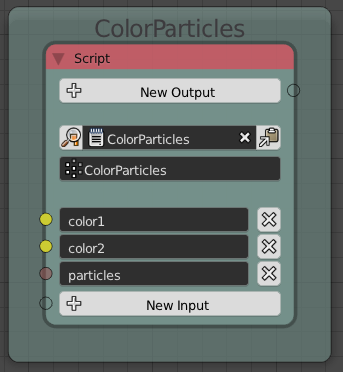
We need a way to color the particles. Create a new Script subprogram named Color Particles. Give it two Color inputs and one Generic List input:
enter image description here

Code:

for p in particles:
    if color1 != color2:
        p.angular_velocity = [(color1[0]+color2[0])/2,(color1[1]+color2[1])/2,(color1[2]+color2[2])/2]

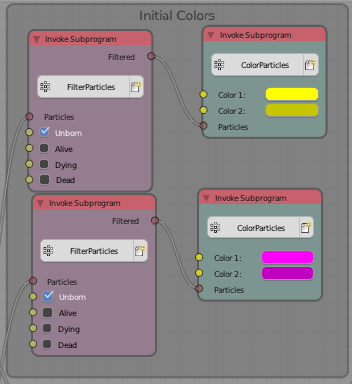
To set the initial colors for each particles system, use a FilterParticles node to get unborn particles, then the Color Particles node to set the color. Note that the two color inputs have to be different for the node to take effect:
enter image description here

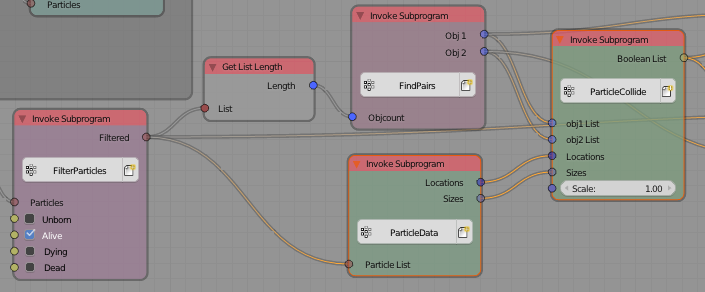
Now, join all the particles together with a Combine List node and use a FilterParticles node to get a list of all Alive particles:

enter image description here

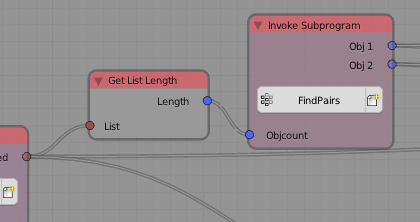
Next, we need to calculate all the different pairs of particles to check collision for. We can just use the same node we created above:
enter image description here

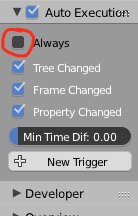
At this point, the numbers start to get really big, and unless you have an über-fast computer, you're going to start to lag. Even then, this NodeTree works better if it's only executed once a frame. If you haven't already, you should turn off Always in the Auto Execution panel of the T sidebar:
enter image description here

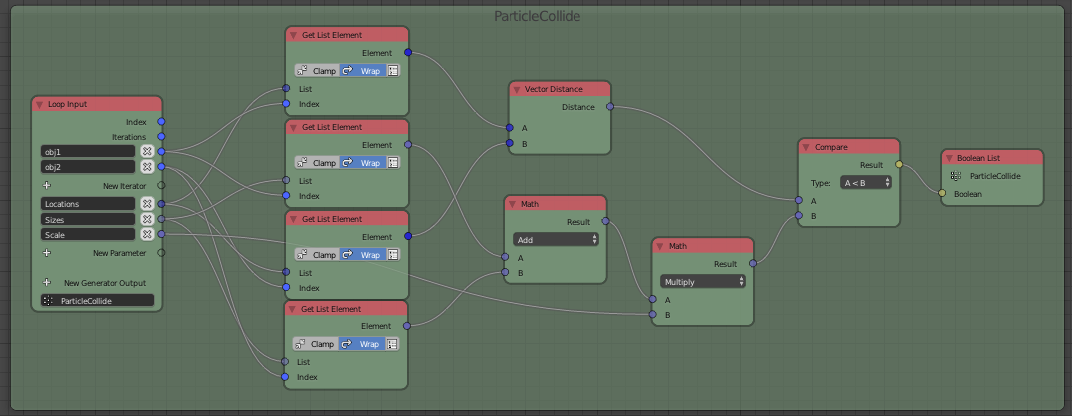
Ok. Next, let's check collision. Since everything is a perfect sphere, the math is pretty simple. The Loop node will need 2 Integer List iterators (obj1 and obj2), a Vector List parameter, a Float List parameter, a Float parameter, and a Boolean List output. Here is the NodeTree:
enter image description here

We can invoke it like so:

enter image description here

We now have a problem. We have an enormous amount of data. For my little 8000 particle simulation, there are over 2 million particle pairs that have to be checked for collision. If we also have to check if they need to have their colors modified, it would take forever. So, we should optimize the lists to only have pairs for which collision is true. Create a Script node with an Integer List and a Boolean List input and an Integer List output:
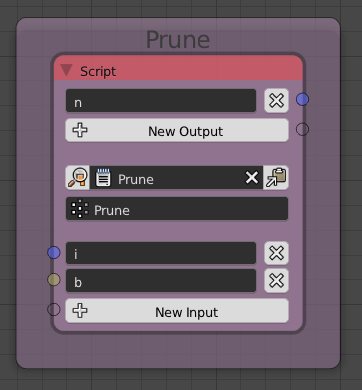
enter image description here

Here is the script:

n = [i[a] for a in range(len(i)) if b[a]]

Use this Prune node on both of the obj lists:
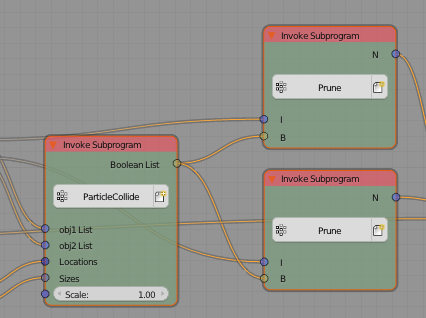
enter image description here

Lastly, we need to change the color of all the colliding pairs. Since we already have a script to calculate and change the color of a pair of particles, we don't have to do much. Create this Loop:
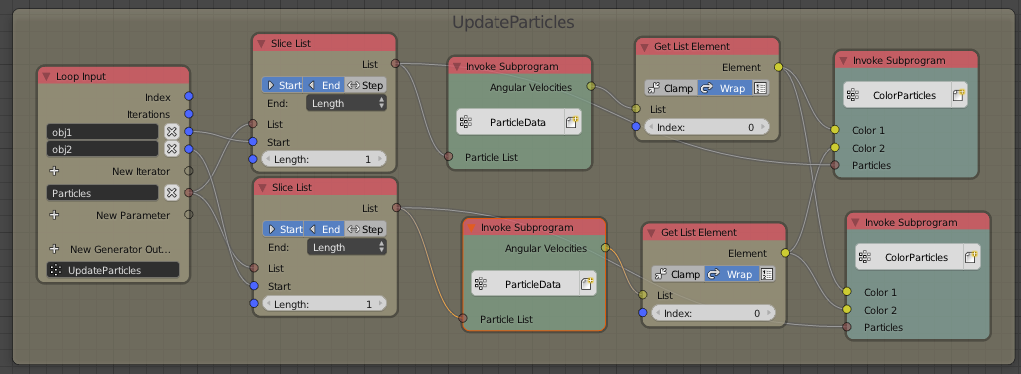
enter image description here

Make sure to change the Slice Type from Index to Length. To finish, put in the Update Particles node:
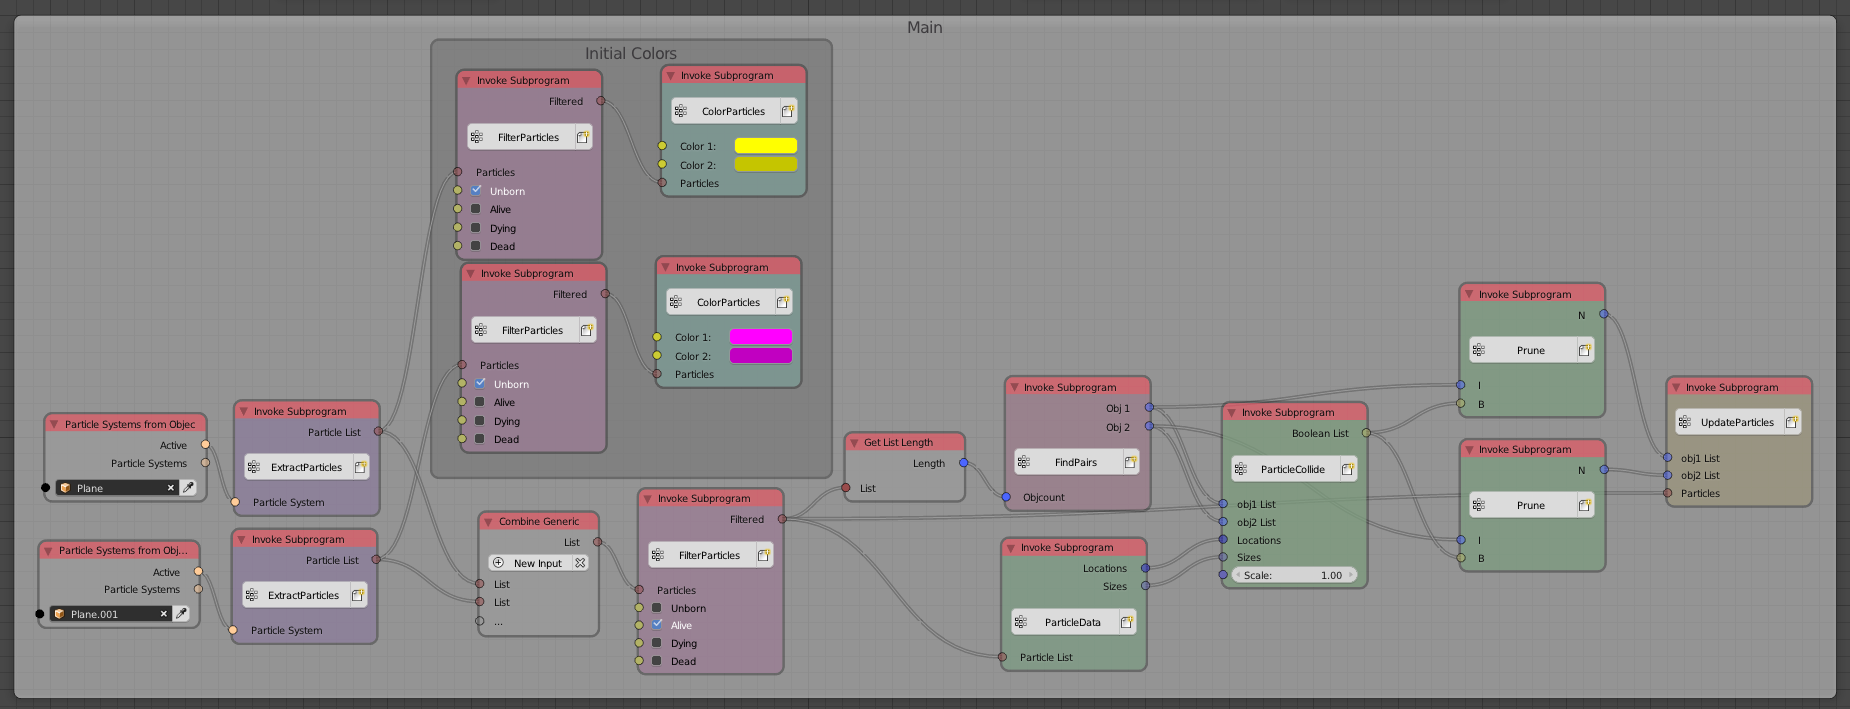
enter image description here

Done!!!

Notes:

This will not run in real-time. For an 8000 particle simulation, it takes my (about average) computer 6-7 seconds to calculate each frame. Realize that the number of pairs increases quadratically, not linearly, so a 10000 particle simulation will take roughly four times as long as a 5000 particle simulation, depending on how many collisions there are.

Be sure to save before rendering. With both the Molecular script and Animation Nodes running, my computer froze once while rendering (I only have 8GB of RAM, though).
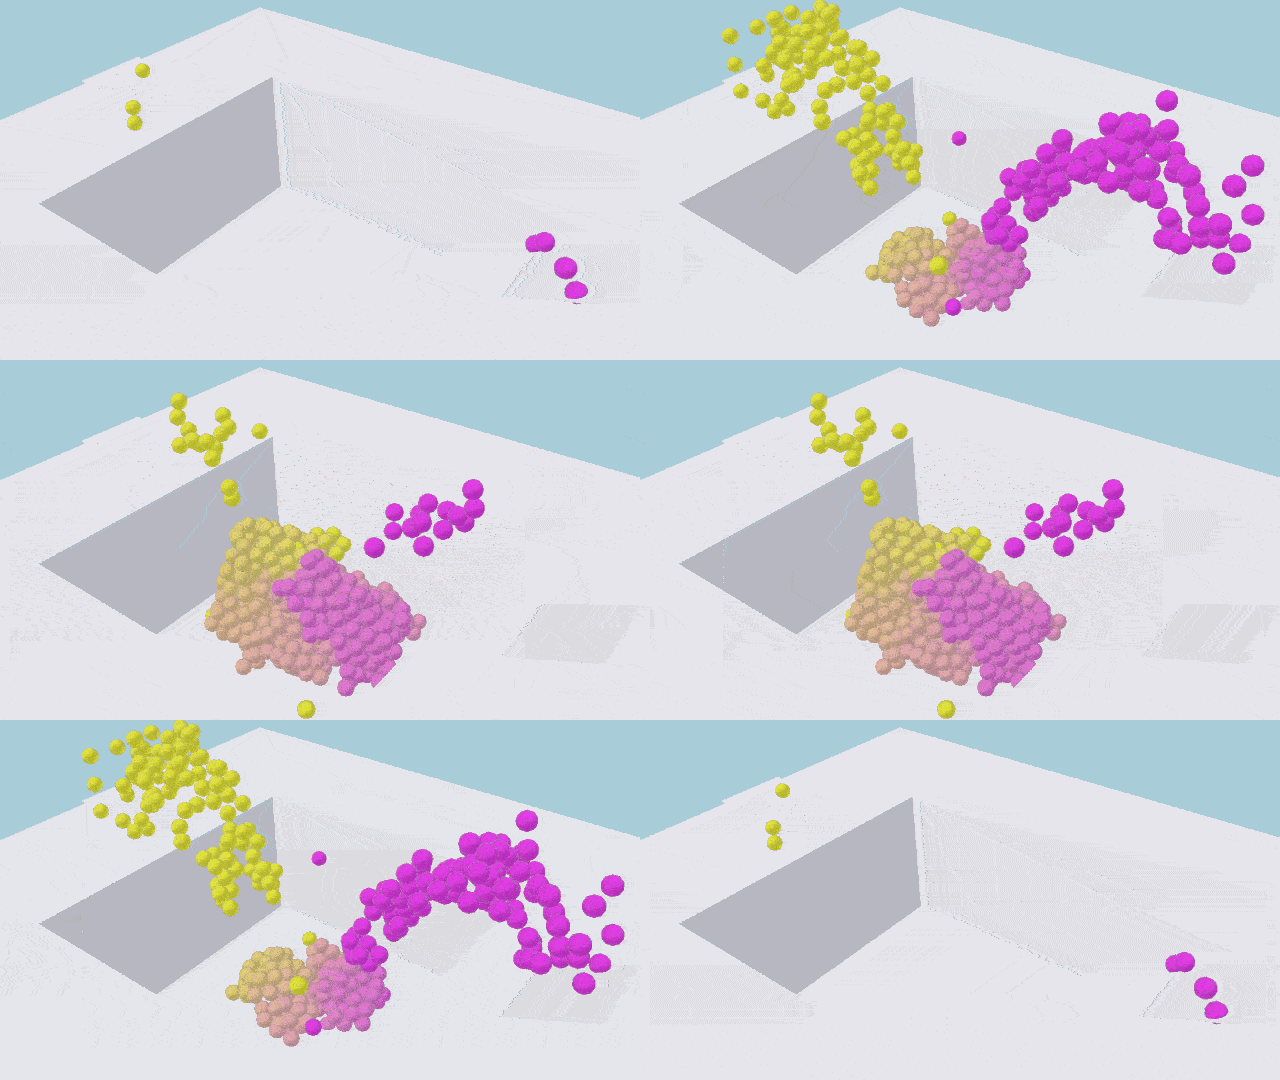
enter image description here


Blend File (requires Animation Nodes and Molecular):


Using CubeSurfer

We can even mesh our simulation and transfer the colors from the particles to the mesh. I'm using CubeSurfer to mesh my particles. It's pretty easy to pick up (controls are at the bottom of the Object panel) and there are tutorials online. Doing this will slow down the simulation a little more, but the NodeTree is pretty simple:

enter image description here

The two Reroutes are bringing in the list of active particles, and the locations of those particles, as labeled, from their respective nodes in the Main frame of the previous NodeTree. The object in the Object Input node is the Isosurface object created by CubeSurfer. You'll need to enable visibility for the Polygon Centers output of the Object Mesh Data node in the N panel. Here is the SetVertexCol script:

Object.data.vertex_colors.new() #Add a new vertex color, since it gets deleted at every frame change.
v_colors = Object.data.vertex_colors["Col"].data #Get the vertex color data
colors = [ParticleList[i].angular_velocity for i in Indices] #Get the colors for each face from the particles
i,j = 0,0
for f in Object.data.polygons:        #Iterate through each face
    for l in f.loop_indices:          #Iterate through each vertex
        v_colors[i].color = colors[j] #Paint vertex with color
        i += 1                        #Increment vertex
    j += 1                            #Increment face

The above code works because Vertex Color data is stored as a list of colors sorted by face, then vertex, which happens to be in the same order the Animation Nodes gets the faces.

Final Result:
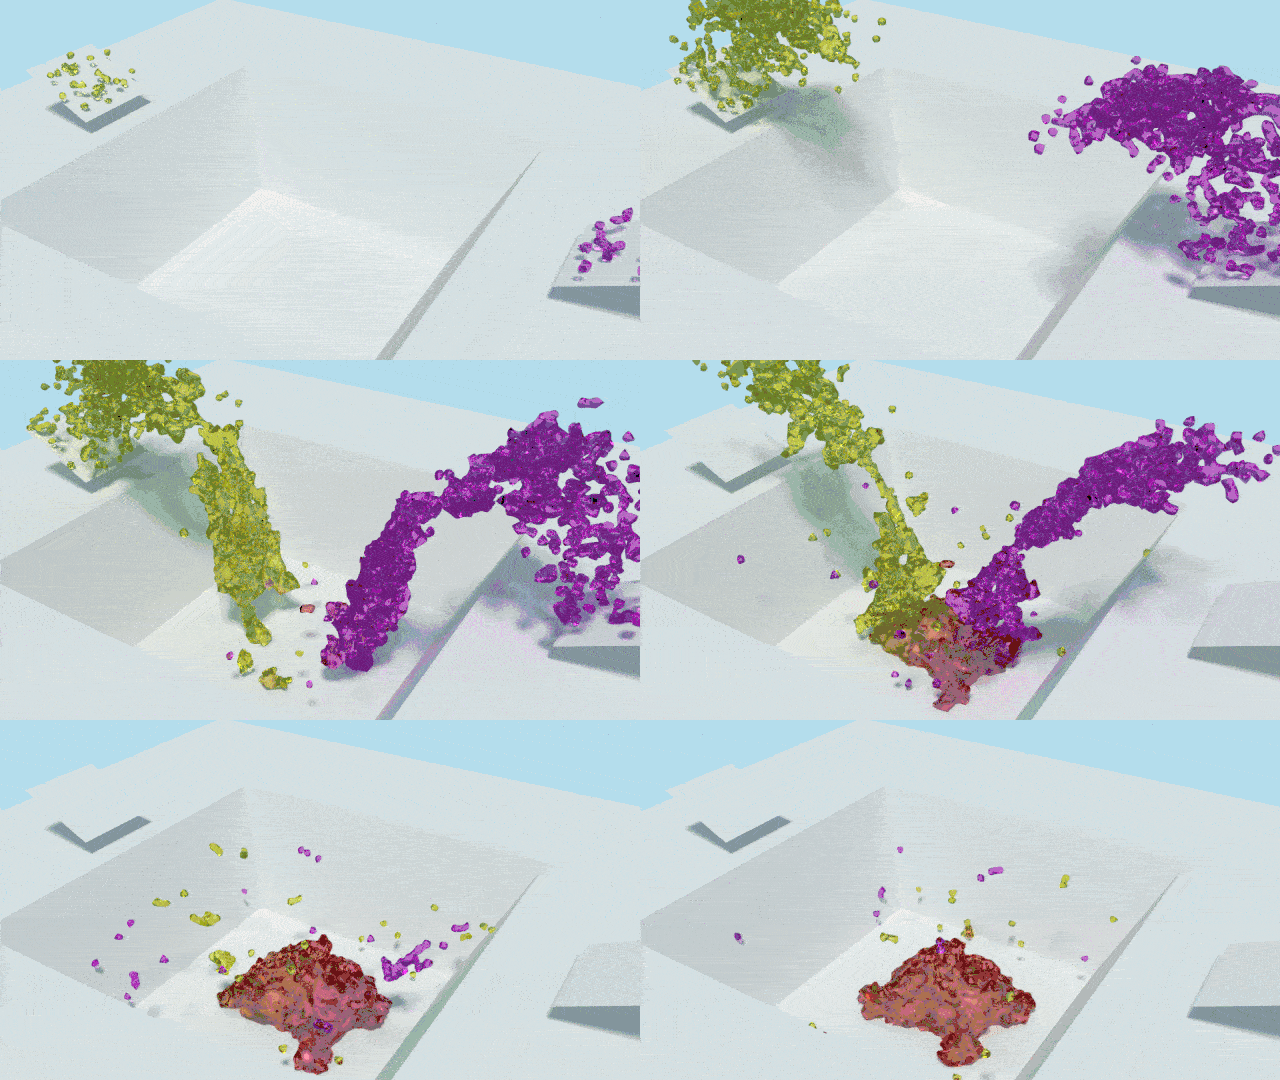
enter image description here

It looks pretty awesome. Unfortunately, converting it to .gif form took down the quality. You can watch the full clip on YouTube here. I recommend watching in slow motion so you can see it frame by frame.


Blend File (Requires Animation Nodes, Molecular, and CubeSurfer):

$\endgroup$
8
  • $\begingroup$ Amazing, I can't wait! Thanks in advance. I'm learning AN now hard as hell, it's a pitty that there are so little resources about them. $\endgroup$
    – cgslav
    Commented May 16, 2017 at 23:23
  • $\begingroup$ @LukeD Agreed. There are several YouTube videos with a lot of examples you can find, along with some BlenderArtists threads. $\endgroup$ Commented May 17, 2017 at 4:41
  • $\begingroup$ @LukeD Updated for Animation Nodes 2.0. $\endgroup$ Commented Jan 2, 2018 at 21:47
  • $\begingroup$ @JacquesLucke Where did the Particle datatype go? $\endgroup$ Commented Jan 2, 2018 at 22:14
  • $\begingroup$ @LukeD And I finally got it working with CubeSurfer. $\endgroup$ Commented Jan 4, 2018 at 1:40
12
$\begingroup$

Light code gets promising results already.
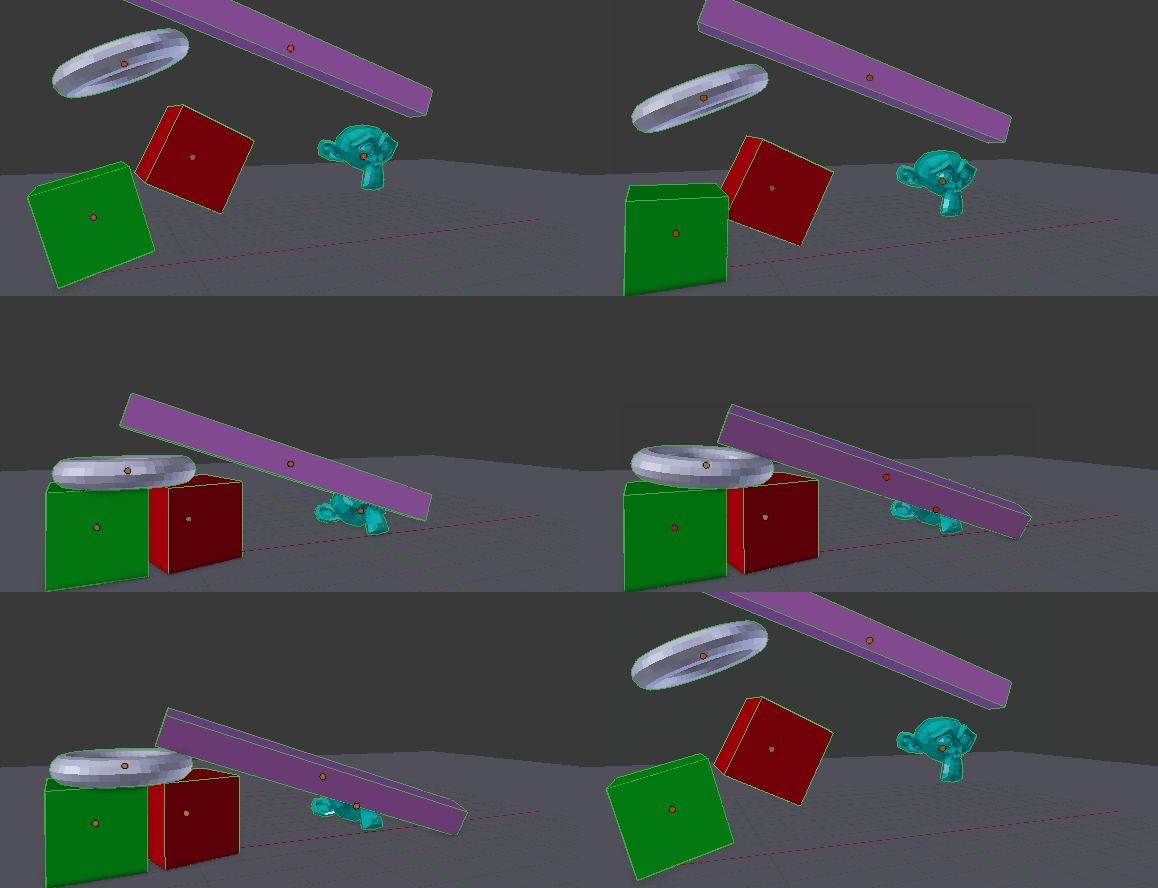
I made an example with rigid body meshes instead of particles. Spherical particle will be easy to detect as well since a collision is defined by their distance.

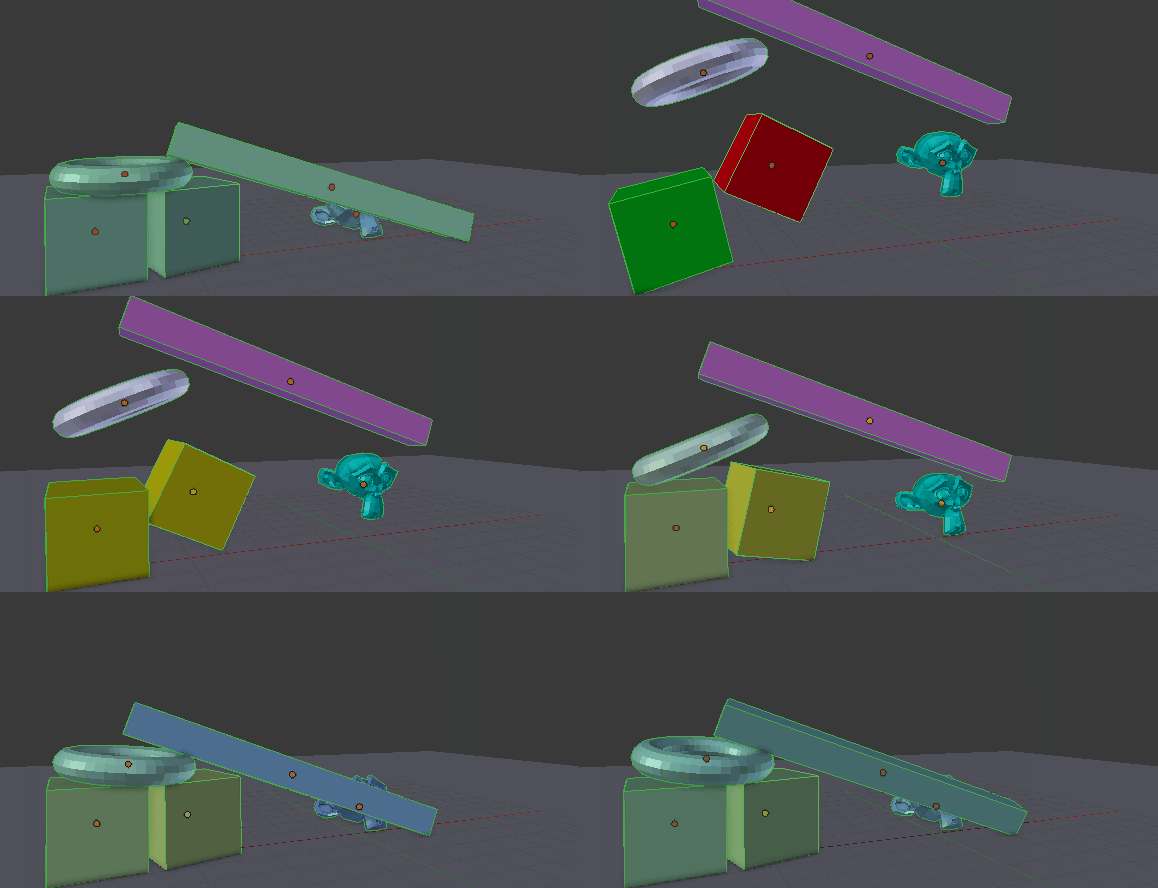
A rigid body simulation.

enter image description here

The simulation after executing the script.

enter image description here

The code.

import bpy
import bmesh
from mathutils.bvhtree import BVHTree
import mathutils

def fat_bm(scn, obj, fatten = 0.1, remove = True):
    dp = obj.modifiers.get("intersect_disp")
    if (dp == None):
        dp = obj.modifiers.new('intersect_disp','DISPLACE')
    dp.strength = fatten;
    me = obj.to_mesh(scn, True, 'PREVIEW')
    if (remove):
        obj.modifiers.remove(dp)
    
    for v in me.vertices:
        v.co = obj.matrix_world * v.co
    bm = bmesh.new() 
    bm.from_mesh(me)
    return bm

def get_overlaps(scn, obj1, obj2, fatten = 0.1, remove = True):
    
    bm_a = fat_bm(scn, obj1, fatten, remove)
    bm_b = fat_bm(scn, obj2, fatten, remove)

    tree_a = BVHTree.FromBMesh(bm_a)
    tree_b = BVHTree.FromBMesh(bm_b)

    bm_a.free()
    bm_b.free()

    overlap_pairs = tree_b.overlap(tree_a)
    return overlap_pairs

def converge_dif_color(obj1, obj2, fac = 1.0):
    a = obj1.data.materials[0].diffuse_color
    b = obj2.data.materials[0].diffuse_color
    c = mathutils.Color((0.0, 0.0, 0.0))
    sat = (a.s + b.s)/2
    val = (a.v + b.v)/2
    hue_dif = b.h - a.h
    hue = a.h + hue_dif/2
    if (hue_dif > 0.5):
        hue = b.h - ((b.h-(1+a.h))/2)
    if (hue_dif < -0.5):
        hue = a.h + (((b.h + 1)-a.h)/2)
    while (hue >= 1):
        hue -=1
    c.hsv = hue, sat, val
    
    obj1.data.materials[0].diffuse_color = (a * (1-fac) + c * fac)
    obj2.data.materials[0].diffuse_color = (b * (1-fac) + c * fac)
    
def compute_material_color(scene, objs, distance = 0.1, color_mix_per_frame = 1.0):
    # TODO check if objs have single user materials
    
    # TODO delete ONLY color keyframes
    
    
    for f in range(scene.frame_start, scene.frame_end + 1):
        print(f)
        scene.frame_set(f)
        
        for i, ob1 in enumerate(objs):
            ob2 = None
            if (i == 0):
                ob2 = objs[len(objs)-1]
            else:
                ob2 = objs[i -1]
            #print(ob1.name, ob2.name)
            if (len(get_overlaps(scene, ob1, ob2, distance)) > 0):
                converge_dif_color(ob1, ob2, color_mix_per_frame)
                
            for ob in objs:
                ob.data.materials[0].keyframe_insert(data_path="diffuse_color")


scene = bpy.context.scene
sel = []
for ob in scene.objects:
    if (ob.select == True):
        sel.append(ob)

compute_material_color(scene, sel, 0.3, 0.4)

To use this code, create some colliding objects, assign them unique color with different materials. Use only few objects at first, the script still has some problems. Select the objects and run the script.

Walkthrough

import bmesh
from mathutils.bvhtree import BVHTree
import mathutils

The bvhtree module in combination with an input bmesh is used to detect intersections.

def fat_bm(scn, obj, fatten = 0.1, remove = True):
    dp = obj.modifiers.get("intersect_disp")
    if (dp == None):
        dp = obj.modifiers.new('intersect_disp','DISPLACE')
    dp.strength = fatten;
    me = obj.to_mesh(scn, True, 'PREVIEW')
    if (remove):
        obj.modifiers.remove(dp)
    
    for v in me.vertices:
        v.co = obj.matrix_world * v.co
    bm = bmesh.new() 
    bm.from_mesh(me)
    return bm

We can't detect collisions, but we can detect intersection. Lets blow up the object in question with a displacement modifier, making it fatter. Two close by object would therefore intersect. Get a mesh with modifier applied, delete the modifier and return a bmesh.

def get_overlaps(scn, obj1, obj2, fatten = 0.1, remove = True):
    
    bm_a = fat_bm(scn, obj1, fatten, remove)
    bm_b = fat_bm(scn, obj2, fatten, remove)

    tree_a = BVHTree.FromBMesh(bm_a)
    tree_b = BVHTree.FromBMesh(bm_b)

    bm_a.free()
    bm_b.free()

    overlap_pairs = tree_b.overlap(tree_a)
    return overlap_pairs

Using the fattened bmesh objects, check if two objects intersect using the bvhtree overlap function. Return the number of overlaps.

def converge_dif_color(obj1, obj2, fac = 1.0):
    a = obj1.data.materials[0].diffuse_color
    b = obj2.data.materials[0].diffuse_color
    c = mathutils.Color((0.0, 0.0, 0.0))
    sat = (a.s + b.s)/2
    val = (a.v + b.v)/2
    hue_dif = b.h - a.h
    hue = a.h + hue_dif/2
    if (hue_dif > 0.5):
        hue = b.h - ((b.h-(1+a.h))/2)
    if (hue_dif < -0.5):
        hue = a.h + (((b.h + 1)-a.h)/2)
    while (hue >= 1):
        hue -=1
    c.hsv = hue, sat, val
    
    obj1.data.materials[0].diffuse_color = (a * (1-fac) + c * fac)
    obj2.data.materials[0].diffuse_color = (b * (1-fac) + c * fac)

A very unfinished function of combining two colors. If you would add up each channel and do something like this (r1 + r2) / 2 everything will turn gray. I tried to find the closest connection in the hue circle. A factor is used so that color may change more slowly over more frames.

def compute_material_color(scene, objs, distance = 0.1, color_mix_per_frame = 1.0):
    # TODO check if objs have single user materials
    
    # TODO delete ONLY color keyframes
    
    
    for f in range(scene.frame_start, scene.frame_end + 1):
        print(f)
        scene.frame_set(f)
        
        for i, ob1 in enumerate(objs):
            ob2 = None
            if (i == 0):
                ob2 = objs[len(objs)-1]
            else:
                ob2 = objs[i -1]
            #print(ob1.name, ob2.name)
            if (len(get_overlaps(scene, ob1, ob2, distance)) > 0):
                converge_dif_color(ob1, ob2, color_mix_per_frame)
                
            for ob in objs:
                ob.data.materials[0].keyframe_insert(data_path="diffuse_color")

Cycle through all frames. On each frame, cycles through all objects and check if a pair has more than 0 intersections. If yes, converge their colors.

To do

  • clean up meshes which gets created with applied modifiers
  • (OR) get a more efficient method to detect collisions
  • converge the hsv colors more naturally
  • check if there are keyframes on the color channels, if yes, remove them first
  • adjust the keyframing for the specific setup (e.g. cycles diffuse nodes)
  • add iterations to the color calculation, right now we're only checking on each objects once one after the other, this produces inaccurate results when an object collides with more than one other

Useful snippets for testing.

Assign random colors

import bpy
import random

objs = bpy.context.selected_objects

for ob in objs:
    r, g, b = [random.random() for i in range(3)]
    ob.data.materials[0].diffuse_color = (r, g, b)

Delete all keyframes from the diffuse channels

import bpy

scene = bpy.context.scene
objs = bpy.context.selected_objects

for f in range(scene.frame_start, scene.frame_end + 1):
    for ob in objs:
        ob.data.materials[0].keyframe_delete(data_path="diffuse_color", index = -1, frame = f)

The required distance and mix amount get passed through all functions.

compute_material_color(scene, objs, distance, color_mix_per_frame)

enter image description here

$\endgroup$
1
$\begingroup$

The easiest solution might be using UPBGE:

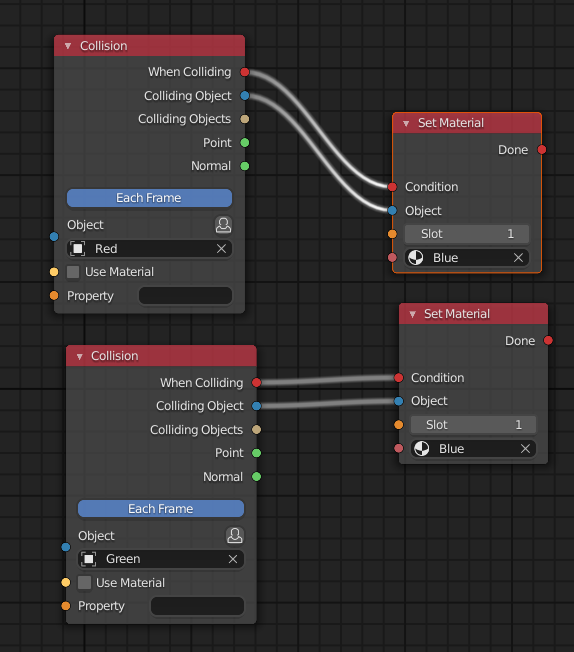
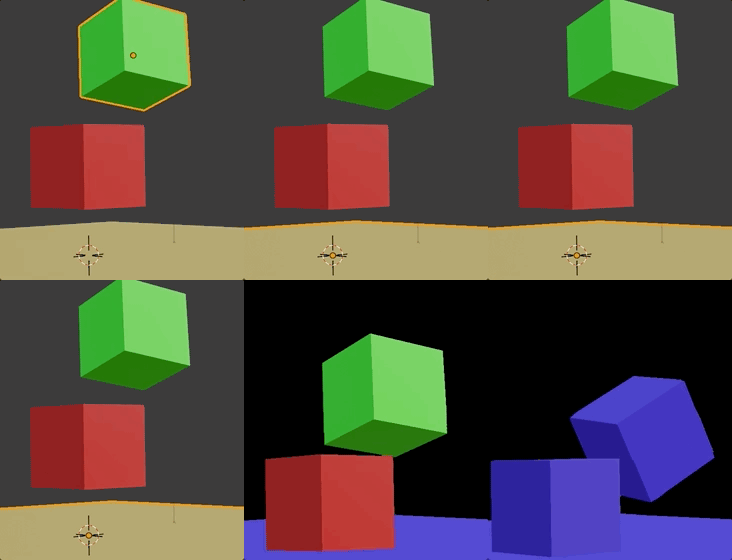
Use this node setup:

enter image description here

and you get:

enter image description here

$\endgroup$
0
$\begingroup$

And what about changing the particles color of your two particles systems as soon as they are : - below a given z value ; - or inside a given coordinates system ?

I'm an artist, so I have no any idea of how to do this, and if such thing is only possible, but if this can help you even a little.

$\endgroup$
2
  • 1
    $\begingroup$ It's not helpful at all, if you pour both particle system to the ground first and then wait them to meet in the middle. Second thing, what if particle system is set to have random colors? And lastly, when you set uneven particle distribution color mixing will be completely different. $\endgroup$
    – cgslav
    Commented Jan 24, 2017 at 21:20
  • $\begingroup$ for an artist is not such a bad answer, at least he be right in the sense that visually it would look smooth, btw eaasy to also by particle age. so kudos $\endgroup$
    – Peter
    Commented May 12, 2017 at 6:25

You must log in to answer this question.

Not the answer you're looking for? Browse other questions tagged .