2
$\begingroup$

How do I crop an image loaded from a file in Blender (using a Python script). The standard Python's Image.crop() function doesn't seem to be available in the Image class.

UPDATE:

I wrote some code by myself, which copies specified pixels of the original image but the output image is somehow screwed up.

This is the original image (some gfx from deviantart): http://postimg.org/image/xegpwy0ur

This is the image after processing - i took a 100x100 fragment (first 10000 pixels of the original image): http://postimg.org/image/c57j2vvjp

And this is the code: http://pastecode.org/index.php/view/5045500

$\endgroup$
6
  • $\begingroup$ How did you load the image? Was it loaded into the Video Sequence Editor? $\endgroup$
    – Garrett
    Commented Jun 24, 2014 at 3:30
  • $\begingroup$ The standard python image library (PIL?) is not included in Blender. $\endgroup$
    – Greg Zaal
    Commented Jun 24, 2014 at 9:00
  • $\begingroup$ i loaded the original image with bpy.data.images.load("path\to\file.jpg"), so now it's available in bpy.data.images[0] $\endgroup$
    – Val
    Commented Jun 24, 2014 at 10:45
  • $\begingroup$ It's probably better not to change the nature of the question after it already has an answer. Your original question and Sambler's answer were good and would be useful to many people, but you've changed it to be about your specific script. Do you mind reverting to your original question? We can try to help you for additional issues in the comment section under Sambler's answer. And in the future, you can ask a second, separate question. $\endgroup$
    – Garrett
    Commented Jun 26, 2014 at 1:21
  • $\begingroup$ I'm not changing my question, I'm trying to find a fully working solution. I still don't have a working cropping algorithm so I don't know if any answer is correct $\endgroup$
    – Val
    Commented Jun 26, 2014 at 6:39

2 Answers 2

5
$\begingroup$

Function to crop an image:

def crop_image(orig_img, cropped_min_x, cropped_max_x, cropped_min_y, cropped_max_y):
    '''Crops an image object of type <class 'bpy.types.Image'>.  For example, for a 10x10 image, 
    if you put cropped_min_x = 2 and cropped_max_x = 6,
    you would get back a cropped image with width 4, and 
    pixels ranging from the 2 to 5 in the x-coordinate

    Note: here y increasing as you down the image.  So, 
    if cropped_min_x and cropped_min_y are both zero, 
    you'll get the top-left of the image (as in GIMP).

    Returns: An image of type  <class 'bpy.types.Image'>
    '''

    num_channels=orig_img.channels
    #calculate cropped image size
    cropped_size_x = cropped_max_x - cropped_min_x
    cropped_size_y = cropped_max_y - cropped_min_y
    #original image size
    orig_size_x = orig_img.size[0]
    orig_size_y = orig_img.size[1]

    cropped_img = bpy.data.images.new(name="cropped_img", width=cropped_size_x, height=cropped_size_y)

    print("Exctracting image fragment, this could take a while...")

    #loop through each row of the cropped image grabbing the appropriate pixels from original
    #the reason for the strange limits is because of the 
    #order that Blender puts pixels into a 1-D array.
    current_cropped_row = 0
    for yy in range(orig_size_y - cropped_max_y, orig_size_y - cropped_min_y):
        #the index we start at for copying this row of pixels from the original image
        orig_start_index = (cropped_min_x + yy*orig_size_x) * num_channels
        #and to know where to stop we add the amount of pixels we must copy
        orig_end_index = orig_start_index + (cropped_size_x * num_channels)
        #the index we start at for the cropped image
        cropped_start_index = (current_cropped_row * cropped_size_x) * num_channels 
        cropped_end_index = cropped_start_index + (cropped_size_x * num_channels)

        #copy over pixels 
        cropped_img.pixels[cropped_start_index : cropped_end_index] = 
                                orig_img.pixels[orig_start_index : orig_end_index]

        #move to the next row before restarting loop
        current_cropped_row += 1

    return cropped_img

How this script works

The image class stores the pixel information as a one-dimensional array, and save 4 channels for RGBA (even if you load a .jpg). For example, on this 2x2 image, I've labelled the order that the pixels appear:
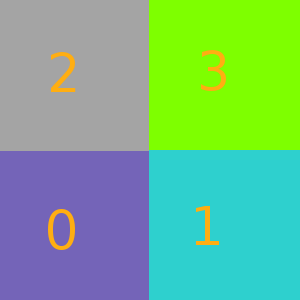
enter image description here

and so if you have an image object named my_image, then my_image.pixels will be a 1-D array: [R value for pixel 0, G value for 0, B value for 0, A value for 0, R value for pixel 1, etc.].

Example usage

#crop image to 100x100 square
cropped_min_x = 300
cropped_max_x = 400
cropped_min_y = 300
cropped_max_y = 400 
input_image_filepath='/home/garrett/Desktop/kjEh.jpg'

orig_img = bpy.data.images.load(input_image_filepath)

cropped_img = crop_image(orig_img, cropped_min_x, cropped_max_x, cropped_min_y, cropped_max_y)

print("Saving new image...")
cropped_img.filepath_raw = "/home/garrett/Desktop/myImage6.png" 
cropped_img.file_format = 'PNG'
cropped_img.save()
print("Finished saving")
$\endgroup$
3
  • $\begingroup$ Haven't had time recently for this but I've finally tested your script and it's working so I've marked your answer as correct. But there's still something I don't understand in the code which is the for loop. What is yy and what does the for loop do exactly inside of it? And thx for your help! $\endgroup$
    – Val
    Commented Jul 3, 2014 at 14:30
  • $\begingroup$ Each iteration of the for loop grabs one row of the image and saves it into the cropped image. It might help to imagine a simple 3x3 image, and then logically run through the code in your head or with paper and pencil handy. You could also insert some print statements to help you understand what's going on. $\endgroup$
    – Garrett
    Commented Jul 3, 2014 at 20:13
  • 1
    $\begingroup$ I adapted this successfully to my work, but it is extremely slow. It maxes out a single CPU core and then leaves Blender unresponsive during the computation. $\endgroup$ Commented Oct 22, 2018 at 1:23
2
$\begingroup$

imageop.crop() was available in python 2.7 but is not included with python 3.x which blender has used since 2.50

Apart from simple painting tools, Blender currently only offers image manipulation within the video sequencer and the compositor. So one option might be to create compositor nodes that crop the image.

Blender's Image class does provide access to the image pixels data so you could write a script to copy the required pixels to another block and switch them or create a new image.

$\endgroup$
8
  • $\begingroup$ i already wrote my script which copies a specified range of pixels from the original image but for some reason when i save the new image the pixels are all screwed up. looks like the order is incorrect or something. any idea? $\endgroup$
    – Val
    Commented Jun 24, 2014 at 10:43
  • 1
    $\begingroup$ Can you share a link to your script? $\endgroup$
    – Garrett
    Commented Jun 24, 2014 at 21:53
  • $\begingroup$ this is the original image (some gfx from deviantart) postimg.org/image/xegpwy0ur $\endgroup$
    – Val
    Commented Jun 25, 2014 at 6:33
  • $\begingroup$ this is the image after processing - i took a 100x100 fragment (first 10000 pixels of the original image): postimg.org/image/c57j2vvjp $\endgroup$
    – Val
    Commented Jun 25, 2014 at 6:35
  • $\begingroup$ and this is the code: pastecode.org/index.php/view/5045500 $\endgroup$
    – Val
    Commented Jun 25, 2014 at 6:39

You must log in to answer this question.

Not the answer you're looking for? Browse other questions tagged .