added 28 characters in body
Source Link
Garrett
  • 6.6k
  • 6
  • 48
  • 75
def crop_image(orig_img, cropped_min_x, cropped_max_x, cropped_min_y, cropped_max_y):
    '''Crops an image object of type <class 'bpy.types.Image'>.  For example, for a 10x10 image, 
    if you put cropped_min_x = 2 and cropped_max_x = 6,
    you would get back a cropped image with width 4, and 
    pixels ranging from the 2 to 5 in the x-coordinate
    
    Note: here y increasing as you down the image.  So, 
    if cropped_min_x and cropped_min_y are both zero, 
    you'll get the top-left of the image (as in GIMP).
    
    Returns: An image of type  <class 'bpy.types.Image'>
    '''

    num_channels=orig_img.channels
    #calculate cropped image size
    cropped_size_x = cropped_max_x - cropped_min_x
    cropped_size_y = cropped_max_y - cropped_min_y
    #original image size
    orig_size_x = orig_img.size[0]
    orig_size_y = orig_img.size[1]
     
    cropped_img = bpy.data.images.new(name="cropped_img", width=cropped_size_x, height=cropped_size_y)
     
    print("Exctracting image fragment, this could take a while...")

    #loop through each row of the cropped image grabbing the appropriate pixels from original
    #the reason for the strange limits is because of the 
    #order that Blender puts pixels into a 1-D array.
    current_cropped_row = 0
    for yy in range(orig_size_y - cropped_max_y, orig_size_y - cropped_min_y):
        #the index we start at for copying this row of pixels from the original image
        orig_start_index = (cropped_min_x + yy*orig_size_x) * num_channels
        #and to know where to stop we add the amount of pixels we must copy
        orig_end_index = orig_start_index + (cropped_size_x * num_channels)
        #the index we start at for the cropped image
        cropped_start_index = (current_cropped_row * cropped_size_x) * num_channels 
        cropped_end_index = cropped_start_index + (cropped_size_x * num_channels)
        
        #copy over pixels 
        cropped_img.pixels[cropped_start_index : cropped_end_index] = 
                                orig_img.pixels[orig_start_index : orig_end_index]
        
        #move to the next row before restarting loop
        current_cropped_row += 1

    return cropped_img

and so if you look at have an image object named my_image, then my_image.pixels will be a 1-D array: [R value for pixel 0, G value for 0, B value for 0, A value for 0, R value for pixel 1, etc.].

#crop image to 100x100 square
cropped_min_x = 300
cropped_max_x = 350400
cropped_min_y = 70300
cropped_max_y = 500400 
input_image_filepath='/home/garrett/Desktop/kjEh.jpg'

orig_img = bpy.data.images.load(input_image_filepath)

cropped_img = crop_image(orig_img, cropped_min_x, cropped_max_x, cropped_min_y, cropped_max_y)
 
print("Saving new image...")
cropped_img.filepath_raw = "/home/garrett/Desktop/myImage6.png" 
cropped_img.file_format = 'PNG'
cropped_img.save()
print("Finished saving")
def crop_image(orig_img, cropped_min_x, cropped_max_x, cropped_min_y, cropped_max_y):
    '''Crops an image object of type <class 'bpy.types.Image'>.  For example, for a 10x10 image, 
    if you put cropped_min_x = 2 and cropped_max_x = 6,
    you would get back a cropped image with width 4, and 
    pixels ranging from the 2 to 5 in the x-coordinate
    
    Note: here y increasing as you down the image.  So, 
    if cropped_min_x and cropped_min_y are both zero, 
    you'll get the top-left of the image (as in GIMP).
    
    Returns: An image of type  <class 'bpy.types.Image'>
    '''

    num_channels=orig_img.channels
    #calculate cropped image size
    cropped_size_x = cropped_max_x - cropped_min_x
    cropped_size_y = cropped_max_y - cropped_min_y
    #original image size
    orig_size_x = orig_img.size[0]
    orig_size_y = orig_img.size[1]
     
    cropped_img = bpy.data.images.new(name="cropped_img", width=cropped_size_x, height=cropped_size_y)
     
    print("Exctracting image fragment, this could take a while...")

    #loop through each row of the cropped image grabbing the appropriate pixels from original
    #the reason for the strange limits is because of the 
    #order that Blender puts pixels into a 1-D array.
    current_cropped_row = 0
    for yy in range(orig_size_y - cropped_max_y, orig_size_y - cropped_min_y):
        #the index we start at for copying this row of pixels from the original image
        orig_start_index = (cropped_min_x + yy*orig_size_x) * num_channels
        #and to know where to stop we add the amount of pixels we must copy
        orig_end_index = orig_start_index + (cropped_size_x * num_channels)
        #the index we start at for the cropped image
        cropped_start_index = (current_cropped_row * cropped_size_x) * num_channels 
        cropped_end_index = cropped_start_index + (cropped_size_x * num_channels)
        
        cropped_img.pixels[cropped_start_index : cropped_end_index] = 
                                orig_img.pixels[orig_start_index : orig_end_index]
        
        #move to the next row before restarting loop
        current_cropped_row += 1

    return cropped_img

and so if you look at have an image object named my_image, then my_image.pixels will be a 1-D array: [R value for pixel 0, G value for 0, B value for 0, A value for 0, R value for pixel 1, etc.].

cropped_min_x = 300
cropped_max_x = 350
cropped_min_y = 70
cropped_max_y = 500 
input_image_filepath='/home/garrett/Desktop/kjEh.jpg'

orig_img = bpy.data.images.load(input_image_filepath)

cropped_img = crop_image(orig_img, cropped_min_x, cropped_max_x, cropped_min_y, cropped_max_y)
 
print("Saving new image...")
cropped_img.filepath_raw = "/home/garrett/Desktop/myImage6.png" 
cropped_img.file_format = 'PNG'
cropped_img.save()
print("Finished saving")
def crop_image(orig_img, cropped_min_x, cropped_max_x, cropped_min_y, cropped_max_y):
    '''Crops an image object of type <class 'bpy.types.Image'>.  For example, for a 10x10 image, 
    if you put cropped_min_x = 2 and cropped_max_x = 6,
    you would get back a cropped image with width 4, and 
    pixels ranging from the 2 to 5 in the x-coordinate
    
    Note: here y increasing as you down the image.  So, 
    if cropped_min_x and cropped_min_y are both zero, 
    you'll get the top-left of the image (as in GIMP).
    
    Returns: An image of type  <class 'bpy.types.Image'>
    '''

    num_channels=orig_img.channels
    #calculate cropped image size
    cropped_size_x = cropped_max_x - cropped_min_x
    cropped_size_y = cropped_max_y - cropped_min_y
    #original image size
    orig_size_x = orig_img.size[0]
    orig_size_y = orig_img.size[1]
     
    cropped_img = bpy.data.images.new(name="cropped_img", width=cropped_size_x, height=cropped_size_y)
     
    print("Exctracting image fragment, this could take a while...")

    #loop through each row of the cropped image grabbing the appropriate pixels from original
    #the reason for the strange limits is because of the 
    #order that Blender puts pixels into a 1-D array.
    current_cropped_row = 0
    for yy in range(orig_size_y - cropped_max_y, orig_size_y - cropped_min_y):
        #the index we start at for copying this row of pixels from the original image
        orig_start_index = (cropped_min_x + yy*orig_size_x) * num_channels
        #and to know where to stop we add the amount of pixels we must copy
        orig_end_index = orig_start_index + (cropped_size_x * num_channels)
        #the index we start at for the cropped image
        cropped_start_index = (current_cropped_row * cropped_size_x) * num_channels 
        cropped_end_index = cropped_start_index + (cropped_size_x * num_channels)
        
        #copy over pixels 
        cropped_img.pixels[cropped_start_index : cropped_end_index] = 
                                orig_img.pixels[orig_start_index : orig_end_index]
        
        #move to the next row before restarting loop
        current_cropped_row += 1

    return cropped_img

and so if you have an image object named my_image, then my_image.pixels will be a 1-D array: [R value for pixel 0, G value for 0, B value for 0, A value for 0, R value for pixel 1, etc.].

#crop image to 100x100 square
cropped_min_x = 300
cropped_max_x = 400
cropped_min_y = 300
cropped_max_y = 400 
input_image_filepath='/home/garrett/Desktop/kjEh.jpg'

orig_img = bpy.data.images.load(input_image_filepath)

cropped_img = crop_image(orig_img, cropped_min_x, cropped_max_x, cropped_min_y, cropped_max_y)
 
print("Saving new image...")
cropped_img.filepath_raw = "/home/garrett/Desktop/myImage6.png" 
cropped_img.file_format = 'PNG'
cropped_img.save()
print("Finished saving")
Source Link
Garrett
  • 6.6k
  • 6
  • 48
  • 75

Function to crop an image:

def crop_image(orig_img, cropped_min_x, cropped_max_x, cropped_min_y, cropped_max_y):
    '''Crops an image object of type <class 'bpy.types.Image'>.  For example, for a 10x10 image, 
    if you put cropped_min_x = 2 and cropped_max_x = 6,
    you would get back a cropped image with width 4, and 
    pixels ranging from the 2 to 5 in the x-coordinate
    
    Note: here y increasing as you down the image.  So, 
    if cropped_min_x and cropped_min_y are both zero, 
    you'll get the top-left of the image (as in GIMP).
    
    Returns: An image of type  <class 'bpy.types.Image'>
    '''

    num_channels=orig_img.channels
    #calculate cropped image size
    cropped_size_x = cropped_max_x - cropped_min_x
    cropped_size_y = cropped_max_y - cropped_min_y
    #original image size
    orig_size_x = orig_img.size[0]
    orig_size_y = orig_img.size[1]
     
    cropped_img = bpy.data.images.new(name="cropped_img", width=cropped_size_x, height=cropped_size_y)
     
    print("Exctracting image fragment, this could take a while...")

    #loop through each row of the cropped image grabbing the appropriate pixels from original
    #the reason for the strange limits is because of the 
    #order that Blender puts pixels into a 1-D array.
    current_cropped_row = 0
    for yy in range(orig_size_y - cropped_max_y, orig_size_y - cropped_min_y):
        #the index we start at for copying this row of pixels from the original image
        orig_start_index = (cropped_min_x + yy*orig_size_x) * num_channels
        #and to know where to stop we add the amount of pixels we must copy
        orig_end_index = orig_start_index + (cropped_size_x * num_channels)
        #the index we start at for the cropped image
        cropped_start_index = (current_cropped_row * cropped_size_x) * num_channels 
        cropped_end_index = cropped_start_index + (cropped_size_x * num_channels)
        
        cropped_img.pixels[cropped_start_index : cropped_end_index] = 
                                orig_img.pixels[orig_start_index : orig_end_index]
        
        #move to the next row before restarting loop
        current_cropped_row += 1

    return cropped_img

How this script works

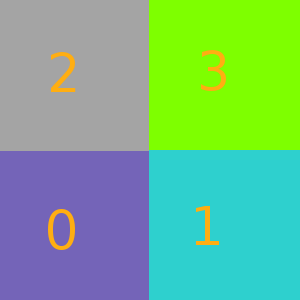
The image class stores the pixel information as a one-dimensional array, and save 4 channels for RGBA (even if you load a .jpg). For example, on this 2x2 image, I've labelled the order that the pixels appear:

enter image description here

and so if you look at have an image object named my_image, then my_image.pixels will be a 1-D array: [R value for pixel 0, G value for 0, B value for 0, A value for 0, R value for pixel 1, etc.].

Example usage

cropped_min_x = 300
cropped_max_x = 350
cropped_min_y = 70
cropped_max_y = 500 
input_image_filepath='/home/garrett/Desktop/kjEh.jpg'

orig_img = bpy.data.images.load(input_image_filepath)

cropped_img = crop_image(orig_img, cropped_min_x, cropped_max_x, cropped_min_y, cropped_max_y)
 
print("Saving new image...")
cropped_img.filepath_raw = "/home/garrett/Desktop/myImage6.png" 
cropped_img.file_format = 'PNG'
cropped_img.save()
print("Finished saving")