12
$\begingroup$

I am in the middle of a project which needs to have a river flowing in it. (You may be familiar with my recent questions; they are all related.) Just for reference and imagination, here's a preview of the setting where the river should go. enter image description here
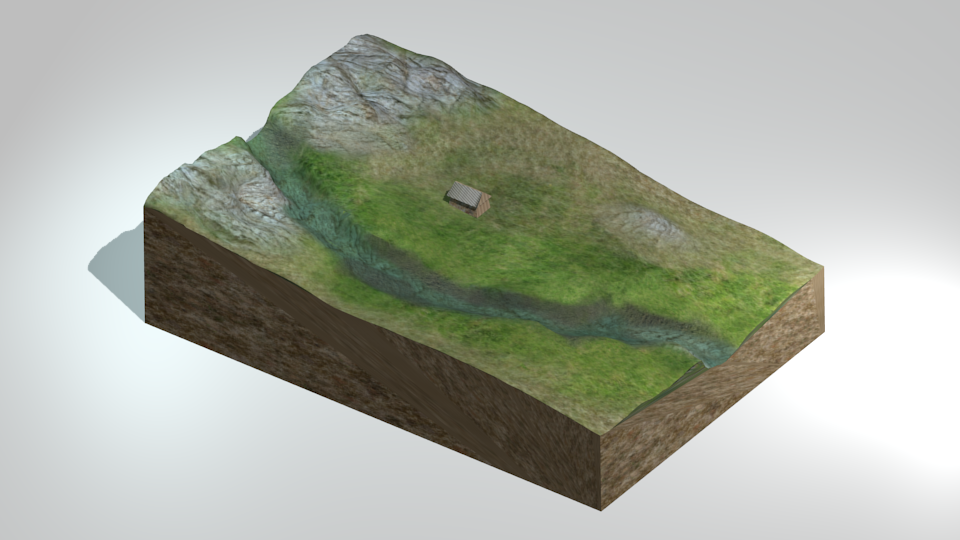
As you can see, what I need to accomplish is:

1) something like an "ever-flowing river". It shouldn't start flowing from some point and expand from there. The final render (it is for a video) should be continuous and seamless.

2) a "caged" river. You should see it flowing as if we took a slice of it, (just like with the rest of the terrain)

I've been looking for tutorials, but the ones I've found tend to cover typical fluid simulations, which I'm not so sure can help me. I think I may need something more simple. Something like a cloth waving (for now it doesn't need to be realistic).

I ran into this video, and I was hoping for some hints on how the creator did that, because I don't understand... I can tell he used code... Maybe some of you can give me a kind introduction to code in Blender aiming to generate this kind of river.

I'm not interested by now in making something as realistic or detailed as the video, but it happens to fits my 2 initial requirements.

$\endgroup$
9
  • 1
    $\begingroup$ This tutorial shows how to make a waterfall, and I bet you could adapt it to simulate your river: youtube.com/watch?v=vhukodLRj-M $\endgroup$ Commented Mar 21, 2014 at 4:05
  • $\begingroup$ It is indeed really useful! you shoul've posted as an answer, thank you! $\endgroup$
    – invicente
    Commented Mar 21, 2014 at 4:11
  • $\begingroup$ Stack Exchange doesn't want to have links to external videos in case the videos later get deleted, otherwise I would have. I think it might've gotten downvoted if I'd posted it as an answer! :S But, I'm hope it helps you! :) $\endgroup$ Commented Mar 21, 2014 at 4:16
  • $\begingroup$ If you need help getting the river to follow a curved path, let me know and I can show you how to do that. :) $\endgroup$ Commented Mar 21, 2014 at 14:32
  • $\begingroup$ @ThomBlairIII It would be fine if you added a summary of the video in your answer in addition to the link. That way the answer isn't completely gone if the video goes. $\endgroup$
    – gandalf3
    Commented Mar 21, 2014 at 19:57

2 Answers 2

9
$\begingroup$

How to make a Procedural River

The Curve Modifier can deform an object so that it conforms to the shape of a curve object. Note that the curve object must be a curve, not a mesh.

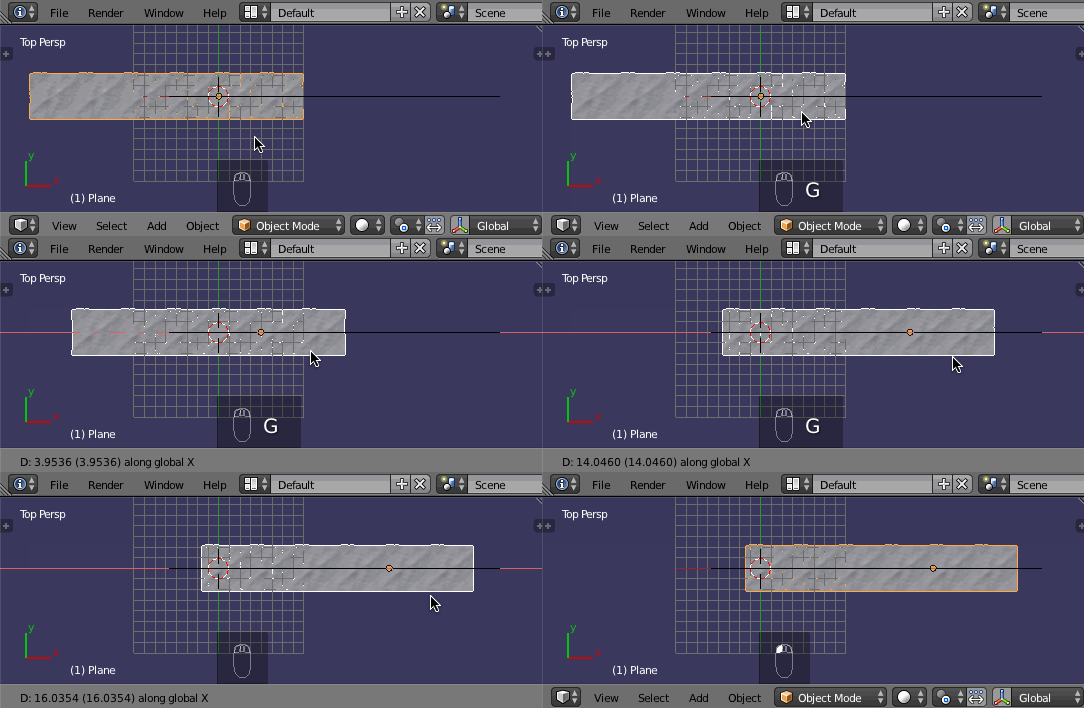
  1. For this technique, your river should be a long straight plane, about the width and length you want the river to be:
    SHIFTA -> Mesh -> Plane -> S -> X -> drag the mouse until the plane is as long as you want it to be

  2. For this technique to be easy, don't move the river away from the 3D cursor

  3. Make sure the location, rotation and scale of the river have been applied if they have been changed:
    • Select the river -> CTRLA -> Apply Location
    • CTRLA again -> Apply Rotation & Scale
  4. Make sure the Origin of the river object is in it's middle. You can put the Origin there like this:
    Tools panel (T) -> Tools tab -> Edit section -> Set Origin -> Origin to Geometry
  5. Now make sure the river mesh has enough subdivisions so that it can deform to the shape you want the river to be. If the river plane doesn't have enough subdivisions, it will not be able to bend to conform to the path we're going to create soon:
    Select the river -> Edit mode (TAB) -> Tools panel -> Tools tab -> Add section -> click Subdivide maybe 4 or 5 times -> exit Edit mode (TAB)
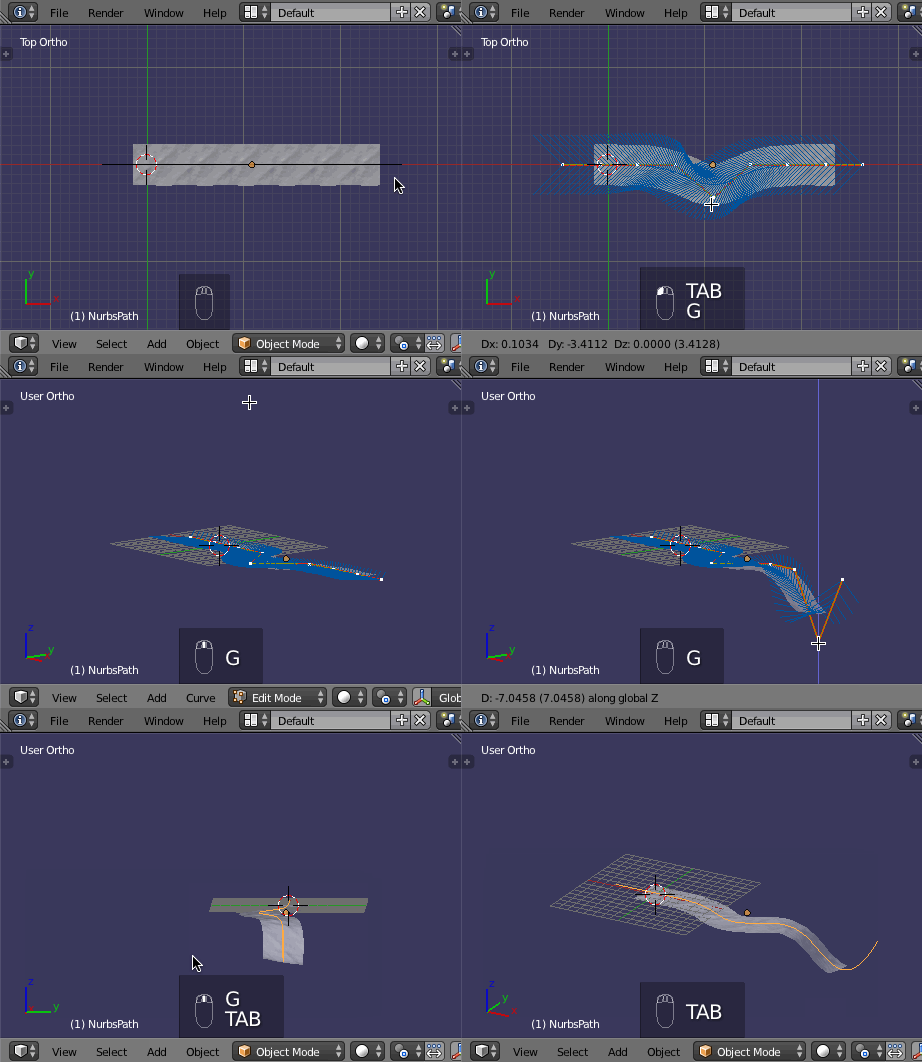
  6. Now add a path curve:
    SHIFTA -> Curve -> Path
  7. Scale (S) the path to be the length of the river
  8. Select the path curve and go into Edit mode (TAB)
  9. Make the path approximately the shape you want your river to be, then exit Edit mode (TAB)
  10. Select the river object, then:
    Properties panel -> Modifiers -> Add Modifier -> Curve (under the Deform header)
  11. Now on the Curve modifier's properties:
    Object -> select the path curve you made for the river (it will be called NurbsPath unless you changed it's name)
  12. The river should now conform to the shape of the path curve
  13. To change the position of the river along the path, translate/slide it along the X axis:
    Select river plane -> Grab (G) -> X -> drag
    Note: you can animate the position of the plane along the curve if you want
  14. To position the river on your landscape, select both the river & the path curve and move them together. You MUST move them together at the same time otherwise they will get separated and behave oddly. If you accidentally get the plane and the path separated, do this:
    • Select the path -> SHIFTS -> Selection to cursor
    • Select the river plane -> SHIFTS -> Selection to cursor
  15. If you want to change anything about the river's width or length, just select it, go into Edit mode and change it
  16. If the river is not smooth enough, you can increase the number of subdivisions in Edit mode, as listed above
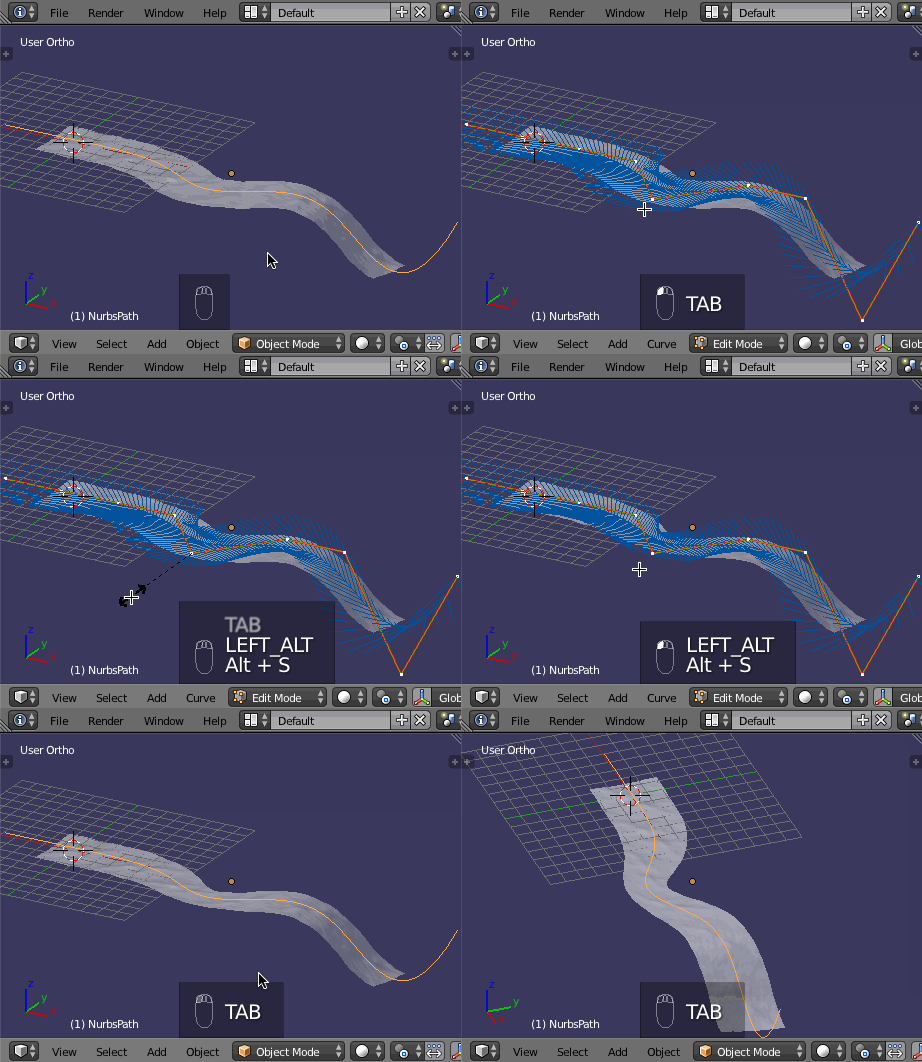
  17. If you want to change the path of the river, select the path curve and edit it
    (Note: you can subdivide the path just like you subdivided the river plane:
    Select the path curve -> TAB -> Tools panel -> Tools tab -> Add section -> Subdivide)

  18. To get the river to conform properly to your landscape, you can now edit the shape of the plane if you want, and then you can also edit the shape of the path

$\endgroup$
5
  • $\begingroup$ Hello again,I have a question. If you watch this video youtu.be/sxgwa-0e5Jw?t=51s you'll see that the texture of the water is somehow following the geometry of the plane, giving a more realistic feel. That is exactly what i'm trying to do, but in the tutorial he doesn't explains that, and I have a bad feeling that it is more difficult in newer versions of blender... what do you think? $\endgroup$
    – invicente
    Commented Apr 23, 2014 at 3:34
  • 1
    $\begingroup$ Actually, I've been wanting to revise my answer with what I think is a MUCH more elegant and effective method using the Ocean modifier, as described in this video. I haven't done it though because I thought you'd probably already finished or found another solution. But, if you still need help, I'd be glad to give an answer based on that video...I think it would meet your 2 requirements. $\endgroup$ Commented Apr 23, 2014 at 3:42
  • $\begingroup$ With the technique using the Ocean modifier, the river and it's flow would follow the contour of the curvature of the river's path...I think it will do just what you want. $\endgroup$ Commented Apr 23, 2014 at 3:49
  • $\begingroup$ It's getting quite late here, almost midnight, so I will write up the answer tomorrow morning and post it. $\endgroup$ Commented Apr 23, 2014 at 3:50
  • $\begingroup$ Thanks, i am an extremely slow person, so the project is still going on. But anyway i think your new answer will be handy for future reference. I think the earlier one is very useful too. But, as the ocean modifier is not used in the video i posted, i still have the question: Is it possible to achieve this, in the current version of blender, only animating the procedural textures and the displacement maps? maybe i should start a new specific question? $\endgroup$
    – invicente
    Commented Apr 23, 2014 at 4:12
11
$\begingroup$

Make a Procedural River using the Ocean Modifier

This technique for creating a river allows the flow of the water to follow the path of the river easily. To do it, simply create an long, narrow Ocean object, then add a Curve Modifier to it.

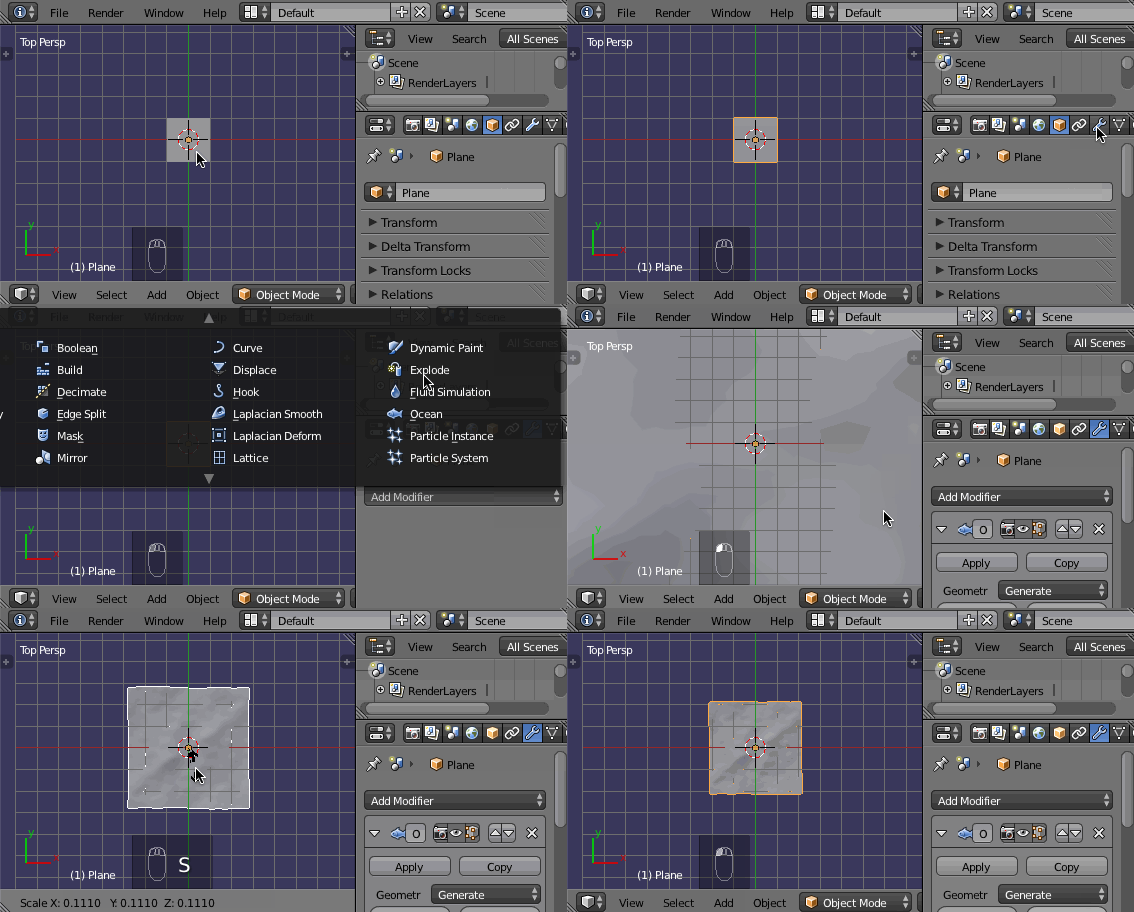
  1. Create a plane: SHIFTA -> Mesh -> Plane
    (NOTE: For this technique to be easy, DO NOT move the plane away from where it is created -- the 3D Cursor is where it is created)

  2. Add an Ocean Modifier to the plane. You may want to scale down the resulting mesh.

    enter image description here

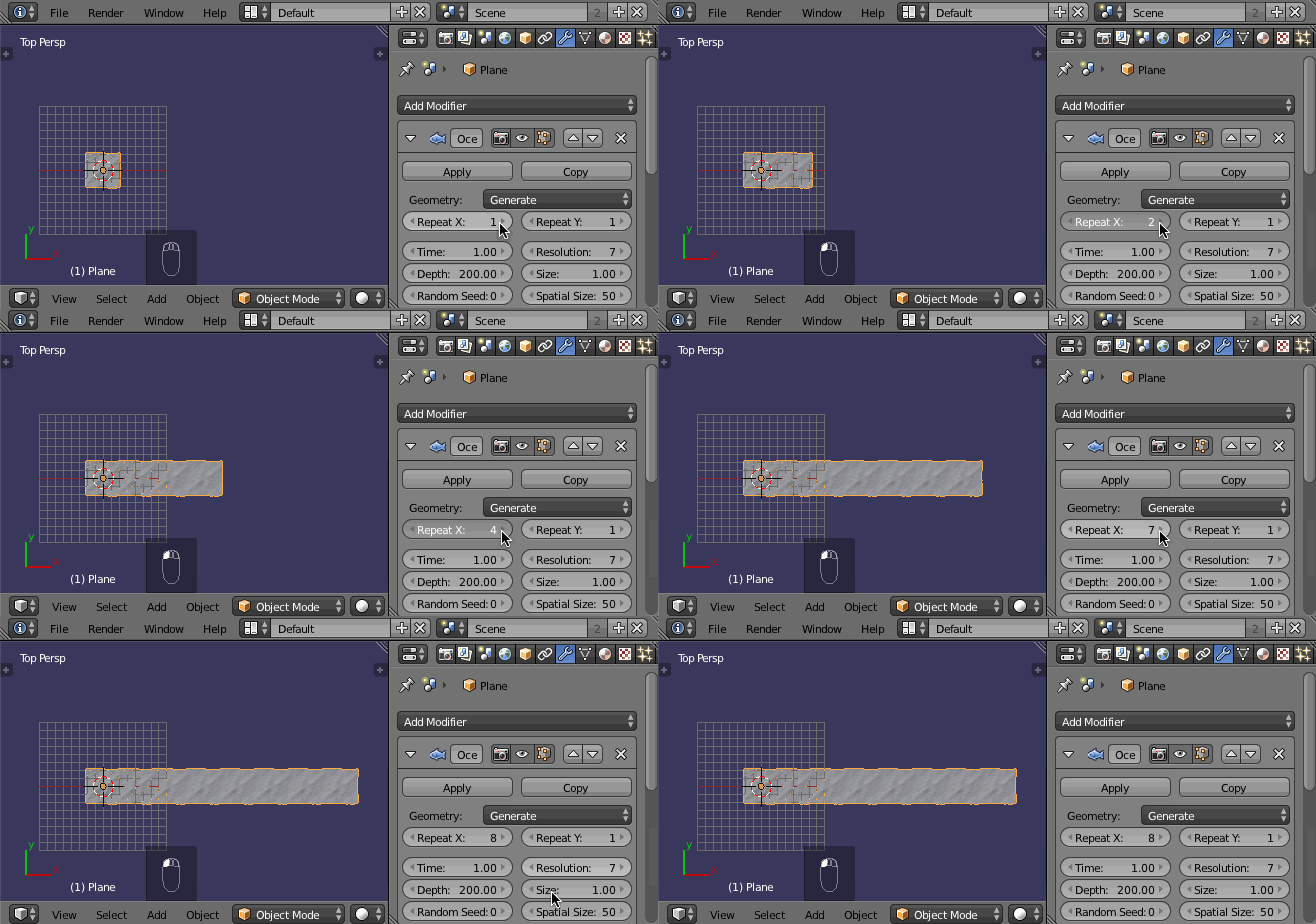
  3. Lengthen the Ocean object along the X axis by increasing the Repeat X value. This will be the river object:

    enter image description here

  4. Add a Path Curve: SHIFTA -> Curve -> Path
    (NOTE: Again, for this technique to be easy, DO NOT move the path away from where it is created -- the 3D Cursor is where it is created, so it will appear right on top of the river)

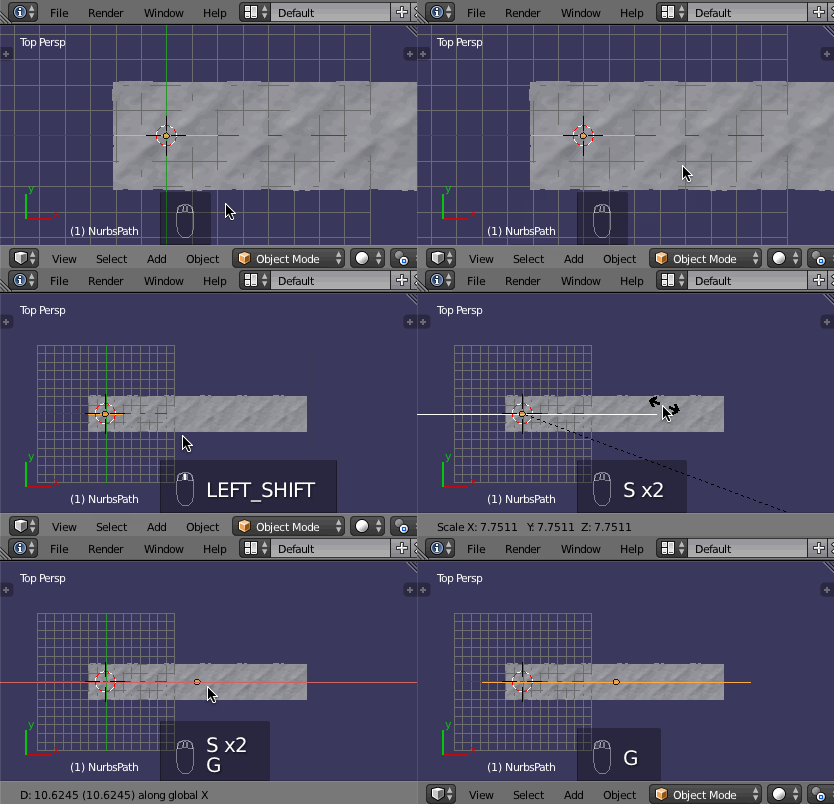
  5. Scale the path so it is a little bit bigger than the river, then position it so it is in the middle of the river:

    • Scale: Select path -> S -> drag mouse

    • Move on X Axis: Select path -> G -> X -> drag mouse
      (NOTE: This is the one time you can move the path until you reach Step #10 below)

    enter image description here

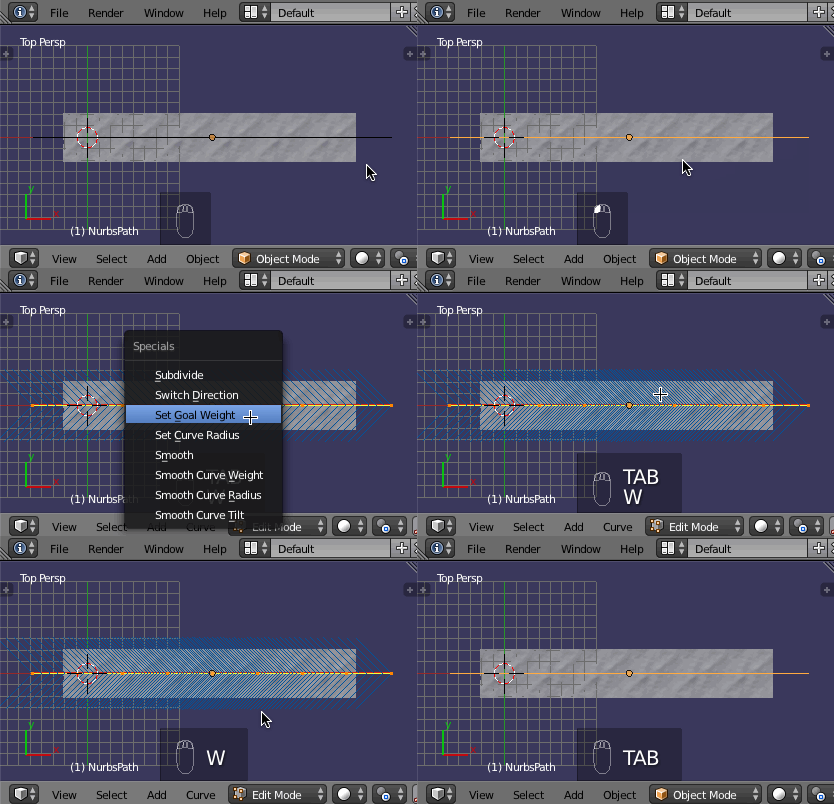
  6. With the path selected, go into Edit mode and subdivide the path as many times as you have bends in the river. In your river, you have one bend, so just subdivide it one time:
    Select path -> TAB W -> Subdivide -> Exit Edit Mode (TAB)

    enter image description here

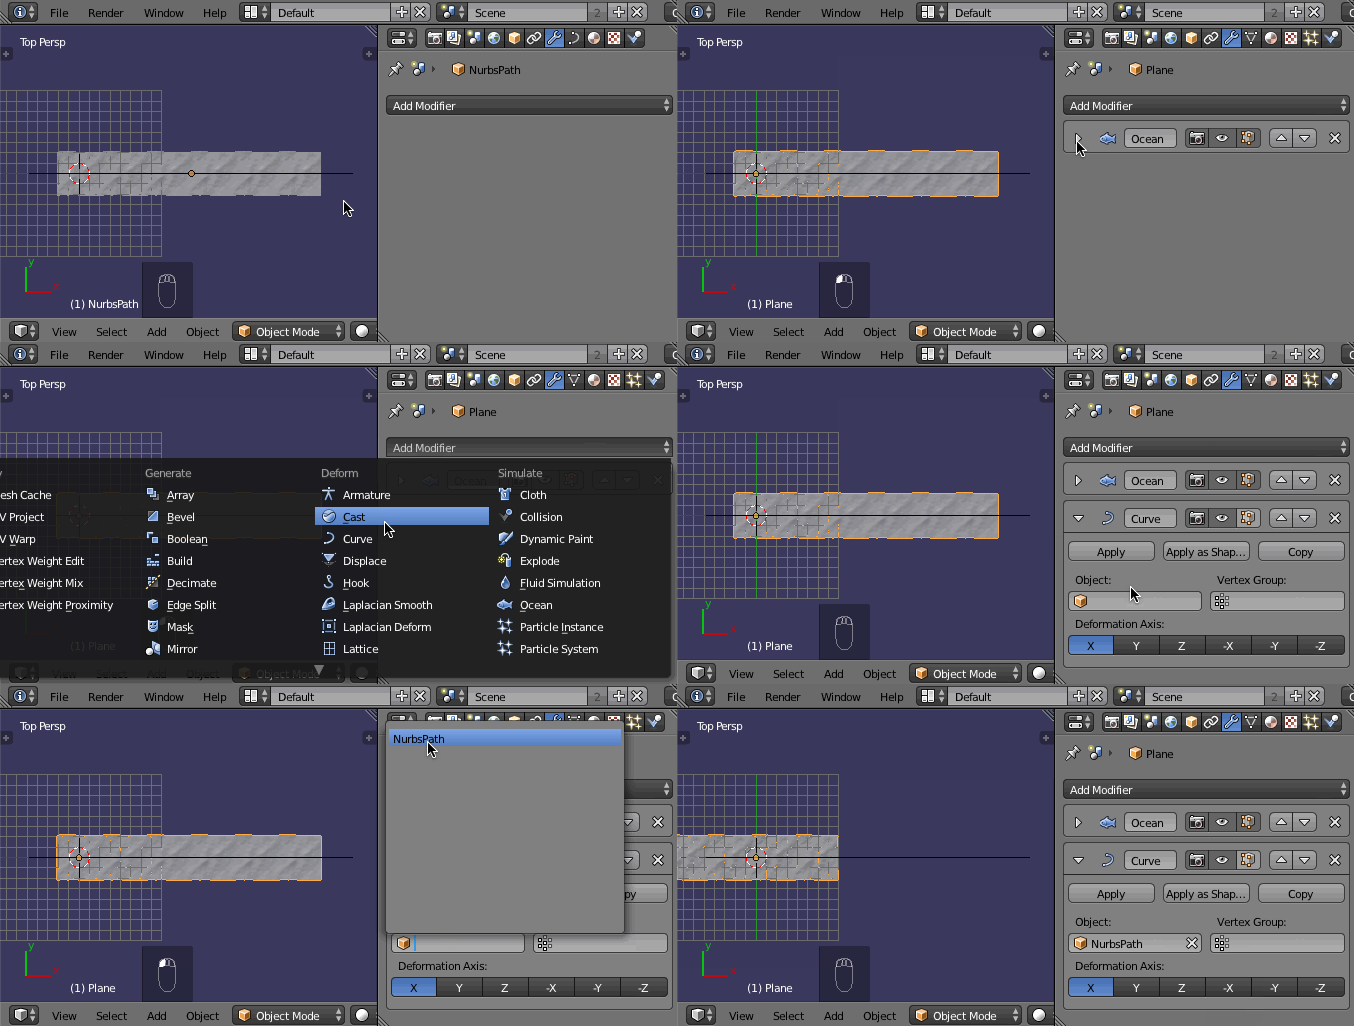
  7. Select the river and add a Curve Deform Modifier to it and set the Object to the path:

    enter image description here

    This makes the river mesh conform to the shape of the path.

  8. Now move the river so it is fully on the path:
    Select river -> G -> X -> drag mouse

    enter image description here

  9. Edit the path so it is the shape you want your river to be:

    enter image description here

  10. Position the river on your landscape. To do this, you MUST move both the path and river together, so select them both, then move them:
    Select path -> hold SHIFT while selecting the river -> G -> Position them

  11. If you want to make the river narrower or wider in certain places, you can do that by select one of the vertices of the path and altering it with ALTS:
    Select path -> TAB -> select vertex -> ALTS -> drag mouse

    enter image description here

Animating the River

To make the river flow, you now need to animate it's properties by setting keyframes for the Ocean Modifier's properties.

$\endgroup$
1
  • $\begingroup$ Good idea about usign Ocean ! +1 $\endgroup$
    – user2266
    Commented Jul 7, 2014 at 8:12

You must log in to answer this question.

Not the answer you're looking for? Browse other questions tagged .