1
$\begingroup$

I'm wondering the most efficient way to programatically "slice" though objects to generate a 2D set of faces, vertex loops and derivatives such as face area, and centrons (for more complex objects I'm assuming there would often be multiple faces in a single slice). From this I want to be able to analyse, colorise and potentially modify the original mesh components the slice was generated from.

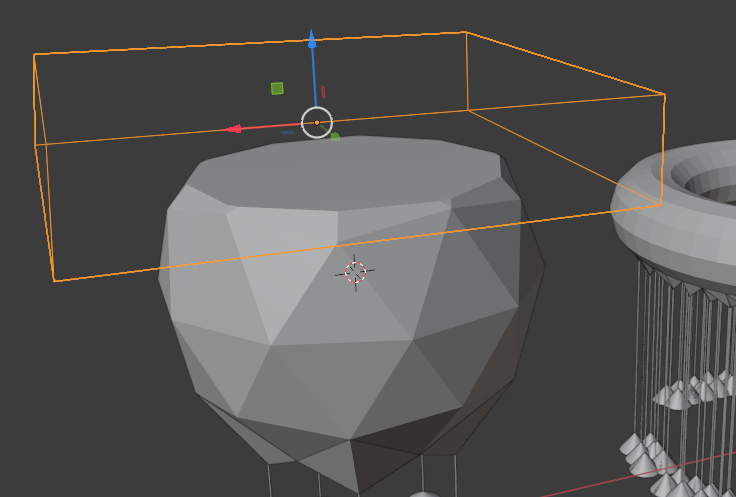
The easiest way would seem to be if I could to access the faces and vertex loops in the same way I had thought the boolean modifier would (such as the top face shown in the image).

However I looked at the Bool Tools code (object_boolean_tools.py) and it doesn't access mesh data, and I can't find any bpy code which actually does this

At the moment therefore, the best option seems to be to copy the object into a bmesh and slice it with bpy.ops.mesh.bisect - the code for doing this could be extracted from https://github.com/Rylangrayston/Dicer but for this purpose I ideally want it to be 2D (which this isn't quite), and to reference the original mesh (which it doesn't). Also having seen someone elses code run dramatically faster than mine, I'm after advice before starting on such a modification as this already seems likely to be fairly slow and inefficient approach for thin slicing as for the highest resolution I could be looking at wanting 100k slices through a model.

Thanks

enter image description here

$\endgroup$
4
  • 2
    $\begingroup$ Related blender.stackexchange.com/questions/195053/… & a slicing and dicing script blender.stackexchange.com/a/133136/15543 Added first link since 100K slices, depending on model dimension, is going to both be slow, and push blenders tolerance. Creating 100K b&w renders may be a quicker way. $\endgroup$
    – batFINGER
    Commented Apr 13, 2021 at 9:46
  • $\begingroup$ Thanks, I'll experiment a bit more. One of the sublinks: blender.stackexchange.com/questions/118884/… took 30sec to slice a model with 80k faces into ~700 slices, but fundamentally I only want the vertex loop of the edge it creates so I need an efficient way to not get the rest of the data. It should also be much more efficient to sort and index the bmesh along the normal of the slicing plane once beforehand so you only access the edges crossing the slice whereas I suspect bisect deals with them fresh every time. $\endgroup$
    – David
    Commented Apr 13, 2021 at 13:33
  • $\begingroup$ Sped up the boolean slicer by replacing the apply modifier operator with evaluated mesh, and used FAST type in boolean modifier. Still goes horrible when a boolean goes horrible. If I understand last comment could use bisect akin to blender.stackexchange.com/questions/121119/… to instead make a series of edge rings.... re last comment maybe the case, can depend on how much faster the C code is than the python used to make more efficient. Any way best way to find out is get coding.. $\endgroup$
    – batFINGER
    Commented Apr 13, 2021 at 13:38
  • $\begingroup$ When I ran the code to slice the original model into 0.1mm slices then repeated as 0.01mm slices the second recursion was well under 1 second (effectively the first slice indexes everything so the vertex count is much lower), so I think managing it that way is likely to work reasonably well. Successively halving the model is likely to be even faster. I will just need to map it back to the original vertices, but if I set the object origin to match the same world origin for original and sliced model and just move the slices to a different layer that shouldn't be too challanging either. $\endgroup$
    – David
    Commented Apr 13, 2021 at 13:56

2 Answers 2

3
$\begingroup$

A more straight-forward approach.

Not sure this is "most efficient" but it's relatively quick and is a straight forward load mesh into bmesh & single bisect cut per rep

Now it's clearer the result desired, re just the edges of the bisect cuts have re-jigged answers from

Python: Bisect mesh into n parts, without separate 'LOOSE'

How to extract side-view outline (e.g. top view) of a 3D object to 2D surface?

to create objects using the result of the bisect operator.

Notes.

  • Suprisingly it was quicker to constantly reload the bmesh rather than use recycling the same

  • For example sake have simply run from (0, 0, -1) to (0, 0, 1) local coordinates to test on sphere / icosphere / cube etc.

  • See Replace matrix @ vector list comprehensions with something more efficient re a fast way to convert between spaces and calculate the required limits.

  • To convert the bmesh to global (or another space) use bm.transform(matrix)

  • To use a mesh with modifiers and shapes applied use bm.from_object(ob, depsgraph)

  • Other commented out code re attempts to squeeze out a bit more speed, have AFAIK left those that ran the quickest.

Test script.

import bpy
import bmesh
from mathutils import Vector
from bpy import context 


def slicer(ob, start, end, cuts):
    #slices = [] could instead return unlinked objects
    axis = end - start
    dv = axis / cuts
    #axis.normalize()
    mw = ob.matrix_world
    bm0 = bm = bmesh.new()
    
    # transform to world coords
    # bm.transform(mw)
    # mesh = bpy.data.meshes.new("Slice")

    for i in range(cuts + 1):
        bm.from_mesh(ob.data)
        #bm.from_object(ob, dg) # use modified mesh
        #bm = bm0.copy()
        #bm.transform(mw) # make global
        plane_co = start + i * dv
       
        cut = bmesh.ops.bisect_plane(
                bm,
                plane_co=plane_co,
                plane_no=axis,
                geom=bm.verts[:] + bm.faces[:] + bm.edges[:],
                clear_inner=True,
                clear_outer=True,
                )["geom_cut"]
        if not cut:
            bm.clear()
            continue
        me = bpy.data.meshes.new(f"Slice{i}")
        # me = mesh.copy()
        bm.to_mesh(me)
        '''
        # only slightly slower
        me.from_pydata(
            [v.co for v in cut if hasattr(v, "co")],
            [(e.verts[0].index, e.verts[1].index) for e in cut if hasattr(e, "verts")],
            []
            )
        '''

        slice = bpy.data.objects.new(f"Slice{i}", me)
        slice.matrix_world = mw
        context.collection.objects.link(slice)
        bm.clear()        
        #bm.free() # if using bm = bm0.copy()
    #bm.free()
    
slicer(
        context.object, 
        Vector((0, 0, -1)), 
        Vector((0, 0, 1)), 
        200)

Timing it.

Using the decorator method

REPS = 10
import time
def time_it(func):
    from builtins import print
    def wrapper(*arg, **kw):
        t1 = time.time()
        for i in range(REPS):
            ret = func(*arg, **kw)
        t2 = time.time()
        print(func.__name__, (t2 - t1))
        return ret
    return wrapper
@time_it
def slicer(....

10 Test runs of 10 reps making 200 cuts in default UV sphere. Using the command for your script of

slicer(0.01, (0,0,1)) # 

which should be 200 cuts on default sphere at origin.

To time the two scripts, after removing prints from yours to make things relatively equal (as mentioned didn't calculate the bounds of mesh, however as shown in link provided using numpy or other methods, it's hardly rate determining) consistently came up with a speed ratio, this answer to yours of around 8 to 11.

However an issue was yours is making 2500 objects, whereas mine makes 2000 over 10 runs, which will also account for some time differential when fixed.

Not seeing the glitch.

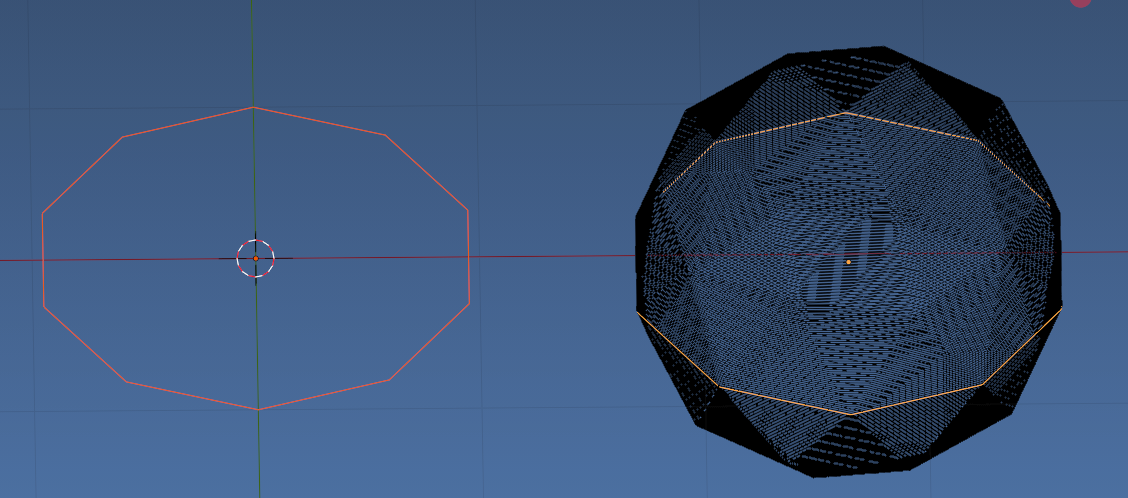
Unfortunately there seems to be a glitch where sometimes layers are lost or only partially formed - I think it's a bug in the bisect function, not my code - eg bottom photo: the icosphere is missing the middle layer if the slice would be at exactly the midline of the icosphere .

No issue with code above run on icosphere,

enter image description here Left using 2 cuts (prob should be segments as it's 1 middle cut) and on right with 200 and middle edge ring selected

$\endgroup$
1
  • $\begingroup$ Your's is definitely simpler, but it bogs down with much larger numbers of faces. There's still something odd even with yours about the central slice (not that I think it needs pursuing any further). With your code that layer alone seems to have (lots of) faces if counted just after the cut with: print("Generated BMesh with: ", len(bm.verts), " verts,", len(bm.edges), " edges,", len(bm.faces), " faces,") $\endgroup$
    – David
    Commented Apr 14, 2021 at 21:12
1
$\begingroup$

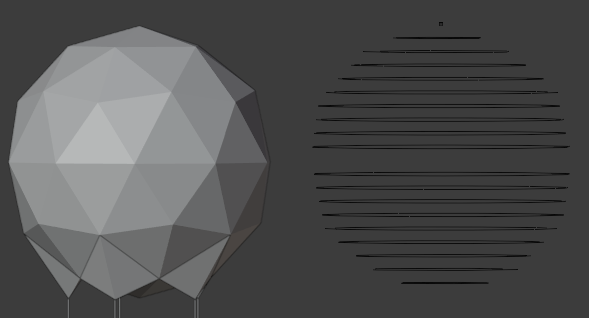
Wow I'm seriously impressed (and surprised) I've managed to get Blender to slice my 80k face object into 2000 slices in under 8 seconds (top image - on the R is the original, L is the sliced version).

Unfortunately there seems to be a glitch where sometimes layers are lost or only partially formed - I think it's a bug in the bisect function, not my code - eg bottom photo: the icosphere is missing the middle layer if the slice would be at exactly the midline of the icosphere .

I've included the code below in case its useful to someone.
enter image description here

enter image description here

import bpy, bmesh
from bpy import context as C
from mathutils import Vector

# This code will slice the selected object into a set of vertices and edges
# along the direction of the unit vector (normal)
# in steps of step_size in local coordinate space 
#(this ignores the scale property, so make sure to apply it before)
# If you want to slice at a different angle then just change the normal, and start
# far enough down the z-axis to ensure the plane will slice the entire model
# You can calculate step size to give appropriate thickness slices with sqrt(x*x + y*y +  z*z)
# NB this strategy won't work if you want to cut perpendicular to the z- axis
# in that case you'll need to change the code a bit more


def newobj(bm, name):
    me = bpy.data.meshes.new(name)
    bm.to_mesh(me)
    ob = bpy.data.objects.new(name,me)
    #C.scene.objects.link(ob)
    bpy.data.collections['Slices'].objects.link(ob)
    return ob

# https://blender.stackexchange.com/questions/32283/what-are-all-values-in-bound-box
def bounds(obj, local=False):

    local_coords = obj.bound_box[:]
    om = obj.matrix_world

    if not local:    
        worldify = lambda p: om * Vector(p[:]) 
        coords = [worldify(p).to_tuple() for p in local_coords]
    else:
        coords = [p[:] for p in local_coords]

    rotated = zip(*coords[::-1])

    push_axis = []
    for (axis, _list) in zip('xyz', rotated):
        info = lambda: None
        info.max = max(_list)
        info.min = min(_list)
        info.distance = info.max - info.min
        push_axis.append(info)

    import collections

    originals = dict(zip(['x', 'y', 'z'], push_axis))

    o_details = collections.namedtuple('object_details', 'x y z')
    
    
    return o_details(**originals)

    #bb = bounds(obj)
    #print("bounds(bb) = ((",bb.x.min,",",bb.x.max,"),(",bb.y.min,",",bb.y.max,"),(",bb.z.min,",",bb.z.max,"))")    


# UID Code
def make_key(obj):
    return hash(obj.name + str(time.time()))
def get_id(self):
    if "id" not in self.keys():
        self["id"] = make_key(self)
    return self["id"]

# set the id type to all objects.
#bpy.types.Object.id = property(get_id)
# could store them in the file as a datastore in the window manager.
#wm = bpy.context.window_manager
#wm["objects"] = 0
#rna = wm.get("_RNA_UI", {})
#rna["objects"] = {o.name: o.id for o in bpy.data.objects}
#wm["objects"] = len(rna["objects"])
#wm["_RNA_UI"] = rna


# This code will slice the selected object into a set of vertices and edges
# along the direction of the unit vector (normal)
# in steps of step_size in local coordinate space 
#(this ignores the scale property, so make sure to apply it before)
# If you want to slice at a different angle then just change the normal, and start
# far enough down the z-axis to ensure the plane will slice the entire model
# You can calculate step size to give appropriate thickness slices with sqrt(x*x + y*y +  z*z)
# NB this strategy won't work if you want to cut perpendicular to the z- axis
# in that case you'll need to change the code a bit more

def slicer(step_size = 0.01, normalOfSlice = (0,0,1)):

    object_details = bounds(C.object, True)
    bpy.ops.object.mode_set(mode='OBJECT')

    # If necessary create a new collection to hold the slices
    if not "Slices" in bpy.data.collections:
        bpy.context.scene.collection.children.link(bpy.data.collections.new("Slices"))


    startLoc = object_details.z.min
    stopLoc = object_details.z.max

    steps = int((stopLoc - startLoc)/step_size) + 1    # + 1 because we want the faces on either end
    print("")
    print("********************   STARTING NEW RUN   ********************")
    print("Slicing into ", steps, "slices")
    print("between dimensions of: ", startLoc, ":", stopLoc)

    lBound = 0

    halving = [steps]
    slices = []
    slices.append(bmesh.new())
    slices[0].from_mesh(C.object.data)


    # Add UIDs to the faces of the original object which will be propogated through the model
    # for these purposes just using the original ID will be fine
    #faceUID = bm.faces.layers.integer.new('faceUID')
    #faceUID = bm.faces.layers.integer.get('faceUID')
    #for face in bm.faces:
    #    face[faceUID] = new_UID()
        

    #while (halving[-1] > lBound):
    while len(halving) > 0:
        if lBound + 1 < halving[-1]:
            # At the moment we're just created successively halved copies of the mesh.
            # And adding them to the list
            # Even though we are duplicate meshes and running the function twice 
            # it is still faster than operating from an original (uncopied) mesh because the bisect function 
            # 1. doesn't seem to index the geometry in any way (so time is proportional to the mesh size)
            #    Splitting at this stage effectively creates indexed bits of meshes)
            # 2. There appears to be no way to create an inner and an outer copy
            #    in the same step (eg by passing in two bmesh objects to the bisect function) 
            #    Thus the bisect function has to be run once on each copy

            curSlice = int(lBound+(halving[-1]-lBound)/2)
            slicePoint = startLoc+curSlice*step_size
            halving.append(curSlice)
            print ("Splitting Mesh into 2 halves with bounds: ",lBound, ":", halving[-1], ":", halving[-2], "and SlicePoint=", startLoc+lBound*step_size, "-", slicePoint, "-", startLoc+halving[-2]*step_size )


            slices.append(slices[-1].copy())
            #This slices the original mesh and discards geometry 
            # on the inner =  lower index = negative side of the plane
            bmesh.ops.bisect_plane(
                slices[-2], 
                geom=slices[-2].verts[:]+slices[-2].edges[:]+slices[-2].faces[:], 
                plane_co=(0,0,slicePoint-step_size), 
                plane_no=normalOfSlice,
                clear_inner=True)

            #This slices the duplicated copy of the mesh and discards geometry 
            # on the outer = higher index = positive side of the plane
            bmesh.ops.bisect_plane(
                slices[-1], 
                geom=slices[-1].verts[:]+slices[-1].edges[:]+slices[-1].faces[:], 
                plane_co=(0,0,slicePoint+step_size), 
                plane_no=normalOfSlice,
                clear_outer=True)

            #print("len(slices) post splitting: ",len(slices))
            
        else:
            # we've just halved the slice directly above the lower bound so slice again to extract 
            # the top and bottom vertex loops (ie discarding the inner and outer geometry for both) 
            # then create two objects from the data
            # Finally step back up to next level clearing out the redundant slice data
            curSlice = int(lBound+(halving[-1]-lBound)/2)
            upperSlicePoint = startLoc+(curSlice+1.5)*step_size
            lowerSlicePoint = startLoc+(curSlice+0.5)*step_size
            
            slices.append(slices[-1].copy())
            print("Extracting last two layers: lowerSlicePoint = ",lowerSlicePoint, "upperSlicePoint = ",upperSlicePoint)
    #        for vert in slices[-1].verts:
    #            print( 'v %f %f %f' % (vert.co.x, vert.co.y, vert.co.z) )
            
            
            #This time slice the mesh and discard both inner and outer geometry to just leave the vertex loops
            bmesh.ops.bisect_plane(
                slices[-2], 
                geom=slices[-2].verts[:]+slices[-2].edges[:]+slices[-2].faces[:], 
                plane_co=(0,0,upperSlicePoint), 
                plane_no=normalOfSlice,
                clear_inner=True,
                clear_outer=True)
            newobj(slices[-2], "bisect-"+str(upperSlicePoint))

            #This time slice the mesh and discard both inner and outer geometry to just leave the vertex loops
            bmesh.ops.bisect_plane(
                slices[-1], 
                geom=slices[-1].verts[:]+slices[-1].edges[:]+slices[-1].faces[:], 
                plane_co=(0,0,lowerSlicePoint), 
                plane_no=normalOfSlice,
                clear_inner=True,
                clear_outer=True)
            newobj(slices[-1], "bisect-"+str(lowerSlicePoint))

                
            #print("halving list = ", halving)
            #print ("extracted:",lBound, halving[-1])
            lBound = halving[-1]+1
            #print ("update: lb1",lBound, halving[-1])
            #print ("del:",halving[-1])
            del halving[-1]
            #print("len(slices) post extraction: ",len(slices))
            del slices[-2:]
            #print("len(slices) post drop end: ",len(slices))
            #print("len(halving) post drop end: ",len(slices))
            
#        if len(halving) > 0:
#            print("checking for halving[-1] > lBound exit criteria:",halving[-1],lBound)
#        if len(halving) == 0:
#            print("EXITING: len(halving) == 0")
#            break
       
    print("FINISHED")
    print("Sliced object into ", steps, "slices of ", step_size, "thickness")
    slices.clear()
    #C.object.user_clear()  # without this, removal would raise an error.
    #bpy.data.objects.remove(C.object, True)       


#slicer(step_size = 0.01, normalOfSlice = (0,0,1))
slicer(1, (0,0,1))

$\endgroup$

You must log in to answer this question.

Not the answer you're looking for? Browse other questions tagged .