added 202 characters in body
Source Link
BK.
  • 125
  • 2
  • 9

enter image description here

I will try to make it a plugin but for now this should help you. Open the source image in blender and replace the "test_file =" image variable (then run with open system console to see the progress). It will create a set of planes colored with Here is the pixel values. You can then switch to edit mode and "Remove Doubles" to make it a consistent mesh (or seperate by loose/materials). It will slow down with bigger images (6464 is quite fast - 10001000 takes a while). As a bonus pixels with alpha 0 will be skipped Add- so you can recreate icons eg (i tested single frame jpg and png). I am a designer and code is probably terribleOn: - but it works (feel free to improve it).https://github.com/benkl/pixeler

#pixeler v0.1 by BK for Blender 2.79 21/01/2018
#Licensed CC BY-SA 4.0 
#https://creativecommons.org/licenses/by-sa/4.0/

import bpy

# Set Data Path
D = bpy.data

# Set File Name
test_file = 'blender.png'

# Set img
img = D.images[test_file]

# Get and set image width and height
w = img.size[0]
h = img.size[1]
tfac = img.pixels[:]

# Set basemesh
bpy.ops.mesh.primitive_plane_add(location=(-2.0, -2.0, 0.0))
basemesh = bpy.context.object
dmat = bpy.data.materials.new(name="origin")
basemesh.data.materials.append(dmat)

#Create Grid from Image
z = 0
y = 0
for index in range(0,h):
    x = 0   
    for index in range(0,w):
        x = x+1              
        
        # Get pixel position in flat array
        colar = (x+(y*w))*4
                 
        # Set color values at current Pixel
        r = tfac[colar-4]
        g = tfac[colar-3]
        b = tfac[colar-2]
            
        # Alpha Check
        if tfac[colar-1]>0:
            
            # Add object at Pixel Location
            # bpy.ops.mesh.primitive_plane_add(location=(x*2, y*2, z))
            basemeshi = basemesh.copy()
            basemeshi.data = basemesh.data.copy()
            basemeshi.location.x = x*2
            basemeshi.location.y = y*2                
            bpy.context.scene.objects.link(basemeshi)
            
            # Get material
            matname = "Mat" + str(r) + str(g) + str(b)
            mat = bpy.data.materials.get(matname)
            if mat is None:
                
                # create material
                mat = bpy.data.materials.new(name=matname)
                mat.use_nodes = True
                prinode = mat.node_tree.nodes.new(type = "ShaderNodeBsdfPrincipled")
                dif = mat.node_tree.nodes["Diffuse BSDF"]
                outshad = mat.node_tree.nodes["Material Output"]
                mat.node_tree.nodes.remove(dif)
                mat.node_tree.links.new(prinode.outputs[0], outshad.inputs[0])
                #rgb = mat.node_tree.nodes.new(type = "ShaderNodeRGB")
                
                # PBR Color
                prin = mat.node_tree.nodes["Principled BSDF"]
                prin.inputs[0].default_value = [r, g, b, 1]
                prin.inputs[7].default_value = 0.6
                
                # Set editor color from pixel value                          
                bpy.data.materials[matname].diffuse_color = (r, g, b)
                
            # assign to 1st material slot
            basemeshi.data.materials[0] = mat            
            
            # Join newly creatd meshes
            basemeshi.select = True
            bpy.context.scene.objects.active = basemeshi
            basemesh.select = False                   
            
            # Print Pixel placement confirmation
            print("Placed object @ x " + str(x) + " y " + str(y))
    
    # Join line
    bpy.ops.object.join()
            
    # Incerement y last    
    y = y+1
    #bpy.ops.object.select_all(action='DESELECT')
   
bpy.context.scene.update()
print("pixels to planes is done")          

enter image description here

I will try to make it a plugin but for now this should help you. Open the source image in blender and replace the "test_file =" image variable (then run with open system console to see the progress). It will create a set of planes colored with the pixel values. You can then switch to edit mode and "Remove Doubles" to make it a consistent mesh (or seperate by loose/materials). It will slow down with bigger images (6464 is quite fast - 10001000 takes a while). As a bonus pixels with alpha 0 will be skipped - so you can recreate icons eg (i tested single frame jpg and png). I am a designer and code is probably terrible - but it works (feel free to improve it).

#pixeler v0.1 by BK for Blender 2.79 21/01/2018

import bpy

# Set Data Path
D = bpy.data

# Set File Name
test_file = 'blender.png'

# Set img
img = D.images[test_file]

# Get and set image width and height
w = img.size[0]
h = img.size[1]
tfac = img.pixels[:]

# Set basemesh
bpy.ops.mesh.primitive_plane_add(location=(-2.0, -2.0, 0.0))
basemesh = bpy.context.object
dmat = bpy.data.materials.new(name="origin")
basemesh.data.materials.append(dmat)

#Create Grid from Image
z = 0
y = 0
for index in range(0,h):
    x = 0   
    for index in range(0,w):
        x = x+1              
        
        # Get pixel position in flat array
        colar = (x+(y*w))*4
                 
        # Set color values at current Pixel
        r = tfac[colar-4]
        g = tfac[colar-3]
        b = tfac[colar-2]
            
        # Alpha Check
        if tfac[colar-1]>0:
            
            # Add object at Pixel Location
            # bpy.ops.mesh.primitive_plane_add(location=(x*2, y*2, z))
            basemeshi = basemesh.copy()
            basemeshi.data = basemesh.data.copy()
            basemeshi.location.x = x*2
            basemeshi.location.y = y*2                
            bpy.context.scene.objects.link(basemeshi)
            
            # Get material
            matname = "Mat" + str(r) + str(g) + str(b)
            mat = bpy.data.materials.get(matname)
            if mat is None:
                
                # create material
                mat = bpy.data.materials.new(name=matname)
                mat.use_nodes = True
                prinode = mat.node_tree.nodes.new(type = "ShaderNodeBsdfPrincipled")
                dif = mat.node_tree.nodes["Diffuse BSDF"]
                outshad = mat.node_tree.nodes["Material Output"]
                mat.node_tree.nodes.remove(dif)
                mat.node_tree.links.new(prinode.outputs[0], outshad.inputs[0])
                #rgb = mat.node_tree.nodes.new(type = "ShaderNodeRGB")
                
                # PBR Color
                prin = mat.node_tree.nodes["Principled BSDF"]
                prin.inputs[0].default_value = [r, g, b, 1]
                prin.inputs[7].default_value = 0.6
                
                # Set editor color from pixel value                          
                bpy.data.materials[matname].diffuse_color = (r, g, b)
                
            # assign to 1st material slot
            basemeshi.data.materials[0] = mat            
            
            # Join newly creatd meshes
            basemeshi.select = True
            bpy.context.scene.objects.active = basemeshi
            basemesh.select = False                   
            
            # Print Pixel placement confirmation
            print("Placed object @ x " + str(x) + " y " + str(y))
    
    # Join line
    bpy.ops.object.join()
            
    # Incerement y last    
    y = y+1
    #bpy.ops.object.select_all(action='DESELECT')
   
bpy.context.scene.update()
print("pixels to planes is done")          
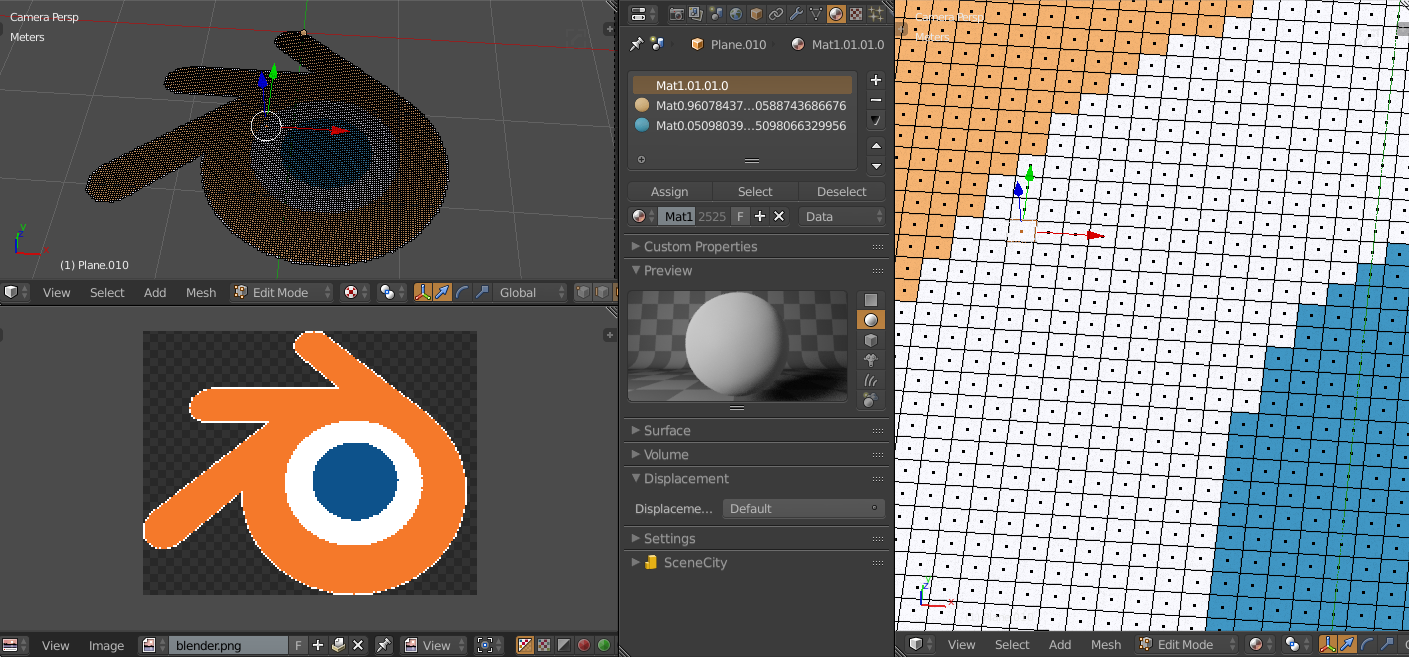
enter image description here

I will try to make it a plugin but for now this should help you. Open the source image in blender and replace the "test_file =" image variable (then run with open system console to see the progress). It will create a set of planes colored with the pixel values. You can then switch to edit mode and "Remove Doubles" to make it a consistent mesh (or seperate by loose/materials). It will slow down with bigger images (6464 is quite fast - 10001000 takes a while). As a bonus pixels with alpha 0 will be skipped - so you can recreate icons eg (i tested single frame jpg and png). I am a designer and code is probably terrible - but it works (feel free to improve it).

#pixeler v0.1 by BK for Blender 2.79 21/01/2018
#Licensed CC BY-SA 4.0 
#https://creativecommons.org/licenses/by-sa/4.0/

import bpy

# Set Data Path
D = bpy.data

# Set File Name
test_file = 'blender.png'

# Set img
img = D.images[test_file]

# Get and set image width and height
w = img.size[0]
h = img.size[1]
tfac = img.pixels[:]

# Set basemesh
bpy.ops.mesh.primitive_plane_add(location=(-2.0, -2.0, 0.0))
basemesh = bpy.context.object
dmat = bpy.data.materials.new(name="origin")
basemesh.data.materials.append(dmat)

#Create Grid from Image
z = 0
y = 0
for index in range(0,h):
    x = 0   
    for index in range(0,w):
        x = x+1              
        
        # Get pixel position in flat array
        colar = (x+(y*w))*4
                 
        # Set color values at current Pixel
        r = tfac[colar-4]
        g = tfac[colar-3]
        b = tfac[colar-2]
            
        # Alpha Check
        if tfac[colar-1]>0:
            
            # Add object at Pixel Location
            # bpy.ops.mesh.primitive_plane_add(location=(x*2, y*2, z))
            basemeshi = basemesh.copy()
            basemeshi.data = basemesh.data.copy()
            basemeshi.location.x = x*2
            basemeshi.location.y = y*2                
            bpy.context.scene.objects.link(basemeshi)
            
            # Get material
            matname = "Mat" + str(r) + str(g) + str(b)
            mat = bpy.data.materials.get(matname)
            if mat is None:
                
                # create material
                mat = bpy.data.materials.new(name=matname)
                mat.use_nodes = True
                prinode = mat.node_tree.nodes.new(type = "ShaderNodeBsdfPrincipled")
                dif = mat.node_tree.nodes["Diffuse BSDF"]
                outshad = mat.node_tree.nodes["Material Output"]
                mat.node_tree.nodes.remove(dif)
                mat.node_tree.links.new(prinode.outputs[0], outshad.inputs[0])
                #rgb = mat.node_tree.nodes.new(type = "ShaderNodeRGB")
                
                # PBR Color
                prin = mat.node_tree.nodes["Principled BSDF"]
                prin.inputs[0].default_value = [r, g, b, 1]
                prin.inputs[7].default_value = 0.6
                
                # Set editor color from pixel value                          
                bpy.data.materials[matname].diffuse_color = (r, g, b)
                
            # assign to 1st material slot
            basemeshi.data.materials[0] = mat            
            
            # Join newly creatd meshes
            basemeshi.select = True
            bpy.context.scene.objects.active = basemeshi
            basemesh.select = False                   
            
            # Print Pixel placement confirmation
            print("Placed object @ x " + str(x) + " y " + str(y))
    
    # Join line
    bpy.ops.object.join()
            
    # Incerement y last    
    y = y+1
    #bpy.ops.object.select_all(action='DESELECT')
   
bpy.context.scene.update()
print("pixels to planes is done")          

Here is the Add-On: https://github.com/benkl/pixeler

enter image description here

I will try to make it a plugin but for now this should help you. Open the source image in blender and replace the "test_file =" image variable (then run with open system console to see the progress). It will create a set of planes colored with the pixel values. You can then switch to edit mode and "Remove Doubles" to make it a consistent mesh (or seperate by loose/materials). It will slow down with bigger images (6464 is quite fast - 10001000 takes a while). As a bonus pixels with alpha 0 will be skipped - so you can recreate icons eg (i tested single frame jpg and png). I am a designer and code is probably terrible - but it works (feel free to improve it).

#pixeler v0.1 by BK for Blender 2.79 21/01/2018

import bpy

# Set Data Path
D = bpy.data

# Set File Name
test_file = 'blender.png'

# Set img
img = D.images[test_file]

# Get and set image width and height
w = img.size[0]
h = img.size[1]
tfac = img.pixels[:]

# Set basemesh
bpy.ops.mesh.primitive_plane_add(location=(-2.0, -2.0, 0.0))
basemesh = bpy.context.object
dmat = bpy.data.materials.new(name="origin")
basemesh.data.materials.append(dmat)

#Create Grid from Image
z = 0
y = 0
for index in range(0,h):
    x = 0   
    for index in range(0,w):
        x = x+1              
        
        # Get pixel position in flat array
        colar = (x+(y*w))*4
                 
        # Set color values at current Pixel
        r = tfac[colar-4]
        g = tfac[colar-3]
        b = tfac[colar-2]
            
        # Alpha Check
        if tfac[colar-1]>0:
            
            # Add object at Pixel Location
            # bpy.ops.mesh.primitive_plane_add(location=(x*2, y*2, z))
            basemeshi = basemesh.copy()
            basemeshi.data = basemesh.data.copy()
            basemeshi.location.x = x*2
            basemeshi.location.y = y*2                
            bpy.context.scene.objects.link(basemeshi)
            
            # Get material
            matname = "Mat" + str(r) + str(g) + str(b)
            mat = bpy.data.materials.get(matname)
            if mat is None:
                
                # create material
                mat = bpy.data.materials.new(name=matname)
                mat.use_nodes = True
                prinode = mat.node_tree.nodes.new(type = "ShaderNodeBsdfPrincipled")
                dif = mat.node_tree.nodes["Diffuse BSDF"]
                outshad = mat.node_tree.nodes["Material Output"]
                mat.node_tree.nodes.remove(dif)
                mat.node_tree.links.new(prinode.outputs[0], outshad.inputs[0])
                #rgb = mat.node_tree.nodes.new(type = "ShaderNodeRGB")
                
                # PBR Color
                prin = mat.node_tree.nodes["Principled BSDF"]
                prin.inputs[0].default_value = [r, g, b, 1]
                prin.inputs[7].default_value = 0.6
                
                # Set editor color from pixel value                          
                bpy.data.materials[matname].diffuse_color = (r, g, b)
                
            # assign to 1st material slot
            basemeshi.data.materials[0] = mat            
            
            # Join newly creatd meshes
            basemeshi.select = True
            bpy.context.scene.objects.active = basemeshi
            basemesh.select = False                   
            
            # Print Pixel placement confirmation
            print("Placed object @ x " + str(x) + " y " + str(y))
    
    # Join line
    bpy.ops.object.join()
            
    # Incerement y last    
    y = y+1
    #bpy.ops.object.select_all(action='DESELECT')
   
bpy.context.scene.update()
print("pixels to planes is done")          
added 91 characters in body
Source Link
BK.
  • 125
  • 2
  • 9

enter image description here

I will try to make it a plugin but for the momentnow this should help you. Open the source image in blender and replace the "test_file =" image variable (then run with open system console to see the progress). It will create a set of planes colored with the pixel values. You can then switch to edit mode and "Remove Doubles" to make it a consistent mesh (or seperate by loose/materials). It will slow down with bigger images (6464 is quite fast - 10001000 takes a while). As a bonus pixels with alpha 0 will be skipped - so you can recreate icons eg (i tested single frame jpg and png). I am a designer and code is probably terrible - but it works (feel free to improve it).

#pixeler v0.1 by BK for Blender 2.79 21/01/2018
#Licensed CC BY-SA 4.0 
#https://creativecommons.org/licenses/by-sa/4.0/

import bpy

# Set Data Path
D = bpy.data

# Set File Name
test_file = 'mariosheet'blender.png'

# Set img
img = D.images[test_file]

# Get and set image width and height
w = img.size[0]
h = img.size[1]
tfac = img.pixels[:]

# Set basemesh
bpy.ops.mesh.primitive_plane_add(location=(-2.0, -2.0, 0.0))
basemesh = bpy.context.object
dmat = bpy.data.materials.new(name="origin")
basemesh.data.materials.append(dmat)

#Create Grid from Image
z = 0
y = 0
for index in range(0,h):
    x = 0   
    for index in range(0,w):
        x = x+1              
        
        # Get pixel position in flat array
        colar = (x+(y*w))*4
                 
        # Set color values at current Pixel
        r = tfac[colar-4]
        g = tfac[colar-3]
        b = tfac[colar-2]
            
        # Alpha Check
        if tfac[colar-1]>0:
            
            # Add object at Pixel Location
            # bpy.ops.mesh.primitive_plane_add(location=(x*2, y*2, z))
            basemeshi = basemesh.copy()
            basemeshi.data = basemesh.data.copy()
            basemeshi.location.x = x*2
            basemeshi.location.y = y*2                
            bpy.context.scene.objects.link(basemeshi)
            
            # Get material
            matname = "Mat" + str(r) + str(g) + str(b)
            mat = bpy.data.materials.get(matname)
            if mat is None:
                
                # create material
                mat = bpy.data.materials.new(name=matname)
                mat.use_nodes = True
                prinode = mat.node_tree.nodes.new(type = "ShaderNodeBsdfPrincipled")
                dif = mat.node_tree.nodes["Diffuse BSDF"]
                outshad = mat.node_tree.nodes["Material Output"]
                mat.node_tree.nodes.remove(dif)
                mat.node_tree.links.new(prinode.outputs[0], outshad.inputs[0])
                #rgb = mat.node_tree.nodes.new(type = "ShaderNodeRGB")
                
                # PBR Color
                prin = mat.node_tree.nodes["Principled BSDF"]
                prin.inputs[0].default_value = [r, g, b, 1]
                prin.inputs[7].default_value = 0.6
                
                # Set editor color from pixel value                          
                bpy.data.materials[matname].diffuse_color = (r, g, b)
                
            # assign to 1st material slot
            basemeshi.data.materials[0] = mat            
            
            # Join newly creatd meshes
            basemeshi.select = True
            bpy.context.scene.objects.active = basemeshi
            basemesh.select = False                   
            
            # Print Pixel placement confirmation
            print("Placed object @ x " + str(x) + " y " + str(y))
    
    # Join line
    bpy.ops.object.join()
            
    # Incerement y last    
    y = y+1
    #bpy.ops.object.select_all(action='DESELECT')
   
bpy.context.scene.update()
print("pixels to planes is done")          

I will try to make it a plugin but for the moment this should help you. Open the source image in blender and replace the "test_file =" image variable (then run with open system console to see the progress). It will create a set of planes colored with the pixel values. You can then switch to edit mode and "Remove Doubles" to make it a consistent mesh (or seperate by loose/materials). It will slow down with bigger images (6464 is quite fast - 10001000 takes a while). As a bonus pixels with alpha 0 will be skipped - so you can recreate icons eg (i tested single frame jpg and png). I am a designer and code is probably terrible - but it works (feel free to improve it).

#pixeler v0.1 by BK for Blender 2.79 21/01/2018
#Licensed CC BY-SA 4.0 
#https://creativecommons.org/licenses/by-sa/4.0/

import bpy

# Set Data Path
D = bpy.data

# Set File Name
test_file = 'mariosheet.png'

# Set img
img = D.images[test_file]

# Get and set image width and height
w = img.size[0]
h = img.size[1]
tfac = img.pixels[:]

# Set basemesh
bpy.ops.mesh.primitive_plane_add(location=(-2.0, -2.0, 0.0))
basemesh = bpy.context.object
dmat = bpy.data.materials.new(name="origin")
basemesh.data.materials.append(dmat)

#Create Grid from Image
z = 0
y = 0
for index in range(0,h):
    x = 0   
    for index in range(0,w):
        x = x+1              
        
        # Get pixel position in flat array
        colar = (x+(y*w))*4
                 
        # Set color values at current Pixel
        r = tfac[colar-4]
        g = tfac[colar-3]
        b = tfac[colar-2]
            
        # Alpha Check
        if tfac[colar-1]>0:
            
            # Add object at Pixel Location
            # bpy.ops.mesh.primitive_plane_add(location=(x*2, y*2, z))
            basemeshi = basemesh.copy()
            basemeshi.data = basemesh.data.copy()
            basemeshi.location.x = x*2
            basemeshi.location.y = y*2                
            bpy.context.scene.objects.link(basemeshi)
            
            # Get material
            matname = "Mat" + str(r) + str(g) + str(b)
            mat = bpy.data.materials.get(matname)
            if mat is None:
                
                # create material
                mat = bpy.data.materials.new(name=matname)
                mat.use_nodes = True
                prinode = mat.node_tree.nodes.new(type = "ShaderNodeBsdfPrincipled")
                dif = mat.node_tree.nodes["Diffuse BSDF"]
                outshad = mat.node_tree.nodes["Material Output"]
                mat.node_tree.nodes.remove(dif)
                mat.node_tree.links.new(prinode.outputs[0], outshad.inputs[0])
                #rgb = mat.node_tree.nodes.new(type = "ShaderNodeRGB")
                
                # PBR Color
                prin = mat.node_tree.nodes["Principled BSDF"]
                prin.inputs[0].default_value = [r, g, b, 1]
                prin.inputs[7].default_value = 0.6
                
                # Set editor color from pixel value                          
                bpy.data.materials[matname].diffuse_color = (r, g, b)
                
            # assign to 1st material slot
            basemeshi.data.materials[0] = mat            
            
            # Join newly creatd meshes
            basemeshi.select = True
            bpy.context.scene.objects.active = basemeshi
            basemesh.select = False                   
            
            # Print Pixel placement confirmation
            print("Placed object @ x " + str(x) + " y " + str(y))
    
    # Join line
    bpy.ops.object.join()
            
    # Incerement y last    
    y = y+1
    #bpy.ops.object.select_all(action='DESELECT')
   
bpy.context.scene.update()
print("pixels to planes is done")          

enter image description here

I will try to make it a plugin but for now this should help you. Open the source image in blender and replace the "test_file =" image variable (then run with open system console to see the progress). It will create a set of planes colored with the pixel values. You can then switch to edit mode and "Remove Doubles" to make it a consistent mesh (or seperate by loose/materials). It will slow down with bigger images (6464 is quite fast - 10001000 takes a while). As a bonus pixels with alpha 0 will be skipped - so you can recreate icons eg (i tested single frame jpg and png). I am a designer and code is probably terrible - but it works (feel free to improve it).

#pixeler v0.1 by BK for Blender 2.79 21/01/2018
#Licensed CC BY-SA 4.0 
#https://creativecommons.org/licenses/by-sa/4.0/

import bpy

# Set Data Path
D = bpy.data

# Set File Name
test_file = 'blender.png'

# Set img
img = D.images[test_file]

# Get and set image width and height
w = img.size[0]
h = img.size[1]
tfac = img.pixels[:]

# Set basemesh
bpy.ops.mesh.primitive_plane_add(location=(-2.0, -2.0, 0.0))
basemesh = bpy.context.object
dmat = bpy.data.materials.new(name="origin")
basemesh.data.materials.append(dmat)

#Create Grid from Image
z = 0
y = 0
for index in range(0,h):
    x = 0   
    for index in range(0,w):
        x = x+1              
        
        # Get pixel position in flat array
        colar = (x+(y*w))*4
                 
        # Set color values at current Pixel
        r = tfac[colar-4]
        g = tfac[colar-3]
        b = tfac[colar-2]
            
        # Alpha Check
        if tfac[colar-1]>0:
            
            # Add object at Pixel Location
            # bpy.ops.mesh.primitive_plane_add(location=(x*2, y*2, z))
            basemeshi = basemesh.copy()
            basemeshi.data = basemesh.data.copy()
            basemeshi.location.x = x*2
            basemeshi.location.y = y*2                
            bpy.context.scene.objects.link(basemeshi)
            
            # Get material
            matname = "Mat" + str(r) + str(g) + str(b)
            mat = bpy.data.materials.get(matname)
            if mat is None:
                
                # create material
                mat = bpy.data.materials.new(name=matname)
                mat.use_nodes = True
                prinode = mat.node_tree.nodes.new(type = "ShaderNodeBsdfPrincipled")
                dif = mat.node_tree.nodes["Diffuse BSDF"]
                outshad = mat.node_tree.nodes["Material Output"]
                mat.node_tree.nodes.remove(dif)
                mat.node_tree.links.new(prinode.outputs[0], outshad.inputs[0])
                #rgb = mat.node_tree.nodes.new(type = "ShaderNodeRGB")
                
                # PBR Color
                prin = mat.node_tree.nodes["Principled BSDF"]
                prin.inputs[0].default_value = [r, g, b, 1]
                prin.inputs[7].default_value = 0.6
                
                # Set editor color from pixel value                          
                bpy.data.materials[matname].diffuse_color = (r, g, b)
                
            # assign to 1st material slot
            basemeshi.data.materials[0] = mat            
            
            # Join newly creatd meshes
            basemeshi.select = True
            bpy.context.scene.objects.active = basemeshi
            basemesh.select = False                   
            
            # Print Pixel placement confirmation
            print("Placed object @ x " + str(x) + " y " + str(y))
    
    # Join line
    bpy.ops.object.join()
            
    # Incerement y last    
    y = y+1
    #bpy.ops.object.select_all(action='DESELECT')
   
bpy.context.scene.update()
print("pixels to planes is done")          
Source Link
BK.
  • 125
  • 2
  • 9

I will try to make it a plugin but for the moment this should help you. Open the source image in blender and replace the "test_file =" image variable (then run with open system console to see the progress). It will create a set of planes colored with the pixel values. You can then switch to edit mode and "Remove Doubles" to make it a consistent mesh (or seperate by loose/materials). It will slow down with bigger images (6464 is quite fast - 10001000 takes a while). As a bonus pixels with alpha 0 will be skipped - so you can recreate icons eg (i tested single frame jpg and png). I am a designer and code is probably terrible - but it works (feel free to improve it).

#pixeler v0.1 by BK for Blender 2.79 21/01/2018
#Licensed CC BY-SA 4.0 
#https://creativecommons.org/licenses/by-sa/4.0/

import bpy

# Set Data Path
D = bpy.data

# Set File Name
test_file = 'mariosheet.png'

# Set img
img = D.images[test_file]

# Get and set image width and height
w = img.size[0]
h = img.size[1]
tfac = img.pixels[:]

# Set basemesh
bpy.ops.mesh.primitive_plane_add(location=(-2.0, -2.0, 0.0))
basemesh = bpy.context.object
dmat = bpy.data.materials.new(name="origin")
basemesh.data.materials.append(dmat)

#Create Grid from Image
z = 0
y = 0
for index in range(0,h):
    x = 0   
    for index in range(0,w):
        x = x+1              
        
        # Get pixel position in flat array
        colar = (x+(y*w))*4
                 
        # Set color values at current Pixel
        r = tfac[colar-4]
        g = tfac[colar-3]
        b = tfac[colar-2]
            
        # Alpha Check
        if tfac[colar-1]>0:
            
            # Add object at Pixel Location
            # bpy.ops.mesh.primitive_plane_add(location=(x*2, y*2, z))
            basemeshi = basemesh.copy()
            basemeshi.data = basemesh.data.copy()
            basemeshi.location.x = x*2
            basemeshi.location.y = y*2                
            bpy.context.scene.objects.link(basemeshi)
            
            # Get material
            matname = "Mat" + str(r) + str(g) + str(b)
            mat = bpy.data.materials.get(matname)
            if mat is None:
                
                # create material
                mat = bpy.data.materials.new(name=matname)
                mat.use_nodes = True
                prinode = mat.node_tree.nodes.new(type = "ShaderNodeBsdfPrincipled")
                dif = mat.node_tree.nodes["Diffuse BSDF"]
                outshad = mat.node_tree.nodes["Material Output"]
                mat.node_tree.nodes.remove(dif)
                mat.node_tree.links.new(prinode.outputs[0], outshad.inputs[0])
                #rgb = mat.node_tree.nodes.new(type = "ShaderNodeRGB")
                
                # PBR Color
                prin = mat.node_tree.nodes["Principled BSDF"]
                prin.inputs[0].default_value = [r, g, b, 1]
                prin.inputs[7].default_value = 0.6
                
                # Set editor color from pixel value                          
                bpy.data.materials[matname].diffuse_color = (r, g, b)
                
            # assign to 1st material slot
            basemeshi.data.materials[0] = mat            
            
            # Join newly creatd meshes
            basemeshi.select = True
            bpy.context.scene.objects.active = basemeshi
            basemesh.select = False                   
            
            # Print Pixel placement confirmation
            print("Placed object @ x " + str(x) + " y " + str(y))
    
    # Join line
    bpy.ops.object.join()
            
    # Incerement y last    
    y = y+1
    #bpy.ops.object.select_all(action='DESELECT')
   
bpy.context.scene.update()
print("pixels to planes is done")