replaced http://blender.stackexchange.com/ with https://blender.stackexchange.com/
Source Link

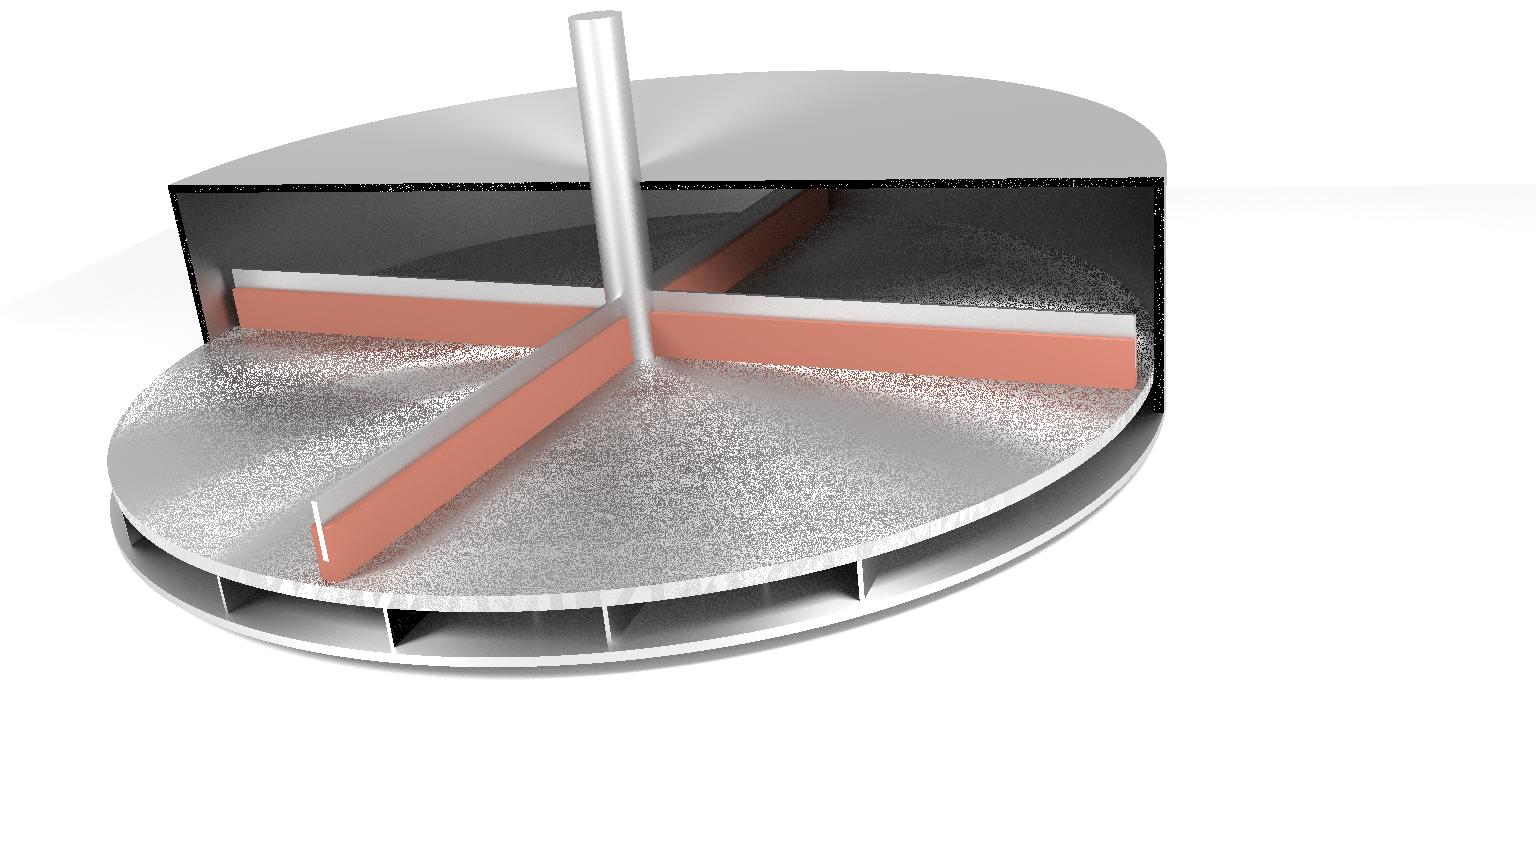
Here is the final fixed result:

enter image description here

Shading

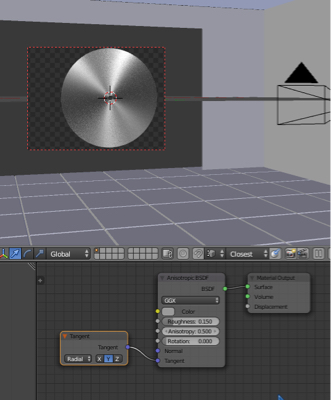
You need to click on the Tangent menu in the material settings and select a Tangent node. Make sure Radial is selected it its settings. Play around with the Axes: to figure out which one to use.

enter image description here

Gandalf3's image from herehere.

Modeling

Your mesh is covered in triangles (not good). From the .blend file that I downloaded, this was my process:

  1. A twice to select everything.
  2. Alt + J converts many tris to quads.
  3. Ctrl + Tab, then 3 to enter Face Select Mode.
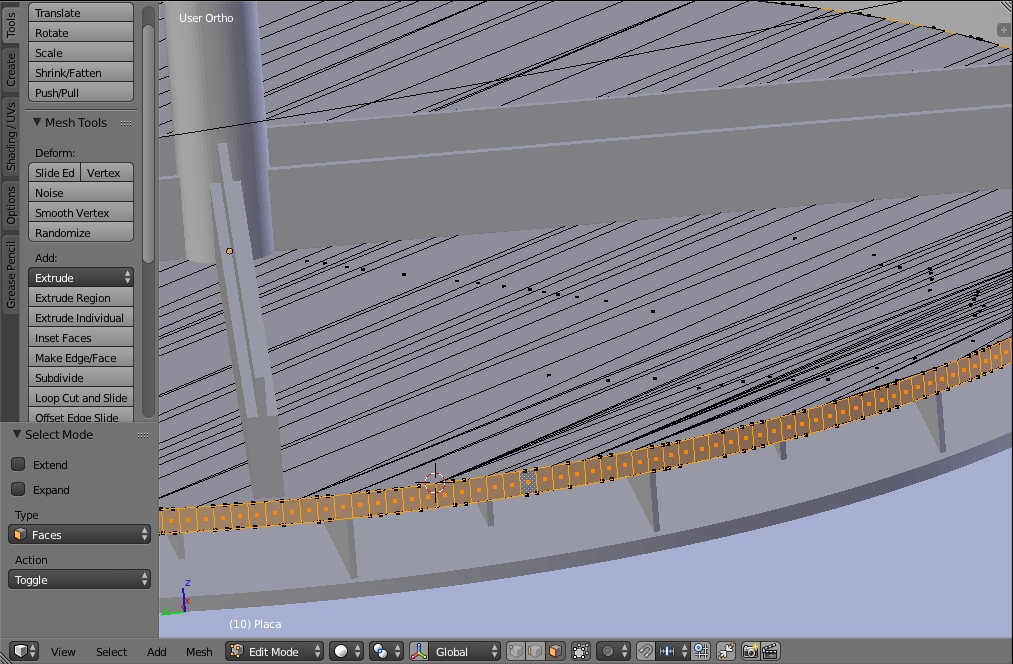
  4. Alt + RMB RMB while hovering over one of the edges around the outside rim to select this face loop:

enter image description here

  1. Ctrl + I to Invert Selection.
  2. X > Faces to open the Delete menu and delete Faces.
  3. Ctrl + Tab, then 1 to enter Vertex Select Mode.
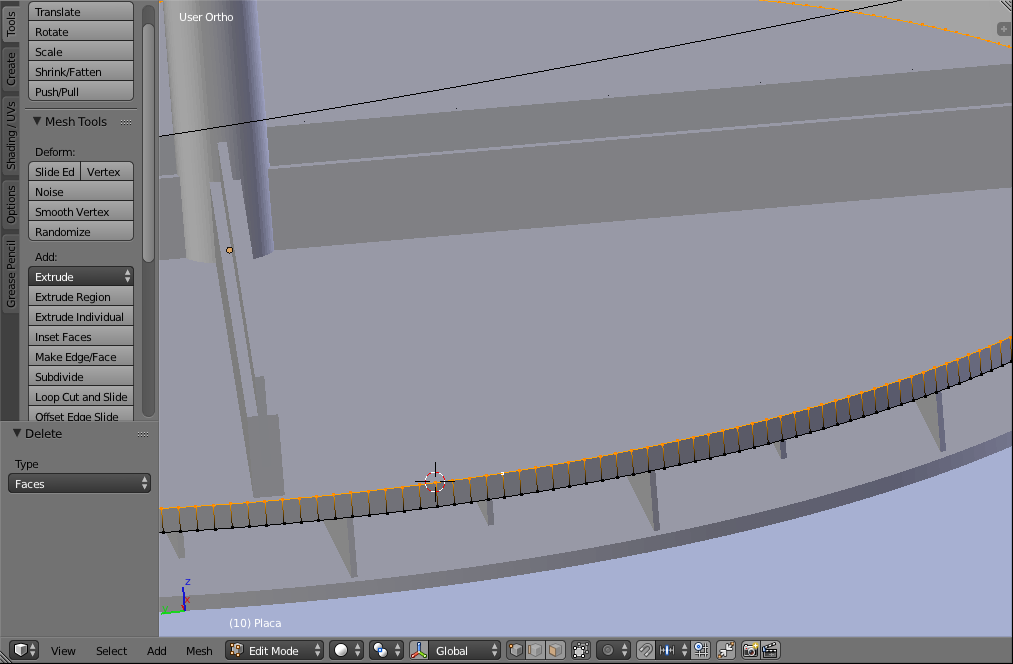
  4. Alt + RMB RMB while hovering over one of the edges in the topmost edge loop to select this edge loop:

enter image description here

  1. F to create an N-Gon face.
  2. Ctrl + I to Invert Selection.
  3. F to create an N-Gon face.
  4. Tab out of Edit Mode.

Here is the fixed .blend file:

P.S.

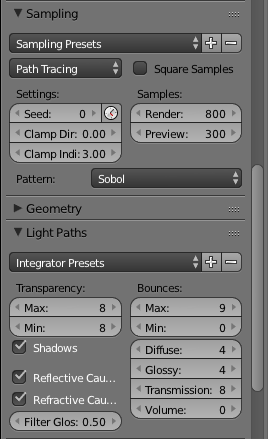
This is not included in the .blend file, but if you want less spotty anisotropy, you should use these settings in the Properties panel > Render tab.

enter image description here

They produce this result:

enter image description here

Here is the final fixed result:

enter image description here

Shading

You need to click on the Tangent menu in the material settings and select a Tangent node. Make sure Radial is selected it its settings. Play around with the Axes: to figure out which one to use.

enter image description here

Gandalf3's image from here.

Modeling

Your mesh is covered in triangles (not good). From the .blend file that I downloaded, this was my process:

  1. A twice to select everything.
  2. Alt + J converts many tris to quads.
  3. Ctrl + Tab, then 3 to enter Face Select Mode.
  4. Alt + RMB RMB while hovering over one of the edges around the outside rim to select this face loop:

enter image description here

  1. Ctrl + I to Invert Selection.
  2. X > Faces to open the Delete menu and delete Faces.
  3. Ctrl + Tab, then 1 to enter Vertex Select Mode.
  4. Alt + RMB RMB while hovering over one of the edges in the topmost edge loop to select this edge loop:

enter image description here

  1. F to create an N-Gon face.
  2. Ctrl + I to Invert Selection.
  3. F to create an N-Gon face.
  4. Tab out of Edit Mode.

Here is the fixed .blend file:

P.S.

This is not included in the .blend file, but if you want less spotty anisotropy, you should use these settings in the Properties panel > Render tab.

enter image description here

They produce this result:

enter image description here

replaced http://blend-exchange.giantcowfilms.com with https://blend-exchange.giantcowfilms.com
Source Link

Here is the final fixed result:

enter image description here

Shading

You need to click on the Tangent menu in the material settings and select a Tangent node. Make sure Radial is selected it its settings. Play around with the Axes: to figure out which one to use.

enter image description here

Gandalf3's image from here.

Modeling

Your mesh is covered in triangles (not good). From the .blend file that I downloaded, this was my process:

  1. A twice to select everything.
  2. Alt + J converts many tris to quads.
  3. Ctrl + Tab, then 3 to enter Face Select Mode.
  4. Alt + RMB RMB while hovering over one of the edges around the outside rim to select this face loop:

enter image description here

  1. Ctrl + I to Invert Selection.
  2. X > Faces to open the Delete menu and delete Faces.
  3. Ctrl + Tab, then 1 to enter Vertex Select Mode.
  4. Alt + RMB RMB while hovering over one of the edges in the topmost edge loop to select this edge loop:

enter image description here

  1. F to create an N-Gon face.
  2. Ctrl + I to Invert Selection.
  3. F to create an N-Gon face.
  4. Tab out of Edit Mode.

Here is the fixed .blend file:

http://blend-exchange.giantcowfilms.com/embedImage.png?bid=2029

P.S.

This is not included in the .blend file, but if you want less spotty anisotropy, you should use these settings in the Properties panel > Render tab.

enter image description here

They produce this result:

enter image description here

Here is the final fixed result:

enter image description here

Shading

You need to click on the Tangent menu in the material settings and select a Tangent node. Make sure Radial is selected it its settings. Play around with the Axes: to figure out which one to use.

enter image description here

Gandalf3's image from here.

Modeling

Your mesh is covered in triangles (not good). From the .blend file that I downloaded, this was my process:

  1. A twice to select everything.
  2. Alt + J converts many tris to quads.
  3. Ctrl + Tab, then 3 to enter Face Select Mode.
  4. Alt + RMB RMB while hovering over one of the edges around the outside rim to select this face loop:

enter image description here

  1. Ctrl + I to Invert Selection.
  2. X > Faces to open the Delete menu and delete Faces.
  3. Ctrl + Tab, then 1 to enter Vertex Select Mode.
  4. Alt + RMB RMB while hovering over one of the edges in the topmost edge loop to select this edge loop:

enter image description here

  1. F to create an N-Gon face.
  2. Ctrl + I to Invert Selection.
  3. F to create an N-Gon face.
  4. Tab out of Edit Mode.

Here is the fixed .blend file:

P.S.

This is not included in the .blend file, but if you want less spotty anisotropy, you should use these settings in the Properties panel > Render tab.

enter image description here

They produce this result:

enter image description here

added 115 characters in body
Source Link
Shady Puck
  • 9k
  • 6
  • 35
  • 63

Here is the final fixed result:

enter image description here

Shading

You need to click on the Tangent menu in the material settings and select a Tangent node. Make sure Radial is selected it its settings. Play around with the Axes: to figure out which one to use.

enter image description here

Gandalf3's image from here.

Modeling

Your mesh is covered in triangles (not good). From the .blend file that I downloaded, this was my process:

  1. A twice to select everything.
  2. Alt + J converts many tris to quads.
  3. Ctrl + Tab, then 3 to enter Face Select Mode.
  4. Alt + RMB RMB while hovering over one of the edges around the outside rim to select this face loop:

enter image description here

  1. Ctrl + I to Invert Selection.
  2. X > Faces to open the Delete menu and delete Faces.
  3. Ctrl + Tab, then 1 to enter Vertex Select Mode.
  4. Alt + RMB RMB while hovering over one of the edges in the topmost edge loop to select this edge loop:

enter image description here

  1. F to create an N-Gon face.
  2. Ctrl + I to Invert Selection.
  3. F to create an N-Gon face.
  4. Tab out of Edit Mode.

Here is the fixed .blend file:

http://blend-exchange.giantcowfilms.com/embedImage.png?bid=2029

P.S.

This is not included in the .blend file, but if you want less spotty anisotropy, you should use these settings in the Properties panel > Render tab.

enter image description here

They produce this result:

enter image description here

Here is the final fixed result:

enter image description here

Shading

You need to click on the Tangent menu in the material settings and select a Tangent node. Make sure Radial is selected it its settings. Play around with the Axes: to figure out which one to use.

enter image description here

Gandalf3's image from here.

Modeling

Your mesh is covered in triangles (not good). From the .blend file that I downloaded, this was my process:

  1. A twice to select everything.
  2. Alt + J converts many tris to quads.
  3. Ctrl + Tab, then 3 to enter Face Select Mode.
  4. Alt + RMB RMB while hovering over one of the edges around the outside rim to select this face loop:

enter image description here

  1. Ctrl + I to Invert Selection.
  2. X > Faces to open the Delete menu and delete Faces.
  3. Ctrl + Tab, then 1 to enter Vertex Select Mode.
  4. Alt + RMB RMB while hovering over one of the edges in the topmost edge loop to select this edge loop:

enter image description here

  1. F to create an N-Gon face.
  2. Ctrl + I to Invert Selection.
  3. F to create an N-Gon face.
  4. Tab out of Edit Mode.

Here is the fixed .blend file:

http://blend-exchange.giantcowfilms.com/embedImage.png?bid=2029

P.S.

This is not included in the .blend file, but if you want less spotty anisotropy, you should use these settings in the Properties panel > Render tab.

enter image description here

They produce this result:

enter image description here

Added the solution.
Source Link
Shady Puck
  • 9k
  • 6
  • 35
  • 63
Loading
Source Link
Shady Puck
  • 9k
  • 6
  • 35
  • 63
Loading