replaced http://blender.stackexchange.com/ with https://blender.stackexchange.com/
Source Link

Technique #1: Create a vertex on a desired part of an edge

This solution is based on the answer herehere.

  1. Select the edge
  2. Press W, and select Subdivide
  3. Select the new vertex
  4. Press Shift + V
  5. Slide the vertex along the edge (the proposed vertex location will snap to the grid), and press LMB to place the vertex permanently
  6. Press Ctrl while sliding to avoid snapping to the grid

Technique #2: Create a vertex and edge at the same time

NOTE: This technique does not attach the new vertex to the edge. The only way to do this is to drag the new vertex to a vertex created on the desire edge using Technique #1.

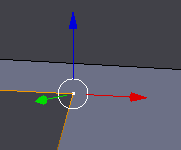
Select an existing vertex

enter image description here

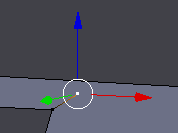
Ctrl + LMB away from the selected vertex to create a new vertex

enter image description here

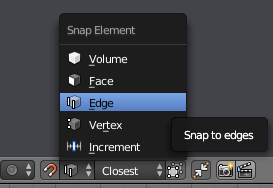
In the 3D Viewport, check to ensure that:

  • Snap During Transform (magnet icon) is turned on
  • Type of Element to Snap to is set to Edge
  • Which Part to Snap Onto Target is set to Closest

enter image description here

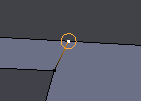
RMB to drag the vertex to snap to the desired edge (The dragged vertex should have a circle around it to indicate it will snap to the edge). Release the RMB, and LMB to confirm the placement.

enter image description here

Technique #1: Create a vertex on a desired part of an edge

This solution is based on the answer here.

  1. Select the edge
  2. Press W, and select Subdivide
  3. Select the new vertex
  4. Press Shift + V
  5. Slide the vertex along the edge (the proposed vertex location will snap to the grid), and press LMB to place the vertex permanently
  6. Press Ctrl while sliding to avoid snapping to the grid

Technique #2: Create a vertex and edge at the same time

NOTE: This technique does not attach the new vertex to the edge. The only way to do this is to drag the new vertex to a vertex created on the desire edge using Technique #1.

Select an existing vertex

enter image description here

Ctrl + LMB away from the selected vertex to create a new vertex

enter image description here

In the 3D Viewport, check to ensure that:

  • Snap During Transform (magnet icon) is turned on
  • Type of Element to Snap to is set to Edge
  • Which Part to Snap Onto Target is set to Closest

enter image description here

RMB to drag the vertex to snap to the desired edge (The dragged vertex should have a circle around it to indicate it will snap to the edge). Release the RMB, and LMB to confirm the placement.
enter image description here

Technique #1: Create a vertex on a desired part of an edge

This solution is based on the answer here.

  1. Select the edge
  2. Press W, and select Subdivide
  3. Select the new vertex
  4. Press Shift + V
  5. Slide the vertex along the edge (the proposed vertex location will snap to the grid), and press LMB to place the vertex permanently
  6. Press Ctrl while sliding to avoid snapping to the grid

Technique #2: Create a vertex and edge at the same time

NOTE: This technique does not attach the new vertex to the edge. The only way to do this is to drag the new vertex to a vertex created on the desire edge using Technique #1.

Select an existing vertex

enter image description here

Ctrl + LMB away from the selected vertex to create a new vertex

enter image description here

In the 3D Viewport, check to ensure that:

  • Snap During Transform (magnet icon) is turned on
  • Type of Element to Snap to is set to Edge
  • Which Part to Snap Onto Target is set to Closest

enter image description here

RMB to drag the vertex to snap to the desired edge (The dragged vertex should have a circle around it to indicate it will snap to the edge). Release the RMB, and LMB to confirm the placement.
enter image description here

Responding to GilesDMiddleton's excellent advice. Added a new technique.
Source Link

Technique #1: Create a vertex on a desired part of an edge

This solution is based on the answer here.

  1. Select the edge
  2. Press W, and select Subdivide
  3. Select the new vertex
  4. Press Shift + V
  5. Slide the vertex along the edge (the proposed vertex location will snap to the grid), and press LMB to place the vertex permanently
  6. Press Ctrl while sliding to avoid snapping to the grid

Technique #2: Create a vertex and edge at the same time

NOTE: This technique does not attach the new vertex to the edge. The only way to do this is to drag the new vertex to a vertex created on the desire edge using Technique #1.

Select an existing vertex

enter image description here

Ctrl + LMB away from the selected vertex to create a new vertex

enter image description here

In the 3D Viewport, check to ensure that:

  • Snap During Transform (magnet icon) is turned on
  • Type of Element to Snap to is set to Edge
  • Which Part to Snap Onto Target is set to Closest

enter image description here

RMB to drag the vertex to snap to the desired edge (The dragged vertex should have a circle around it to indicate it will snap to the edge). Release the RMB, and LMB to confirm the placement.
enter image description here

Technique #1: Create a vertex on a desired part of an edge

This solution is based on the answer here.

  1. Select the edge
  2. Press W, and select Subdivide
  3. Select the new vertex
  4. Press Shift + V
  5. Slide the vertex along the edge (the proposed vertex location will snap to the grid), and press LMB to place the vertex permanently
  6. Press Ctrl while sliding to avoid snapping to the grid

Technique #2: Create a vertex and edge at the same time

NOTE: This technique does not attach the new vertex to the edge. The only way to do this is to drag the new vertex to a vertex created on the desire edge using Technique #1.

Select an existing vertex

enter image description here

Ctrl + LMB away from the selected vertex to create a new vertex

enter image description here

In the 3D Viewport, check to ensure that:

  • Snap During Transform (magnet icon) is turned on
  • Type of Element to Snap to is set to Edge
  • Which Part to Snap Onto Target is set to Closest

enter image description here

RMB to drag the vertex to snap to the desired edge (The dragged vertex should have a circle around it to indicate it will snap to the edge). Release the RMB, and LMB to confirm the placement.

enter image description here

Source Link

Select an existing vertex

enter image description here

Ctrl + LMB away from the selected vertex to create a new vertex

enter image description here

In the 3D Viewport, check to ensure that:

  • Snap During Transform (magnet icon) is turned on
  • Type of Element to Snap to is set to Edge
  • Which Part to Snap Onto Target is set to Closest

enter image description here

RMB to drag the vertex to snap to the desired edge (The dragged vertex should have a circle around it to indicate it will snap to the edge). Release the RMB, and LMB to confirm the placement.

enter image description here