Post Closed as "Duplicate" by Duarte Farrajota Ramos
deleted 1 character in body
Source Link
PolyMad
  • 844
  • 6
  • 21

I just can't get the scene to work properly with a single HDR texture. Spent 3 days on this, playing with the material, curves, input, photshop, etc.

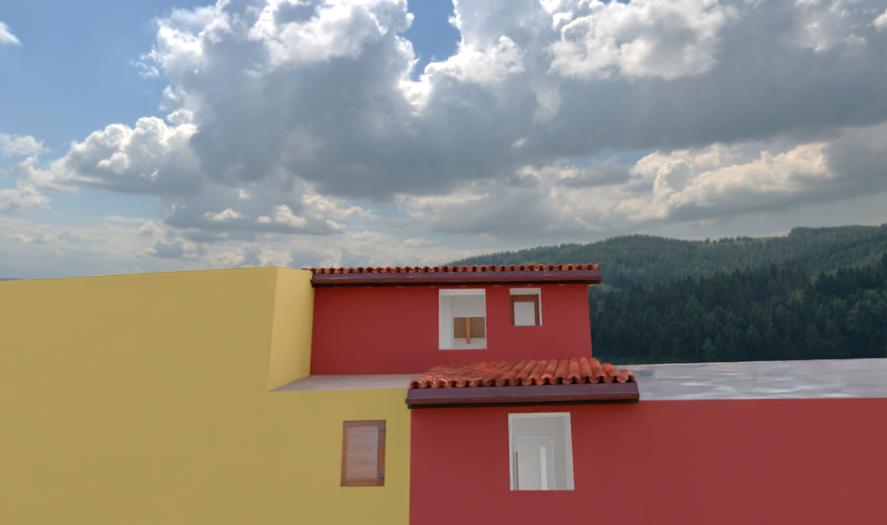
No way to obtain what I want from a single material. The background is always off in respect to the illumination. In example, if the sky is correctly rendered, like this: enter image description here
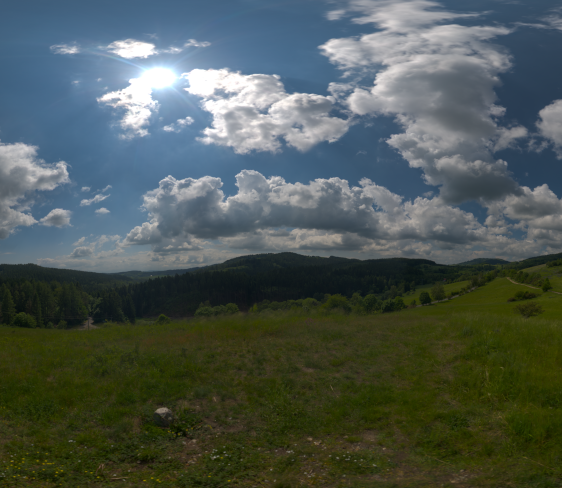
Then the lighting in the scene is far too low.

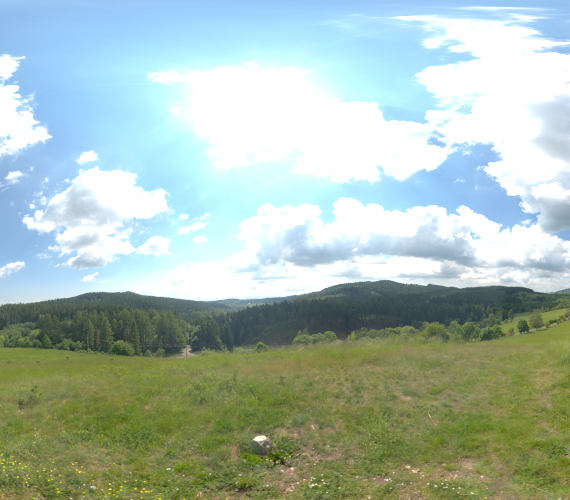
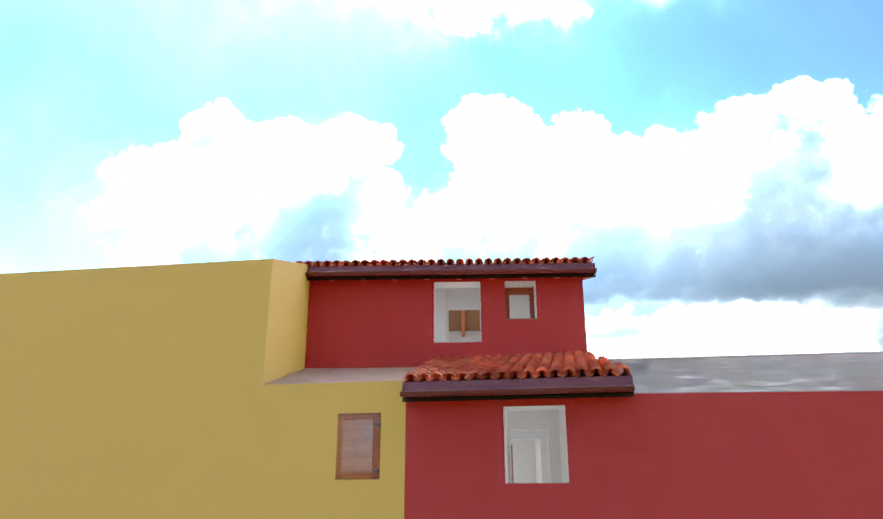
If the sky is wrongfully rendered, like this:

enter image description here

Then the scene is lighted correctly, but the sky looks like s**t.

I tried to multiply using FACTOR, the curves, etc. No way. The power coming from the sun (if it's "small" in the sky) is always far less than what I want), and linking the image to FACTOR also changes its visual appearance.

My solution

Use one material to show the surroundings EXACTLY as one wants, and another material to light the scene so to match the visuals. I am too much noob to get how to do this without spending another week on it, so I'm asking here.

My fastest, dirty solution would be:

  1. Make the WORLD MATERIAL with the LIGHTING texture to light the scene the correct way.
  2. Cover the world texture by adding a 1 km sphere with the VISUAL texture mapped on it, making it unshaded (i.e.: just render the exact texture color without any other interaction with the ligthing, exactly like the WORLD MATERIAL does), and disabling casting shadows and any other interaction with the scene.

But I am sure there's some cleaner method to do it, probably all inside the SHADER EDITOR.

Edit

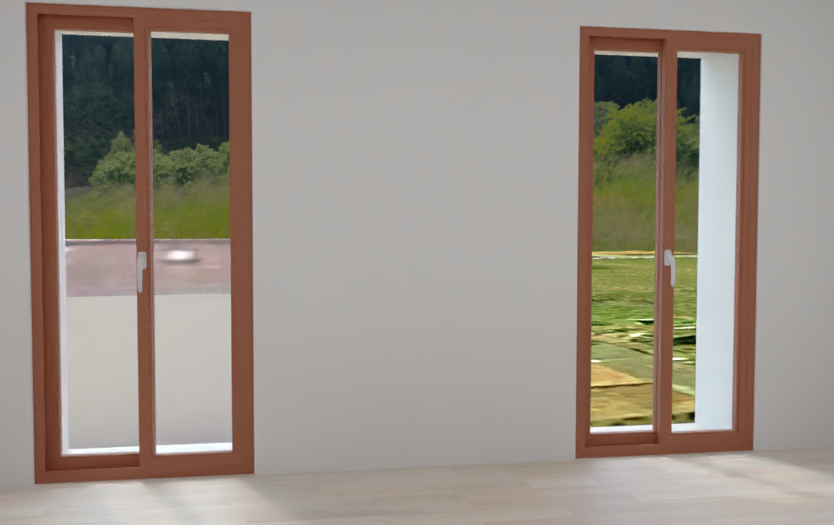
For anyone interested, the additional sphere solution works perfectly. Here below you can see an image from inside the room, and you can see the outside green textured plane blends quite well with the world sphere:

enter image description here

And I have some decent shadows coming in from the windows, as expected. Not perfect, but I still need to work a bit on the lighting texture, that has a too widespread emissive area.

Here you can see that the sky looks quite well, almost exactly as I want it:

enter image description here

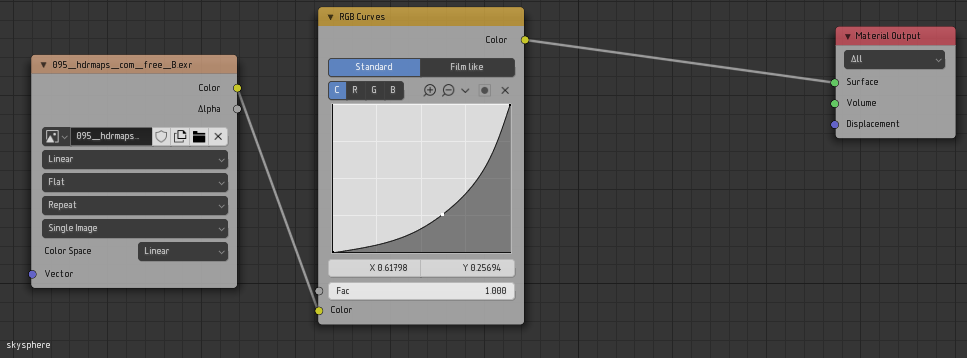
And this below is the actual WORLD MATERIAL, that gives the lighting to the scene (I just disabled the sphere visibility for this):

enter image description here

And here below is the material used for the sphere:

enter image description here

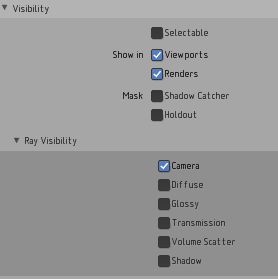
Don't forget to align the sphere with the world material, and you will probably also need to scale it to -1 on the Y axis, if you keep the default UV. You also need to set the object render options like this:

enter image description here

I just can't get the scene to work properly with a single HDR texture. Spent 3 days on this, playing with the material, curves, input, photshop, etc.

No way to obtain what I want from a single material. The background is always off in respect to the illumination. In example, if the sky is correctly rendered, like this: enter image description here

Then the lighting in the scene is far too low.

If the sky is wrongfully rendered, like this:

enter image description here

Then the scene is lighted correctly, but the sky looks like s**t.

I tried to multiply using FACTOR, the curves, etc. No way. The power coming from the sun (if it's "small" in the sky) is always far less than what I want), and linking the image to FACTOR also changes its visual appearance.

My solution

Use one material to show the surroundings EXACTLY as one wants, and another material to light the scene so to match the visuals. I am too much noob to get how to do this without spending another week on it, so I'm asking here.

My fastest, dirty solution would be:

  1. Make the WORLD MATERIAL with the LIGHTING texture to light the scene the correct way.
  2. Cover the world texture by adding a 1 km sphere with the VISUAL texture mapped on it, making it unshaded (i.e.: just render the exact texture color without any other interaction with the ligthing, exactly like the WORLD MATERIAL does), and disabling casting shadows and any other interaction with the scene.

But I am sure there's some cleaner method to do it, probably all inside the SHADER EDITOR.

Edit

For anyone interested, the additional sphere solution works perfectly. Here below you can see an image from inside the room, and you can see the outside green textured plane blends quite well with the world sphere:

enter image description here

And I have some decent shadows coming in from the windows, as expected. Not perfect, but I still need to work a bit on the lighting texture, that has a too widespread emissive area.

Here you can see that the sky looks quite well, almost exactly as I want it:

enter image description here

And this below is the actual WORLD MATERIAL, that gives the lighting to the scene (I just disabled the sphere visibility for this):

enter image description here

And here below is the material used for the sphere:

enter image description here

Don't forget to align the sphere with the world material, and you will probably also need to scale it to -1 on the Y axis, if you keep the default UV. You also need to set the object render options like this:
enter image description here

I just can't get the scene to work properly with a single HDR texture. Spent 3 days on this, playing with the material, curves, input, photshop, etc.

No way to obtain what I want from a single material. The background is always off in respect to the illumination. In example, if the sky is correctly rendered, like this: enter image description here

Then the lighting in the scene is far too low.

If the sky is wrongfully rendered, like this:

enter image description here

Then the scene is lighted correctly, but the sky looks like s**t.

I tried to multiply using FACTOR, the curves, etc. No way. The power coming from the sun (if it's "small" in the sky) is always far less than what I want, and linking the image to FACTOR also changes its visual appearance.

My solution

Use one material to show the surroundings EXACTLY as one wants, and another material to light the scene so to match the visuals. I am too much noob to get how to do this without spending another week on it, so I'm asking here.

My fastest, dirty solution would be:

  1. Make the WORLD MATERIAL with the LIGHTING texture to light the scene the correct way.
  2. Cover the world texture by adding a 1 km sphere with the VISUAL texture mapped on it, making it unshaded (i.e.: just render the exact texture color without any other interaction with the ligthing, exactly like the WORLD MATERIAL does), and disabling casting shadows and any other interaction with the scene.

But I am sure there's some cleaner method to do it, probably all inside the SHADER EDITOR.

Edit

For anyone interested, the additional sphere solution works perfectly. Here below you can see an image from inside the room, and you can see the outside green textured plane blends quite well with the world sphere:

enter image description here

And I have some decent shadows coming in from the windows, as expected. Not perfect, but I still need to work a bit on the lighting texture, that has a too widespread emissive area.

Here you can see that the sky looks quite well, almost exactly as I want it:

enter image description here

And this below is the actual WORLD MATERIAL, that gives the lighting to the scene (I just disabled the sphere visibility for this):

enter image description here

And here below is the material used for the sphere:

enter image description here

Don't forget to align the sphere with the world material, and you will probably also need to scale it to -1 on the Y axis, if you keep the default UV. You also need to set the object render options like this:
enter image description here

Added my solution to the problem.
Source Link
PolyMad
  • 844
  • 6
  • 21

I just can't get the scene to work properly with a single HDR texture. Spent 3 days on this, playing with the material, curves, input, photshop, etc.

No way to obtain what I want from a single material. The background is always off in respect to the illumination. In example, if the sky is correctly rendered, like this: enter image description here

Then the lighting in the scene is far too low.

If the sky is wrongfully rendered, like this:

enter image description here

Then the scene is lighted correctly, but the sky looks like s**t.

I tried to multiply using FACTOR, the curves, etc. No way. The power coming from the sun (if it's "small" in the sky) is always far less than what I want), and linking the image to FACTOR also changes its visual appearance.

My solutionMy solution

Use one material to show the surroundings EXACTLY as one wants, and another material to light the scene so to match the visuals. I am too much noob to get how to do this without spending another week on it, so I'm asking here.

My fastest, dirty solution would be:

  1. Make the WORLD MATERIAL with the LIGHTING texture to light the scene the correct way.
  2. Cover the world texture by adding a 1 km sphere with the VISUAL texture mapped on it, making it unshaded (i.e.: just render the exact texture color without any other interaction with the ligthing, exactly like the WORLD MATERIAL does), and disabling casting shadows and any other interaction with the scene.

But I am sure there's some cleaner method to do it, probably all inside the SHADER EDITOR.

Edit

For anyone interested, the additional sphere solution works perfectly. Here below you can see an image from inside the room, and you can see the outside green textured plane blends quite well with the world sphere:

enter image description here

And I have some decent shadows coming in from the windows, as expected. Not perfect, but I still need to work a bit on the lighting texture, that has a too widespread emissive area.

Here you can see that the sky looks quite well, almost exactly as I want it:

enter image description here

And this below is the actual WORLD MATERIAL, that gives the lighting to the scene (I just disabled the sphere visibility for this):

enter image description here

And here below is the material used for the sphere:

enter image description here

Don't forget to align the sphere with the world material, and you will probably also need to scale it to -1 on the Y axis, if you keep the default UV. You also need to set the object render options like this:
enter image description here

I just can't get the scene to work properly with a single HDR texture. Spent 3 days on this, playing with the material, curves, input, photshop, etc.

No way to obtain what I want from a single material. The background is always off in respect to the illumination. In example, if the sky is correctly rendered, like this: enter image description here

Then the lighting in the scene is far too low.

If the sky is wrongfully rendered, like this:

enter image description here

Then the scene is lighted correctly, but the sky looks like s**t.

I tried to multiply using FACTOR, the curves, etc. No way. The power coming from the sun (if it's "small" in the sky) is always far less than what I want), and linking the image to FACTOR also changes its visual appearance.

My solution

Use one material to show the surroundings EXACTLY as one wants, and another material to light the scene so to match the visuals. I am too much noob to get how to do this without spending another week on it, so I'm asking here.

My fastest, dirty solution would be:

  1. Make the WORLD MATERIAL with the LIGHTING texture to light the scene the correct way.
  2. Cover the world texture by adding a 1 km sphere with the VISUAL texture mapped on it, making it unshaded (i.e.: just render the exact texture color without any other interaction with the ligthing, exactly like the WORLD MATERIAL does), and disabling casting shadows and any other interaction with the scene.

But I am sure there's some cleaner method to do it, probably all inside the SHADER EDITOR.

Edit

For anyone interested, the additional sphere solution works perfectly. Here below you can see an image from inside the room, and you can see the outside green textured plane blends quite well with the world sphere:

enter image description here

And I have some decent shadows coming in from the windows, as expected. Not perfect, but I still need to work a bit on the lighting texture, that has a too widespread emissive area.

Here you can see that the sky looks quite well, almost exactly as I want it:

enter image description here

And this below is the actual WORLD MATERIAL, that gives the lighting to the scene (I just disabled the sphere visibility for this):

enter image description here

And here below is the material used for the sphere:

enter image description here

Don't forget to align the sphere with the world material, and you will probably also need to scale it to -1 on the Y axis, if you keep the default UV. You also need to set the object render options like this:
enter image description here

Source Link
PolyMad
  • 844
  • 6
  • 21

Is there a way to use a WORLD MATERIAL for lighting, and have another WORLD MATERIAL for visuals?

I just can't get the scene to work properly with a single HDR texture. Spent 3 days on this, playing with the material, curves, input, photshop, etc.

No way to obtain what I want from a single material. The background is always off in respect to the illumination. In example, if the sky is correctly rendered, like this: enter image description here

Then the lighting in the scene is far too low.

If the sky is wrongfully rendered, like this:

enter image description here

Then the scene is lighted correctly, but the sky looks like s**t.

I tried to multiply using FACTOR, the curves, etc. No way. The power coming from the sun (if it's "small" in the sky) is always far less than what I want), and linking the image to FACTOR also changes its visual appearance.

My solution

Use one material to show the surroundings EXACTLY as one wants, and another material to light the scene so to match the visuals. I am too much noob to get how to do this without spending another week on it, so I'm asking here.

My fastest, dirty solution would be:

  1. Make the WORLD MATERIAL with the LIGHTING texture to light the scene the correct way.
  2. Cover the world texture by adding a 1 km sphere with the VISUAL texture mapped on it, making it unshaded (i.e.: just render the exact texture color without any other interaction with the ligthing, exactly like the WORLD MATERIAL does), and disabling casting shadows and any other interaction with the scene.

But I am sure there's some cleaner method to do it, probably all inside the SHADER EDITOR.