added 10 characters in body
Source Link
vklidu
  • 37.2k
  • 1
  • 64
  • 143

If you dont mind you can use just a Curve.

Shape

  • add Curve Circle, in edit mode Rotate 45, Duplicate and move 2.8 on X axis
  • select all vertices switch handles to Free V and delete from both circles the center segment
  • select end points and press F to connect

To get even distribution of colors you need to evenly distribut a curve's control points, that is not right now, but you can add another curve object - straight like, subdivide several times and deform this curve by previously shaped curve.

  • Add some stickness to curve (tube) - go to Properties editor > Object Data > Geometry > Bevel > Depth
  • It is better to keep curve in type Shape > 2D and Fill > None
  • Add Curve modifier (ensure origins both objects are at the same place)
  • Moving along X axis will move along shape

2.8x7x Material

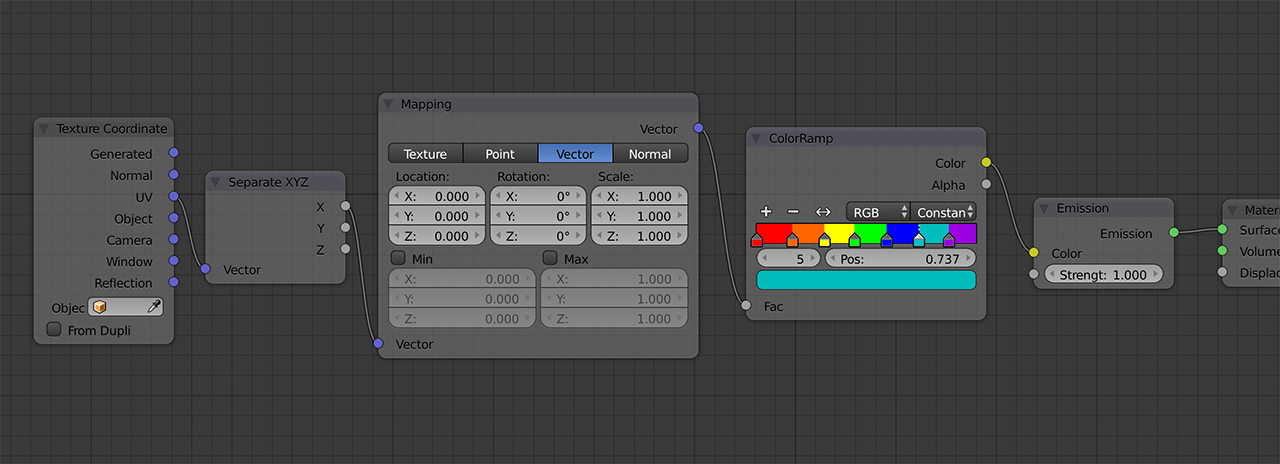
  • Plug UV Texture Coordinate socket into Separate XYZ node
    and use X socket to lug into ColorRamp
  • Enable under Properties editor > Object Data > Texture Space > Use UV for mapping.

To see material switch to Rendered type view mode.

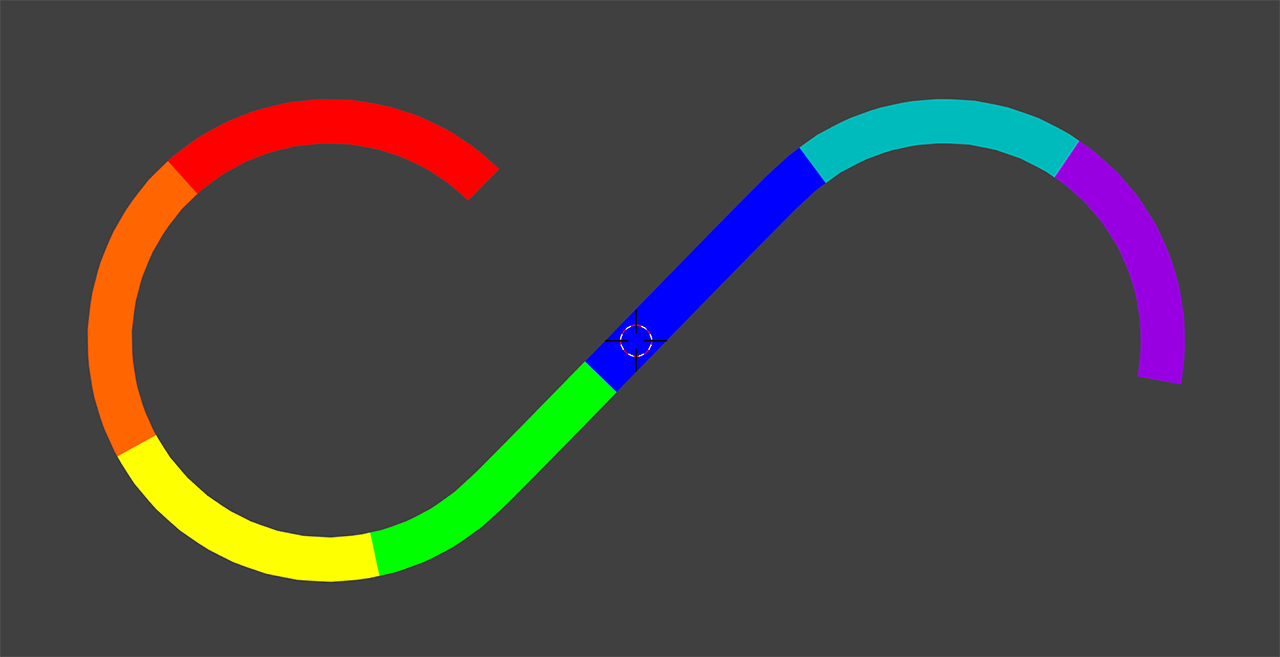
enter image description here

enter image description here

2.9x Material
is like here, you don't have to worry about UV in curve properties, it is set by default.


ChangingNotes:
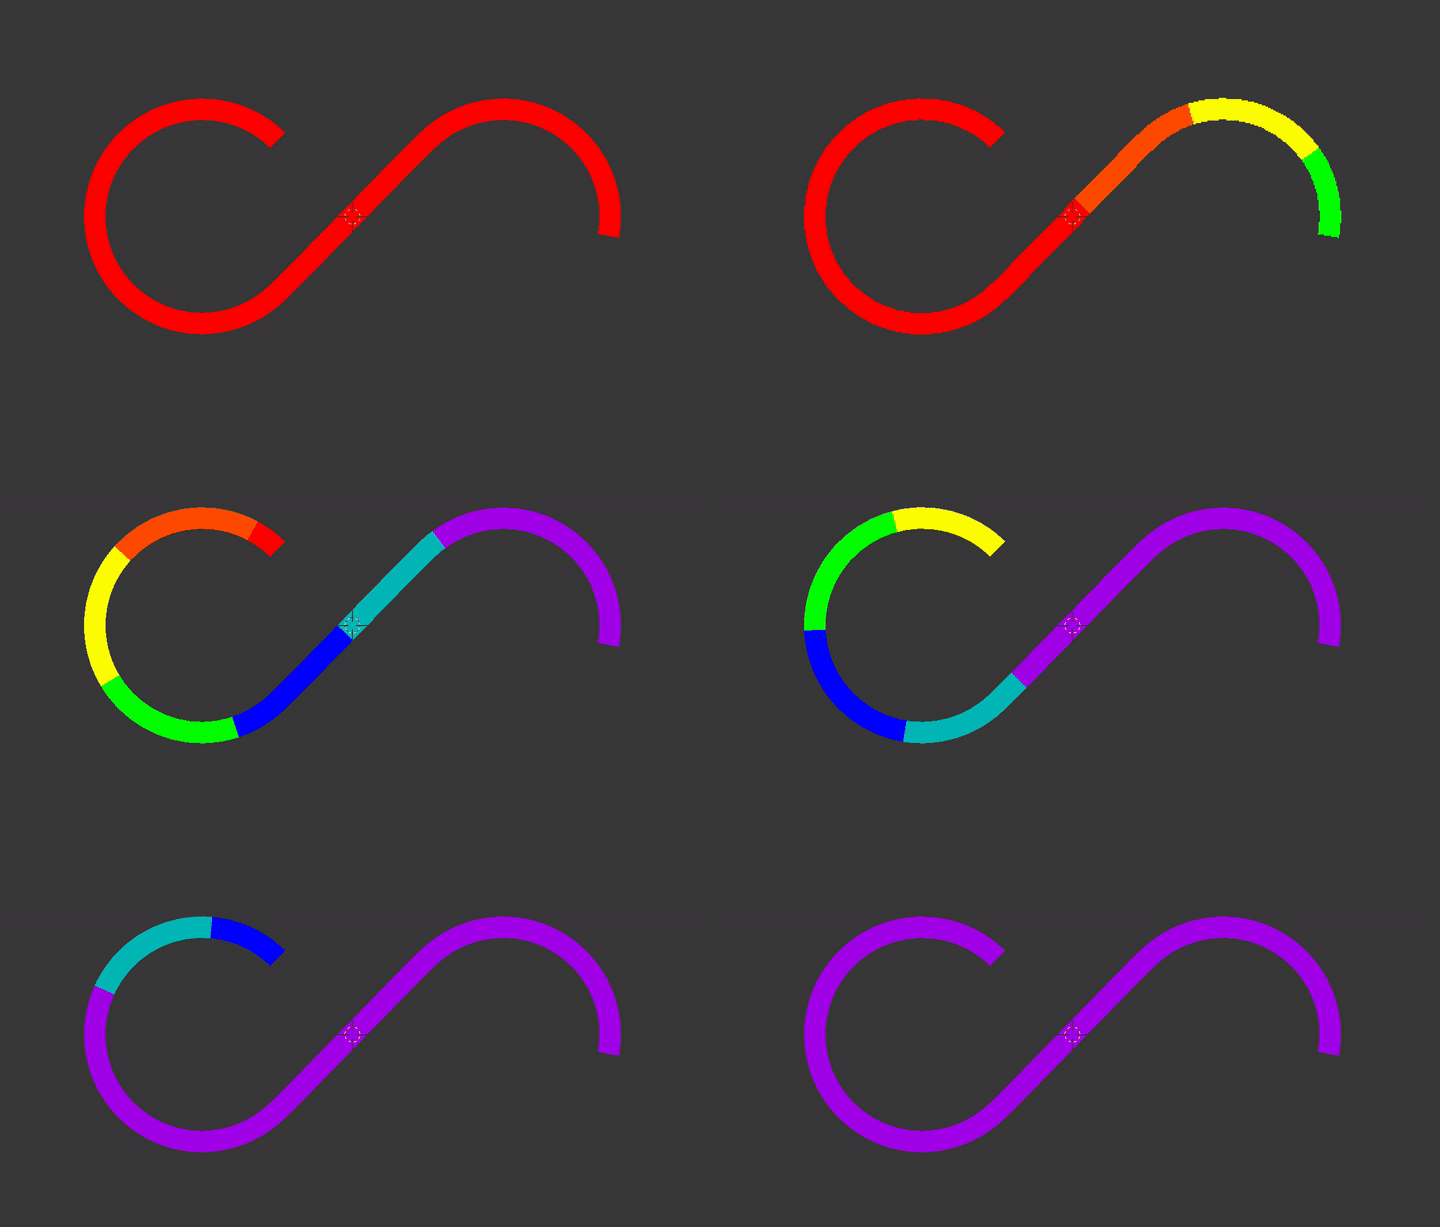
Changing X Location will move gradient along curve. enter image description here
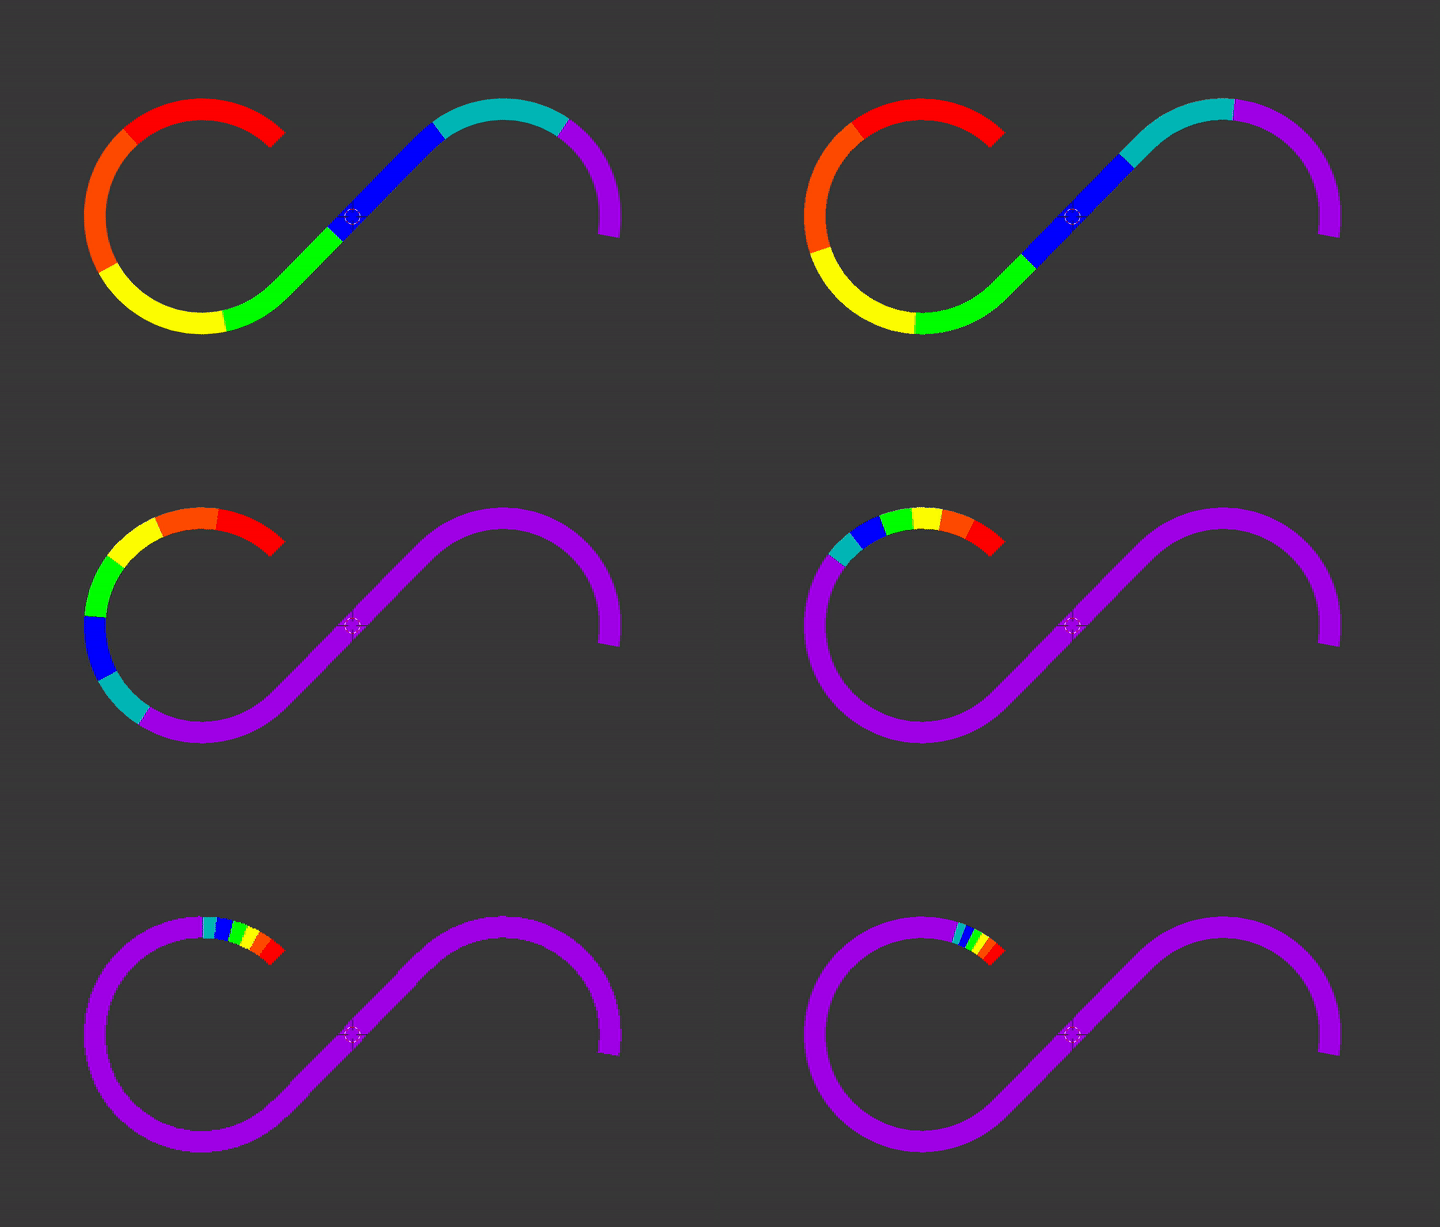
Changing X Scale in Mapping node will change gradient scale. enter image description here
If you dont mind you can use just a Curve.

Shape

  • add Curve Circle, in edit mode Rotate 45, Duplicate and move 2.8 on X axis
  • select all vertices switch handles to Free V and delete from both circles the center segment
  • select end points and press F to connect

To get even distribution of colors you need to evenly distribut a curve's control points, that is not right now, but you can add another curve object - straight like, subdivide several times and deform this curve by previously shaped curve.

  • Add some stickness to curve (tube) - go to Properties editor > Object Data > Geometry > Bevel > Depth
  • It is better to keep curve in type Shape > 2D and Fill > None
  • Add Curve modifier (ensure origins both objects are at the same place)
  • Moving along X axis will move along shape

2.8x Material

  • Plug UV Texture Coordinate socket into Separate XYZ node
    and use X socket to lug into ColorRamp
  • Enable under Properties editor > Object Data > Texture Space > Use UV for mapping.

To see material switch to Rendered type view mode.

enter image description here

enter image description here

2.9x Material
is like here, you don't have to worry about UV in curve properties, it is set by default.


Changing X Location will move gradient along curve. enter image description here

Changing X Scale in Mapping node will change gradient scale. enter image description here

If you dont mind you can use just a Curve.

Shape

  • add Curve Circle, in edit mode Rotate 45, Duplicate and move 2.8 on X axis
  • select all vertices switch handles to Free V and delete from both circles the center segment
  • select end points and press F to connect

To get even distribution of colors you need to evenly distribut a curve's control points, that is not right now, but you can add another curve object - straight like, subdivide several times and deform this curve by previously shaped curve.

  • Add some stickness to curve (tube) - go to Properties editor > Object Data > Geometry > Bevel > Depth
  • It is better to keep curve in type Shape > 2D and Fill > None
  • Add Curve modifier (ensure origins both objects are at the same place)
  • Moving along X axis will move along shape

2.7x Material

  • Plug UV Texture Coordinate socket into Separate XYZ node
    and use X socket to lug into ColorRamp
  • Enable under Properties editor > Object Data > Texture Space > Use UV for mapping.

To see material switch to Rendered type view mode.

enter image description here

enter image description here

2.9x Material
is like here, you don't have to worry about UV in curve properties, it is set by default.


Notes:
Changing X Location will move gradient along curve. enter image description here

Changing X Scale in Mapping node will change gradient scale. enter image description here
added 20 characters in body
Source Link
vklidu
  • 37.2k
  • 1
  • 64
  • 143

If you dont mind you can use just a Curve.

Shape

  • add Curve Circle, in edit mode Rotate 45, Duplicate and move 2.8 on X axis
  • select all vertices switch handles to Free V and delete from both circles the center segment
  • select end points and press F to connect

To get even distribution of colors you need even distribution ofto evenly distribut a curve's control points (that, that is not right now), but you can add another curve object - straight like, subdivide several times and deform this curve by previously shaped curve.

  • Add some stickness to curve (tube) - go to Properties editor > Object Data > Geometry > Bevel > Depth
  • It is better to keep curve in type Shape > 2D and Fill > None
  • Add Curve modifier (ensure origins both objects are at the same place)
  • Moving along X axis will move along shape

2.8x Material

  • Plug UV Texture Coordinate socket into Separate XYZ node
    and use X socket to lug into ColorRamp
  • Enable under Properties editor > Object Data > Texture Space > Use UV for mapping.

To see material switch to Rendered type view mode.

enter image description here

enter image description here

2.9x Material
is like here, you don't have to worry about UV in curve properties, it is set by default.


Changing X Location will move gradient along curve. enter image description here

Changing X Scale in Mapping node will change gradient scale. enter image description here
If you dont mind you can use just a Curve.

Shape

  • add Curve Circle, in edit mode Rotate 45, Duplicate and move 2.8 on X axis
  • select all vertices switch handles to Free V and delete from both circles the center segment
  • select end points and press F to connect

To get even distribution of colors you need even distribution of curve's control points (that is not right now), you can add another curve object, subdivide several times and deform this curve by previously shaped curve.

  • Add some stickness to curve (tube) - go to Properties editor > Object Data > Geometry > Bevel > Depth
  • It is better to keep curve in type Shape > 2D and Fill > None
  • Add Curve modifier (ensure origins both objects are at the same place)
  • Moving along X axis will move along shape

2.8x Material

  • Plug UV Texture Coordinate socket into Separate XYZ node
    and use X socket to lug into ColorRamp
  • Enable under Properties editor > Object Data > Texture Space > Use UV for mapping.

To see material switch to Rendered type view mode.

enter image description here

enter image description here

2.9x Material
is like here, you don't have to worry about UV in curve properties, it is set by default.


Changing X Location will move gradient along curve. enter image description here

Changing X Scale in Mapping node will change gradient scale. enter image description here

If you dont mind you can use just a Curve.

Shape

  • add Curve Circle, in edit mode Rotate 45, Duplicate and move 2.8 on X axis
  • select all vertices switch handles to Free V and delete from both circles the center segment
  • select end points and press F to connect

To get even distribution of colors you need to evenly distribut a curve's control points, that is not right now, but you can add another curve object - straight like, subdivide several times and deform this curve by previously shaped curve.

  • Add some stickness to curve (tube) - go to Properties editor > Object Data > Geometry > Bevel > Depth
  • It is better to keep curve in type Shape > 2D and Fill > None
  • Add Curve modifier (ensure origins both objects are at the same place)
  • Moving along X axis will move along shape

2.8x Material

  • Plug UV Texture Coordinate socket into Separate XYZ node
    and use X socket to lug into ColorRamp
  • Enable under Properties editor > Object Data > Texture Space > Use UV for mapping.

To see material switch to Rendered type view mode.

enter image description here

enter image description here

2.9x Material
is like here, you don't have to worry about UV in curve properties, it is set by default.


Changing X Location will move gradient along curve. enter image description here

Changing X Scale in Mapping node will change gradient scale. enter image description here

deleted 2 characters in body
Source Link
vklidu
  • 37.2k
  • 1
  • 64
  • 143

If you dont mind you can use just a Curve.

Shape

  • add Curve Circle, in edit mode Rotate 45, Duplicate and move 2.8 on X axis
  • select all vertices switch handles to Free V and delete from both circles the center segment
  • select end points and press F to connect

To get even distribution of colors you need even distribution of curve's control points (that is not right now), you can add another curve object, subdivide several times and deform this curve by previously shaped curve.

  • Add some stickness to curve (tube) - go to Properties editor > Object Data > Geometry > Bevel > Depth
  • It is better to keep curve in type Shape > 2D and Fill > None
  • Add Curve modifier (ensure origins both objects are at the same place)
  • Moving along X axis will move along shape

Material2.8x Material

  • Plug UV Texture Coordinate socket into Separate XYZ node
    and use X socket to lug into ColorRamp
  • enableEnable under Properties editor > Object Data > Texture Space > Use UV for mapping.

To see material switch to Rendered type view mode.

enter image description here

enter image description here

2.9x Material
is like here, you don't have to worry about UV in curve properties, it is set by default.


Changing X Location will move gradient along curve. enter image description here

Changing X Scale in Mapping node will change gradient scale. enter image description here

To see material switch to Rendered type view mode.

If you dont mind you can use just a Curve.

Shape

  • add Curve Circle, in edit mode Rotate 45, Duplicate and move 2.8 on X axis
  • select all vertices switch handles to Free V and delete from both circles the center segment
  • select end points and press F to connect

To get even distribution of colors you need even distribution of curve's control points (that is not right now), you can add another curve object, subdivide several times and deform this curve by previously shaped curve.

  • Add some stickness to curve (tube) - go to Properties editor > Object Data > Geometry > Bevel > Depth
  • It is better to keep curve in type Shape > 2D and Fill > None
  • Add Curve modifier (ensure origins both objects are at the same place)
  • Moving along X axis will move along shape

Material

  • Plug UV Texture Coordinate socket into Separate XYZ node
    and use X socket to lug into ColorRamp
  • enable under Properties editor > Object Data > Texture Space > Use UV for mapping

enter image description here

enter image description here


Changing X Location will move gradient along curve. enter image description here

Changing X Scale in Mapping node will change gradient scale. enter image description here

To see material switch to Rendered type view mode.

If you dont mind you can use just a Curve.

Shape

  • add Curve Circle, in edit mode Rotate 45, Duplicate and move 2.8 on X axis
  • select all vertices switch handles to Free V and delete from both circles the center segment
  • select end points and press F to connect

To get even distribution of colors you need even distribution of curve's control points (that is not right now), you can add another curve object, subdivide several times and deform this curve by previously shaped curve.

  • Add some stickness to curve (tube) - go to Properties editor > Object Data > Geometry > Bevel > Depth
  • It is better to keep curve in type Shape > 2D and Fill > None
  • Add Curve modifier (ensure origins both objects are at the same place)
  • Moving along X axis will move along shape

2.8x Material

  • Plug UV Texture Coordinate socket into Separate XYZ node
    and use X socket to lug into ColorRamp
  • Enable under Properties editor > Object Data > Texture Space > Use UV for mapping.

To see material switch to Rendered type view mode.

enter image description here

enter image description here

2.9x Material
is like here, you don't have to worry about UV in curve properties, it is set by default.


Changing X Location will move gradient along curve. enter image description here

Changing X Scale in Mapping node will change gradient scale. enter image description here

added 1172 characters in body
Source Link
vklidu
  • 37.2k
  • 1
  • 64
  • 143
Loading
Post Undeleted by vklidu
added 1172 characters in body
Source Link
vklidu
  • 37.2k
  • 1
  • 64
  • 143
Loading
Post Deleted by vklidu
added 221 characters in body
Source Link
vklidu
  • 37.2k
  • 1
  • 64
  • 143
Loading
Source Link
vklidu
  • 37.2k
  • 1
  • 64
  • 143
Loading