improved formatting
Source Link
gandalf3
  • 158.3k
  • 60
  • 612
  • 1.1k

1.go to node editor and enable use nodes 2.add mask node and mix node 3.in uv editor change from paint to mask(if you want mask image ,upload that image to uv editor ,mask will be placed over your image) basic set up 4.LMB(leftmousebutton)+ctrl add point of the curve, close curve with toggle cyclic 5.use this mask as input for mask node and plug mask node to factor of the mix node
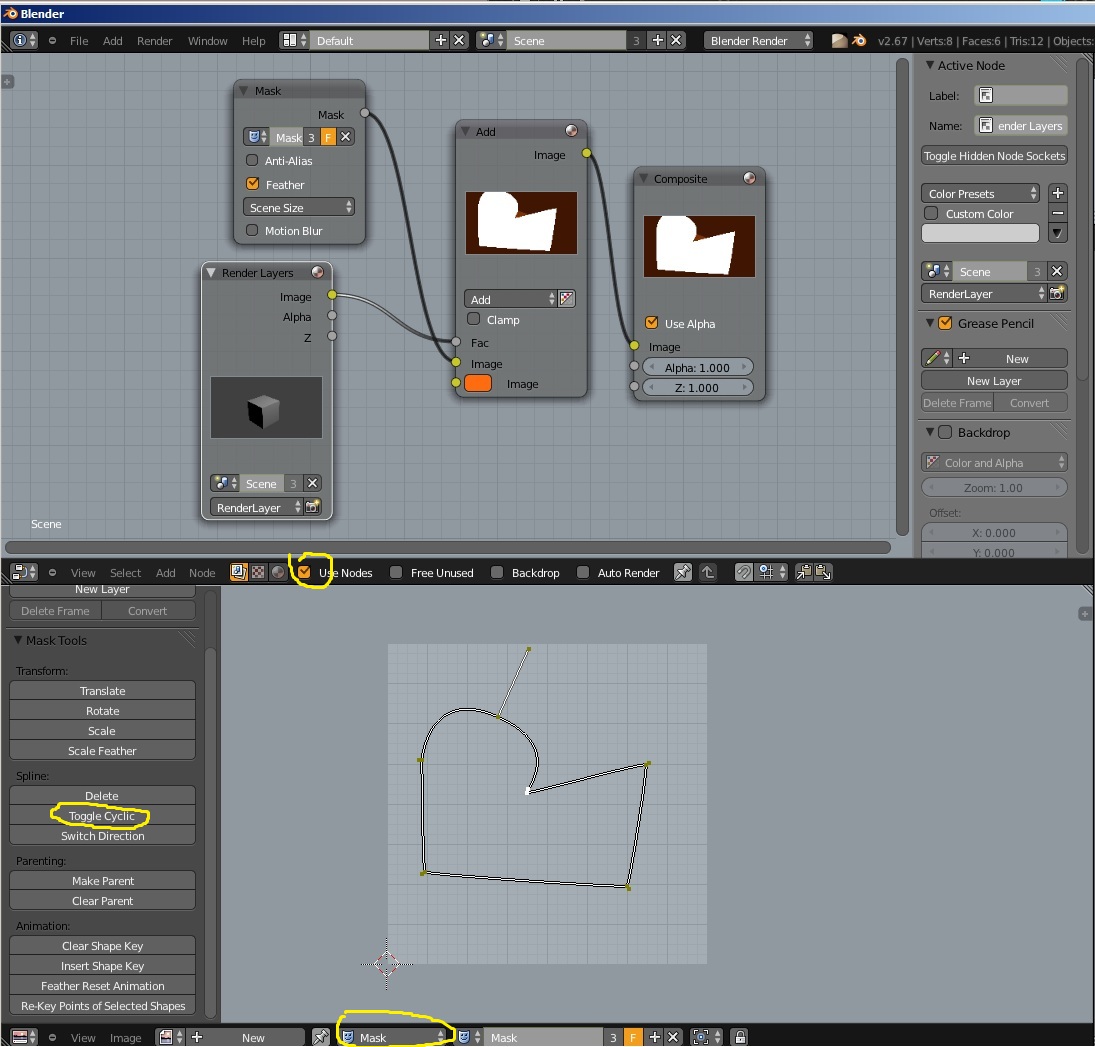
  1. go to node editor and enable use nodes
  2. add mask node and mix node
  3. in uv editor change from paint to mask (if you want a mask image, upload that image to uv editor, the mask will be placed over your image) basic set up
  4. LMB+Ctrl to add point on the curve, close curve by enabling toggle cyclic
  5. use this mask as input for mask node and plug mask node to factor of the mix node

for rotoscoping you could be use add onthis http://wiki.blender.org/index.php/Extensions:2.6/Py/Scripts/Animation/RotoBezieradd on  , see http://www.blendernation.com/2010/11/22/new-feature-rotobezier/this for more info.

1.go to node editor and enable use nodes 2.add mask node and mix node 3.in uv editor change from paint to mask(if you want mask image ,upload that image to uv editor ,mask will be placed over your image) basic set up 4.LMB(leftmousebutton)+ctrl add point of the curve, close curve with toggle cyclic 5.use this mask as input for mask node and plug mask node to factor of the mix node

for rotoscoping could be use add on http://wiki.blender.org/index.php/Extensions:2.6/Py/Scripts/Animation/RotoBezier  http://www.blendernation.com/2010/11/22/new-feature-rotobezier/

  1. go to node editor and enable use nodes
  2. add mask node and mix node
  3. in uv editor change from paint to mask (if you want a mask image, upload that image to uv editor, the mask will be placed over your image) basic set up
  4. LMB+Ctrl to add point on the curve, close curve by enabling toggle cyclic
  5. use this mask as input for mask node and plug mask node to factor of the mix node

for rotoscoping you could use this add on, see this for more info.

deleted 5 characters in body
Source Link
Utas
  • 854
  • 8
  • 16

1.go to node editor and enable use nodes 2.add mask node and mix node 3.in uv editor change from paint to mask(if you want mask image ,upload that image to uv editor ,mask will be placed over your image) basic set up 4.LMB(leftmousebutton)+ctrl add point of the curve, close curve with toggle cyclic 5.use this mask as input for mask node and plug mask node to factor of the mix node

mask could be animated as well with adding shape keys,if you want mask some image upload that image to uv editor ,mask will be placed over your image basic set up

for rotoscoping could be use add on http://wiki.blender.org/index.php/Extensions:2.6/Py/Scripts/Animation/RotoBezier http://www.blendernation.com/2010/11/22/new-feature-rotobezier/

1.go to node editor and enable use nodes 2.add mask node and mix node 3.in uv editor change from paint to mask(if you want mask image ,upload that image to uv editor ,mask will be placed over your image) basic set up 4.LMB(leftmousebutton)+ctrl add point of the curve, close curve with toggle cyclic 5.use this mask as input for mask node and plug mask node to factor of the mix node

for rotoscoping could be use add on http://wiki.blender.org/index.php/Extensions:2.6/Py/Scripts/Animation/RotoBezier http://www.blendernation.com/2010/11/22/new-feature-rotobezier/

added 46 characters in body
Source Link
Utas
  • 854
  • 8
  • 16

1.go to node editor and enable use nodes 2.add mask node and mix node 3.in uv editor change from paint to mask(if you want mask image ,upload that image to uv editor ,mask will be placed over your image) basic set up 4.LMB(leftmousebutton)+ctrl add point of the curve, close curve with toggle cyclic 5.use this mask as input for mask node and plug mask node to factor of the mix node

mask could be animated as well with adding shape keys,if you want mask some image upload that image to uv editor ,mask will be placed over your image basic set up

for rotoscoping could be use add on http://wiki.blender.org/index.php/Extensions:2.6/Py/Scripts/Animation/RotoBezier http://www.blendernation.com/2010/11/22/new-feature-rotobezier/

1.go to node editor and enable use nodes 2.add mask node and mix node 3.in uv editor change from paint to mask 4.LMB(leftmousebutton)+ctrl add point of the curve, close curve with toggle cyclic 5.use this mask as input for mask node and plug mask node to factor of the mix node

mask could be animated as well with adding shape keys basic set up

for rotoscoping could be use add on http://wiki.blender.org/index.php/Extensions:2.6/Py/Scripts/Animation/RotoBezier http://www.blendernation.com/2010/11/22/new-feature-rotobezier/

1.go to node editor and enable use nodes 2.add mask node and mix node 3.in uv editor change from paint to mask(if you want mask image ,upload that image to uv editor ,mask will be placed over your image) basic set up 4.LMB(leftmousebutton)+ctrl add point of the curve, close curve with toggle cyclic 5.use this mask as input for mask node and plug mask node to factor of the mix node

mask could be animated as well with adding shape keys,if you want mask some image upload that image to uv editor ,mask will be placed over your image basic set up

for rotoscoping could be use add on http://wiki.blender.org/index.php/Extensions:2.6/Py/Scripts/Animation/RotoBezier http://www.blendernation.com/2010/11/22/new-feature-rotobezier/

added 46 characters in body
Source Link
Utas
  • 854
  • 8
  • 16
Loading
added 36 characters in body
Source Link
Utas
  • 854
  • 8
  • 16
Loading
Source Link
Utas
  • 854
  • 8
  • 16
Loading