Reference to 2nd answer
Source Link
WolfiG
  • 378
  • 2
  • 10

You can bake your material to an image. "Render" tab, at the bottom.

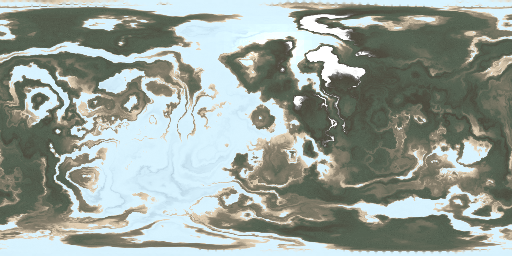
Edit 07/10/17: just saw that you want a rectangularly shaped texture map. Then don't define the seam along the equator but rather from one pole to the other. You will get some distortion due to the projection of a sphere to the recangle, but this should be fixable by adjusting the UV map of the sphere on the output image. Here is the result of a test, the dark spot is a shadow from a lamp in the scene:

enter image description here

Important to get to proper rectangular UV map: when you create your sphere check the option "Generate UVs" (see my 2nd answer below). This is the output from your blend file when I do the baking from your file: Test bake result with newly added sphere
Edit 06/10/17: request for more Details on baking process.

This is a summary from this video tutorial: https://www.blenderguru.com/tutorials/introduction-baking-cycles

I assume you are using Cycles as render engine First you need to UV-unwrap your object

  1. Select your object (the sphere)
  2. Go to edit mode
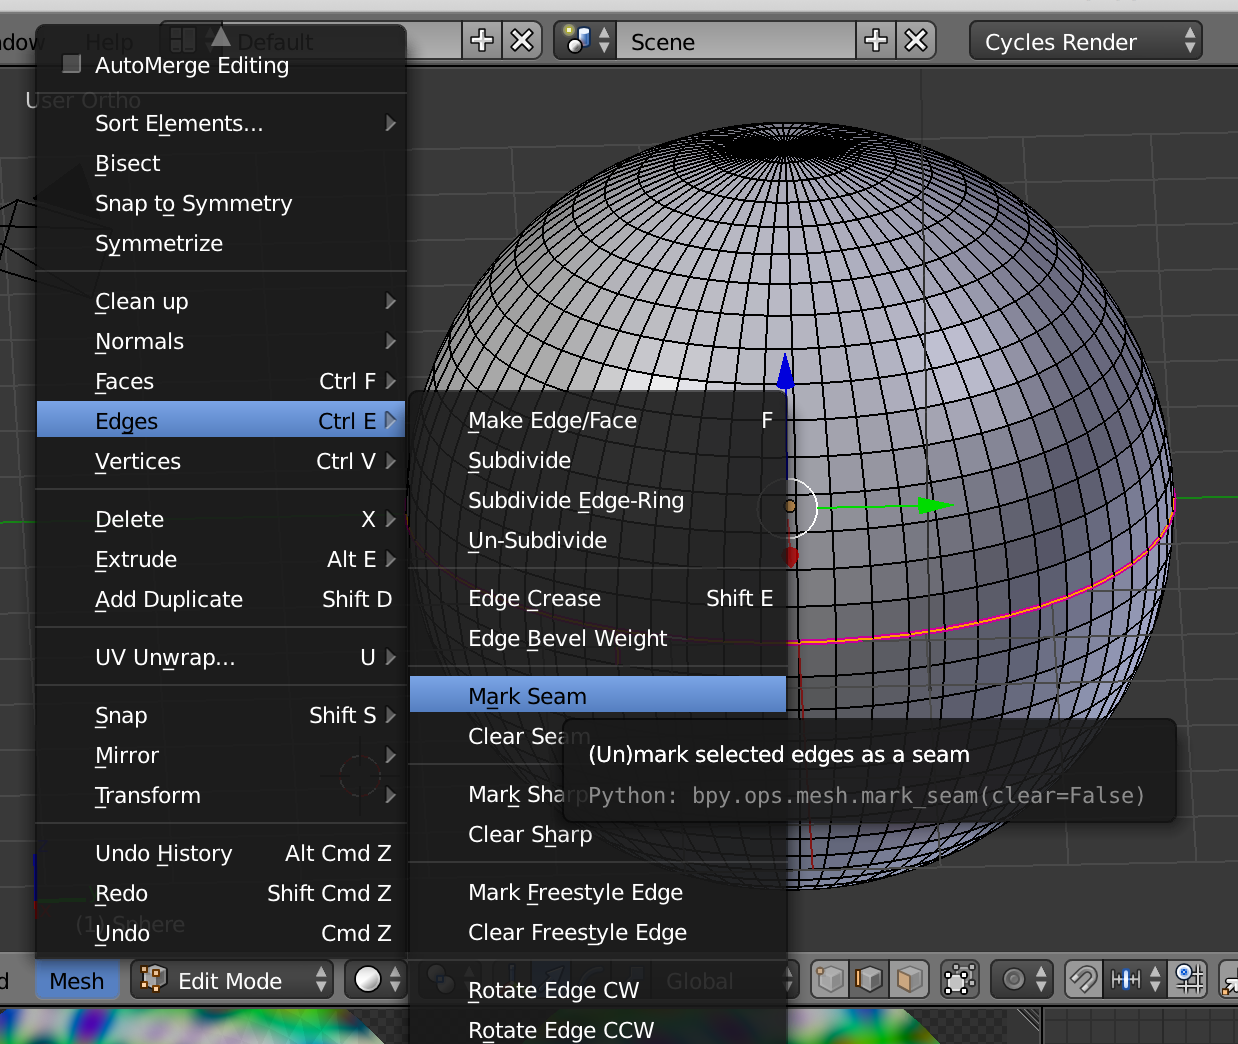
  3. Select the equator edges of the sphere and make them a seam for UV unwrapping: enter image description here
  4. Select all faces ("a") in edit mode
  5. Open UV/Image editor in addition to 3D editor window
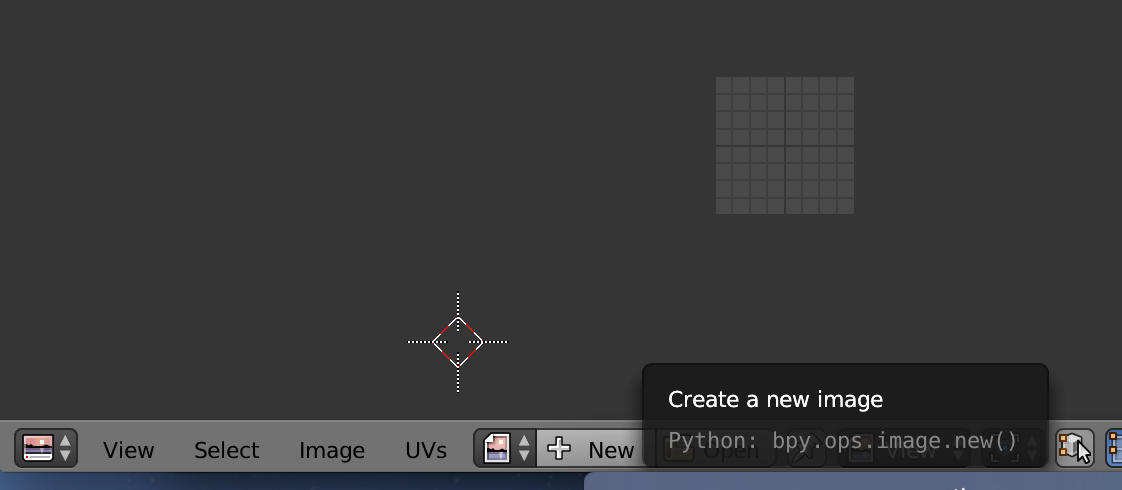
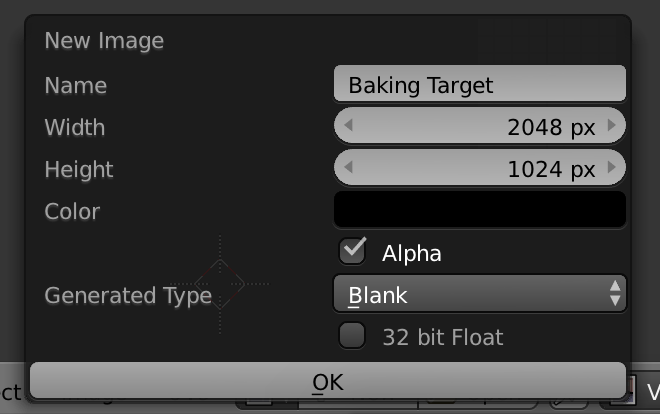
  6. Add a new image to UV/Image editor: enter image description here of desired size e.g. 1024x2024. The empty image should be double as wide as it is high, as you will have to place to circular meshes from UV unwrapping on the image: enter image description here
  7. With all faces selected, click on UV unwrap in the mesh menu of the 3D editor window --> as a result, two circular meshes should appear in the UV/Image editor: enter image description here
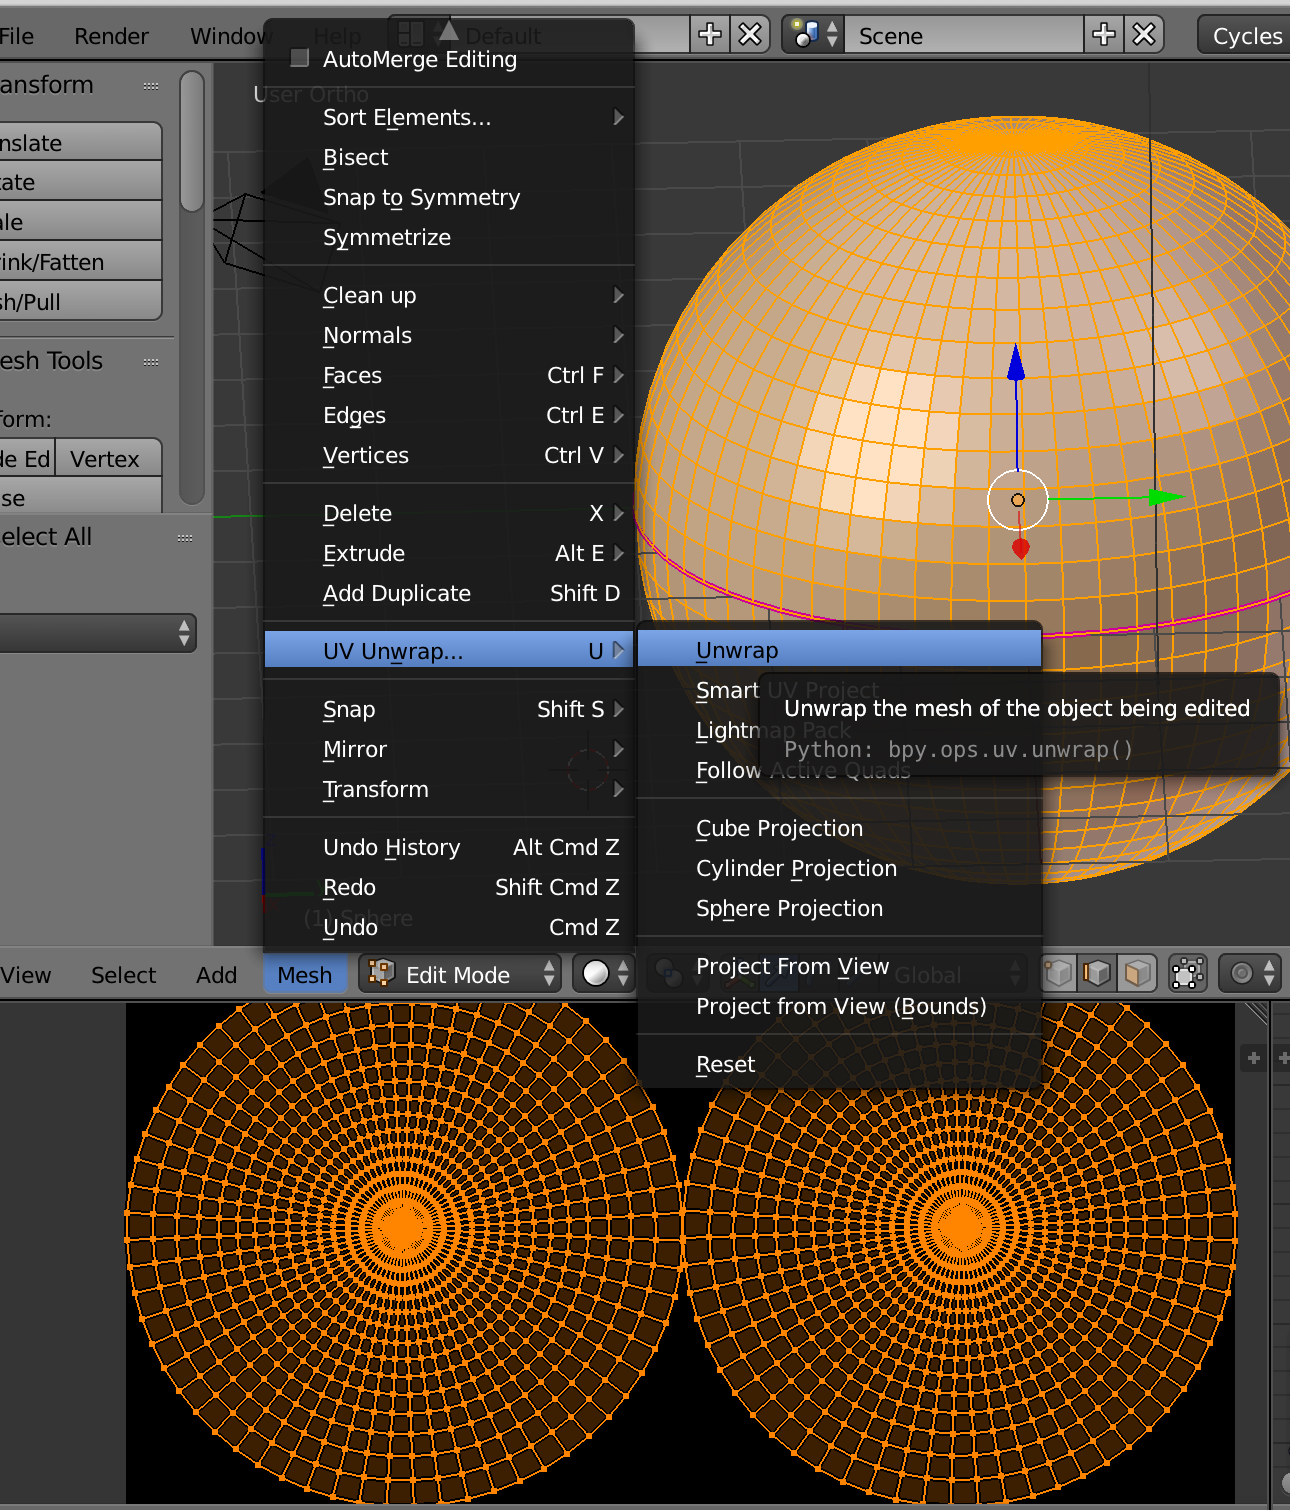
  8. Place the two meshes side by side on the area of the new image
  9. Select your material in the material tab
  10. Open a node editor window and add a new Image texture node. Do not link the new node to anything, but leave it highlighted.
  11. In the Image texture node select your newly created image as linked image: enter image description here
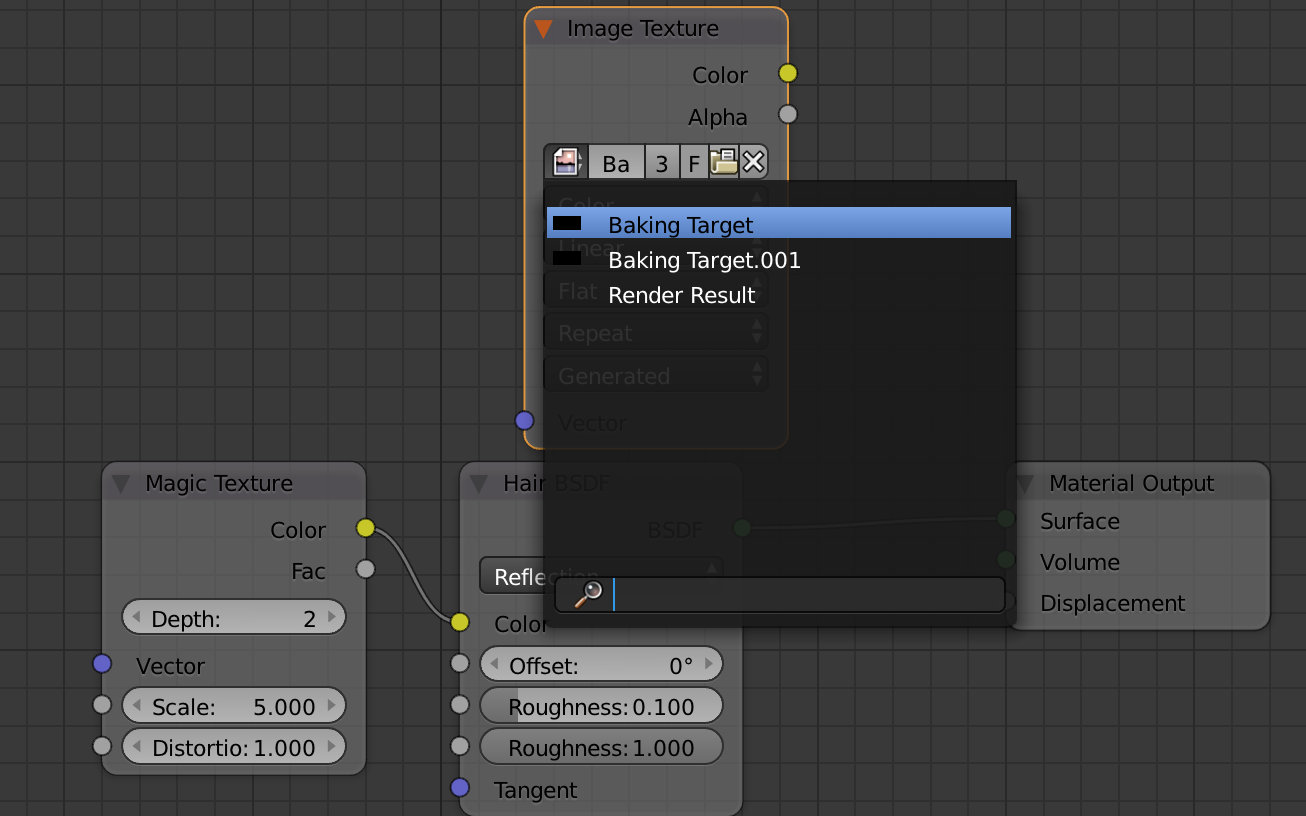
  12. now find on the "Render" tab the "Bake" submenu (bottom of the panel).
  13. select your baking method (combined should be ok) and check the options to your needs
  14. Click on the "Bake" button.

Now Blender should start to render the unwrapped sphere to the new image. The image can be saved and edited in an image editor.

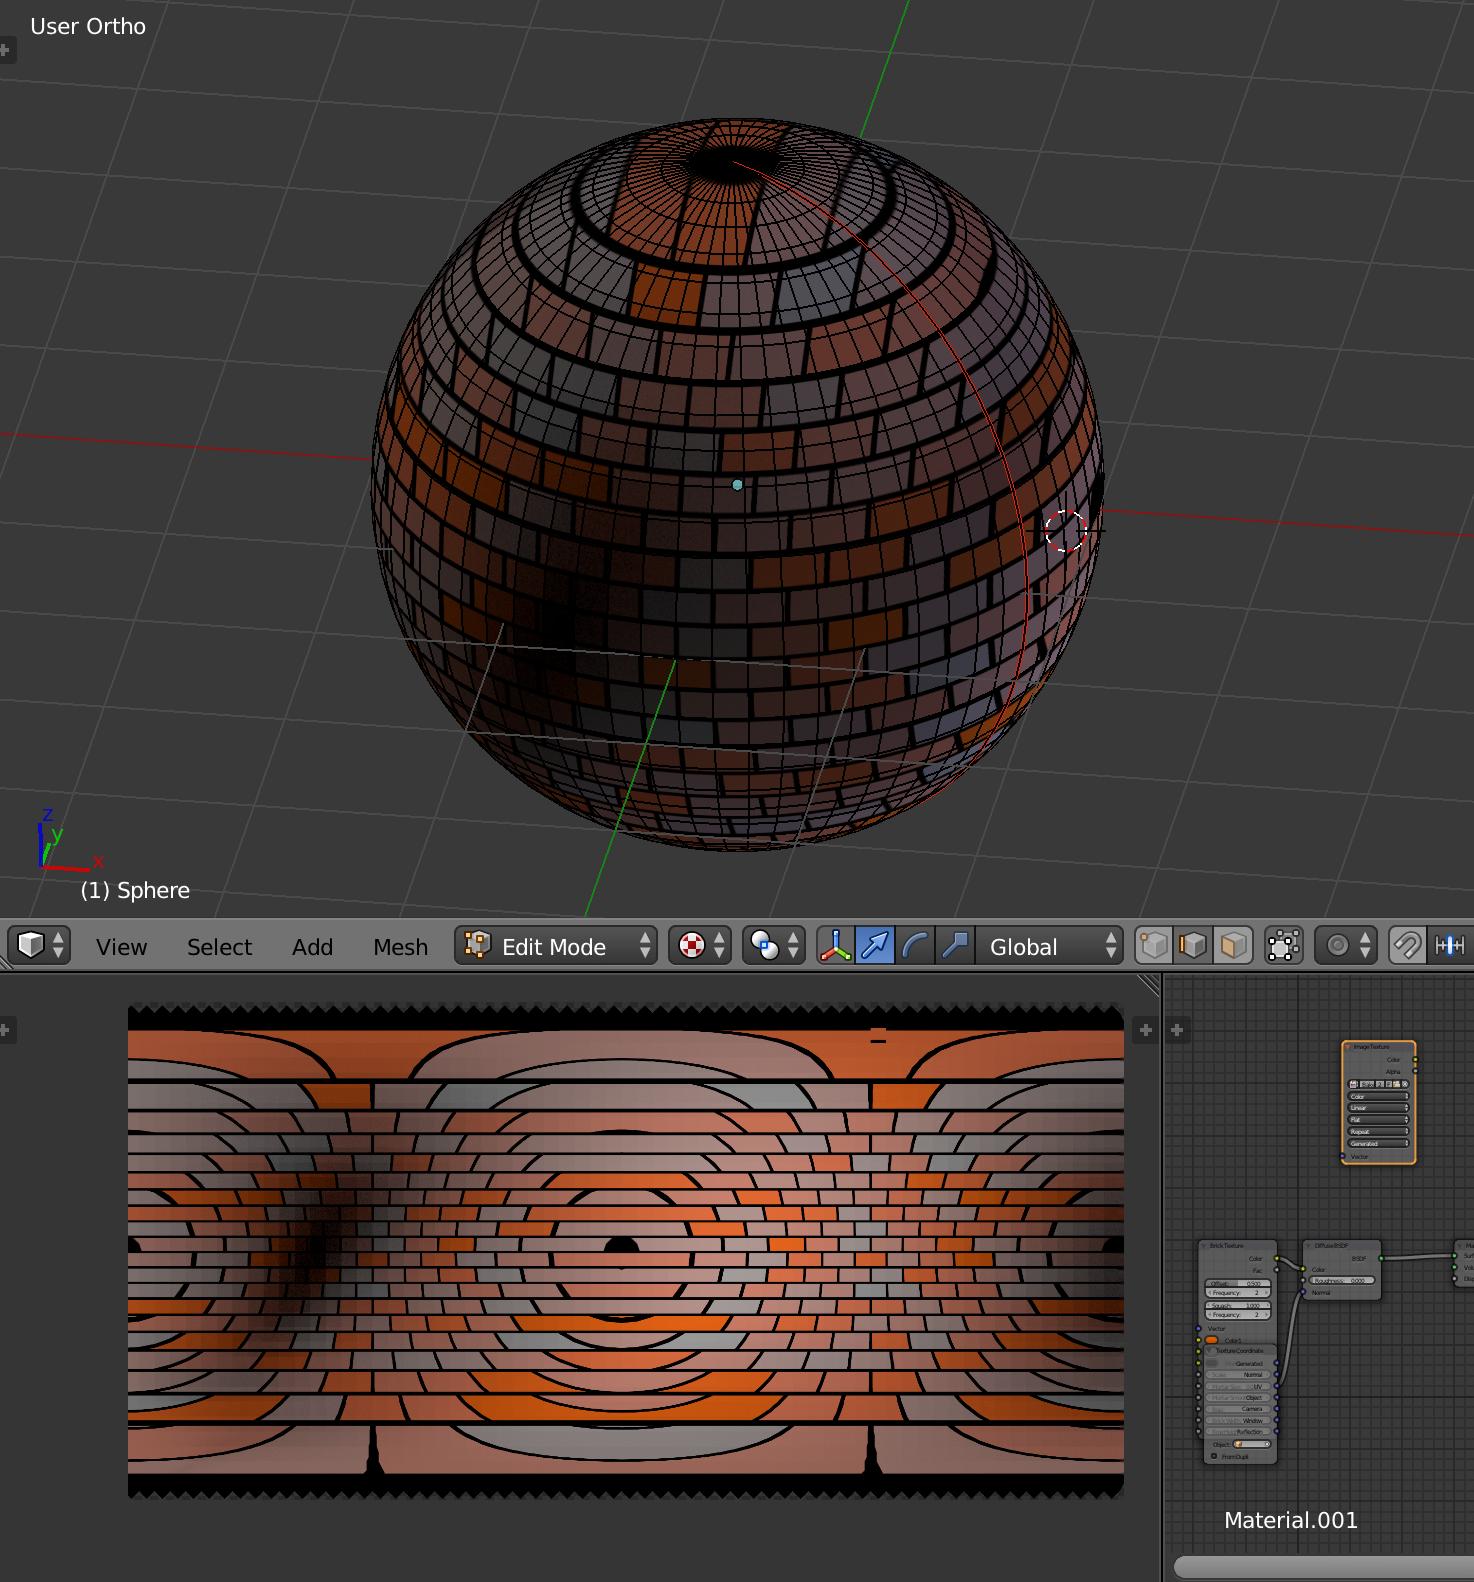
You can bake your material to an image. "Render" tab, at the bottom.

Edit 07/10/17: just saw that you want a rectangularly shaped texture map. Then don't define the seam along the equator but rather from one pole to the other. You will get some distortion due to the projection of a sphere to the recangle, but this should be fixable by adjusting the UV map of the sphere on the output image. Here is the result of a test, the dark spot is a shadow from a lamp in the scene:

enter image description here

Important to get to proper rectangular UV map: when you create your sphere check the option "Generate UVs". This is the output from your blend file when I do the baking from your file: Test bake result with newly added sphere

Edit 06/10/17: request for more Details on baking process.

This is a summary from this video tutorial: https://www.blenderguru.com/tutorials/introduction-baking-cycles

I assume you are using Cycles as render engine First you need to UV-unwrap your object

  1. Select your object (the sphere)
  2. Go to edit mode
  3. Select the equator edges of the sphere and make them a seam for UV unwrapping: enter image description here
  4. Select all faces ("a") in edit mode
  5. Open UV/Image editor in addition to 3D editor window
  6. Add a new image to UV/Image editor: enter image description here of desired size e.g. 1024x2024. The empty image should be double as wide as it is high, as you will have to place to circular meshes from UV unwrapping on the image: enter image description here
  7. With all faces selected, click on UV unwrap in the mesh menu of the 3D editor window --> as a result, two circular meshes should appear in the UV/Image editor: enter image description here
  8. Place the two meshes side by side on the area of the new image
  9. Select your material in the material tab
  10. Open a node editor window and add a new Image texture node. Do not link the new node to anything, but leave it highlighted.
  11. In the Image texture node select your newly created image as linked image: enter image description here
  12. now find on the "Render" tab the "Bake" submenu (bottom of the panel).
  13. select your baking method (combined should be ok) and check the options to your needs
  14. Click on the "Bake" button.

Now Blender should start to render the unwrapped sphere to the new image. The image can be saved and edited in an image editor.

You can bake your material to an image. "Render" tab, at the bottom.

Edit 07/10/17: just saw that you want a rectangularly shaped texture map. Then don't define the seam along the equator but rather from one pole to the other. You will get some distortion due to the projection of a sphere to the recangle, but this should be fixable by adjusting the UV map of the sphere on the output image. Here is the result of a test, the dark spot is a shadow from a lamp in the scene:

enter image description here

Important to get to proper rectangular UV map: when you create your sphere check the option "Generate UVs" (see my 2nd answer below). This is the output from your blend file when I do the baking from your file: Test bake result with newly added sphere

Edit 06/10/17: request for more Details on baking process.

This is a summary from this video tutorial: https://www.blenderguru.com/tutorials/introduction-baking-cycles

I assume you are using Cycles as render engine First you need to UV-unwrap your object

  1. Select your object (the sphere)
  2. Go to edit mode
  3. Select the equator edges of the sphere and make them a seam for UV unwrapping: enter image description here
  4. Select all faces ("a") in edit mode
  5. Open UV/Image editor in addition to 3D editor window
  6. Add a new image to UV/Image editor: enter image description here of desired size e.g. 1024x2024. The empty image should be double as wide as it is high, as you will have to place to circular meshes from UV unwrapping on the image: enter image description here
  7. With all faces selected, click on UV unwrap in the mesh menu of the 3D editor window --> as a result, two circular meshes should appear in the UV/Image editor: enter image description here
  8. Place the two meshes side by side on the area of the new image
  9. Select your material in the material tab
  10. Open a node editor window and add a new Image texture node. Do not link the new node to anything, but leave it highlighted.
  11. In the Image texture node select your newly created image as linked image: enter image description here
  12. now find on the "Render" tab the "Bake" submenu (bottom of the panel).
  13. select your baking method (combined should be ok) and check the options to your needs
  14. Click on the "Bake" button.

Now Blender should start to render the unwrapped sphere to the new image. The image can be saved and edited in an image editor.

Performed test bake and added result
Source Link
WolfiG
  • 378
  • 2
  • 10

You can bake your material to an image. "Render" tab, at the bottom.

Edit 07/10/17: just saw that you want a rectangularly shaped texture map. Then don't define the seam along the equator but rather from one pole to the other. You will get some distortion due to the projection of a sphere to the recangle, but this should be fixable by adjusting the UV map of the sphere on the output image. Here is the result of a test, the dark spot is a shadow from a lamp in the scene:

enter image description here

If this does not work out you might considerImportant to apply your materialget to a planeproper rectangular UV map: when you create your sphere check the option "Generate UVs". This is the output from your blend file when I do the baking from your file: Test bake result with newly added sphere

Edit 06/10/17: request for more Details on baking process.

This is a summary from this video tutorial: https://www.blenderguru.com/tutorials/introduction-baking-cycles

I assume you are using Cycles as render engine First you need to UV-unwrap your object

  1. Select your object (the sphere)
  2. Go to edit mode
  3. Select the equator edges of the sphere and make them a seam for UV unwrapping: enter image description here
  4. Select all faces ("a") in edit mode
  5. Open UV/Image editor in addition to 3D editor window
  6. Add a new image to UV/Image editor: enter image description here of desired size e.g. 1024x2024. The empty image should be double as wide as it is high, as you will have to place to circular meshes from UV unwrapping on the image: enter image description here
  7. With all faces selected, click on UV unwrap in the mesh menu of the 3D editor window --> as a result, two circular meshes should appear in the UV/Image editor: enter image description here
  8. Place the two meshes side by side on the area of the new image
  9. Select your material in the material tab
  10. Open a node editor window and add a new Image texture node. Do not link the new node to anything, but leave it highlighted.
  11. In the Image texture node select your newly created image as linked image: enter image description here
  12. now find on the "Render" tab the "Bake" submenu (bottom of the panel).
  13. select your baking method (combined should be ok) and check the options to your needs
  14. Click on the "Bake" button.

Now Blender should start to render the unwrapped sphere to the new image. The image can be saved and edited in an image editor.

You can bake your material to an image. "Render" tab, at the bottom.

Edit 07/10/17: just saw that you want a rectangularly shaped texture map. Then don't define the seam along the equator but rather from one pole to the other. You will get some distortion due to the projection of a sphere to the recangle, but this should be fixable by adjusting the UV map of the sphere on the output image. Here is the result of a test, the dark spot is a shadow from a lamp in the scene:

enter image description here

If this does not work out you might consider to apply your material to a plane.

Edit 06/10/17: request for more Details on baking process.

This is a summary from this video tutorial: https://www.blenderguru.com/tutorials/introduction-baking-cycles

I assume you are using Cycles as render engine First you need to UV-unwrap your object

  1. Select your object (the sphere)
  2. Go to edit mode
  3. Select the equator edges of the sphere and make them a seam for UV unwrapping: enter image description here
  4. Select all faces ("a") in edit mode
  5. Open UV/Image editor in addition to 3D editor window
  6. Add a new image to UV/Image editor: enter image description here of desired size e.g. 1024x2024. The empty image should be double as wide as it is high, as you will have to place to circular meshes from UV unwrapping on the image: enter image description here
  7. With all faces selected, click on UV unwrap in the mesh menu of the 3D editor window --> as a result, two circular meshes should appear in the UV/Image editor: enter image description here
  8. Place the two meshes side by side on the area of the new image
  9. Select your material in the material tab
  10. Open a node editor window and add a new Image texture node. Do not link the new node to anything, but leave it highlighted.
  11. In the Image texture node select your newly created image as linked image: enter image description here
  12. now find on the "Render" tab the "Bake" submenu (bottom of the panel).
  13. select your baking method (combined should be ok) and check the options to your needs
  14. Click on the "Bake" button.

Now Blender should start to render the unwrapped sphere to the new image. The image can be saved and edited in an image editor.

You can bake your material to an image. "Render" tab, at the bottom.

Edit 07/10/17: just saw that you want a rectangularly shaped texture map. Then don't define the seam along the equator but rather from one pole to the other. You will get some distortion due to the projection of a sphere to the recangle, but this should be fixable by adjusting the UV map of the sphere on the output image. Here is the result of a test, the dark spot is a shadow from a lamp in the scene:

enter image description here

Important to get to proper rectangular UV map: when you create your sphere check the option "Generate UVs". This is the output from your blend file when I do the baking from your file: Test bake result with newly added sphere

Edit 06/10/17: request for more Details on baking process.

This is a summary from this video tutorial: https://www.blenderguru.com/tutorials/introduction-baking-cycles

I assume you are using Cycles as render engine First you need to UV-unwrap your object

  1. Select your object (the sphere)
  2. Go to edit mode
  3. Select the equator edges of the sphere and make them a seam for UV unwrapping: enter image description here
  4. Select all faces ("a") in edit mode
  5. Open UV/Image editor in addition to 3D editor window
  6. Add a new image to UV/Image editor: enter image description here of desired size e.g. 1024x2024. The empty image should be double as wide as it is high, as you will have to place to circular meshes from UV unwrapping on the image: enter image description here
  7. With all faces selected, click on UV unwrap in the mesh menu of the 3D editor window --> as a result, two circular meshes should appear in the UV/Image editor: enter image description here
  8. Place the two meshes side by side on the area of the new image
  9. Select your material in the material tab
  10. Open a node editor window and add a new Image texture node. Do not link the new node to anything, but leave it highlighted.
  11. In the Image texture node select your newly created image as linked image: enter image description here
  12. now find on the "Render" tab the "Bake" submenu (bottom of the panel).
  13. select your baking method (combined should be ok) and check the options to your needs
  14. Click on the "Bake" button.

Now Blender should start to render the unwrapped sphere to the new image. The image can be saved and edited in an image editor.

Added an image of a test with a banded material
Source Link
WolfiG
  • 378
  • 2
  • 10

You can bake your material to an image. "Render" tab, at the bottom.

Edit 07/10/17: just saw that you want a rectangularly shaped texture map. Then don't define the seam along the equator but rather from one pole to the other. You will get some distortion due to the projection of a sphere to the recangle, but this should be fixable by adjusting the UV map of the sphere on the output image. If Here is the result of a test, the dark spot is a shadow from a lamp in the scene:

enter image description here

If this does not work out you might consider to apply your material to a plane.

Edit 06/10/17: request for more Details on baking process.

This is a summary from this video tutorial: https://www.blenderguru.com/tutorials/introduction-baking-cycles

I assume you are using Cycles as render engine First you need to UV-unwrap your object

  1. Select your object (the sphere)
  2. Go to edit mode
  3. Select the equator edges of the sphere and make them a seam for UV unwrapping: enter image description here
  4. Select all faces ("a") in edit mode
  5. Open UV/Image editor in addition to 3D editor window
  6. Add a new image to UV/Image editor: enter image description here of desired size e.g. 1024x2024. The empty image should be double as wide as it is high, as you will have to place to circular meshes from UV unwrapping on the image: enter image description here
  7. With all faces selected, click on UV unwrap in the mesh menu of the 3D editor window --> as a result, two circular meshes should appear in the UV/Image editor: enter image description here
  8. Place the two meshes side by side on the area of the new image
  9. Select your material in the material tab
  10. Open a node editor window and add a new Image texture node. Do not link the new node to anything, but leave it highlighted.
  11. In the Image texture node select your newly created image as linked image: enter image description here
  12. now find on the "Render" tab the "Bake" submenu (bottom of the panel).
  13. select your baking method (combined should be ok) and check the options to your needs
  14. Click on the "Bake" button.

Now Blender should start to render the unwrapped sphere to the new image. The image can be saved and edited in an image editor.

You can bake your material to an image. "Render" tab, at the bottom.

Edit: just saw that you want a rectangularly shaped texture map. Then don't define the seam along the equator but rather from one pole to the other. You will get some distortion due to the projection of a sphere to the recangle, but this should be fixable by adjusting the UV map of the sphere on the output image. If this does not work out you might consider to apply your material to a plane.

Edit: request for more Details on baking process.

This is a summary from this video tutorial: https://www.blenderguru.com/tutorials/introduction-baking-cycles

I assume you are using Cycles as render engine First you need to UV-unwrap your object

  1. Select your object (the sphere)
  2. Go to edit mode
  3. Select the equator edges of the sphere and make them a seam for UV unwrapping: enter image description here
  4. Select all faces ("a") in edit mode
  5. Open UV/Image editor in addition to 3D editor window
  6. Add a new image to UV/Image editor: enter image description here of desired size e.g. 1024x2024. The empty image should be double as wide as it is high, as you will have to place to circular meshes from UV unwrapping on the image: enter image description here
  7. With all faces selected, click on UV unwrap in the mesh menu of the 3D editor window --> as a result, two circular meshes should appear in the UV/Image editor: enter image description here
  8. Place the two meshes side by side on the area of the new image
  9. Select your material in the material tab
  10. Open a node editor window and add a new Image texture node. Do not link the new node to anything, but leave it highlighted.
  11. In the Image texture node select your newly created image as linked image: enter image description here
  12. now find on the "Render" tab the "Bake" submenu (bottom of the panel).
  13. select your baking method (combined should be ok) and check the options to your needs
  14. Click on the "Bake" button.

Now Blender should start to render the unwrapped sphere to the new image. The image can be saved and edited in an image editor.

You can bake your material to an image. "Render" tab, at the bottom.

Edit 07/10/17: just saw that you want a rectangularly shaped texture map. Then don't define the seam along the equator but rather from one pole to the other. You will get some distortion due to the projection of a sphere to the recangle, but this should be fixable by adjusting the UV map of the sphere on the output image. Here is the result of a test, the dark spot is a shadow from a lamp in the scene:

enter image description here

If this does not work out you might consider to apply your material to a plane.

Edit 06/10/17: request for more Details on baking process.

This is a summary from this video tutorial: https://www.blenderguru.com/tutorials/introduction-baking-cycles

I assume you are using Cycles as render engine First you need to UV-unwrap your object

  1. Select your object (the sphere)
  2. Go to edit mode
  3. Select the equator edges of the sphere and make them a seam for UV unwrapping: enter image description here
  4. Select all faces ("a") in edit mode
  5. Open UV/Image editor in addition to 3D editor window
  6. Add a new image to UV/Image editor: enter image description here of desired size e.g. 1024x2024. The empty image should be double as wide as it is high, as you will have to place to circular meshes from UV unwrapping on the image: enter image description here
  7. With all faces selected, click on UV unwrap in the mesh menu of the 3D editor window --> as a result, two circular meshes should appear in the UV/Image editor: enter image description here
  8. Place the two meshes side by side on the area of the new image
  9. Select your material in the material tab
  10. Open a node editor window and add a new Image texture node. Do not link the new node to anything, but leave it highlighted.
  11. In the Image texture node select your newly created image as linked image: enter image description here
  12. now find on the "Render" tab the "Bake" submenu (bottom of the panel).
  13. select your baking method (combined should be ok) and check the options to your needs
  14. Click on the "Bake" button.

Now Blender should start to render the unwrapped sphere to the new image. The image can be saved and edited in an image editor.

added a suggestion how to get a rectangular map
Source Link
WolfiG
  • 378
  • 2
  • 10
Loading
Added some screenshots
Source Link
WolfiG
  • 378
  • 2
  • 10
Loading
Post Undeleted by David
Added step by step explanation on baking
Source Link
WolfiG
  • 378
  • 2
  • 10
Loading
Added step by step explanation on baking
Source Link
WolfiG
  • 378
  • 2
  • 10
Loading
Mod Converts to Comment
Post Deleted by David
Post Undeleted by David
Post Deleted by David
Source Link
WolfiG
  • 378
  • 2
  • 10
Loading