deleted 413 characters in body
Source Link
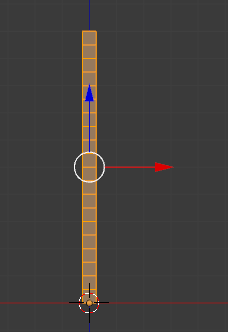
  1. From the Front Ortho view Numpad 1 create a thin tall segmented column from cube like this:
    enter image description here

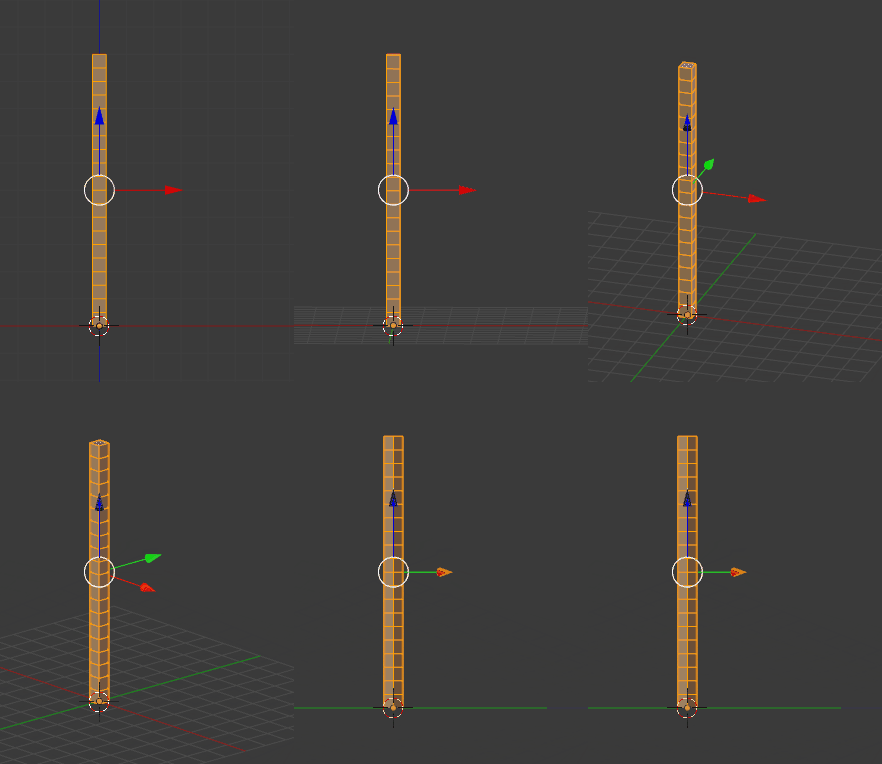
  2. Switch to 45° viewvertical curve (hold downyou can also convert segmented edge to curve with Alt to snap while orbiting+C) and also switch to Transform Orientation: View:
    enter image description here.

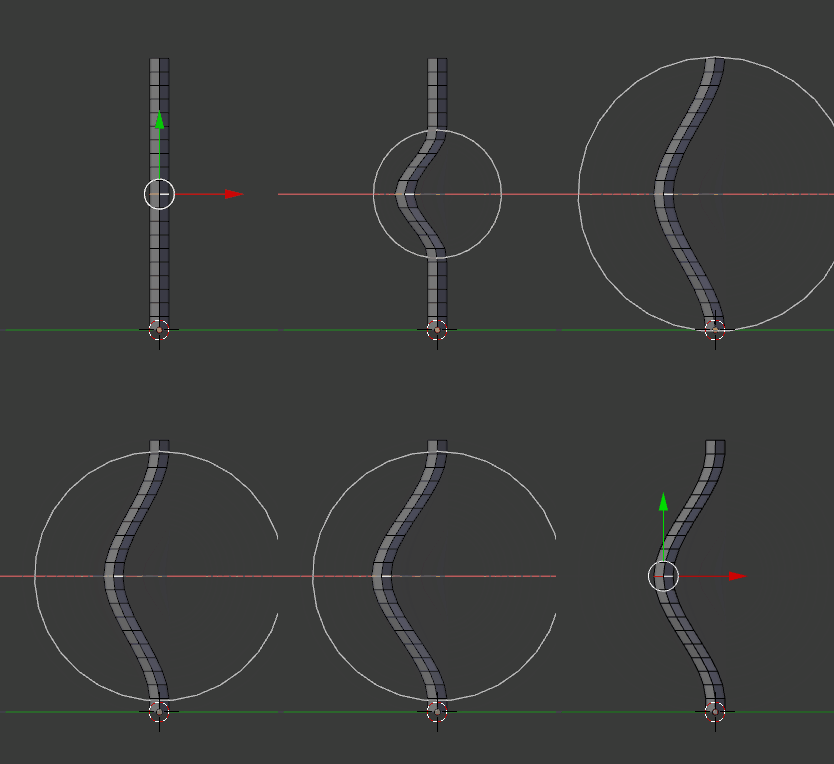
  3. Select the middle looppoint and with proportional editing on (O) define the amount of bulging the shapebasket will have:
    enter image description hereenter image description here

  4. Add a plane and convert to curve to get a square profile. Set this profile as the bulged curve's bevel object:
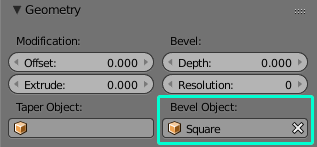
    enter image description here

  5. Turn off proportional editing. DuplicateIn editmode Tab offset the bulged curve from origin, duplicate the piece around and arrange like this:
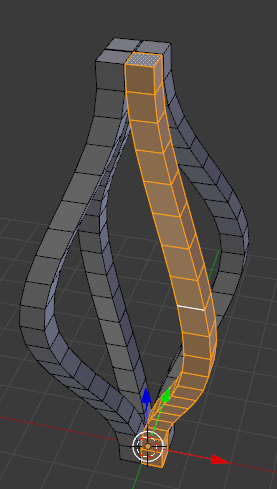
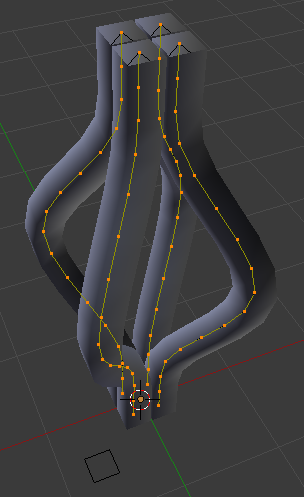
    enter image description hereenter image description here

    Move it around, set origin point to 3D cursor, duplicate with Shift+D, cancel move with RMB and rotate with R. You can also use the Spin tool for this. Make sure the ends of curves form a square

  6. Turn on proportional editing, this time set the type to Linear. Select the top 4 faces and create the final shape like this (set the final heightvertices and twisting amount):
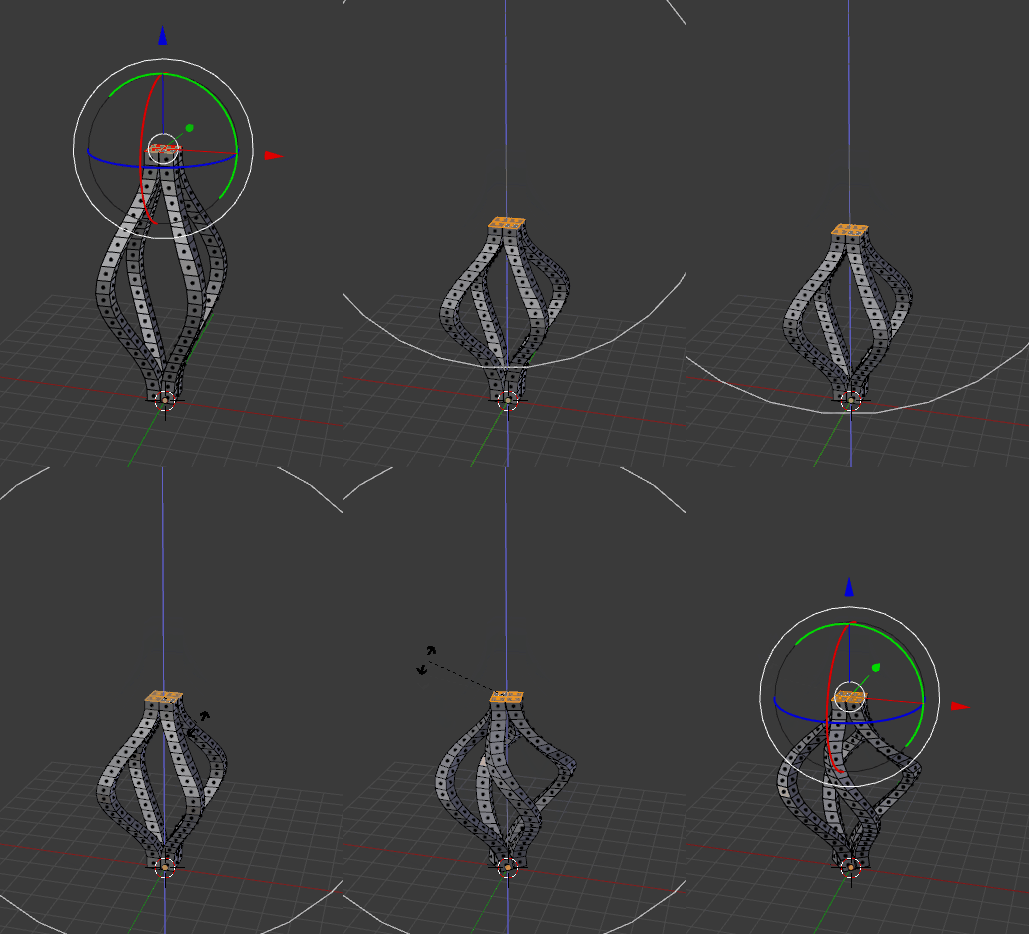
    enter image description here

  7. Beveltwist the vertical edgeloops Ctrl+B:
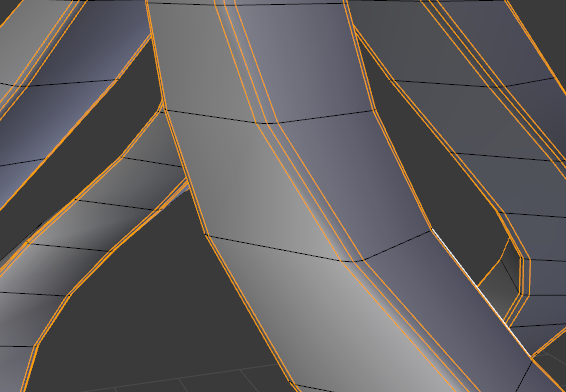
    enter image description here

  8. Add subdivision modifiercurves around Z axis:
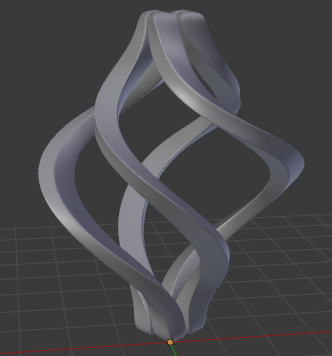
    enter image description here

    (Mine turned out to be a little wide but you get the idea how to get any shape..)enter image description here

  9.  

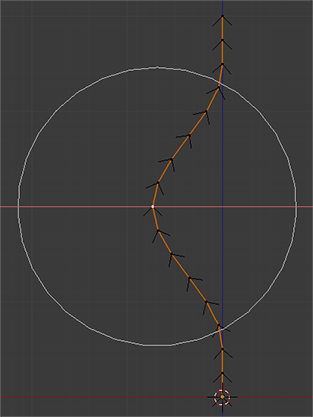
    A curve-based solution will keep the profile of the individual pieces much better. You do everything the same but on a curve (not on a segmented column) and then set a square as the curve's bevel shape (add a plane and convert to curve). For the curve for each its vertices a Mean Tilt value can be specified to control the rotation of the square profile:

    enter image description here

    . With such control nice basket endings (and transition to the rod) can be achieved.

  10. Optionally subdivide the profile curve, convert the basket to mesh, add subdivision modifier, recalculate normals:

    enter image description here

  1. From the Front Ortho view Numpad 1 create a thin tall segmented column from cube like this:

    enter image description here

  2. Switch to 45° view (hold down Alt to snap while orbiting) and also switch to Transform Orientation: View:

    enter image description here

  3. Select the middle loop and with proportional editing on (O) define the amount of bulging the shape will have:

    enter image description here

  4. Turn off proportional editing. Duplicate the piece and arrange like this:

    enter image description here

    Move it around, set origin point to 3D cursor, duplicate with Shift+D, cancel move with RMB and rotate with R.

  5. Turn on proportional editing, this time set the type to Linear. Select the top 4 faces and create the final shape like this (set the final height and twisting amount):

    enter image description here

  6. Bevel the vertical edgeloops Ctrl+B:

    enter image description here

  7. Add subdivision modifier:

    enter image description here

    (Mine turned out to be a little wide but you get the idea how to get any shape..)
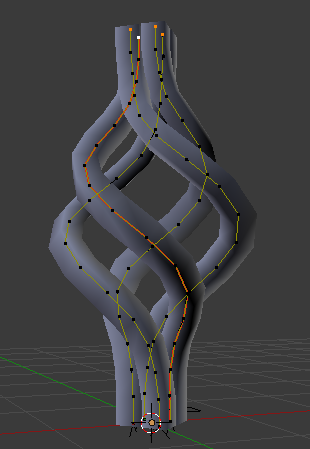
  8.  

    A curve-based solution will keep the profile of the individual pieces much better. You do everything the same but on a curve (not on a segmented column) and then set a square as the curve's bevel shape (add a plane and convert to curve). For the curve for each its vertices a Mean Tilt value can be specified to control the rotation of the square profile:
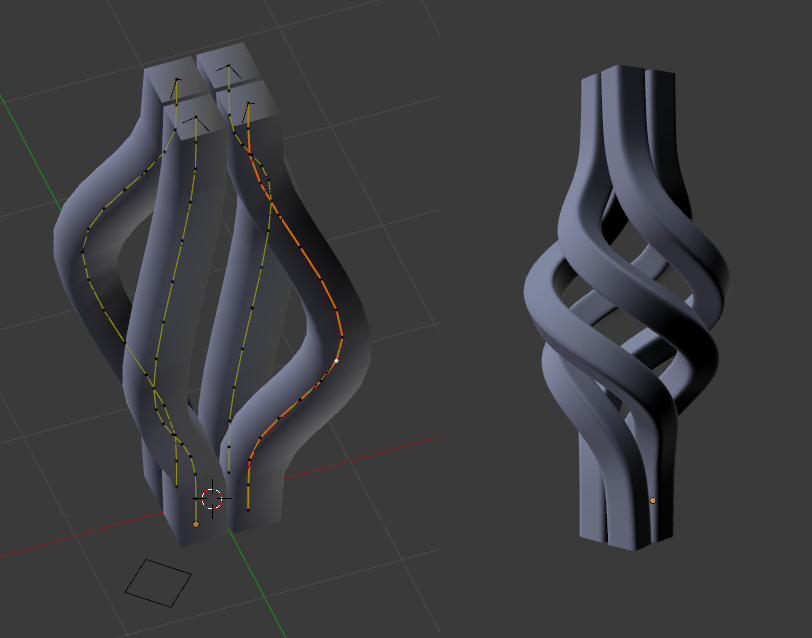
    enter image description here

    With such control nice basket endings (and transition to the rod) can be achieved.

  1. From the Front Ortho view Numpad 1 create a segmented vertical curve (you can also convert segmented edge to curve with Alt+C).

  2. Select the middle point and with proportional editing on (O) define the amount of bulging the basket will have:

    enter image description here

  3. Add a plane and convert to curve to get a square profile. Set this profile as the bulged curve's bevel object:

    enter image description here

  4. Turn off proportional editing. In editmode Tab offset the bulged curve from origin, duplicate the piece around and arrange like this:

    enter image description here

    Move it around, set origin point to 3D cursor, duplicate with Shift+D, cancel move with RMB and rotate with R. You can also use the Spin tool for this. Make sure the ends of curves form a square

  5. Turn on proportional editing, this time set the type to Linear. Select the top vertices and twist the curves around Z axis:

    enter image description here

    For the curve vertices a Mean Tilt value can be specified to control the rotation of the square profile. With such control nice basket endings (and transition to the rod) can be achieved.

  6. Optionally subdivide the profile curve, convert the basket to mesh, add subdivision modifier, recalculate normals:
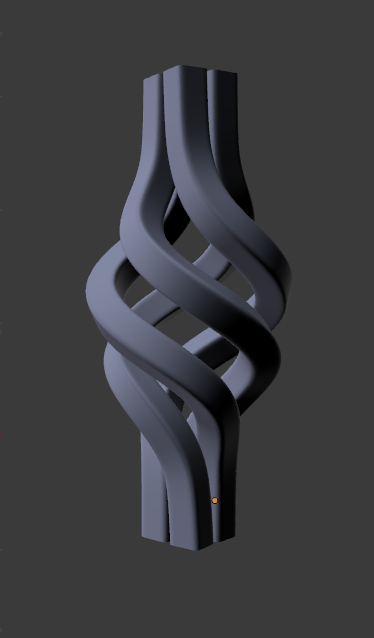
    enter image description here

added 330 characters in body
Source Link
  1. From the Front Ortho view Numpad 1 create a thin tall segmented column from cube like this:

    enter image description here

  2. Switch to 45° view (hold down Alt to snap while orbiting) and also switch to Transform Orientation: View:

    enter image description here

  3. Select the middle loop and with proportional editing on (O) define the amount of bulging the shape will have:

    enter image description here

  4. Turn off proportional editing. Duplicate the piece and arrange like this:

    enter image description here

    Move it around, set origin point to 3D cursor, duplicate with Shift+D, cancel move with RMB and rotate with R.

  5. Turn on proportional editing, this time set the type to Linear. Select the top 4 faces and create the final shape like this (set the final height and twisting amount):

    enter image description here

  6. Bevel the vertical edgeloops Ctrl+B:

    enter image description here

  7. Add subdivision modifier:

    enter image description here

    (Mine turned out to be a little wide but you get the idea how to get any shape..)

  8. A curve-based solution will keep the profile of the individual pieces much better. You do everything the same but on a curve (not on a segmented column) and then set a square as the curve's bevel shape (add a plane and convert to curve). For the curve for each its vertices a Mean Tilt value can be specified to control the rotation of the square profile:

    enter image description here

    With such control nice basket endings (and transition to the rod) can be achieved.

  1. From the Front Ortho view Numpad 1 create a thin tall segmented column from cube like this:

    enter image description here

  2. Switch to 45° view (hold down Alt to snap while orbiting) and also switch to Transform Orientation: View:

    enter image description here

  3. Select the middle loop and with proportional editing on (O) define the amount of bulging the shape will have:

    enter image description here

  4. Turn off proportional editing. Duplicate the piece and arrange like this:

    enter image description here

    Move it around, set origin point to 3D cursor, duplicate with Shift+D, cancel move with RMB and rotate with R.

  5. Turn on proportional editing, this time set the type to Linear. Select the top 4 faces and create the final shape like this (set the final height and twisting amount):

    enter image description here

  6. Bevel the vertical edgeloops Ctrl+B:

    enter image description here

  7. Add subdivision modifier:

    enter image description here

    (Mine turned out to be a little wide but you get the idea how to get any shape..)

  8. A curve-based solution will keep the profile of the individual pieces much better. You do everything the same but on a curve (not on a segmented column) and then set a square as the curve's bevel shape.

  1. From the Front Ortho view Numpad 1 create a thin tall segmented column from cube like this:

    enter image description here

  2. Switch to 45° view (hold down Alt to snap while orbiting) and also switch to Transform Orientation: View:

    enter image description here

  3. Select the middle loop and with proportional editing on (O) define the amount of bulging the shape will have:

    enter image description here

  4. Turn off proportional editing. Duplicate the piece and arrange like this:

    enter image description here

    Move it around, set origin point to 3D cursor, duplicate with Shift+D, cancel move with RMB and rotate with R.

  5. Turn on proportional editing, this time set the type to Linear. Select the top 4 faces and create the final shape like this (set the final height and twisting amount):

    enter image description here

  6. Bevel the vertical edgeloops Ctrl+B:

    enter image description here

  7. Add subdivision modifier:

    enter image description here

    (Mine turned out to be a little wide but you get the idea how to get any shape..)

  8. A curve-based solution will keep the profile of the individual pieces much better. You do everything the same but on a curve (not on a segmented column) and then set a square as the curve's bevel shape (add a plane and convert to curve). For the curve for each its vertices a Mean Tilt value can be specified to control the rotation of the square profile:

    enter image description here

    With such control nice basket endings (and transition to the rod) can be achieved.

Source Link

  1. From the Front Ortho view Numpad 1 create a thin tall segmented column from cube like this:

    enter image description here

  2. Switch to 45° view (hold down Alt to snap while orbiting) and also switch to Transform Orientation: View:

    enter image description here

  3. Select the middle loop and with proportional editing on (O) define the amount of bulging the shape will have:

    enter image description here

  4. Turn off proportional editing. Duplicate the piece and arrange like this:

    enter image description here

    Move it around, set origin point to 3D cursor, duplicate with Shift+D, cancel move with RMB and rotate with R.

  5. Turn on proportional editing, this time set the type to Linear. Select the top 4 faces and create the final shape like this (set the final height and twisting amount):

    enter image description here

  6. Bevel the vertical edgeloops Ctrl+B:

    enter image description here

  7. Add subdivision modifier:

    enter image description here

    (Mine turned out to be a little wide but you get the idea how to get any shape..)

  8. A curve-based solution will keep the profile of the individual pieces much better. You do everything the same but on a curve (not on a segmented column) and then set a square as the curve's bevel shape.