added 133 characters in body
Source Link
Nathan
  • 25.2k
  • 1
  • 24
  • 72

Technically, literally, you can copy the location of a group of vertices by assigning those vertices to a vertex group, and then using a copy location constraint to target that group; for the tail, you can stretch-to constraint that group. Once you have constraints, you can just apply as rest pose (ctrl a menu in pose mode) and then clear constraints ("clear pose constraints" operation.)

That's a little tedious, but almost unavoidably so, to do exactly what you want. The alternative is snapping cursors to vertices and then bones to cursors, which is equally tedious. With few bones, and thus few mode changes, cursors are easier; with lots of bones and lots of mode changes, constraints are easier.

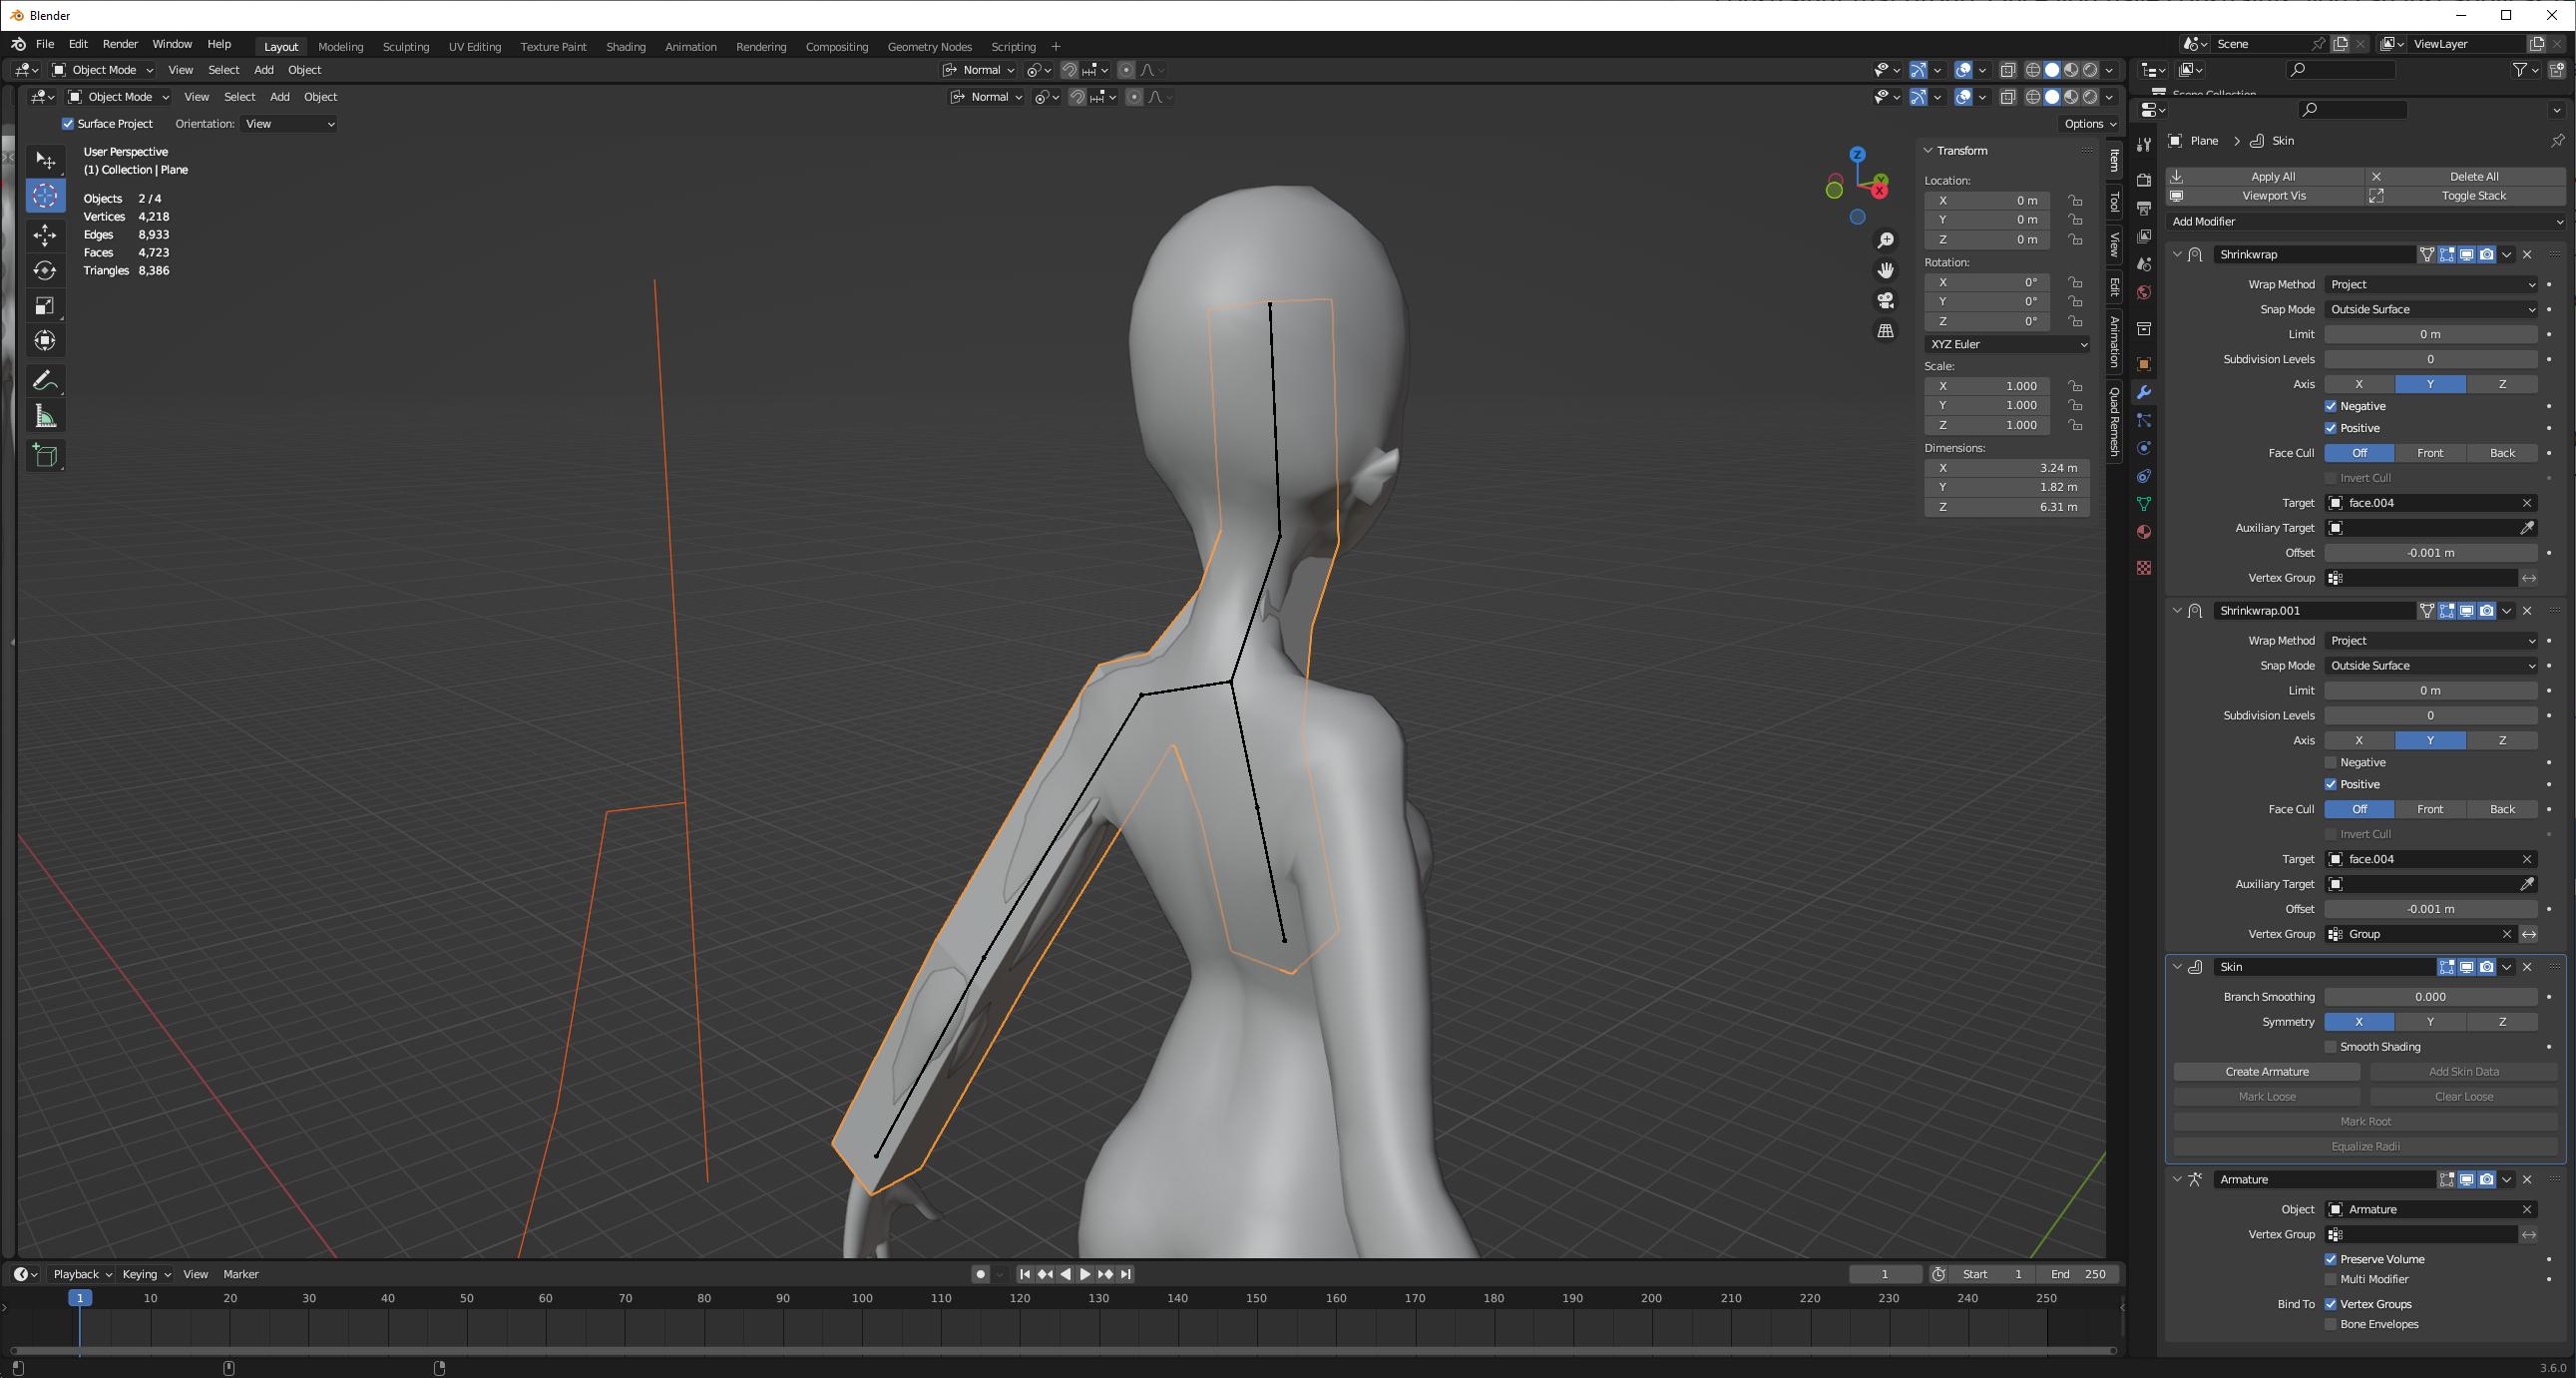
Something I recently did, that's easier, to make an armature quickly: Make a string of vertices. Assign all vertices to a vertex group ("Group") at 0.5 strength. Give it a shrinkwrap modifier, on project Y mode, targeting your mesh; set this modifier to outside surface, with an offset of -0.001 or something. Give it a second shrinkwrap modifier, on project Y mode, projecting only forward, limited by Group. Give the mesh a skin modifier, then hit the "create armature" button on the skin modifier.

enter image description here

This creates an armature centered not between vertices, but between surfaces. It's almost in the middle of surfaces, projected in the object's Y axis-- not quite, because of the tiny 0.001 offset on one of the shrinkwraps. You can delete the mesh object after creating the armature; the only reason for the mesh object was to quickly create the armature.

This armature can be joined to other armatures as desired. Some reversal and/or reparenting of bones should be expected. If you have disconnected bones, verts of disconnected strings will have to be marked as root verts on the skin modifier to create bones from them.

Technically, literally, you can copy the location of a group of vertices by assigning those vertices to a vertex group, and then using a copy location constraint to target that group; for the tail, you can stretch-to constraint that group. Once you have constraints, you can just apply as rest pose (ctrl a menu in pose mode) and then clear constraints ("clear pose constraints" operation.)

That's a little tedious, but almost unavoidably so, to do exactly what you want. The alternative is snapping cursors to vertices and then bones to cursors, which is equally tedious.

Something I recently did, that's easier, to make an armature quickly: Make a string of vertices. Assign all vertices to a vertex group ("Group") at 0.5 strength. Give it a shrinkwrap modifier, on project Y mode, targeting your mesh; set this modifier to outside surface, with an offset of -0.001 or something. Give it a second shrinkwrap modifier, on project Y mode, projecting only forward, limited by Group. Give the mesh a skin modifier, then hit the "create armature" button on the skin modifier.

enter image description here

This creates an armature centered not between vertices, but between surfaces. It's almost in the middle of surfaces, projected in the object's Y axis-- not quite, because of the tiny 0.001 offset on one of the shrinkwraps. You can delete the mesh object after creating the armature; the only reason for the mesh object was to quickly create the armature.

This armature can be joined to other armatures as desired. Some reversal and/or reparenting of bones should be expected. If you have disconnected bones, verts of disconnected strings will have to be marked as root verts on the skin modifier to create bones from them.

Technically, literally, you can copy the location of a group of vertices by assigning those vertices to a vertex group, and then using a copy location constraint to target that group; for the tail, you can stretch-to constraint that group. Once you have constraints, you can just apply as rest pose (ctrl a menu in pose mode) and then clear constraints ("clear pose constraints" operation.)

That's a little tedious, but almost unavoidably so, to do exactly what you want. The alternative is snapping cursors to vertices and then bones to cursors, which is equally tedious. With few bones, and thus few mode changes, cursors are easier; with lots of bones and lots of mode changes, constraints are easier.

Something I recently did, that's easier, to make an armature quickly: Make a string of vertices. Assign all vertices to a vertex group ("Group") at 0.5 strength. Give it a shrinkwrap modifier, on project Y mode, targeting your mesh; set this modifier to outside surface, with an offset of -0.001 or something. Give it a second shrinkwrap modifier, on project Y mode, projecting only forward, limited by Group. Give the mesh a skin modifier, then hit the "create armature" button on the skin modifier.

enter image description here

This creates an armature centered not between vertices, but between surfaces. It's almost in the middle of surfaces, projected in the object's Y axis-- not quite, because of the tiny 0.001 offset on one of the shrinkwraps. You can delete the mesh object after creating the armature; the only reason for the mesh object was to quickly create the armature.

This armature can be joined to other armatures as desired. Some reversal and/or reparenting of bones should be expected. If you have disconnected bones, verts of disconnected strings will have to be marked as root verts on the skin modifier to create bones from them.

Source Link
Nathan
  • 25.2k
  • 1
  • 24
  • 72

Technically, literally, you can copy the location of a group of vertices by assigning those vertices to a vertex group, and then using a copy location constraint to target that group; for the tail, you can stretch-to constraint that group. Once you have constraints, you can just apply as rest pose (ctrl a menu in pose mode) and then clear constraints ("clear pose constraints" operation.)

That's a little tedious, but almost unavoidably so, to do exactly what you want. The alternative is snapping cursors to vertices and then bones to cursors, which is equally tedious.

Something I recently did, that's easier, to make an armature quickly: Make a string of vertices. Assign all vertices to a vertex group ("Group") at 0.5 strength. Give it a shrinkwrap modifier, on project Y mode, targeting your mesh; set this modifier to outside surface, with an offset of -0.001 or something. Give it a second shrinkwrap modifier, on project Y mode, projecting only forward, limited by Group. Give the mesh a skin modifier, then hit the "create armature" button on the skin modifier.

enter image description here

This creates an armature centered not between vertices, but between surfaces. It's almost in the middle of surfaces, projected in the object's Y axis-- not quite, because of the tiny 0.001 offset on one of the shrinkwraps. You can delete the mesh object after creating the armature; the only reason for the mesh object was to quickly create the armature.

This armature can be joined to other armatures as desired. Some reversal and/or reparenting of bones should be expected. If you have disconnected bones, verts of disconnected strings will have to be marked as root verts on the skin modifier to create bones from them.