Refined answer
Source Link
quellenform
  • 39.6k
  • 10
  • 56
  • 149

You could use the following technique here:OK, I think now it's time for you to get to know Geometry Nodes ;-)

  • Extrude the shape with the modifier Solidify.
  • Use the modifier Remesh with the option Sharp. Then choose the resolution of the mesh with Octree Depth. This way it doesn't really matter what your original shape is, because all subdivisions will be replaced by a new grid, as the name Remesh says.

enter image description here Of course you can do all this with modifiers and various edits directly on the mesh, but this is a desctructive edit, and I strongly assume you are talking about procedural creation of your mesh.

Or, as mentioned in the commentIn this example, you can useI created the same technique you used successfully before when cuttingentire object directly from a curve-based shape from the inside ofusing Geometry Nodes:

Screenshot 1

As you can see, it's a relatively clean and high-resolution mesh: Cutting a hole in a wall with displaced texture? that you can always make finer.

Screenshot 2

The only difference isnodes that you apply the modifier Boolean with the option Intersectcreated this result look like this:

Nodes

I explain briefly what I do here:

  1. First, I create a grid, and set the size and resolution here. The dimensions should be a bit higher than your shape. You influence the resolution with the number of vertices of the grid, and additionally with the node Subdivision.

  2. I capture the dimensions of this grid with the node Bounding Box and then map the positions of the individual points to an area that can then be used for texture mapping. The size of the texture is defined with the node Scale (Vector Math).

  3. Then I include the actual displacement map with the node Image Texture, which receives the previously calculated positions as vector input. The height of the displacement is controlled by the node Multiply (Math).

  4. In the next step I apply the displacement to the grid with the node Set Position. The node Transform defines the final position of the grid.

  5. At the same time I get the shape of the grid. In this case it must be a curve. In your case you have the optimal data when importing SVG, and if it is still a mesh, just transform it into curves beforehand. I fill this curve(s) with the node Fill Curve (with the settings N-gons) so that I have a clean mesh as a base. Furthermore I apply the node Extrude which gives me an extruded mesh like the modifier Solidify.

  6. Now comes the computationally intensive part: I combine these shapes with the node Mesh Boolean (with the setting Difference), so that I finally get the result where only the surface of the mesh is affected by the displacement, but still only the surface is replaced by a clean grid.

  7. In the final step I apply the original shape with flipped faces on the bottom side and merge the vertices with the node Merge Vertices.

With that, leaving the intersection of two shapesyou should have your 100% procedural mesh.

TipNote: If you want to reduce/decimate the faces after successfully applying your displacement, just use the modifier Decimate with the option Planar last.

  • Since everything here is procedural, a lot of processing power is needed. So always try changes on a less high resolution mesh first (reduce the subdivision)! Increase the subdivision only at the end, as soon as you are satisfied with your result.
  • The shape to which you apply the displacement must always be a little larger than the shape you want to edit.

You could use the following technique here:

  • Extrude the shape with the modifier Solidify.
  • Use the modifier Remesh with the option Sharp. Then choose the resolution of the mesh with Octree Depth. This way it doesn't really matter what your original shape is, because all subdivisions will be replaced by a new grid, as the name Remesh says.

enter image description here

Or, as mentioned in the comment, you can use the same technique you used successfully before when cutting a shape from the inside of a mesh: Cutting a hole in a wall with displaced texture?.

The only difference is that you apply the modifier Boolean with the option Intersect, leaving the intersection of two shapes.

Tip: If you want to reduce/decimate the faces after successfully applying your displacement, just use the modifier Decimate with the option Planar last.

OK, I think now it's time for you to get to know Geometry Nodes ;-)

Of course you can do all this with modifiers and various edits directly on the mesh, but this is a desctructive edit, and I strongly assume you are talking about procedural creation of your mesh.

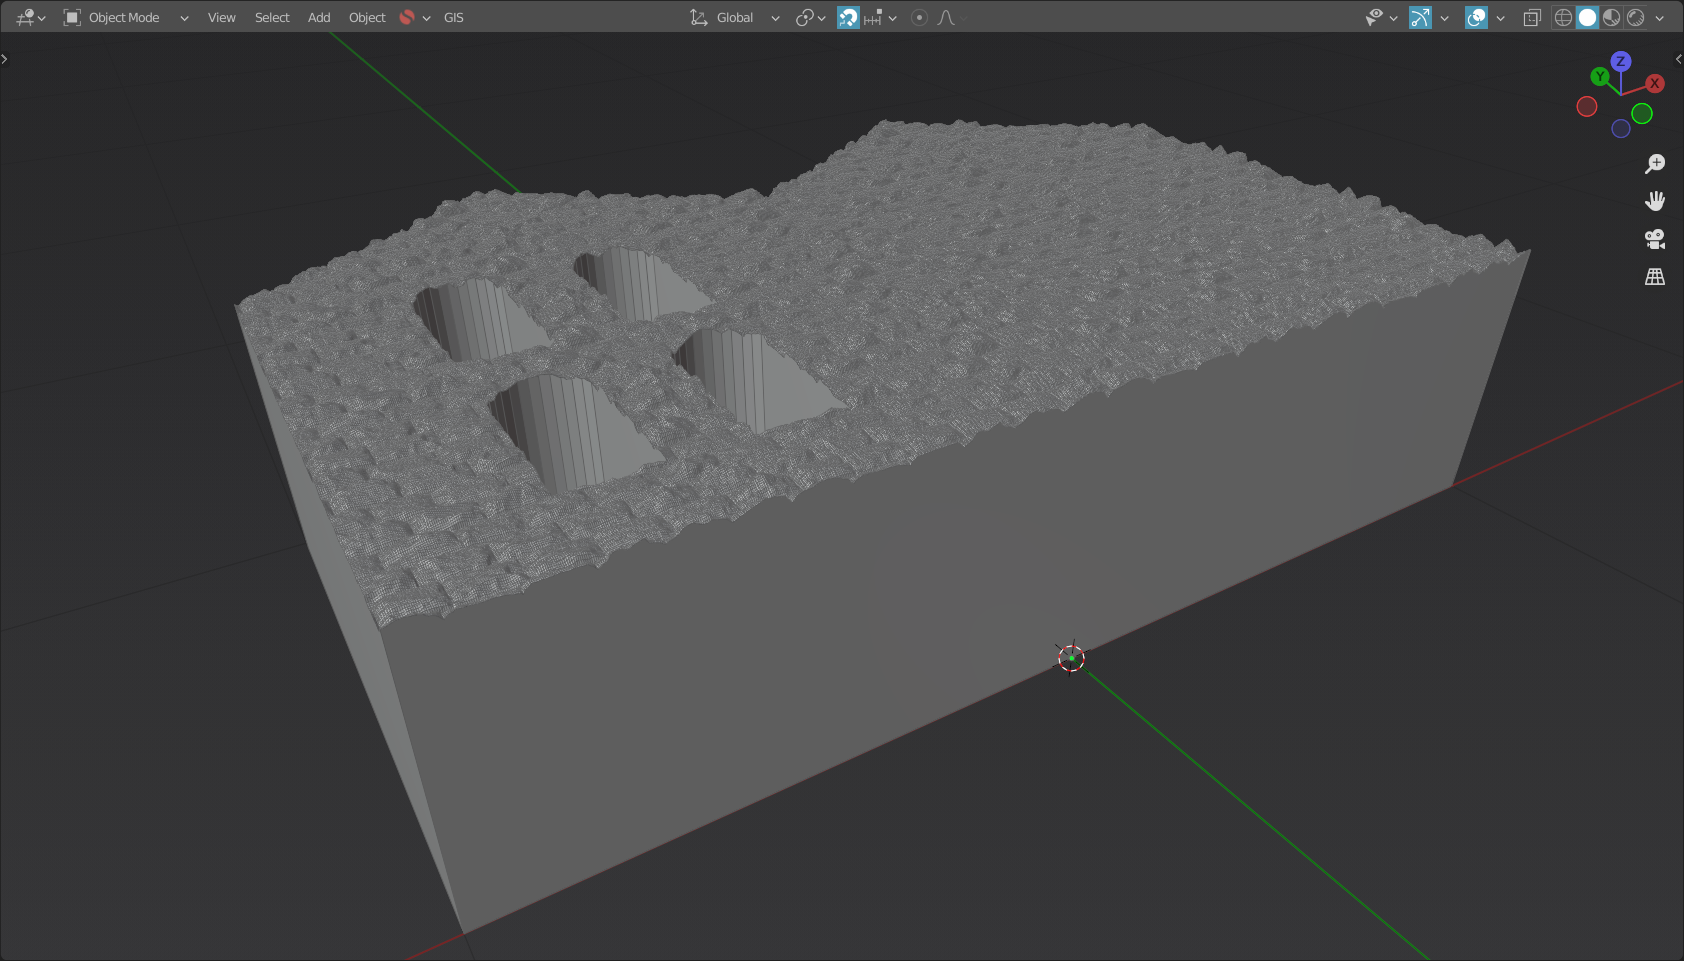
In this example, I created the entire object directly from a curve-based shape using Geometry Nodes:

Screenshot 1

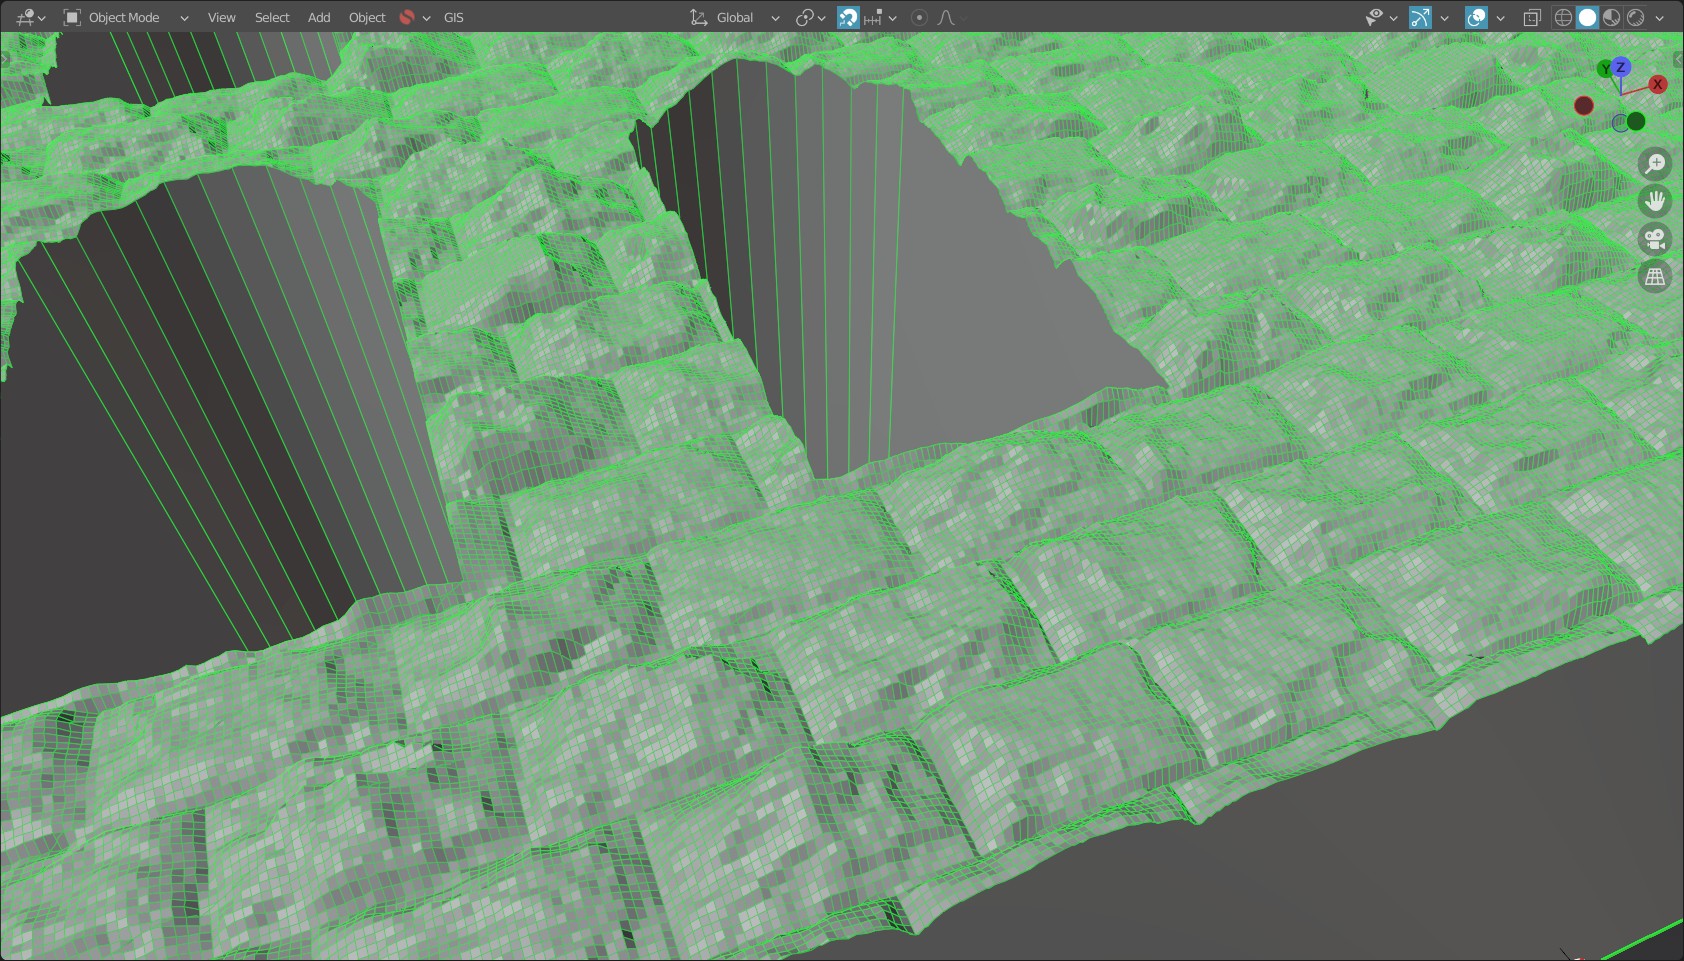
As you can see, it's a relatively clean and high-resolution mesh that you can always make finer.

Screenshot 2

The nodes that created this result look like this:

Nodes

I explain briefly what I do here:

  1. First, I create a grid, and set the size and resolution here. The dimensions should be a bit higher than your shape. You influence the resolution with the number of vertices of the grid, and additionally with the node Subdivision.

  2. I capture the dimensions of this grid with the node Bounding Box and then map the positions of the individual points to an area that can then be used for texture mapping. The size of the texture is defined with the node Scale (Vector Math).

  3. Then I include the actual displacement map with the node Image Texture, which receives the previously calculated positions as vector input. The height of the displacement is controlled by the node Multiply (Math).

  4. In the next step I apply the displacement to the grid with the node Set Position. The node Transform defines the final position of the grid.

  5. At the same time I get the shape of the grid. In this case it must be a curve. In your case you have the optimal data when importing SVG, and if it is still a mesh, just transform it into curves beforehand. I fill this curve(s) with the node Fill Curve (with the settings N-gons) so that I have a clean mesh as a base. Furthermore I apply the node Extrude which gives me an extruded mesh like the modifier Solidify.

  6. Now comes the computationally intensive part: I combine these shapes with the node Mesh Boolean (with the setting Difference), so that I finally get the result where only the surface of the mesh is affected by the displacement, but still only the surface is replaced by a clean grid.

  7. In the final step I apply the original shape with flipped faces on the bottom side and merge the vertices with the node Merge Vertices.

With that, you should have your 100% procedural mesh.

Note:

  • Since everything here is procedural, a lot of processing power is needed. So always try changes on a less high resolution mesh first (reduce the subdivision)! Increase the subdivision only at the end, as soon as you are satisfied with your result.
  • The shape to which you apply the displacement must always be a little larger than the shape you want to edit.
added 6 characters in body
Source Link
quellenform
  • 39.6k
  • 10
  • 56
  • 149

You could use the following technique here:

  • Extrude the shape with the modifier Solidify.
  • Use the modifier Remesh with the option Sharp. Then choose the resolution of the mesh with Octree Depth. This way it doesn't really matter what your original shape is, because all subdivisions will be replaced by a new grid, as the name Remesh says.

enter image description here

Or, as mentioned in the comment, you can use the same technique you used successfully before when cutting a shape from the inside of a mesh: Cutting a hole in a wall with displaced texture?.

The only difference is that you apply the modifier Boolean with the option Intersect, leaving the intersection of two shapes.

Tip: If you want to planarizereduce/decimate the faces after successfully applying your displacement, just use the modifier Decimate with the option Planar last.

You could use the following technique here:

  • Extrude the shape with the modifier Solidify.
  • Use the modifier Remesh with the option Sharp. Then choose the resolution of the mesh with Octree Depth. This way it doesn't really matter what your original shape is, because all subdivisions will be replaced by a new grid, as the name Remesh says.

enter image description here

Or, as mentioned in the comment, you can use the same technique you used successfully before when cutting a shape from the inside of a mesh: Cutting a hole in a wall with displaced texture?.

The only difference is that you apply the modifier Boolean with the option Intersect, leaving the intersection of two shapes.

Tip: If you want to planarize the faces after successfully applying your displacement, just use the modifier Decimate with the option Planar last.

You could use the following technique here:

  • Extrude the shape with the modifier Solidify.
  • Use the modifier Remesh with the option Sharp. Then choose the resolution of the mesh with Octree Depth. This way it doesn't really matter what your original shape is, because all subdivisions will be replaced by a new grid, as the name Remesh says.

enter image description here

Or, as mentioned in the comment, you can use the same technique you used successfully before when cutting a shape from the inside of a mesh: Cutting a hole in a wall with displaced texture?.

The only difference is that you apply the modifier Boolean with the option Intersect, leaving the intersection of two shapes.

Tip: If you want to reduce/decimate the faces after successfully applying your displacement, just use the modifier Decimate with the option Planar last.

fixed typo
Source Link
quellenform
  • 39.6k
  • 10
  • 56
  • 149

You could use the following technique here:

  • Extrude the shape with the modifier SolidifierSolidify.
  • Use the modifier Remesh with the option Sharp. Then choose the resolution of the mesh with Octree Depth. This way it doesn't really matter what your original shape is, because all subdivisions will be replaced by a new grid, as the name Remesh says.

enter image description here

Or, as mentioned in the comment, you can use the same technique you used successfully before when cutting a shape from the inside of a mesh: Cutting a hole in a wall with displaced texture?.

The only difference is that you apply the modifier Boolean with the option Intersect, leaving the intersection of two shapes.

Tip: If you want to planarize the faces after successfully applying your displacement, just use the modifier Decimate with the option Planar last.

You could use the following technique here:

  • Extrude the shape with the modifier Solidifier.
  • Use the modifier Remesh with the option Sharp. Then choose the resolution of the mesh with Octree Depth. This way it doesn't really matter what your original shape is, because all subdivisions will be replaced by a new grid, as the name Remesh says.

enter image description here

Or, as mentioned in the comment, you can use the same technique you used successfully before when cutting a shape from the inside of a mesh: Cutting a hole in a wall with displaced texture?.

The only difference is that you apply the modifier Boolean with the option Intersect, leaving the intersection of two shapes.

Tip: If you want to planarize the faces after successfully applying your displacement, just use the modifier Decimate with the option Planar last.

You could use the following technique here:

  • Extrude the shape with the modifier Solidify.
  • Use the modifier Remesh with the option Sharp. Then choose the resolution of the mesh with Octree Depth. This way it doesn't really matter what your original shape is, because all subdivisions will be replaced by a new grid, as the name Remesh says.

enter image description here

Or, as mentioned in the comment, you can use the same technique you used successfully before when cutting a shape from the inside of a mesh: Cutting a hole in a wall with displaced texture?.

The only difference is that you apply the modifier Boolean with the option Intersect, leaving the intersection of two shapes.

Tip: If you want to planarize the faces after successfully applying your displacement, just use the modifier Decimate with the option Planar last.

Source Link
quellenform
  • 39.6k
  • 10
  • 56
  • 149
Loading