replaced http://blend-exchange.giantcowfilms.com with https://blend-exchange.giantcowfilms.com
Source Link

Here is what I achieved using transparent nodes and AnimAll addon. enter image description here

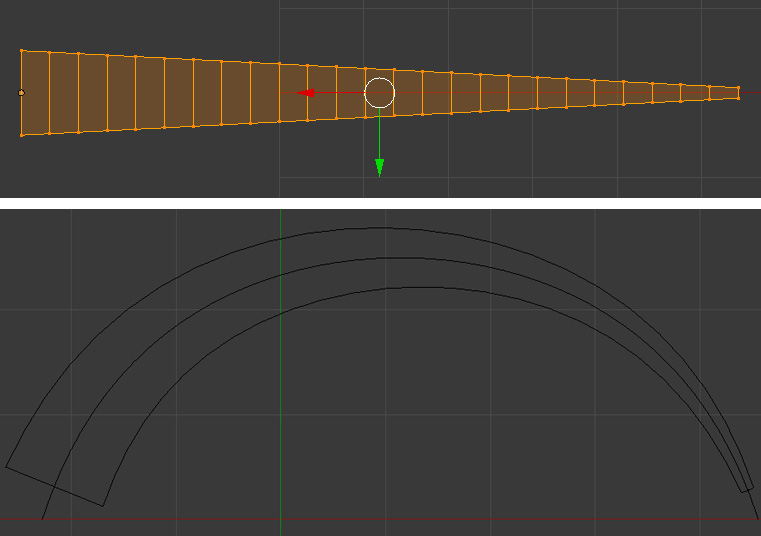
Create a plane and give it a 'slashy' shape. Add a curve and place a mesh along it using a Curve Modifier. Add a Subsurf Modifier also if you like. enter image description here
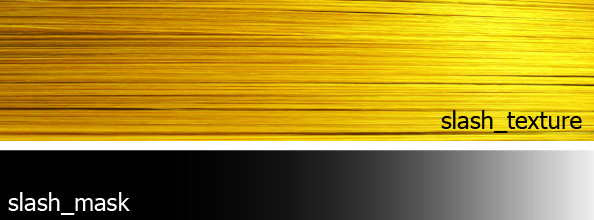
Prepare two textures- a color map texture (in this case I used a hair photo) and a mask texture (a simple oblong b&w gradient image). enter image description here
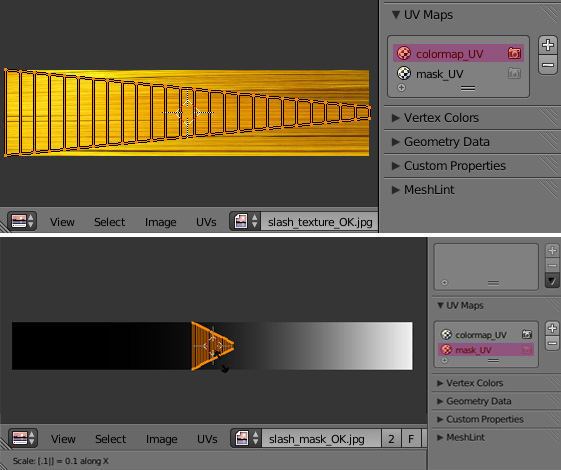
Create two UV Maps- first for a color texture and second for a mask (which will be helpful in achieving the fading effect). Unwrap the mesh using Project from View (Bounds). Scale the island of the second UV map as shown below. enter image description here
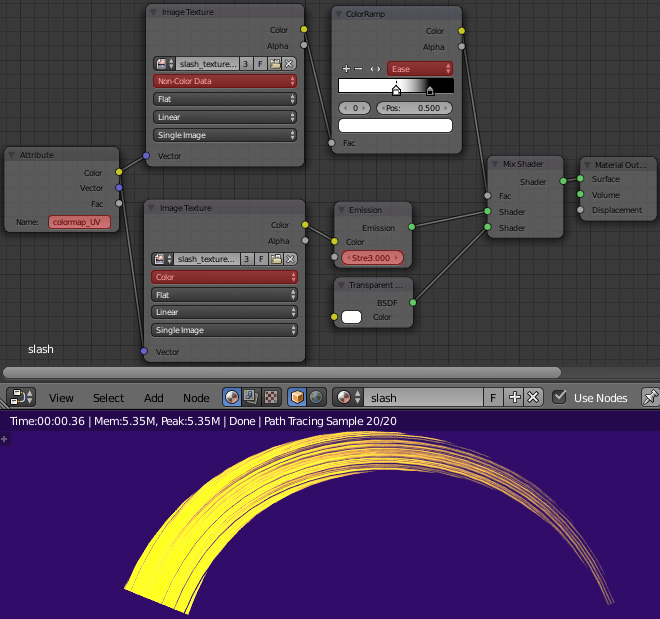
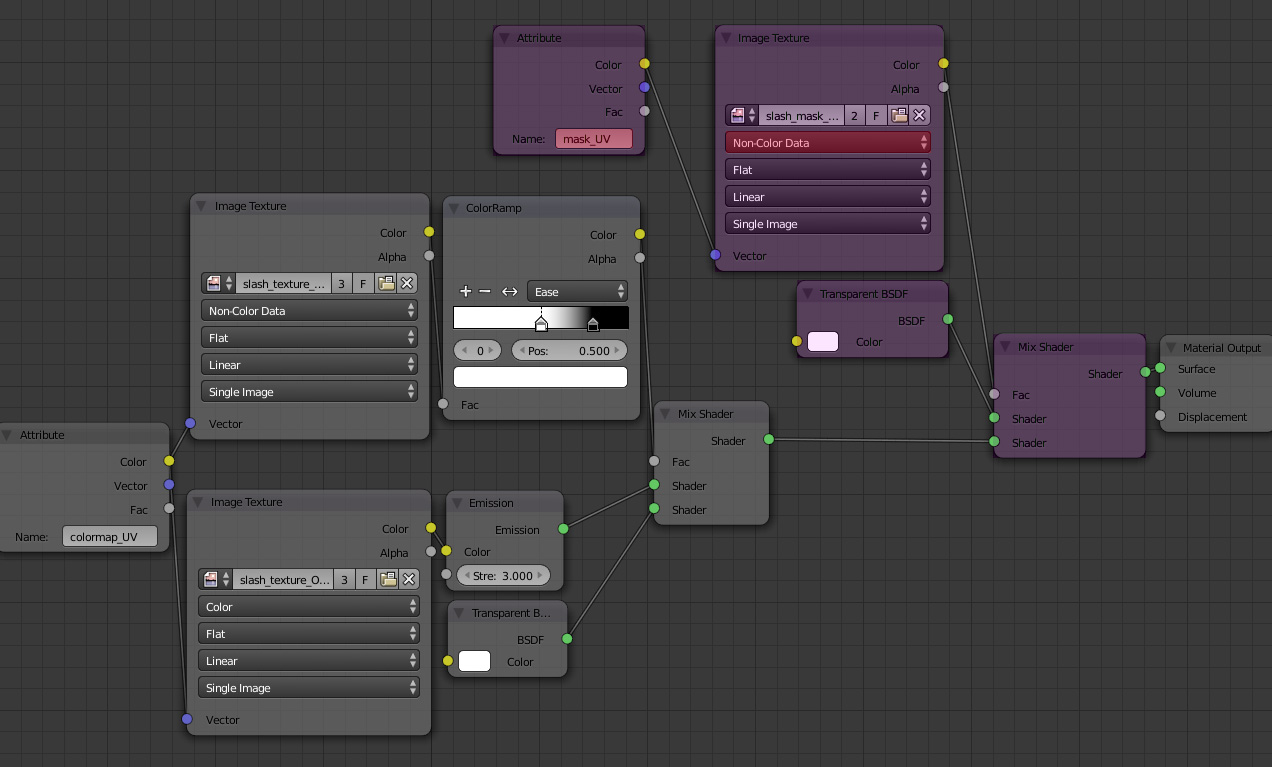
Set up the nodes as pictured below. We want to use the color texture for the emission color and as a mask for a transparency. Optional you may add an extra overall transparency to the mesh (just add one more transparency node and mix it with existing nodes). enter image description here
Now we'll set up an oblong gradient texture as a mask for a fading effect. enter image description here
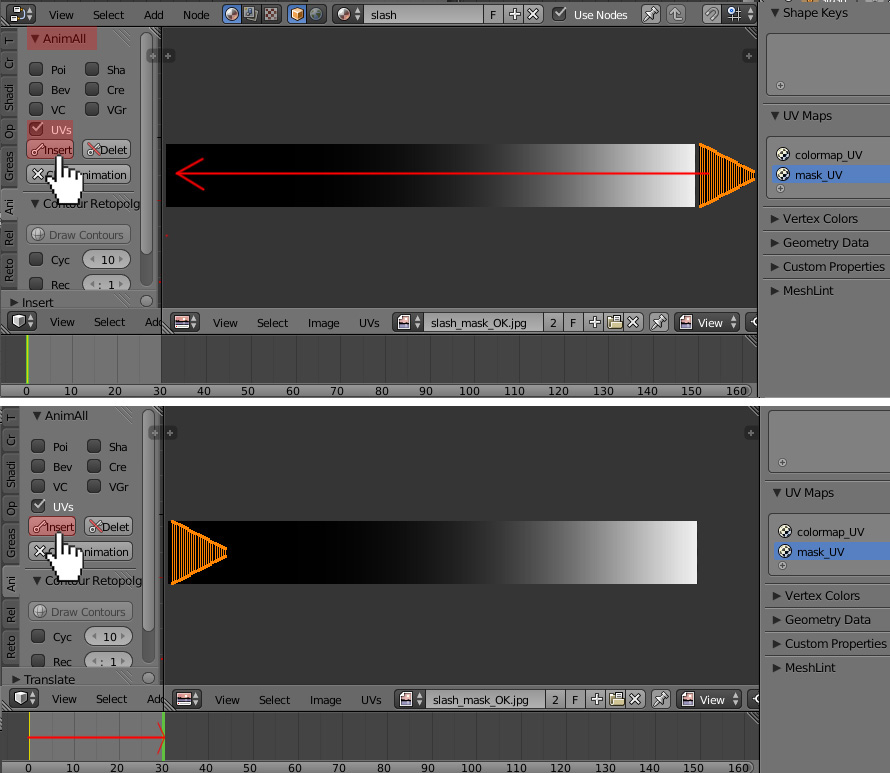
Place the uv island as pictured below, enable the AnimAll Addon and check the UVs box . Go to the desired start frame and insert a keyframe. Next, place the uv island in the dark part of a gradient texture. Go to another chosen frame and insert a keyframe again. Play the animation in Object Mode and you'll see the fading effect. enter image description here
Here is the same animation as on top, but with less transparency and played slower. enter image description here

Here's the .blend file: http://blend-exchange.giantcowfilms.com/embedImage.png?bid=1036

Here is what I achieved using transparent nodes and AnimAll addon. enter image description here

Create a plane and give it a 'slashy' shape. Add a curve and place a mesh along it using a Curve Modifier. Add a Subsurf Modifier also if you like. enter image description here

Prepare two textures- a color map texture (in this case I used a hair photo) and a mask texture (a simple oblong b&w gradient image). enter image description here

Create two UV Maps- first for a color texture and second for a mask (which will be helpful in achieving the fading effect). Unwrap the mesh using Project from View (Bounds). Scale the island of the second UV map as shown below. enter image description here

Set up the nodes as pictured below. We want to use the color texture for the emission color and as a mask for a transparency. Optional you may add an extra overall transparency to the mesh (just add one more transparency node and mix it with existing nodes). enter image description here

Now we'll set up an oblong gradient texture as a mask for a fading effect. enter image description here

Place the uv island as pictured below, enable the AnimAll Addon and check the UVs box . Go to the desired start frame and insert a keyframe. Next, place the uv island in the dark part of a gradient texture. Go to another chosen frame and insert a keyframe again. Play the animation in Object Mode and you'll see the fading effect. enter image description here

Here is the same animation as on top, but with less transparency and played slower. enter image description here

Here's the .blend file:

added 156 characters in body
Source Link
Paul Gonet
  • 33.5k
  • 18
  • 92
  • 174

Here is what I achieved using transparent nodes and AnimAll addon. enter image description here

Create a plane and give it a 'slashy' shape. Add a curve and place a mesh along it using a Curve Modifier. Add a Subsurf Modifier also if you like. enter image description here

Prepare two textures- a color map texture (in this case I used a hair photo) and a mask texture (a simple oblong b&w gradient image). enter image description here

Create two UV Maps- first for a color texture and second for a mask (which will be helpful in achieving the fading effect). Unwrap the mesh using Project from View (Bounds). Scale the island of the second UV map as shown below. enter image description here

Set up the nodes as pictured below. We want to use the color texture for the emission color and as a mask for a transparency. Optional you may add an extra overall transparency to the mesh (just add one more transparency node and mix it with existing nodes). enter image description here

Now we'll set up an oblong gradient texture as a mask for a fading effect. enter image description here

Place the uv island as pictured below, enable the AnimAll Addon and check the UVs box . Go to the desired start frame and insert a keyframe. Next, place the uv island in the dark part of a gradient texture. Go to another chosen frame and insert a keyframe again. Play the animation in Object Mode and you'll see the fading effect. enter image description here

Here is the same animation as on top, but with less transparency and played slower. enter image description here

Here's the .blend file: http://blend-exchange.giantcowfilms.com/embedImage.png?bid=1036

Here is what I achieved using transparent nodes and AnimAll addon. enter image description here

Create a plane and give it a 'slashy' shape. Add a curve and place a mesh along it using a Curve Modifier. Add a Subsurf Modifier also if you like. enter image description here

Prepare two textures- a color map texture (in this case I used a hair photo) and a mask texture (a simple oblong b&w gradient image). enter image description here

Create two UV Maps- first for a color texture and second for a mask (which will be helpful in achieving the fading effect). Unwrap the mesh using Project from View (Bounds). Scale the island of the second UV map as shown below. enter image description here

Set up the nodes as pictured below. We want to use the color texture for the emission color and as a mask for a transparency. Optional you may add an extra overall transparency to the mesh (just add one more transparency node and mix it with existing nodes). enter image description here

Now we'll set up an oblong gradient texture as a mask for a fading effect. enter image description here

Place the uv island as pictured below, enable the AnimAll Addon and check the UVs box . Go to the desired start frame and insert a keyframe. Next, place the uv island in the dark part of a gradient texture. Go to another chosen frame and insert a keyframe again. Play the animation in Object Mode and you'll see the fading effect. enter image description here

Here is the same animation as on top, but with less transparency and played slower. enter image description here

Here's the .blend file: http://blend-exchange.giantcowfilms.com/embedImage.png?bid=1036

edited body
Source Link
Paul Gonet
  • 33.5k
  • 18
  • 92
  • 174

Here is what I achieved using transparent nodes and AnimAll addon. enter image description hereenter image description here

Create a plane and give it a 'slashy' shape. Add a curve and place a mesh along it using a Curve Modifier. Add a Subsurf Modifier also if you like. enter image description here

Prepare two textures- a color map texture (in this case I used a hair photo) and a mask texture (a simple oblong b&w gradient image). enter image description here

Create two UV Maps- first for a color texture and second for a mask (which will be helpful in achieving the fading effect). Unwrap the mesh using Project from View (Bounds). Scale the island of the second UV map as shown below. enter image description here

Set up the nodes as pictured below. We want to use the color texture for the emission color and as a mask for a transparency. Optional you may add an extra overall transparency to the mesh (just add one more transparency node and mix it with existing nodes). enter image description here

Now we'll set up an oblong gradient texture as a mask for a fading effect. enter image description here

Place the uv island as pictured below, enable the AnimAll Addon and check the UVs box . Go to the desired start frame and insert a keyframe. Next, place the uv island in the dark part of a gradient texture. Go to another chosen frame and insert a keyframe again. Play the animation in Object Mode and you'll see the fading effect. enter image description here

Here is the same animation as on top, but with less transparency and played slower. enter image description here

Here is what I achieved using transparent nodes and AnimAll addon. enter image description here

Create a plane and give it a 'slashy' shape. Add a curve and place a mesh along it using a Curve Modifier. Add a Subsurf Modifier also if you like. enter image description here

Prepare two textures- a color map texture (in this case I used a hair photo) and a mask texture (a simple oblong b&w gradient image). enter image description here

Create two UV Maps- first for a color texture and second for a mask (which will be helpful in achieving the fading effect). Unwrap the mesh using Project from View (Bounds). Scale the island of the second UV map as shown below. enter image description here

Set up the nodes as pictured below. We want to use the color texture for the emission color and as a mask for a transparency. Optional you may add an extra overall transparency to the mesh (just add one more transparency node and mix it with existing nodes). enter image description here

Now we'll set up an oblong gradient texture as a mask for a fading effect. enter image description here

Place the uv island as pictured below, enable the AnimAll Addon and check the UVs box . Go to the desired start frame and insert a keyframe. Next, place the uv island in the dark part of a gradient texture. Go to another chosen frame and insert a keyframe again. Play the animation in Object Mode and you'll see the fading effect. enter image description here

Here is the same animation as on top, but with less transparency and played slower. enter image description here

added 4 characters in body
Source Link
Paul Gonet
  • 33.5k
  • 18
  • 92
  • 174
Loading
added 162 characters in body
Source Link
Paul Gonet
  • 33.5k
  • 18
  • 92
  • 174
Loading
Source Link
Paul Gonet
  • 33.5k
  • 18
  • 92
  • 174
Loading