deleted 21 characters in body
Source Link
moonboots
  • 167.7k
  • 8
  • 114
  • 181

Two other ways to make pipes: Vertex extrusion and Spin tool.

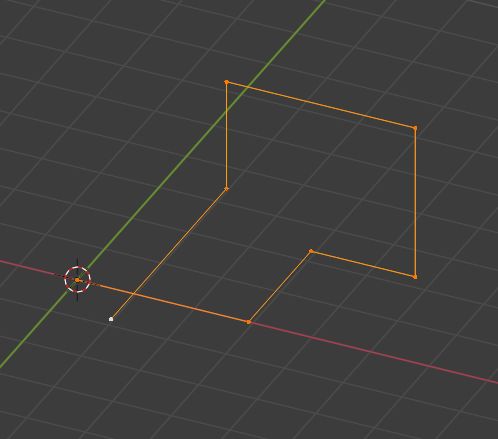
A fun way to make pipes is first to create with simple vertex extrusions:

Enter image description here

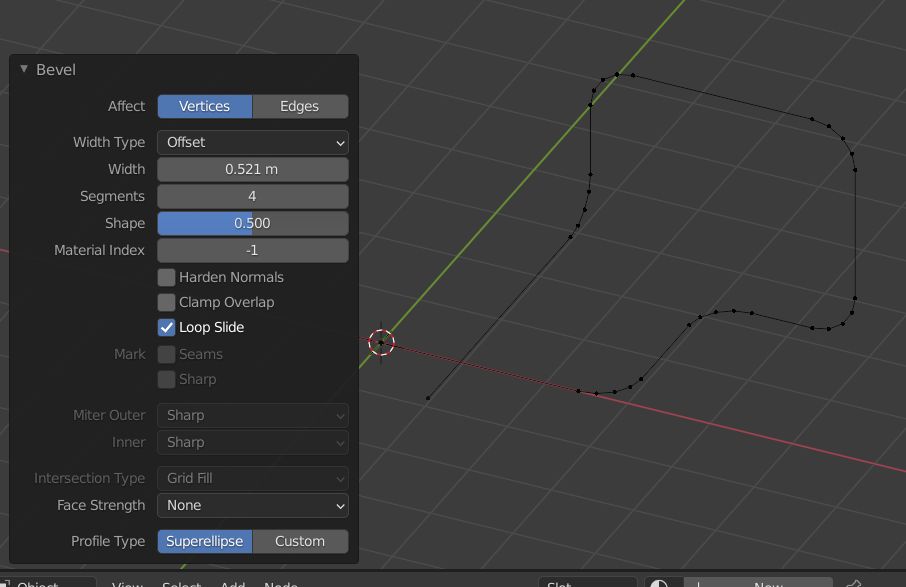
Then bevel the angles (Ctrl + B and tweak the parameters in the Operator box):

Enter image description here

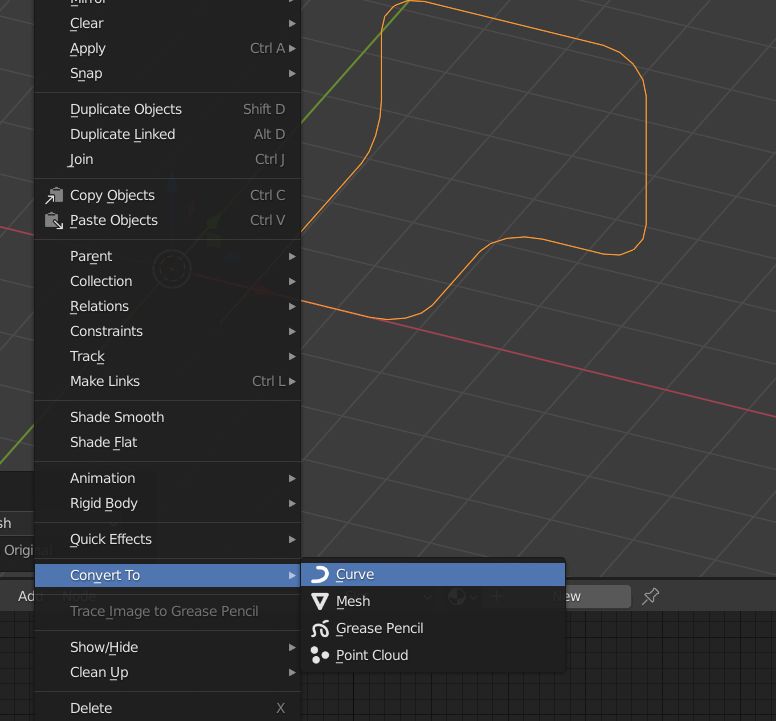
Convert your mesh to a Bézier curve (header menu → ObjectConvert ToCurve):

Enter image description here

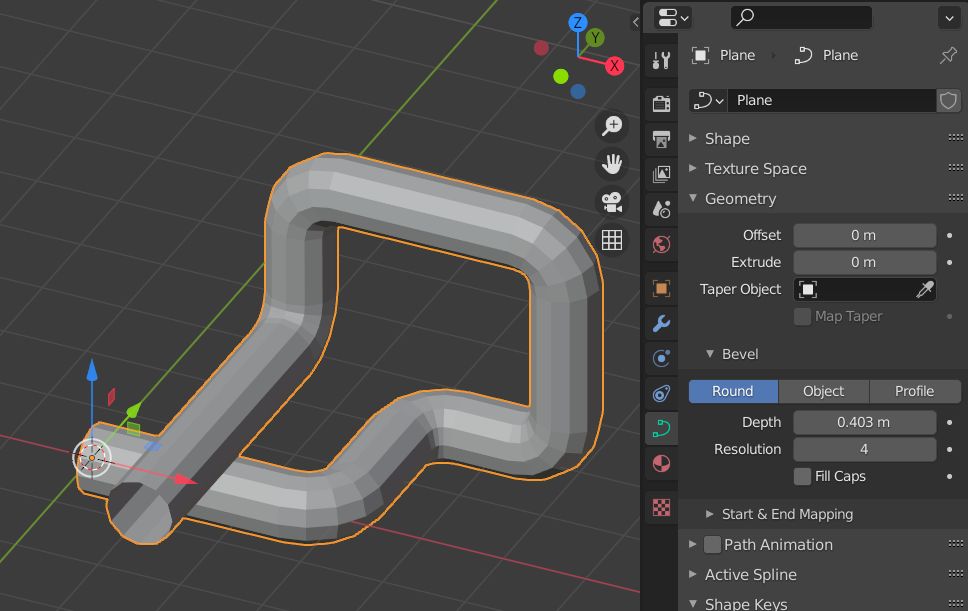
Then bevel your curve to give it thickness (Properties panelObject DataGeometryBevel). After that, reconvert to mesh, give it a Subdivision Surface modifier, and a smooth shading...

Enter image description here

Instead of converting to curve you could give your mesh a Skin modifier (CtrlA to change the vertices radius):

enter image description here

When you're good, apply the Skin modifier, give your object a Subdivision Surface modifier:

enter image description here

Use for example the

Another way is to use the Spin tool. Switch to top view, select the edge, put your 3D cursor where the center of the rotation is supposed to be:

enter image description here

Select the Spin tool:

enter image description here

Rotate the edge, use Ctrl to constrain to 10° by 10°, tweak the Operator box parameters if necessary:

enter image description here

Two other ways to make pipes: Vertex extrusion and Spin tool.

A fun way to make pipes is first to create with simple vertex extrusions:

Enter image description here

Then bevel the angles (Ctrl + B and tweak the parameters in the Operator box):

Enter image description here

Convert your mesh to a Bézier curve (header menu → ObjectConvert ToCurve):

Enter image description here

Then bevel your curve to give it thickness (Properties panelObject DataGeometryBevel). After that, reconvert to mesh, give it a Subdivision Surface modifier, and a smooth shading...

Enter image description here

Instead of converting to curve you could give your mesh a Skin modifier (CtrlA to change the vertices radius):

enter image description here

When you're good, apply the Skin modifier, give your object a Subdivision Surface modifier:

enter image description here

Use for example the

Another way is to use the Spin tool. Switch to top view, select the edge, put your 3D cursor where the center of the rotation is supposed to be:

enter image description here

Select the Spin tool:

enter image description here

Rotate the edge, use Ctrl to constrain to 10° by 10°, tweak the Operator box parameters if necessary:
enter image description here

Two other ways to make pipes: Vertex extrusion and Spin tool.

A fun way to make pipes is first to create with simple vertex extrusions:

Enter image description here

Then bevel the angles (Ctrl + B and tweak the parameters in the Operator box):

Enter image description here

Convert your mesh to a Bézier curve (header menu → ObjectConvert ToCurve):

Enter image description here

Then bevel your curve to give it thickness (Properties panelObject DataGeometryBevel). After that, reconvert to mesh, give it a Subdivision Surface modifier, and a smooth shading...

Enter image description here

Instead of converting to curve you could give your mesh a Skin modifier (CtrlA to change the vertices radius):

enter image description here

When you're good, apply the Skin modifier, give your object a Subdivision Surface modifier:

enter image description here

Another way is to use the Spin tool. Switch to top view, select the edge, put your 3D cursor where the center of the rotation is supposed to be:

enter image description here

Select the Spin tool:

enter image description here

Rotate the edge, use Ctrl to constrain to 10° by 10°, tweak the Operator box parameters if necessary:
enter image description here

added 434 characters in body
Source Link
moonboots
  • 167.7k
  • 8
  • 114
  • 181

Two other ways to make pipes: Vertex extrusion and Spin tool.

A fun way to make pipes is first to create with simple vertex extrusions:

Enter image description here

Then bevel the angles (Ctrl + B and tweak the parameters in the Operator box):

Enter image description here

Convert your mesh to a Bézier curve (header menu → ObjectConvert ToCurve):

Enter image description here

Then bevel your curve to give it thickness (Properties panelObject DataGeometryBevel). After that, reconvert to mesh, give it a Subdivision Surface modifier, and a smooth shading...

Enter image description here

Instead of converting to curve you could give your mesh a Skin modifier (CtrlA to change the vertices radius):

enter image description here

When you're good, apply the Skin modifier, give your object a Subdivision Surface modifier:

enter image description here

Use for example the

Another way is to use the Spin tool. Switch to top view, select the edge, put your 3D cursor where the center of the rotation is supposed to be:

enter image description here

Select the Spin tool:

enter image description here

Rotate the edge, use Ctrl to constrain to 10° by 10°, tweak the Operator box parameters if necessary:
enter image description here

Two other ways to make pipes: Vertex extrusion and Spin tool.

A fun way to make pipes is first to create with simple vertex extrusions:

Enter image description here

Then bevel the angles (Ctrl + B and tweak the parameters in the Operator box):

Enter image description here

Convert your mesh to a Bézier curve (header menu → ObjectConvert ToCurve):

Enter image description here

Then bevel your curve to give it thickness (Properties panelObject DataGeometryBevel). After that, reconvert to mesh, give it a Subdivision Surface modifier, and a smooth shading...

Enter image description here

Another way is to use the Spin tool. Switch to top view, select the edge, put your 3D cursor where the center of the rotation is supposed to be:

enter image description here

Select the Spin tool:

enter image description here

Rotate the edge, use Ctrl to constrain to 10° by 10°, tweak the Operator box parameters if necessary:
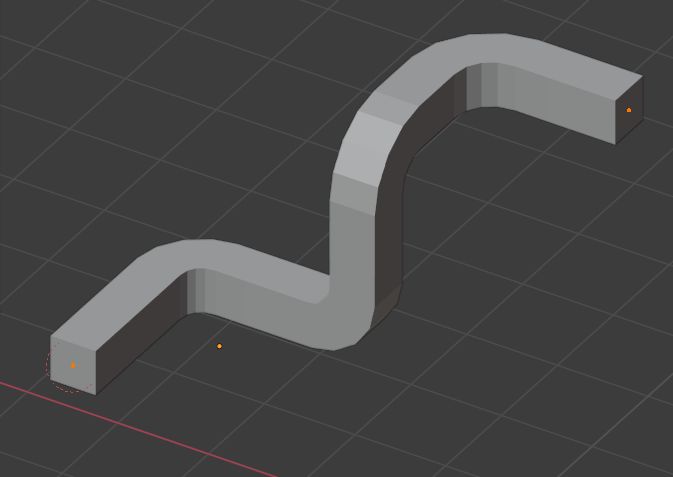
enter image description here

Two other ways to make pipes: Vertex extrusion and Spin tool.

A fun way to make pipes is first to create with simple vertex extrusions:

Enter image description here

Then bevel the angles (Ctrl + B and tweak the parameters in the Operator box):

Enter image description here

Convert your mesh to a Bézier curve (header menu → ObjectConvert ToCurve):

Enter image description here

Then bevel your curve to give it thickness (Properties panelObject DataGeometryBevel). After that, reconvert to mesh, give it a Subdivision Surface modifier, and a smooth shading...

Enter image description here

Instead of converting to curve you could give your mesh a Skin modifier (CtrlA to change the vertices radius):

enter image description here

When you're good, apply the Skin modifier, give your object a Subdivision Surface modifier:

enter image description here

Use for example the

Another way is to use the Spin tool. Switch to top view, select the edge, put your 3D cursor where the center of the rotation is supposed to be:

enter image description here

Select the Spin tool:

enter image description here

Rotate the edge, use Ctrl to constrain to 10° by 10°, tweak the Operator box parameters if necessary:
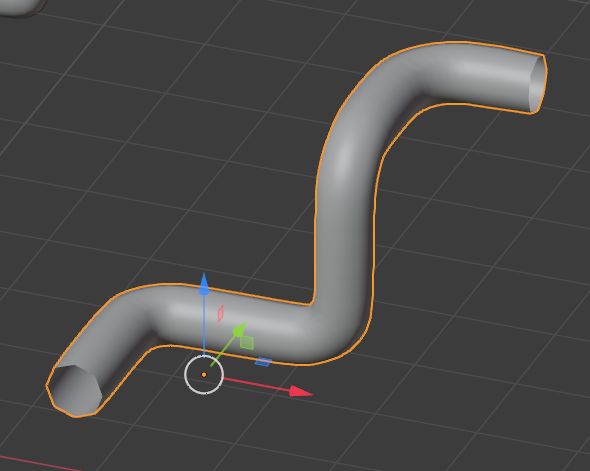
enter image description here

deleted 4 characters in body
Source Link
moonboots
  • 167.7k
  • 8
  • 114
  • 181

Two other ways to make pipes: Vertex extrusion and Spin tool.

A fun way to make pipes is first to create with simple vertex extrusions:

Enter image description here

Then bevel the angles (Ctrl + B and tweak the parameters in the Operator box):

Enter image description here

Convert your mesh to a Bézier curve (header menu → ObjectConvert ToCurve):

Enter image description here

Then bevel your curve to give it thickness (Properties panelObject DataGeometryBevel). After that, reconvert to mesh, give it a Subdivision Surface modifier, and a smooth shading...

Enter image description here

Another way is to use the Spin tool. Switch to top view, select the edge, put your 3D cursor where the center of the rotation is supposed to happenbe:

enter image description here

Select the Spin tool:

enter image description here

Rotate the edge, use Ctrl to constrain to 10° by 10°, tweak the Operator box parameters if necessary:
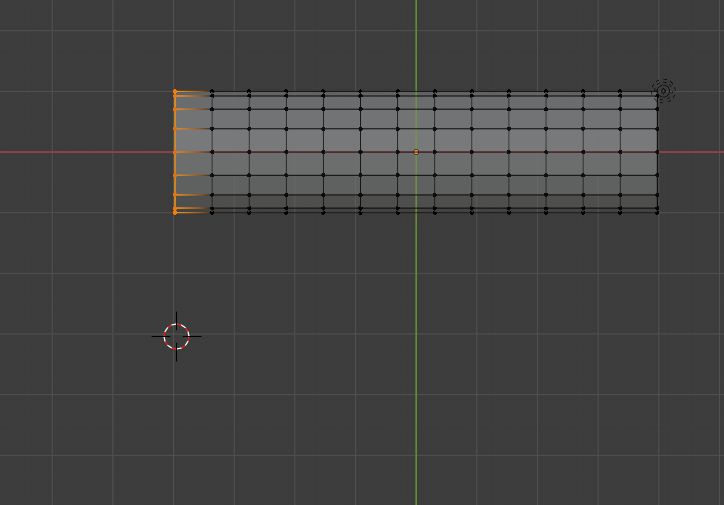
enter image description here

Two other ways to make pipes: Vertex extrusion and Spin tool.

A fun way to make pipes is first to create with simple vertex extrusions:

Enter image description here

Then bevel the angles (Ctrl + B and tweak the parameters in the Operator box):

Enter image description here

Convert your mesh to a Bézier curve (header menu → ObjectConvert ToCurve):

Enter image description here

Then bevel your curve to give it thickness (Properties panelObject DataGeometryBevel). After that, reconvert to mesh, give it a Subdivision Surface modifier, and a smooth shading...

Enter image description here

Another way is to use the Spin tool. Switch to top view, select the edge, put your 3D cursor where the center of the rotation is supposed to happen:

enter image description here

Select the Spin tool:

enter image description here

Rotate the edge, use Ctrl to constrain to 10° by 10°, tweak the Operator box parameters if necessary:
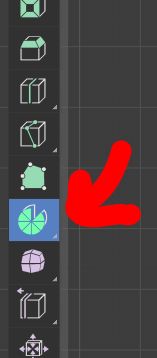
enter image description here

Two other ways to make pipes: Vertex extrusion and Spin tool.

A fun way to make pipes is first to create with simple vertex extrusions:

Enter image description here

Then bevel the angles (Ctrl + B and tweak the parameters in the Operator box):

Enter image description here

Convert your mesh to a Bézier curve (header menu → ObjectConvert ToCurve):

Enter image description here

Then bevel your curve to give it thickness (Properties panelObject DataGeometryBevel). After that, reconvert to mesh, give it a Subdivision Surface modifier, and a smooth shading...

Enter image description here

Another way is to use the Spin tool. Switch to top view, select the edge, put your 3D cursor where the center of the rotation is supposed to be:

enter image description here

Select the Spin tool:

enter image description here

Rotate the edge, use Ctrl to constrain to 10° by 10°, tweak the Operator box parameters if necessary:
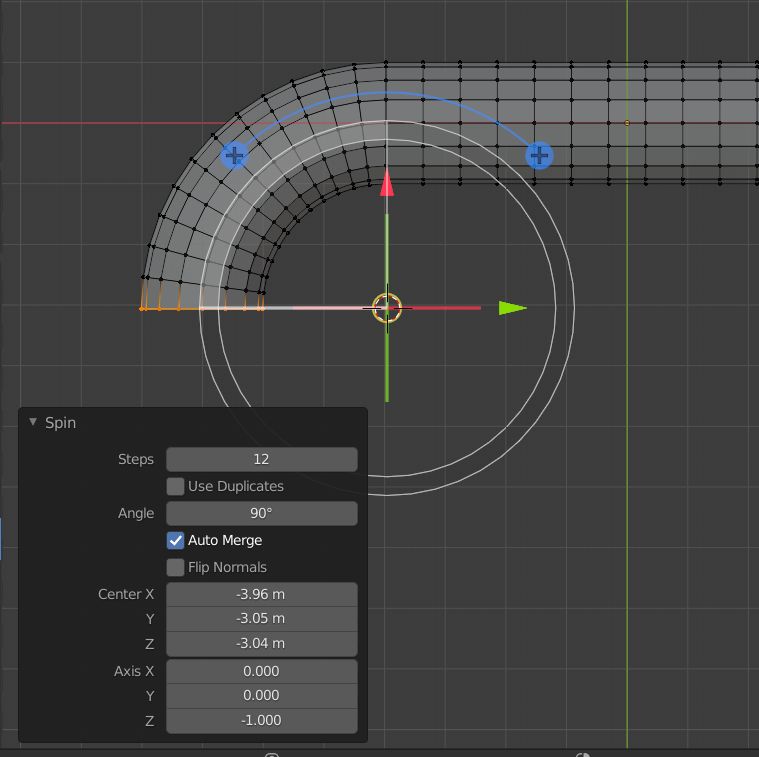
enter image description here

added 924 characters in body
Source Link
moonboots
  • 167.7k
  • 8
  • 114
  • 181
Loading
Source Link
moonboots
  • 167.7k
  • 8
  • 114
  • 181
Loading