clarification
Source Link
R-800
  • 3k
  • 1
  • 10
  • 25

Examining this video was an interesting exercise. I was able to get this to work as he shows, but had to watch a few times. What is curious to me is that I was able to get the needed face snapping behavior without any of the checkboxes activated that he recommends in the video, which confuses me. Just to be clear, there is nothing special about the whole Object Mode/Edit Mode situation you describe. It is true, the eye is in Object Mode while the head is in Edit Mode, but the relevant point is that the video demonstrates Face Snapping while using a checkbox called Project Individual Elements. According to the tooltip, this feature allows the snapping elements to interact with other objects. So that explains how he's able to bridge the gap between Edit Mode and Object Mode. Except that it doesn't because as I said, I was able to get it to work without the Project Individual Elements option checked. So this is a mystery to me. Maybe someone else can shed some light.

I thought I would point out that I use a different technique to get eyes and eyelids to meet, and I think it's superior (if only because it requires no vertex tweaking) to the one in the video. 

I createstart by creating a vertex group. In Object Mode, select the eyelid geometry, then go into Edit Mode and itselect the inner-most edge ring for the eyelid object (highlighted in green in the pic below). This vertex group will contains only the vertices from the edge ring which defines the inner rim of the eye lid.

enter image description here

Next, go to the Object Data tab, and look for the Vertex Group section. Click the "+" sign to add a new group, which will be empty initially. It will be called Group by default, but you can name it whatever you want. Click Assign.

enter image description here

Then I create a Shrinkwrap modifier for the headeyelid object. In Object Mode, select the eyelid object, then click on the Modifier tab in the Properties Panel and pointcreate a new modifer. Make it a Shrinkwrap.

enter image description here

Point the Shrinkwrap modifier to the eye object as its target. There is a (left green arrow), and use the Vertex Group input field for the Shrinkwrap modifier. Pointto point it also to the vertex group you just created for the eye lid rim, and it will instantly snap to(right green arrow). If you don't use the eyevertex group option, while leaving the rest of the headentire eyelid mesh alone. This achieveswill completely collapse against the same result withouteyeball. If you do use the need to manhandle every single eye lid vertex in order to get it to meet withgroup option, only the eye ball geometryinner rim will touch the eyeball. It also doesn't missAnd that's exactly what you want.

enter image description here

Examining this video was an interesting exercise. I was able to get this to work as he shows, but had to watch a few times. What is curious to me is that I was able to get the needed face snapping behavior without any of the checkboxes activated that he recommends in the video, which confuses me. Just to be clear, there is nothing special about the whole Object Mode/Edit Mode situation you describe. It is true, the eye is in Object Mode while the head is in Edit Mode, but the relevant point is that the video demonstrates Face Snapping while using a checkbox called Project Individual Elements. According to the tooltip, this feature allows the snapping elements to interact with other objects. So that explains how he's able to bridge the gap between Edit Mode and Object Mode. Except that it doesn't because as I said, I was able to get it to work without the Project Individual Elements option checked. So this is a mystery to me. Maybe someone else can shed some light.

I thought I would point out that I use a different technique to get eyes and eyelids to meet, and I think it's superior (if only because it requires no vertex tweaking) to the one in the video. I create a vertex group, and it contains only the vertices from the edge ring which defines the inner rim of the eye lid. Then I create a Shrinkwrap modifier for the head, and point it to the eye object as its target. There is a Vertex Group field for the Shrinkwrap modifier. Point it to the vertex group you created for the eye lid rim, and it will instantly snap to the eye, while leaving the rest of the head mesh alone. This achieves the same result without the need to manhandle every single eye lid vertex in order to get it to meet with the eye ball geometry. It also doesn't miss.

Examining this video was an interesting exercise. I was able to get this to work as he shows, but had to watch a few times. What is curious to me is that I was able to get the needed face snapping behavior without any of the checkboxes activated that he recommends in the video, which confuses me. Just to be clear, there is nothing special about the whole Object Mode/Edit Mode situation you describe. It is true, the eye is in Object Mode while the head is in Edit Mode, but the relevant point is that the video demonstrates Face Snapping while using a checkbox called Project Individual Elements. According to the tooltip, this feature allows the snapping elements to interact with other objects. So that explains how he's able to bridge the gap between Edit Mode and Object Mode. Except that it doesn't because as I said, I was able to get it to work without the Project Individual Elements option checked. So this is a mystery to me. Maybe someone else can shed some light.

I thought I would point out that I use a different technique to get eyes and eyelids to meet, and I think it's superior (if only because it requires no vertex tweaking) to the one in the video. 

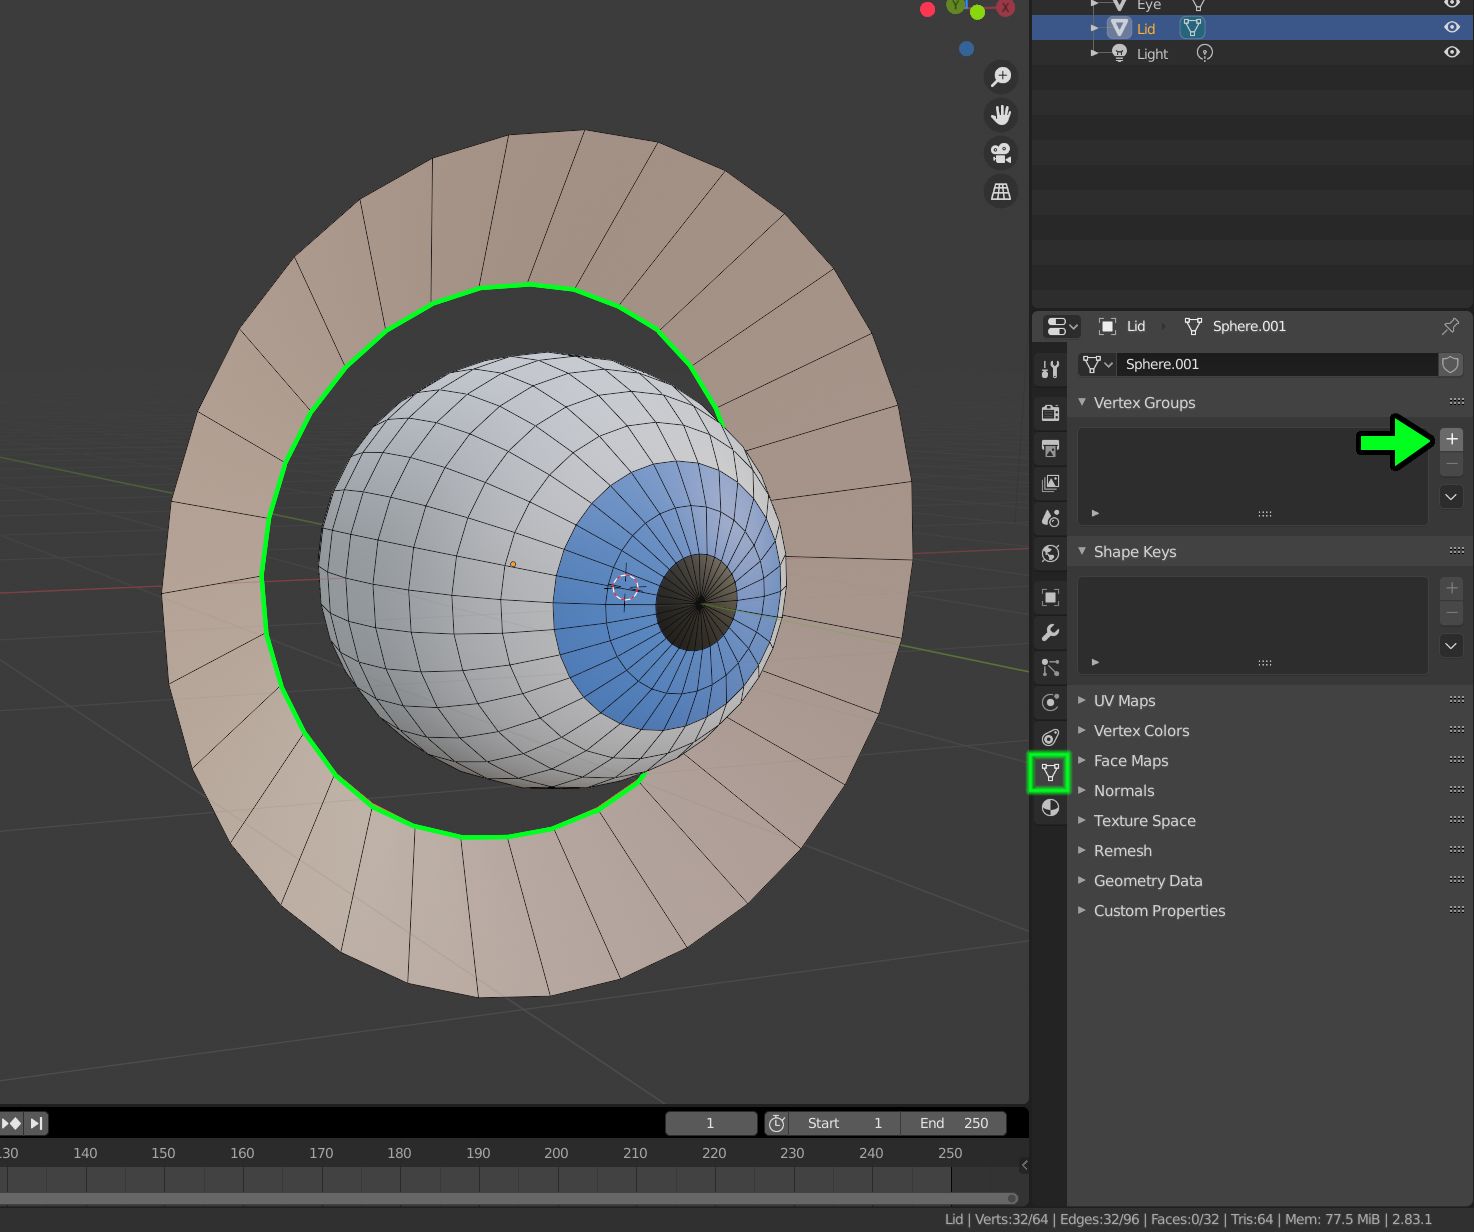
I start by creating a vertex group. In Object Mode, select the eyelid geometry, then go into Edit Mode and select the inner-most edge ring for the eyelid object (highlighted in green in the pic below). This vertex group will contains only the vertices from the edge ring which defines the inner rim of the eye lid.

enter image description here

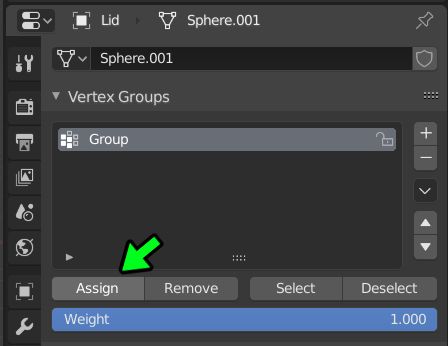
Next, go to the Object Data tab, and look for the Vertex Group section. Click the "+" sign to add a new group, which will be empty initially. It will be called Group by default, but you can name it whatever you want. Click Assign.

enter image description here

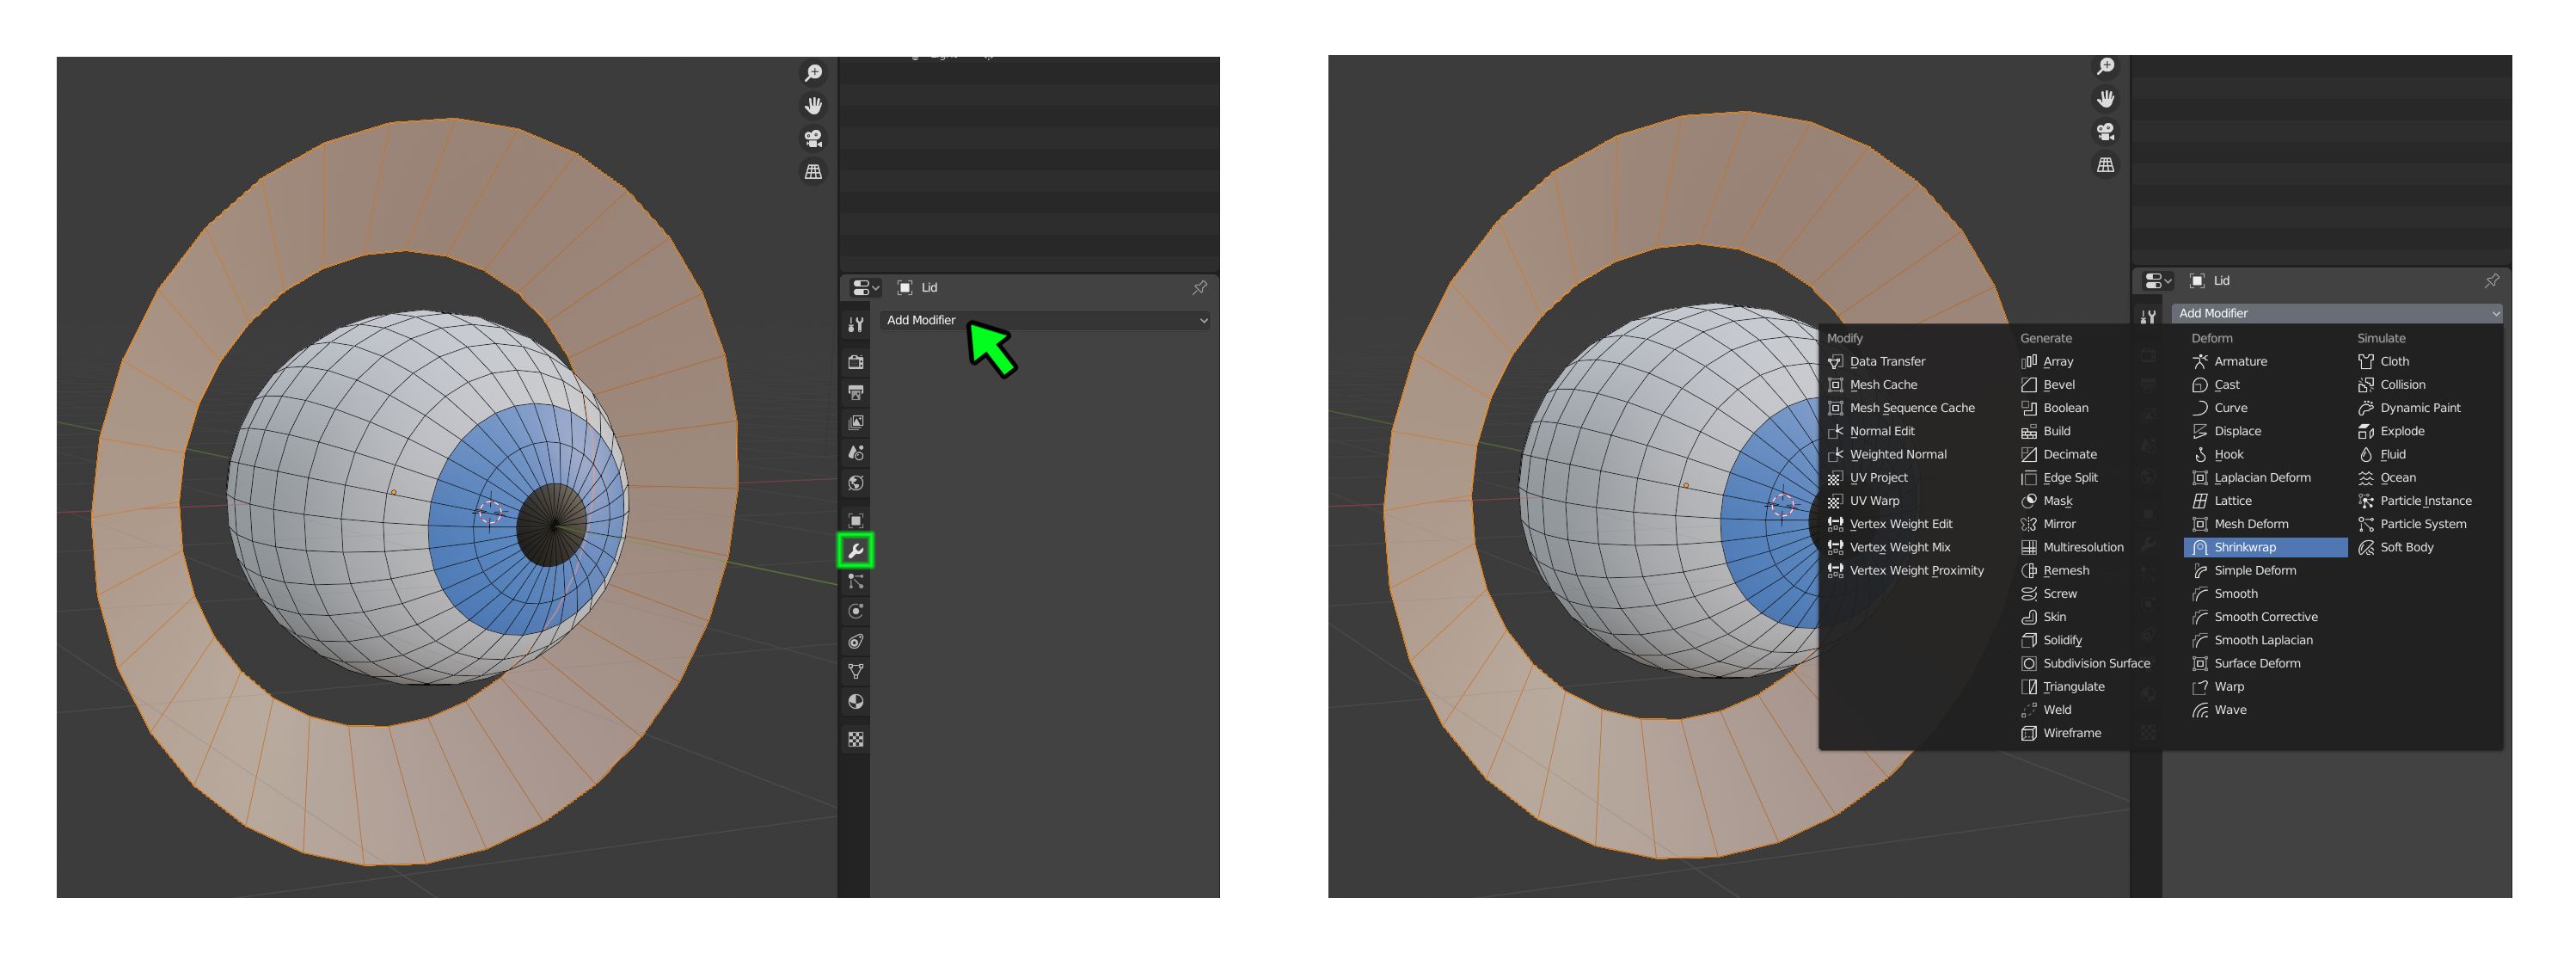
Then create a Shrinkwrap modifier for the eyelid object. In Object Mode, select the eyelid object, then click on the Modifier tab in the Properties Panel and create a new modifer. Make it a Shrinkwrap.

enter image description here

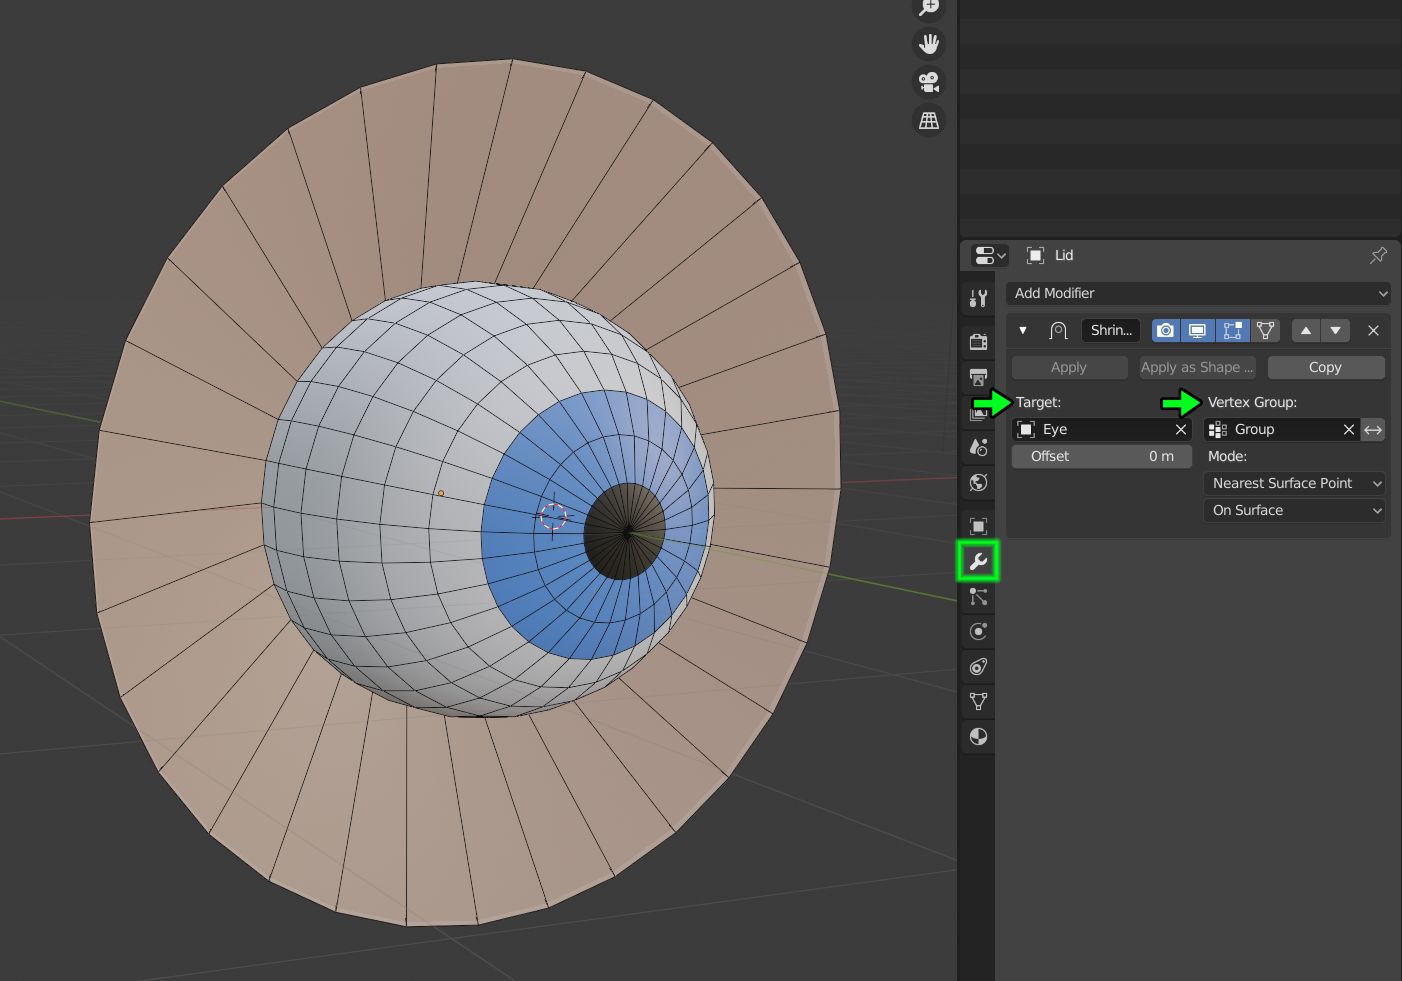
Point the Shrinkwrap modifier to the eye object as its target (left green arrow), and use the Vertex Group input field to point it also to the vertex group you just created (right green arrow). If you don't use the vertex group option, the entire eyelid mesh will completely collapse against the eyeball. If you do use the vertex group option, only the inner rim will touch the eyeball. And that's exactly what you want.

enter image description here

deleted 2 characters in body
Source Link
R-800
  • 3k
  • 1
  • 10
  • 25

Examining this video was an interesting exercise. I was able to get this to work as he shows, but had to watch a few times. What is curious to me is that I was able to get the needed face snapping behavior without any of the checkboxes activated that he recommends in the video, which confuses me. Just to be clear, there is nothing special about the whole Object Mode/Edit Mode situation you describe. It is true, the eye is in Object Mode while the head is in Edit Mode, but the relevant point is that the video demonstrates Face Snapping while using a checkbox called Project Individual Elements. According to the tooltip, this feature allows the snapping elements to interact with other objects. So that explains how he's able to bridge the gap between Edit Mode and Object Mode. Except that it doesn't because as I said, I was able to get it to work without the Project Individual Elements option checked. So this is a mystery to me. Maybe someone else can shed some light.

I thought I would point out that I use a different technique to get eyes and eyelids to meet, and I think it's superior (if only because it requires no vertex tweaking) thanto the one in the video. I create a vertex group, and it contains only the vertices from the edge ring which defines the inner rim of the eye lid. Then I create a Shrinkwrap modifier for the head, and point it to the eye object as its target. There is a Vertex Group field for the Shrinkwrap modifier. Point it to the vertex group you created for the eye lid rim, and it will instantly snap to the eye, while leaving the rest of the head mesh alone. This achieves the same result without the need to manhandle every single eye lid vertex in order to get it to meet with the eye ball geometry. It also doesn't miss.

Examining this video was an interesting exercise. I was able to get this to work as he shows, but had to watch a few times. What is curious to me is that I was able to get the needed face snapping behavior without any of the checkboxes activated that he recommends in the video, which confuses me. Just to be clear, there is nothing special about the whole Object Mode/Edit Mode situation you describe. It is true, the eye is in Object Mode while the head is in Edit Mode, but the relevant point is that the video demonstrates Face Snapping while using a checkbox called Project Individual Elements. According to the tooltip, this feature allows the snapping elements to interact with other objects. So that explains how he's able to bridge the gap between Edit Mode and Object Mode. Except that it doesn't because as I said, I was able to get it to work without the Project Individual Elements option checked. So this is a mystery to me. Maybe someone else can shed some light.

I thought I would point out that I use a different technique to get eyes and eyelids to meet, and I think it's superior (if only because it requires no vertex tweaking) than the one in the video. I create a vertex group, and it contains only the vertices from the edge ring which defines the inner rim of the eye lid. Then I create a Shrinkwrap modifier for the head, and point it to the eye object as its target. There is a Vertex Group field for the Shrinkwrap modifier. Point it to the vertex group you created for the eye lid rim, and it will instantly snap to the eye, while leaving the rest of the head mesh alone. This achieves the same result without the need to manhandle every single eye lid vertex in order to get it to meet with the eye ball geometry. It also doesn't miss.

Examining this video was an interesting exercise. I was able to get this to work as he shows, but had to watch a few times. What is curious to me is that I was able to get the needed face snapping behavior without any of the checkboxes activated that he recommends in the video, which confuses me. Just to be clear, there is nothing special about the whole Object Mode/Edit Mode situation you describe. It is true, the eye is in Object Mode while the head is in Edit Mode, but the relevant point is that the video demonstrates Face Snapping while using a checkbox called Project Individual Elements. According to the tooltip, this feature allows the snapping elements to interact with other objects. So that explains how he's able to bridge the gap between Edit Mode and Object Mode. Except that it doesn't because as I said, I was able to get it to work without the Project Individual Elements option checked. So this is a mystery to me. Maybe someone else can shed some light.

I thought I would point out that I use a different technique to get eyes and eyelids to meet, and I think it's superior (if only because it requires no vertex tweaking) to the one in the video. I create a vertex group, and it contains only the vertices from the edge ring which defines the inner rim of the eye lid. Then I create a Shrinkwrap modifier for the head, and point it to the eye object as its target. There is a Vertex Group field for the Shrinkwrap modifier. Point it to the vertex group you created for the eye lid rim, and it will instantly snap to the eye, while leaving the rest of the head mesh alone. This achieves the same result without the need to manhandle every single eye lid vertex in order to get it to meet with the eye ball geometry. It also doesn't miss.

Source Link
R-800
  • 3k
  • 1
  • 10
  • 25

Examining this video was an interesting exercise. I was able to get this to work as he shows, but had to watch a few times. What is curious to me is that I was able to get the needed face snapping behavior without any of the checkboxes activated that he recommends in the video, which confuses me. Just to be clear, there is nothing special about the whole Object Mode/Edit Mode situation you describe. It is true, the eye is in Object Mode while the head is in Edit Mode, but the relevant point is that the video demonstrates Face Snapping while using a checkbox called Project Individual Elements. According to the tooltip, this feature allows the snapping elements to interact with other objects. So that explains how he's able to bridge the gap between Edit Mode and Object Mode. Except that it doesn't because as I said, I was able to get it to work without the Project Individual Elements option checked. So this is a mystery to me. Maybe someone else can shed some light.

I thought I would point out that I use a different technique to get eyes and eyelids to meet, and I think it's superior (if only because it requires no vertex tweaking) than the one in the video. I create a vertex group, and it contains only the vertices from the edge ring which defines the inner rim of the eye lid. Then I create a Shrinkwrap modifier for the head, and point it to the eye object as its target. There is a Vertex Group field for the Shrinkwrap modifier. Point it to the vertex group you created for the eye lid rim, and it will instantly snap to the eye, while leaving the rest of the head mesh alone. This achieves the same result without the need to manhandle every single eye lid vertex in order to get it to meet with the eye ball geometry. It also doesn't miss.