Update for present status
Source Link

You probably meant God rays, and googleing that would be a good idea.

In Blender Internal:

Step 1: Add a spot light (Shift-A>Lamp>Spot)

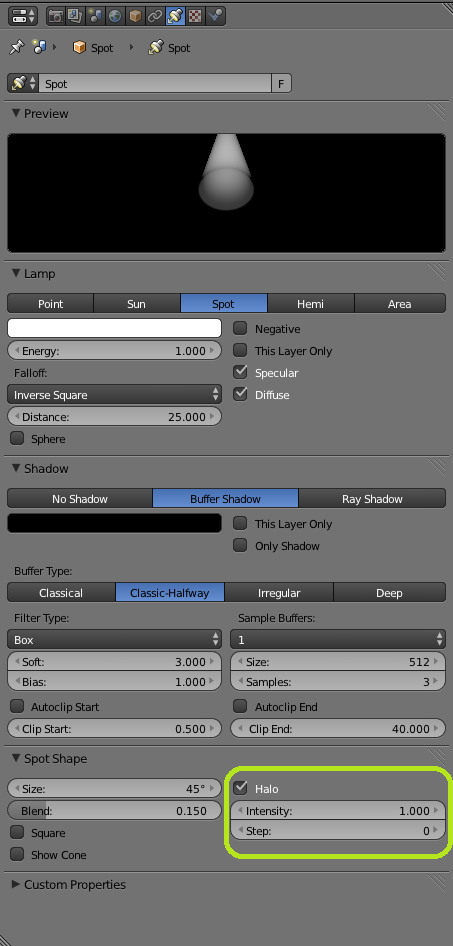
Step 2: Check Halo

Intensity will effect how strong your God Rays are, step will remove any banding, you will what to set the step to at least 8, otherwise this effect will not work properly. image 1
Step 3: As you may have noticed, you have one solid ray, which doesn't look very nice. to fix this, you will need to make a stencil for the light. To do this, add a plane. Subdivide it(W>Subdivide>F6) It the menu that pops up set the cuts to five. hit (Shift-R)

Step 3.5: We will now cut holes in our stencil.

Hit C to activate brush select. select a random pattern on your plane as such:
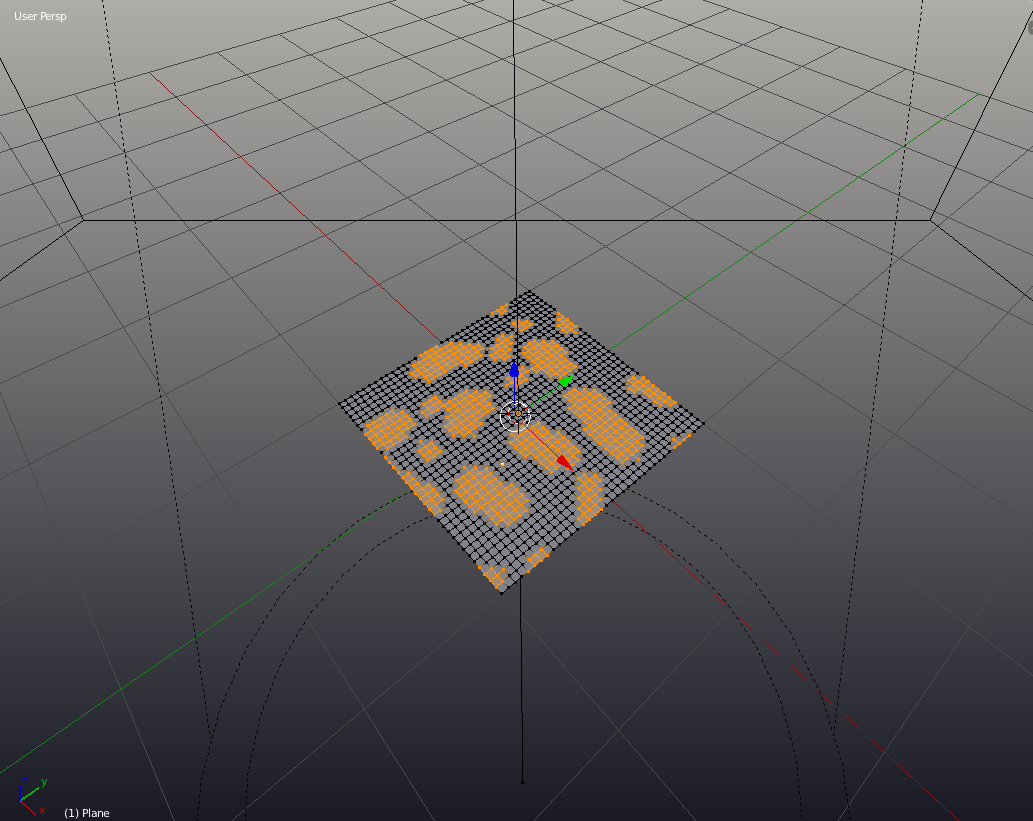
Pattern

Hit X. Your stencil now has holes in it.

Step 4:

Move the stencil close to the top of the stop light's cone as such:
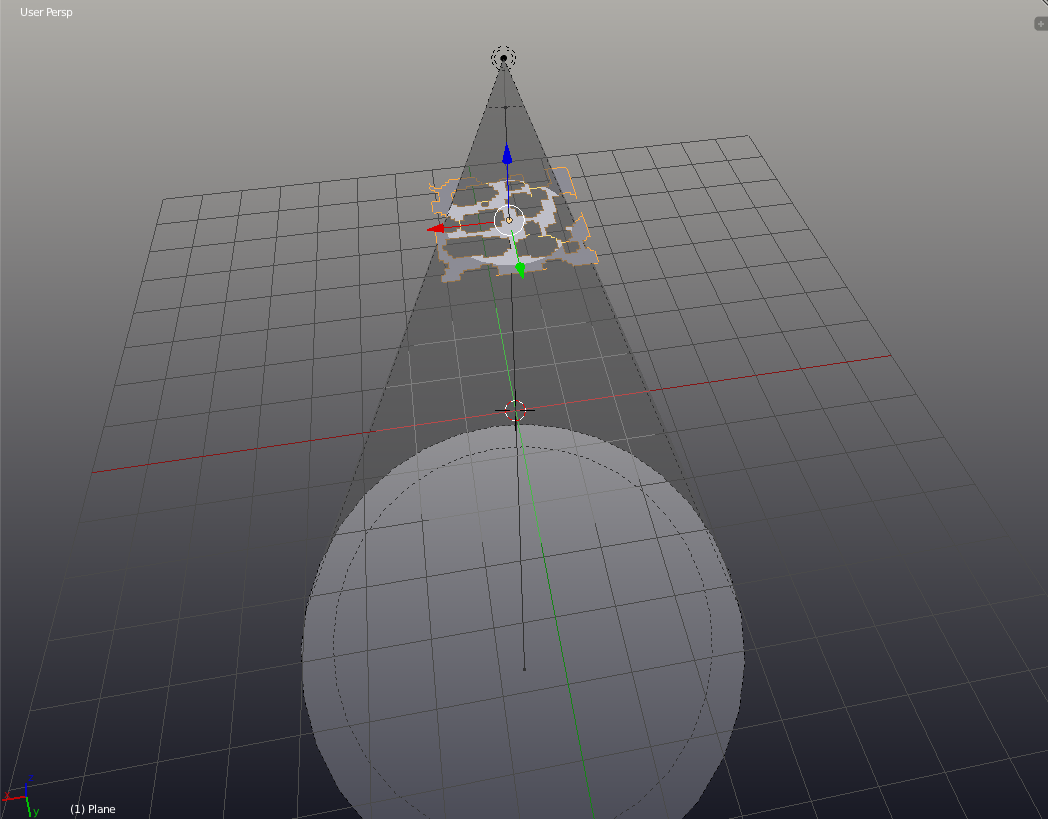
Cone

Your God Rays are now ready to Render.

In Cycles:

Complete Steps 1, 3, 3.5, and 4 form the previous section.

Step 1: Make sure you are using a very recent build of blender 2.71+

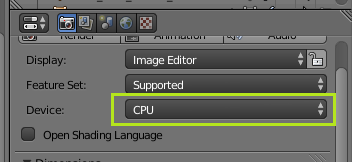
Step 2: Make sure CPU rendering is enabled(GPU support coming soon-ish).
enter image description here

If you don't see this drop down, then it is set to CPU

UPDATE: GPU rendering is now supported (starting with version 2.72) using GPU on Nvidia/Cuda cards, but there are some issues rendering on AMD/Radeon GPUs

Step 32: Go into the world tab of the properties panel. Under volume set the material to Volume Scatter. (You can also add a cube around the spot lamp, and set its volume material to Volume Scatter, it will save a lot of rendering time.)

Also check Homogeneous Volume* if you want less slow render times.
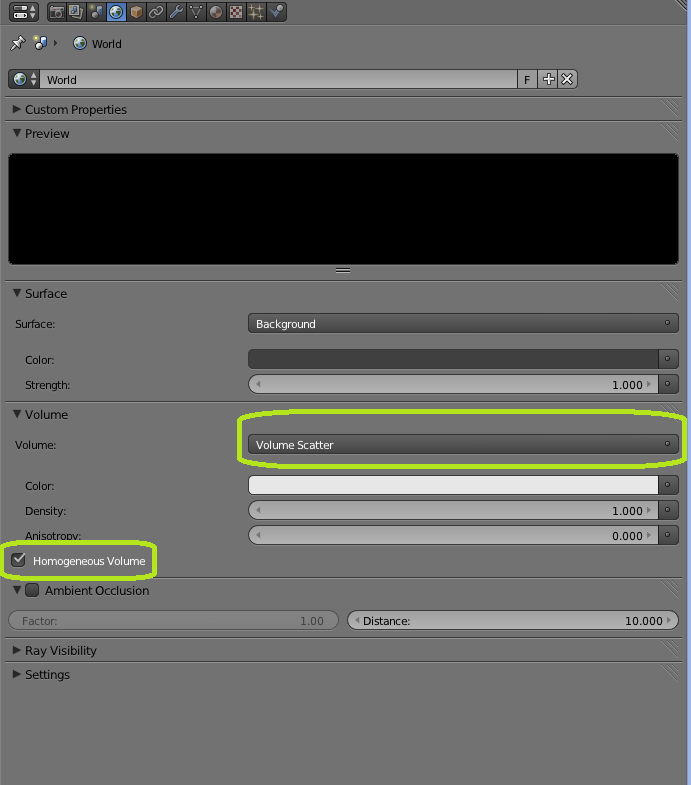
Settings

Usually the default value of 1 for density is way to high, so start with a smaller value and find what works for your needs.

Keep in mind that the intensity of the lights in the scene will be affected by the scattering, they might not seem as bright as you expect them, so be ready to set the light intensity to a much larger value than you normally would.

Step 4: Put your samples up really high, (approx 150)

Hit Render... Wait... Wait... Wait... Tada! you have God Rays in Cycles.

*Homogeneous Volume means that you have applied no textures to your world volume, if you do, something will break.

Edit

Note, that in cycles, mesh lights work as well as a spot light. with mesh lights, you can also add a texture to the emission value.

You probably meant God rays, and googleing that would be a good idea.

In Blender Internal:

Step 1: Add a spot light (Shift-A>Lamp>Spot)

Step 2: Check Halo

Intensity will effect how strong your God Rays are, step will remove any banding, you will what to set the step to at least 8, otherwise this effect will not work properly. image 1

Step 3: As you may have noticed, you have one solid ray, which doesn't look very nice. to fix this, you will need to make a stencil for the light. To do this, add a plane. Subdivide it(W>Subdivide>F6) It the menu that pops up set the cuts to five. hit (Shift-R)

Step 3.5: We will now cut holes in our stencil.

Hit C to activate brush select. select a random pattern on your plane as such:

Pattern

Hit X. Your stencil now has holes in it.

Step 4:

Move the stencil close to the top of the stop light's cone as such:

Cone

Your God Rays are now ready to Render.

In Cycles:

Complete Steps 1, 3, 3.5, and 4 form the previous section.

Step 1: Make sure you are using a very recent build of blender 2.71+

Step 2: Make sure CPU rendering is enabled(GPU support coming soon-ish).

enter image description here

If you don't see this drop down, then it is set to CPU

UPDATE: GPU rendering is now supported (starting with version 2.72) using GPU on Nvidia/Cuda cards, but there are some issues rendering on AMD/Radeon GPUs

Step 3: Go into the world tab of the properties panel. Under volume set the material to Volume Scatter. (You can also add a cube around the spot lamp, and set its volume material to Volume Scatter, it will save a lot of rendering time.)

Also check Homogeneous Volume* if you want less slow render times.

Settings

Usually the default value of 1 for density is way to high, so start with a smaller value and find what works for your needs.

Keep in mind that the intensity of the lights in the scene will be affected by the scattering, they might not seem as bright as you expect them, so be ready to set the light intensity to a much larger value than you normally would.

Step 4: Put your samples up really high, (approx 150)

Hit Render... Wait... Wait... Wait... Tada! you have God Rays in Cycles.

*Homogeneous Volume means that you have applied no textures to your world volume, if you do, something will break.

Edit

Note, that in cycles, mesh lights work as well as a spot light. with mesh lights, you can also add a texture to the emission value.

You probably meant God rays, and googleing that would be a good idea.

In Blender Internal:

Step 1: Add a spot light (Shift-A>Lamp>Spot)

Step 2: Check Halo

Intensity will effect how strong your God Rays are, step will remove any banding, you will what to set the step to at least 8, otherwise this effect will not work properly. image 1

Step 3: As you may have noticed, you have one solid ray, which doesn't look very nice. to fix this, you will need to make a stencil for the light. To do this, add a plane. Subdivide it(W>Subdivide>F6) It the menu that pops up set the cuts to five. hit (Shift-R)

Step 3.5: We will now cut holes in our stencil.

Hit C to activate brush select. select a random pattern on your plane as such:

Pattern

Hit X. Your stencil now has holes in it.

Step 4:

Move the stencil close to the top of the stop light's cone as such:

Cone

Your God Rays are now ready to Render.

In Cycles:

Complete Steps 1, 3, 3.5, and 4 form the previous section.

Step 1: Make sure you are using a very recent build of blender 2.71+

enter image description here

Step 2: Go into the world tab of the properties panel. Under volume set the material to Volume Scatter. (You can also add a cube around the spot lamp, and set its volume material to Volume Scatter, it will save a lot of rendering time.)

Also check Homogeneous Volume* if you want less slow render times.

Settings

Usually the default value of 1 for density is way to high, so start with a smaller value and find what works for your needs.

Keep in mind that the intensity of the lights in the scene will be affected by the scattering, they might not seem as bright as you expect them, so be ready to set the light intensity to a much larger value than you normally would.

Step 4: Put your samples up really high, (approx 150)

Hit Render... Wait... Wait... Wait... Tada! you have God Rays in Cycles.

*Homogeneous Volume means that you have applied no textures to your world volume, if you do, something will break.

Edit

Note, that in cycles, mesh lights work as well as a spot light. with mesh lights, you can also add a texture to the emission value.

Commonmark migration
Source Link

You probably meant God rays, and googleing that would be a good idea. #In Blender Internal:#

In Blender Internal:

Step 1: Add a spot light (Shift-A>Lamp>Spot)

Step 2: Check Halo

Intensity will effect how strong your God Rays are, step will remove any banding, you will what to set the step to at least 8, otherwise this effect will not work properly. image 1

Step 3: As you may have noticed, you have one solid ray, which doesn't look very nice. to fix this, you will need to make a stencil for the light. To do this, add a plane. Subdivide it(W>Subdivide>F6) It the menu that pops up set the cuts to five. hit (Shift-R)

Step 3.5: We will now cut holes in our stencil.

Hit C to activate brush select. select a random pattern on your plane as such:

Pattern

Hit X. Your stencil now has holes in it.

Step 4:

Move the stencil close to the top of the stop light's cone as such:

Cone

Your God Rays are now ready to Render.

#In Cycles:#

In Cycles:

Complete Steps 1, 3, 3.5, and 4 form the previous section.

Step 1: Make sure you are using a very recent build of blender 2.71+

Step 2: Make sure CPU rendering is enabled(GPU support coming soon-ish).

enter image description here

If you don't see this drop down, then it is set to CPU

UPDATE: GPU rendering is now supported (starting with version 2.72) using GPU on Nvidia/Cuda cards, but there are some issues rendering on AMD/Radeon GPUs

Step 3: Go into the world tab of the properties panel. Under volume set the material to Volume Scatter. (You can also add a cube around the spot lamp, and set its volume material to Volume Scatter, it will save a lot of rendering time.)

Also check Homogeneous Volume* if you want less slow render times.

Settings

Usually the default value of 1 for density is way to high, so start with a smaller value and find what works for your needs.

Keep in mind that the intensity of the lights in the scene will be affected by the scattering, they might not seem as bright as you expect them, so be ready to set the light intensity to a much larger value than you normally would.

Step 4: Put your samples up really high, (approx 150)

Hit Render... Wait... Wait... Wait... Tada! you have God Rays in Cycles.

*Homogeneous Volume means that you have applied no textures to your world volume, if you do, something will break.

Edit

##Edit## NoteNote, that in cycles, mesh lights work as well as a spot light. with mesh lights, you can also add a texture to the emission value.

You probably meant God rays, and googleing that would be a good idea. #In Blender Internal:#

Step 1: Add a spot light (Shift-A>Lamp>Spot)

Step 2: Check Halo

Intensity will effect how strong your God Rays are, step will remove any banding, you will what to set the step to at least 8, otherwise this effect will not work properly. image 1

Step 3: As you may have noticed, you have one solid ray, which doesn't look very nice. to fix this, you will need to make a stencil for the light. To do this, add a plane. Subdivide it(W>Subdivide>F6) It the menu that pops up set the cuts to five. hit (Shift-R)

Step 3.5: We will now cut holes in our stencil.

Hit C to activate brush select. select a random pattern on your plane as such:

Pattern

Hit X. Your stencil now has holes in it.

Step 4:

Move the stencil close to the top of the stop light's cone as such:

Cone

Your God Rays are now ready to Render.

#In Cycles:#

Complete Steps 1, 3, 3.5, and 4 form the previous section.

Step 1: Make sure you are using a very recent build of blender 2.71+

Step 2: Make sure CPU rendering is enabled(GPU support coming soon-ish).

enter image description here

If you don't see this drop down, then it is set to CPU

UPDATE: GPU rendering is now supported (starting with version 2.72) using GPU on Nvidia/Cuda cards, but there are some issues rendering on AMD/Radeon GPUs

Step 3: Go into the world tab of the properties panel. Under volume set the material to Volume Scatter. (You can also add a cube around the spot lamp, and set its volume material to Volume Scatter, it will save a lot of rendering time.)

Also check Homogeneous Volume* if you want less slow render times.

Settings

Usually the default value of 1 for density is way to high, so start with a smaller value and find what works for your needs.

Keep in mind that the intensity of the lights in the scene will be affected by the scattering, they might not seem as bright as you expect them, so be ready to set the light intensity to a much larger value than you normally would.

Step 4: Put your samples up really high, (approx 150)

Hit Render... Wait... Wait... Wait... Tada! you have God Rays in Cycles.

*Homogeneous Volume means that you have applied no textures to your world volume, if you do, something will break.

##Edit## Note, that in cycles, mesh lights work as well as a spot light. with mesh lights, you can also add a texture to the emission value.

You probably meant God rays, and googleing that would be a good idea.

In Blender Internal:

Step 1: Add a spot light (Shift-A>Lamp>Spot)

Step 2: Check Halo

Intensity will effect how strong your God Rays are, step will remove any banding, you will what to set the step to at least 8, otherwise this effect will not work properly. image 1

Step 3: As you may have noticed, you have one solid ray, which doesn't look very nice. to fix this, you will need to make a stencil for the light. To do this, add a plane. Subdivide it(W>Subdivide>F6) It the menu that pops up set the cuts to five. hit (Shift-R)

Step 3.5: We will now cut holes in our stencil.

Hit C to activate brush select. select a random pattern on your plane as such:

Pattern

Hit X. Your stencil now has holes in it.

Step 4:

Move the stencil close to the top of the stop light's cone as such:

Cone

Your God Rays are now ready to Render.

In Cycles:

Complete Steps 1, 3, 3.5, and 4 form the previous section.

Step 1: Make sure you are using a very recent build of blender 2.71+

Step 2: Make sure CPU rendering is enabled(GPU support coming soon-ish).

enter image description here

If you don't see this drop down, then it is set to CPU

UPDATE: GPU rendering is now supported (starting with version 2.72) using GPU on Nvidia/Cuda cards, but there are some issues rendering on AMD/Radeon GPUs

Step 3: Go into the world tab of the properties panel. Under volume set the material to Volume Scatter. (You can also add a cube around the spot lamp, and set its volume material to Volume Scatter, it will save a lot of rendering time.)

Also check Homogeneous Volume* if you want less slow render times.

Settings

Usually the default value of 1 for density is way to high, so start with a smaller value and find what works for your needs.

Keep in mind that the intensity of the lights in the scene will be affected by the scattering, they might not seem as bright as you expect them, so be ready to set the light intensity to a much larger value than you normally would.

Step 4: Put your samples up really high, (approx 150)

Hit Render... Wait... Wait... Wait... Tada! you have God Rays in Cycles.

*Homogeneous Volume means that you have applied no textures to your world volume, if you do, something will break.

Edit

Note, that in cycles, mesh lights work as well as a spot light. with mesh lights, you can also add a texture to the emission value.

deleted 149 characters in body
Source Link
user1853
user1853

You probably meant God rays, and googleing that would be a good idea. #In Blender Internal:#

Step 1: Add a spot light (Shift-A>Lamp>Spot)

Step 2: Check Halo

Intensity will effect how strong your God Rays are, step will remove any banding, you will what to set the step to at least 8, otherwise this effect will not work properly. image 1

Step 3: As you may have noticed, you have one solid ray, which doesn't look very nice. to fix this, you will need to make a stencil for the light. To do this, add a plane. Subdivide it(W>Subdivide>F6) It the menu that pops up set the cuts to five. hit (Shift-R)

Step 3.5: We will now cut holes in our stencil.

Hit C to activate brush select. select a random pattern on your plane as such:

Pattern

Hit X. Your stencil now has holes in it.

Step 4:

Move the stencil close to the top of the stop light's cone as such:

Cone

Your God Rays are now ready to Render.

#In Cycles:#

Complete Steps 1, 3, 3.5, and 4 form the previous section. Note that the lamp has to be a directional light like point, spot or even an area light. Volumetrics in cycles will not work with Sun or Hemi lights.

Step 1: Make sure you are using a very recent build of blender 2.71+

Step 2: Make sure CPU rendering is enabled(GPU support coming soon-ish).

enter image description here

If you don't see this drop down, then it is set to CPU

UPDATE: GPU rendering is now supported (starting with version 2.72) using GPU on Nvidia/Cuda cards, but there are some issues rendering on AMD/Radeon GPUs

Step 3: Go into the world tab of the properties panel. Under volume set the material to Volume Scatter. (You can also add a cube around the spot lamp, and set its volume material to Volume Scatter, it will save a lot of rendering time.)

Also check Homogeneous Volume* if you want less slow render times.

Settings

Usually the default value of 1 for density is way to high, so start with a smaller value and find what works for your needs.

Keep in mind that the intensity of the lights in the scene will be affected by the scattering, they might not seem as bright as you expect them, so be ready to set the light intensity to a much larger value than you normally would.

Step 4: Put your samples up really high, (approx 150)

Hit Render... Wait... Wait... Wait... Tada! you have God Rays in Cycles.

*Homogeneous Volume means that you have applied no textures to your world volume, if you do, something will break.

##Edit## Note, that in cycles, mesh lights work as well as a spot light. with mesh lights, you can also add a texture to the emission value.

You probably meant God rays, and googleing that would be a good idea. #In Blender Internal:#

Step 1: Add a spot light (Shift-A>Lamp>Spot)

Step 2: Check Halo

Intensity will effect how strong your God Rays are, step will remove any banding, you will what to set the step to at least 8, otherwise this effect will not work properly. image 1

Step 3: As you may have noticed, you have one solid ray, which doesn't look very nice. to fix this, you will need to make a stencil for the light. To do this, add a plane. Subdivide it(W>Subdivide>F6) It the menu that pops up set the cuts to five. hit (Shift-R)

Step 3.5: We will now cut holes in our stencil.

Hit C to activate brush select. select a random pattern on your plane as such:

Pattern

Hit X. Your stencil now has holes in it.

Step 4:

Move the stencil close to the top of the stop light's cone as such:

Cone

Your God Rays are now ready to Render.

#In Cycles:#

Complete Steps 1, 3, 3.5, and 4 form the previous section.

Step 1: Make sure you are using a very recent build of blender 2.71+

Step 2: Make sure CPU rendering is enabled(GPU support coming soon-ish).

enter image description here

If you don't see this drop down, then it is set to CPU

UPDATE: GPU rendering is now supported (starting with version 2.72) using GPU on Nvidia/Cuda cards, but there are some issues rendering on AMD/Radeon GPUs

Step 3: Go into the world tab of the properties panel. Under volume set the material to Volume Scatter. (You can also add a cube around the spot lamp, and set its volume material to Volume Scatter, it will save a lot of rendering time.)

Also check Homogeneous Volume* if you want less slow render times.

Settings

Usually the default value of 1 for density is way to high, so start with a smaller value and find what works for your needs.

Keep in mind that the intensity of the lights in the scene will be affected by the scattering, they might not seem as bright as you expect them, so be ready to set the light intensity to a much larger value than you normally would.

Step 4: Put your samples up really high, (approx 150)

Hit Render... Wait... Wait... Wait... Tada! you have God Rays in Cycles.

*Homogeneous Volume means that you have applied no textures to your world volume, if you do, something will break.

##Edit## Note, that in cycles, mesh lights work as well as a spot light. with mesh lights, you can also add a texture to the emission value.

added 62 characters in body
Source Link
user1853
user1853
Loading
added 629 characters in body
Source Link
user1853
user1853
Loading
added 156 characters in body
Source Link
GiantCowFilms
  • 18.8k
  • 10
  • 78
  • 141
Loading
added 32 characters in body
Source Link
GiantCowFilms
  • 18.8k
  • 10
  • 78
  • 141
Loading
added 68 characters in body
Source Link
GiantCowFilms
  • 18.8k
  • 10
  • 78
  • 141
Loading
added 75 characters in body
Source Link
GiantCowFilms
  • 18.8k
  • 10
  • 78
  • 141
Loading
Source Link
GiantCowFilms
  • 18.8k
  • 10
  • 78
  • 141
Loading