2
$\begingroup$

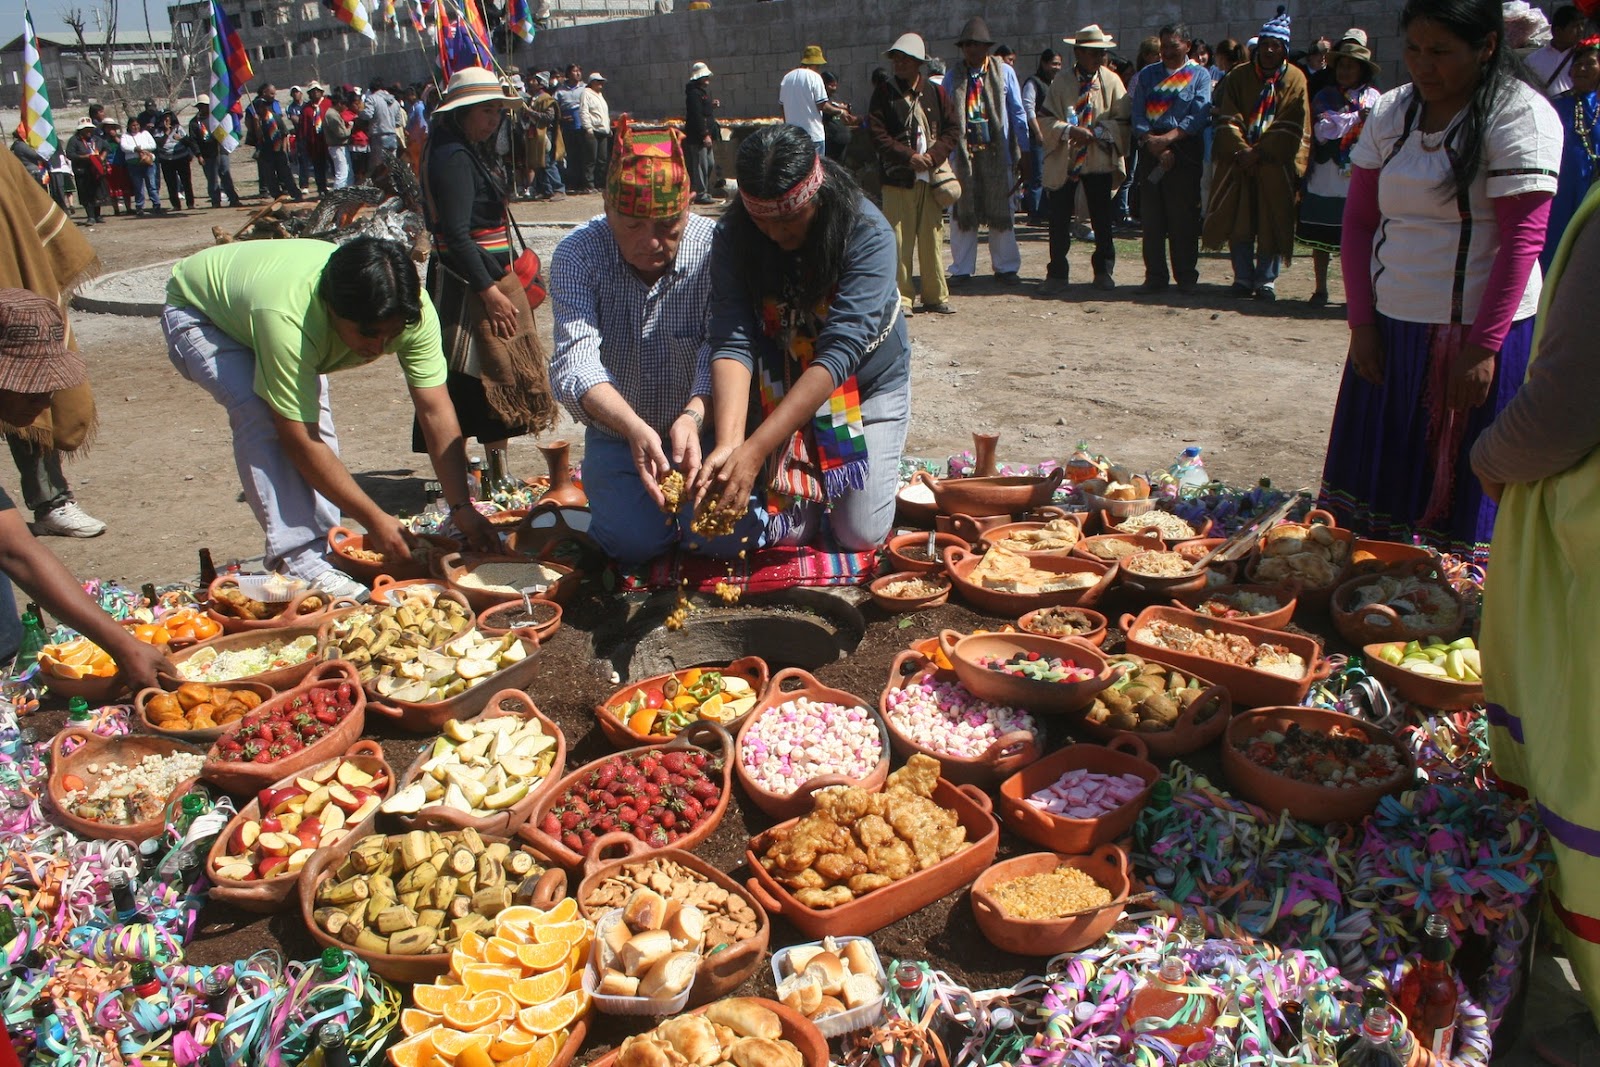
I want to create a floor scenary with streamers - serpentine in the floor something like this (see the inferior borders of the picture to get an idea):

Pachamama

I saw something that may work but don't know how to do it:

https://vimeo.com/18569617

Any ideas? thanks in advance to the kind souls willing to help :)

$\endgroup$
2
  • $\begingroup$ I don't have time for a full answer at the moment, but a small pointer. It looks like a cloth simulation, and there are plenty of tutorials out there. Cloth in the manual. And a list of tutorials found by Google. $\endgroup$
    – user27640
    Commented Sep 17, 2016 at 18:28
  • $\begingroup$ If you just want them laying ton the ground, the easiest way I can think of is to do a bunch of curves with some extrusion $\endgroup$
    – user1853
    Commented Sep 17, 2016 at 19:01

3 Answers 3

5
$\begingroup$

I just came across a fast method of creating a non-uniform serpentine curve (in this tutorial) so for the sake of completeness here's another method of creating floor covered with serpentines.

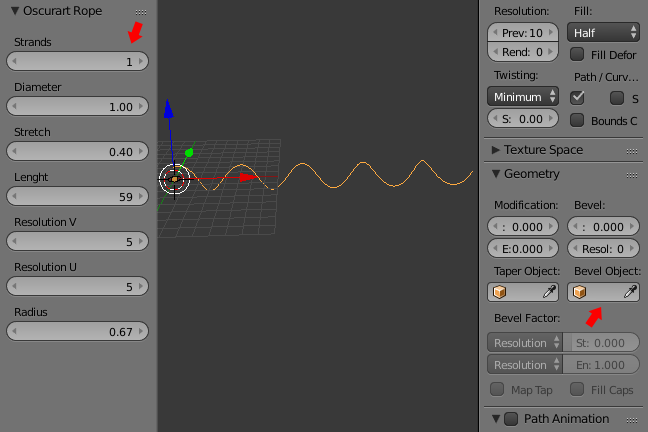
  1. To use this method install and activate the addon called Oscurart Rope Maker. Add a new curve: Shift + A > Oscurart Rope. Set Strands to 1 on the Tool shelf (T) and adjust other settings to your liking. Select the curve, then go to Properties Editor > Object Data and remove the Bevel Object.

    Add curve

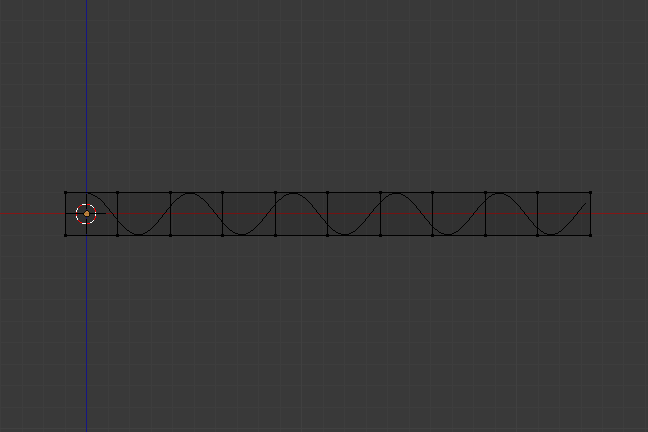
  2. Add a cube at one end of the curve, Tab to Edit Mode and resize the cube to cover the whole curve. Add several loop cuts (Ctrl + R, scroll MW MW to add more).

    Add cube

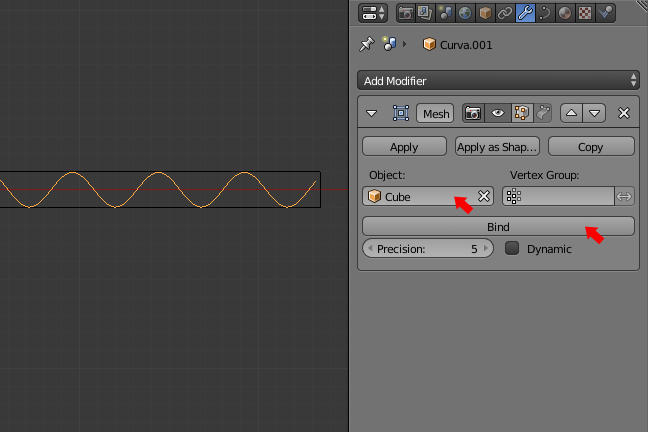
  3. Tab back to Object Mode, select the curve and add Mesh Deform modifier. In Object field select the mesh object (cube) and press Bind.

    Add mesh deform modifier

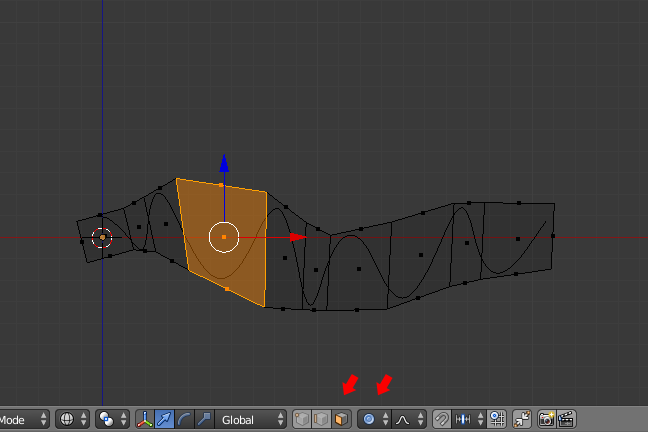
  4. Select the mesh object, Tab to Edit Mode, switch to Face select and turn on Proportional Editing (O). Move the blocks around, resize them and rotate to create natural looking serpentine shape (editing the mesh will affect the shape of the curve). Use Warp tool (Space > type Warp) to bend the curve.

    Edit the curve

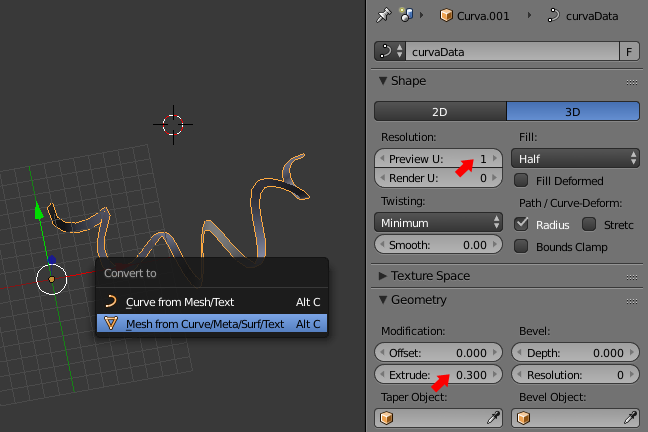
  5. Once you're happy with the shape, Tab back to Object Mode, select the curve, apply the modifier and delete the mesh deform object. Then go to Properties Editor > Object Data and extrude the curve. For more realistic look you can Tilt (Ctrl + T) some control points like in the linked tutorial, but I don't think this step is necessary here (that much detail won't be visible from a far distance). Change curve resolution to 1 and convert it to mesh (Alt + C > Mesh from curve).

    Convert to mesh

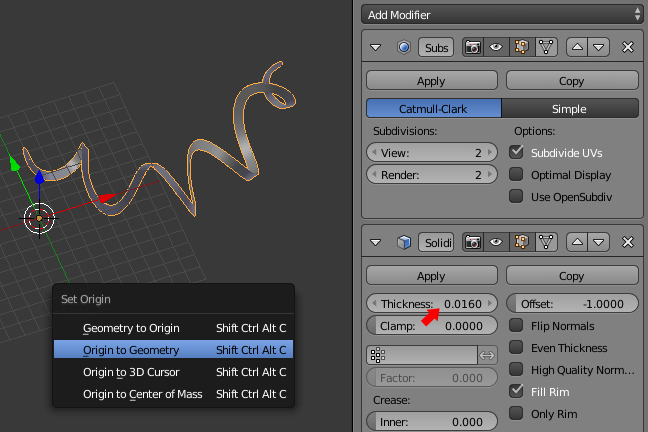
  6. Add Subdivision surface modifier and Solidify modifier. Adjust Thickness to your liking. Go to Properties Editor > Object Data and enable Auto smooth option. Set origin to geometry (Ctrl + Alt + Shift + C).

    Add solidify modifier

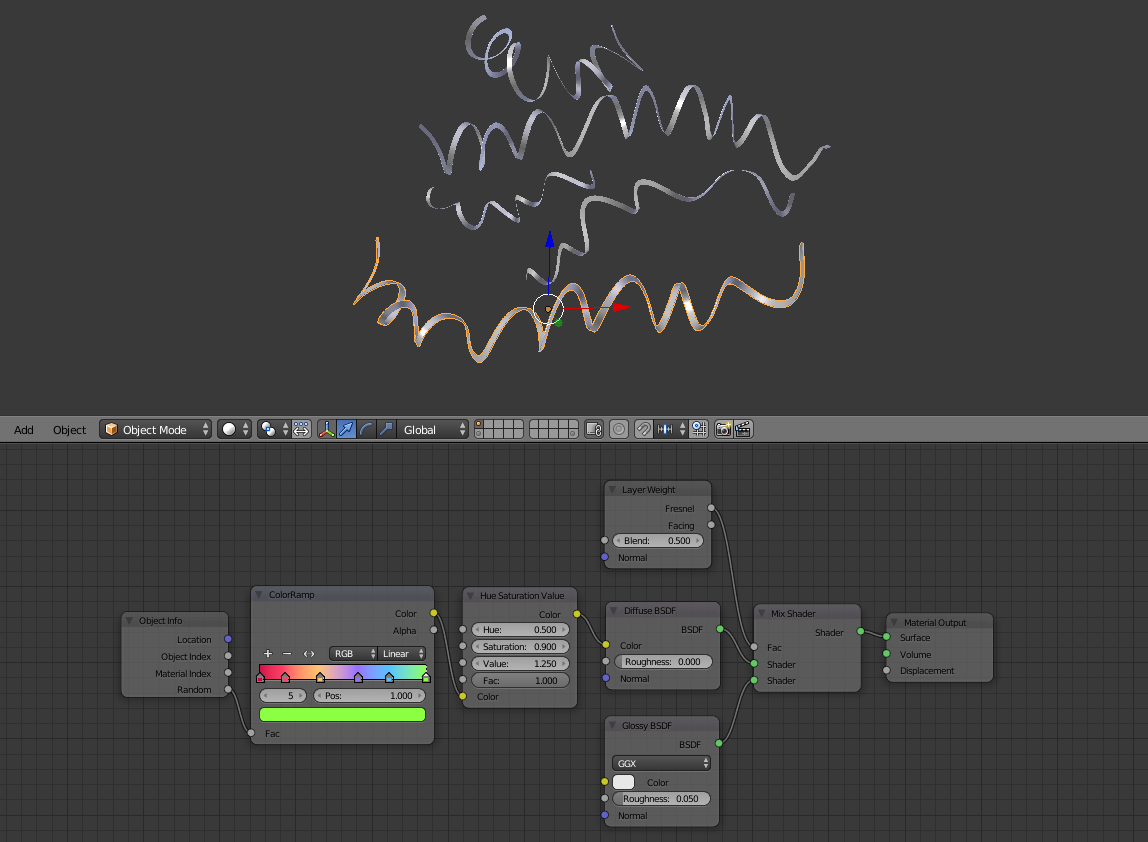
  7. Use this method to create a few different serpentine shapes. The more you make, the more realistic the look will be. Add a new material and set the nodes like in the picture below. Set the same material for each serpentine shape. The material takes a random colour from the ColorRamp (you can set any colours you like), so each object will have a different colour. The Hue Saturation Value node is for fine-tuning the colours. I also added a bit of glossiness to the serpentines.

    Add a material

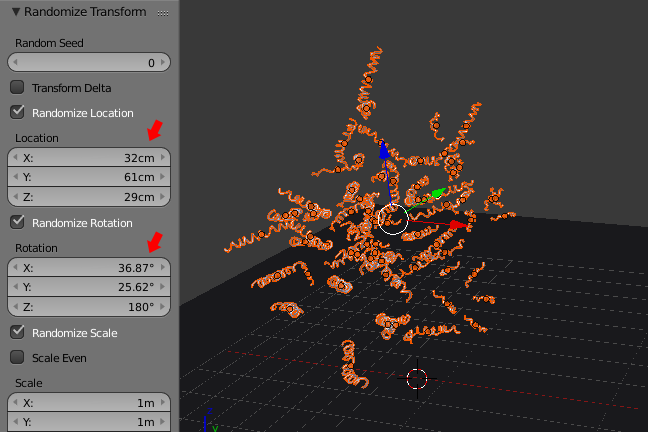
  8. Copy all shapes several times (I have 65 serpentines in my scene). Randomize their location and rotation (select all shapes, go to Object > Transform > Randomize Transform and modify the numbers). Add a plane underneath the shapes.

    Copy all shapes

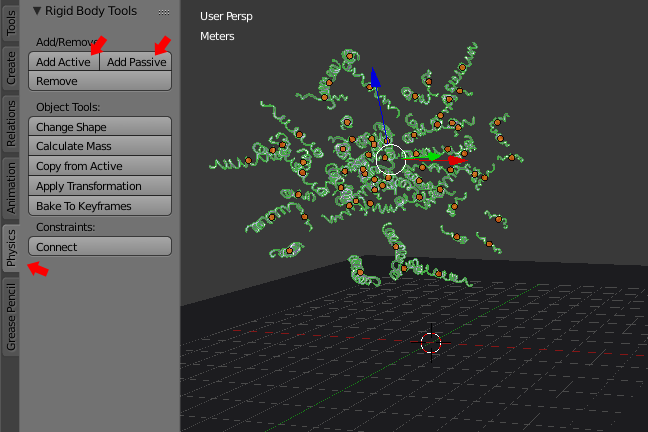
  9. With all shapes selected go to Tool Shelf (T) > Physics > Add Active. Then select the plane and press Add passive. That's basic setup for rigid body simulation.

    Setup rigid body simulation

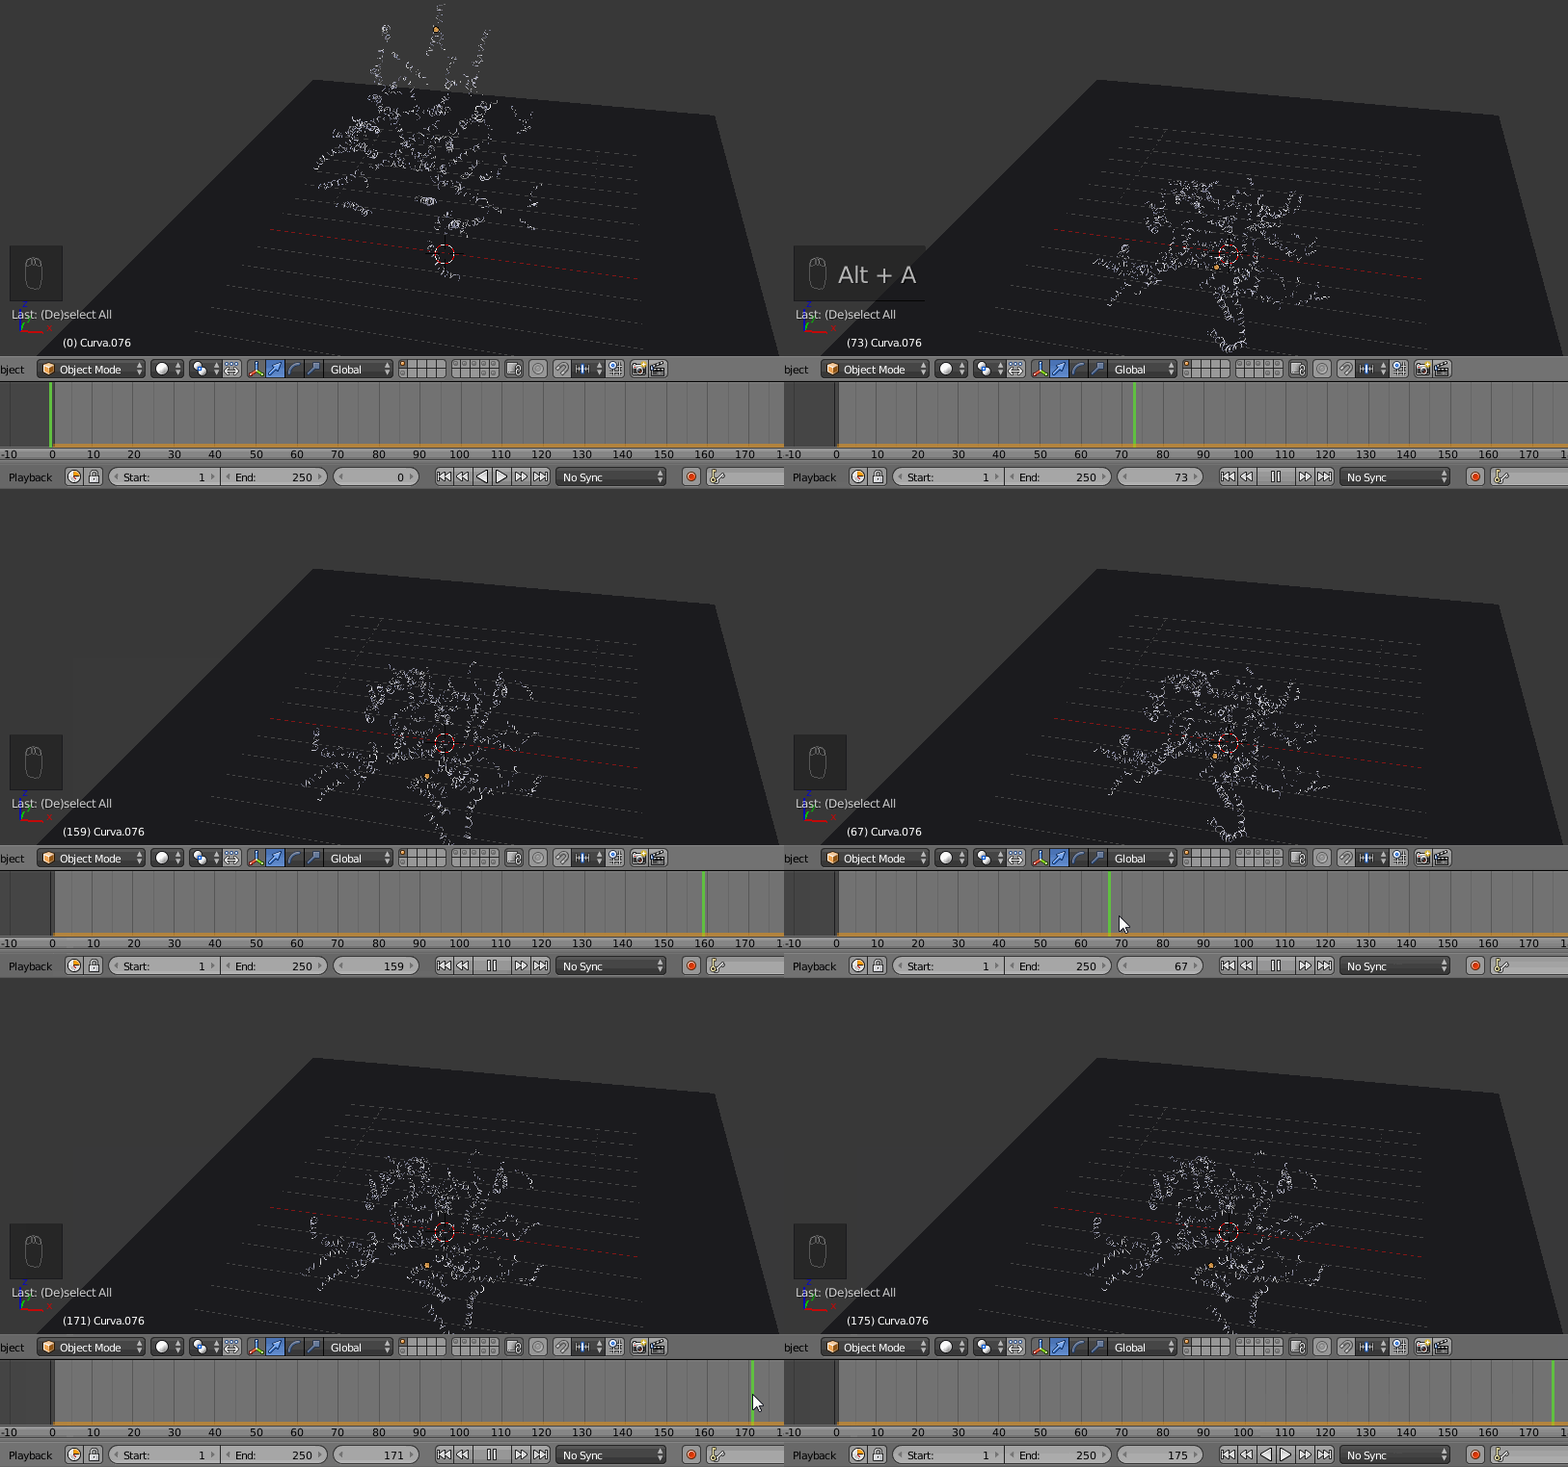
  10. Press Alt + A to start the simulation. The serpentines will fall on the plane. When the simulation is finished (Esc to stop), find a frame you like using Timeline and remember that frame number.

    Start the simulation

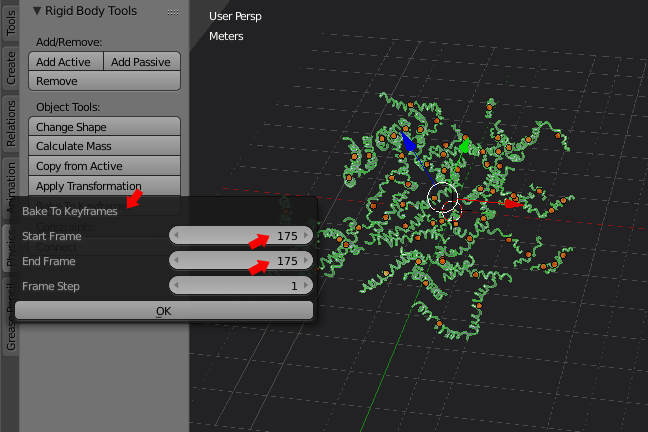
  11. With all shapes selected go to Tool shelf (T) > Physics > Bake To Keyframes and enter the chosen frame number as both Start Frame and End Frame, then press OK to apply the simulation. If there are serpentines that are not lying flat on the ground, you can repeat the simulation (you may want to change some settings, eg. increase gravity).

    Bake to keyframes

  12. The rendered result looks like this:

    Render

$\endgroup$
1
  • 1
    $\begingroup$ Wooow!!.. Amazing!!!! Thanks for sharing this!!!. This is definitely what I was looking for!. $\endgroup$ Commented Oct 5, 2016 at 22:14
9
$\begingroup$

As suggested the Cloth simulator is one way to go. In the example below the mesh is split with the V key along the vertical edges, but remains one object onto which the simulator acts. Important here is the weight painting that creates the group - ALT drag the brush for a smooth gradient. The weights are pinned in the Cloth settings.

The effect is visible once a force of some kind is added - each has somewhat different effect and can also be animated. Here I just used Harmonic as it works fine in a static position. ALTA to play animation.
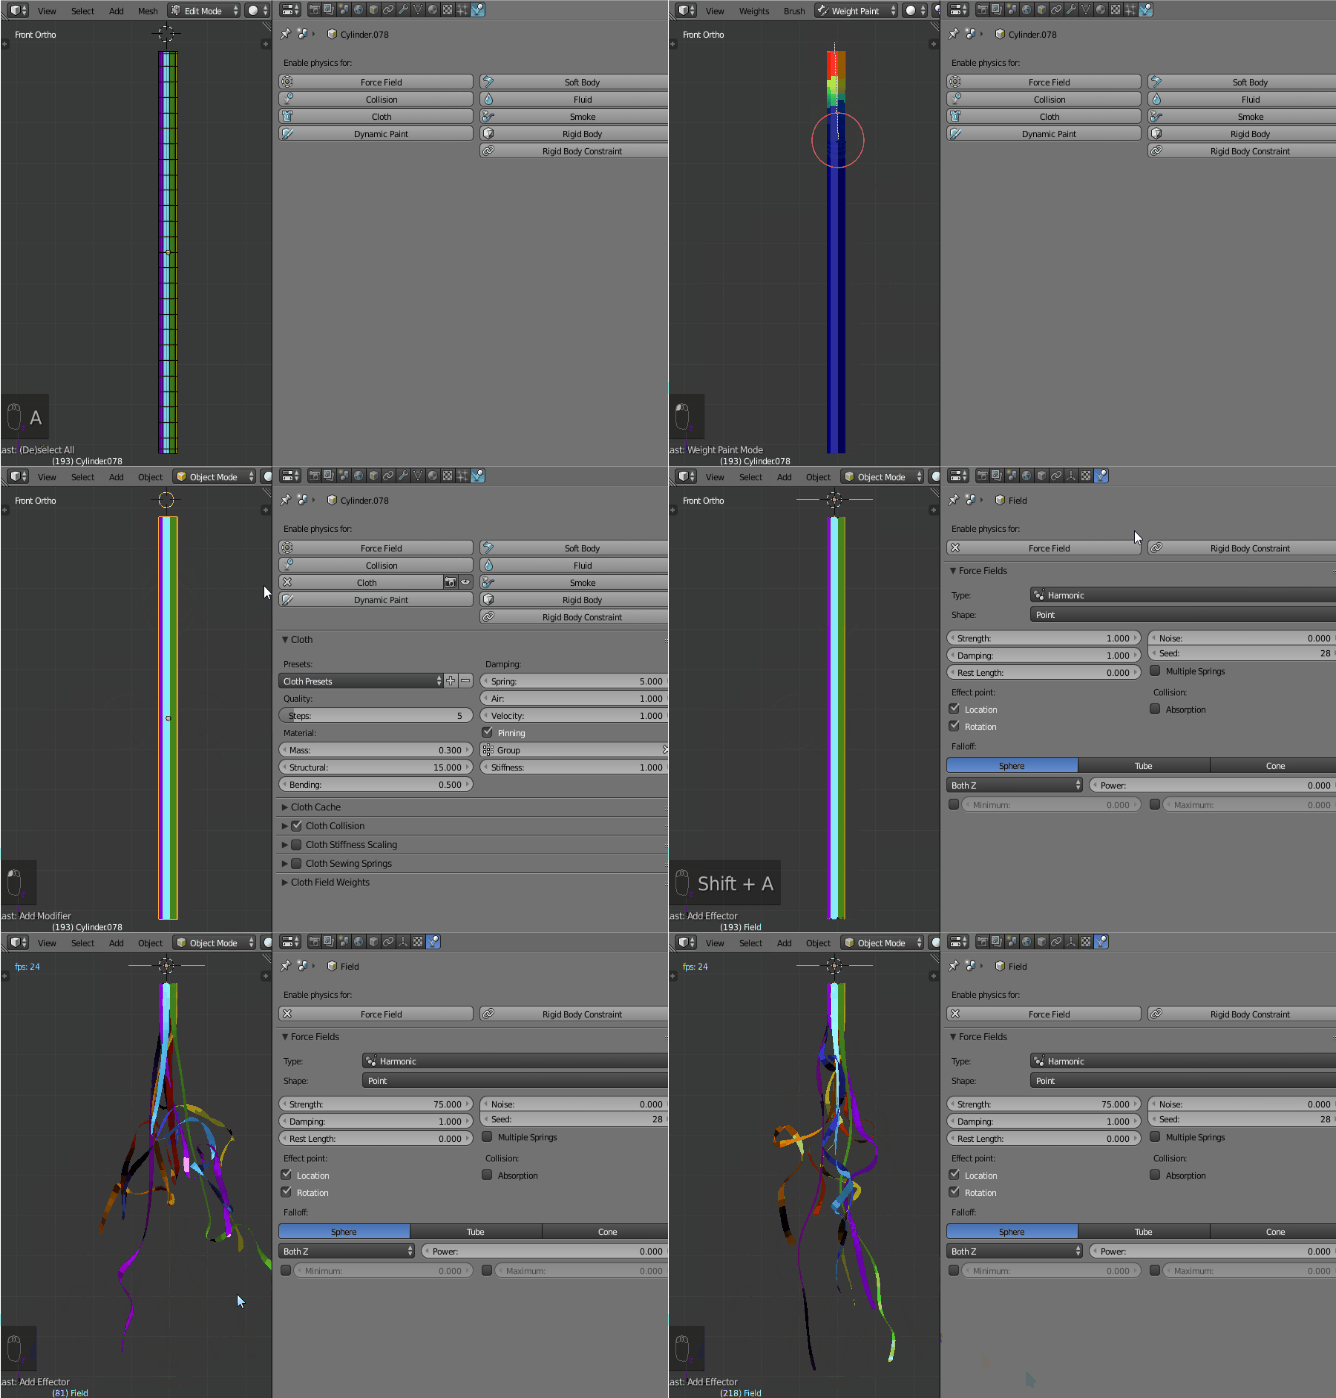
enter image description here

At any point in the animation you can freeze the mesh by applying the Cloth. Below I have added a second cloth modifier onto the mesh created from the first cloth modifier and dropped it onto a plane with collision enabled. Again here you can choose a point in the animation and then apply it to work on it further as a mesh.
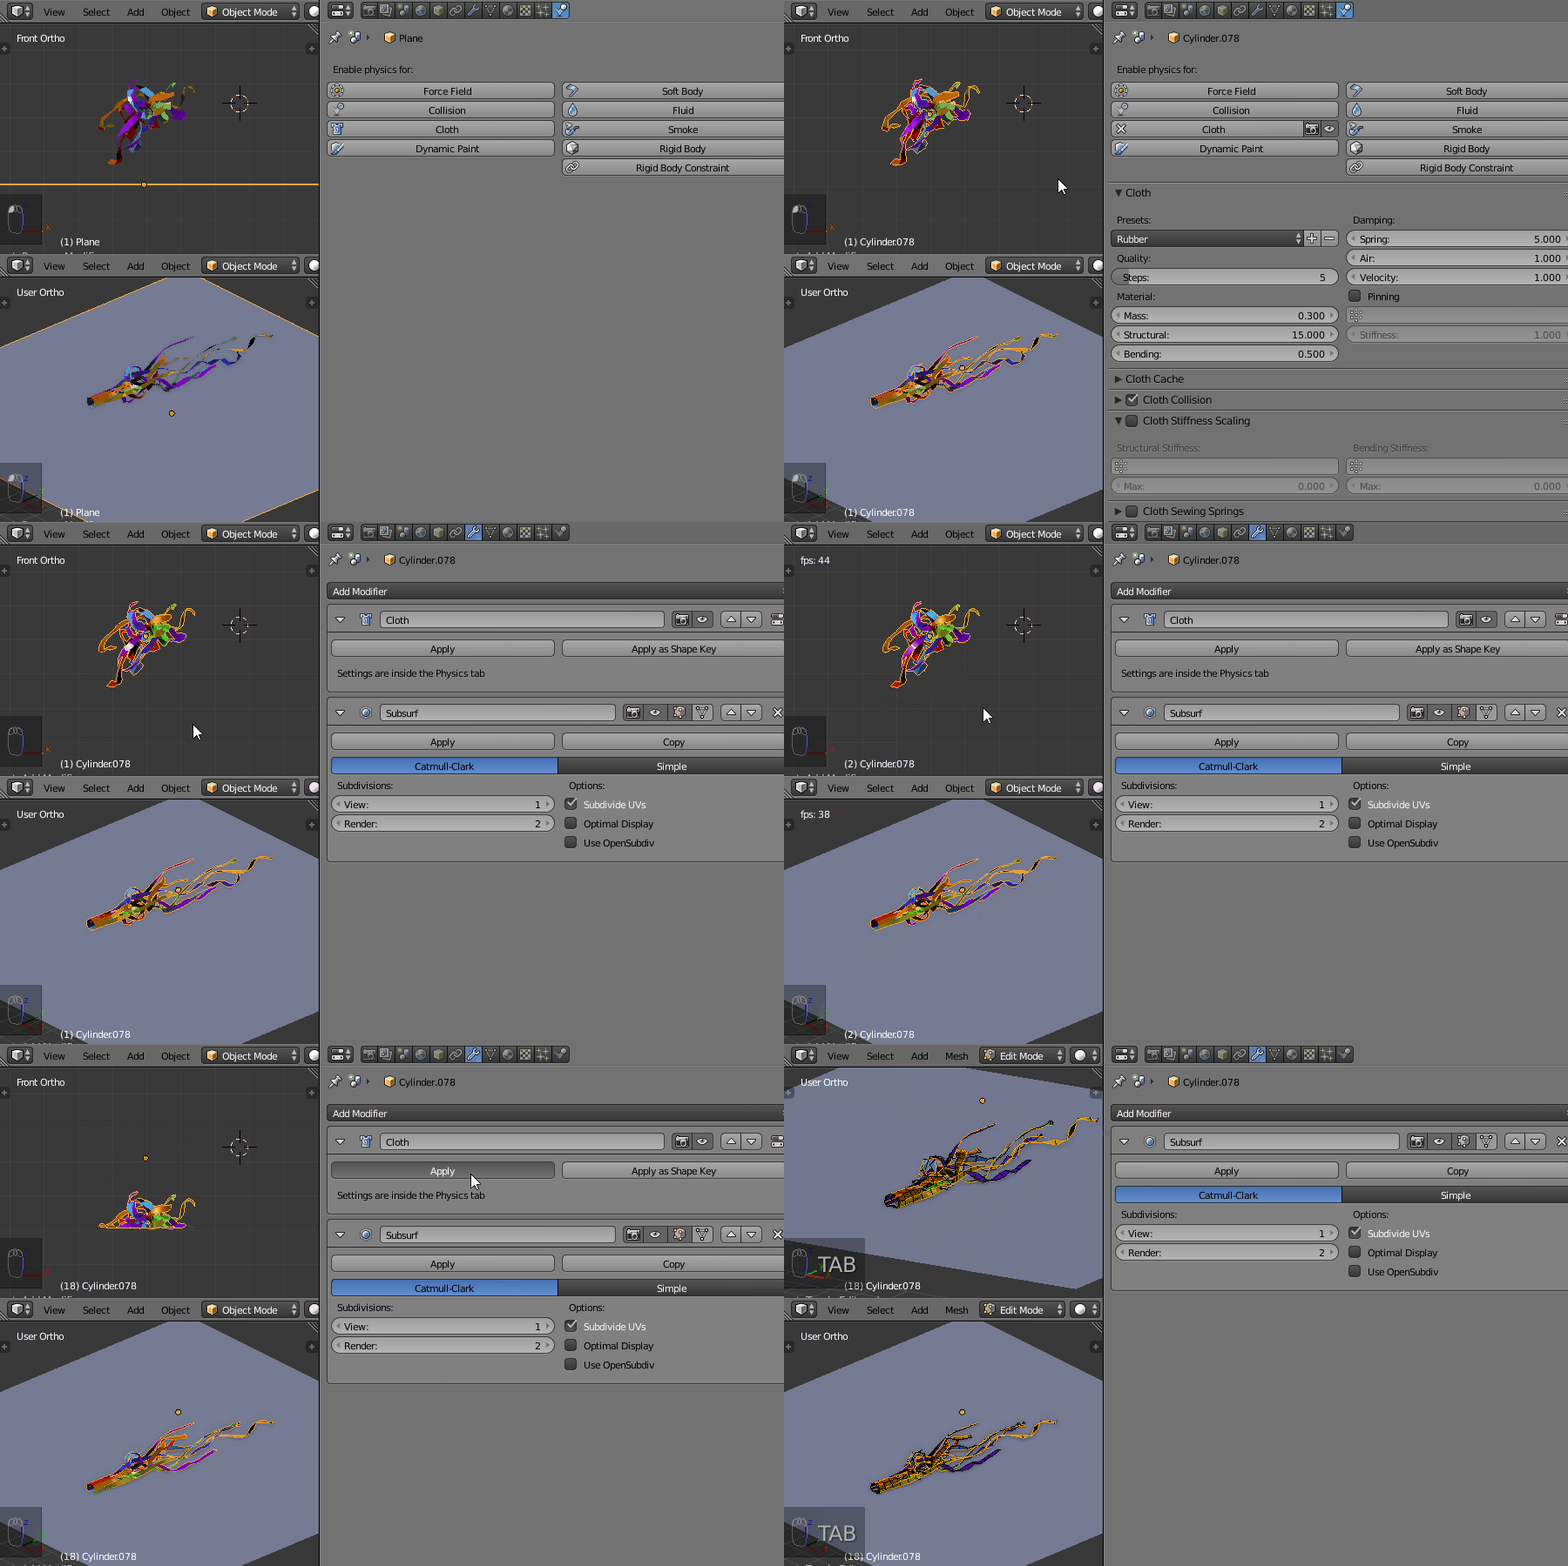
enter image description here

$\endgroup$
1
  • $\begingroup$ Excellent!!!! I will play with it for sure! Thanks for your very well explained response!. $\endgroup$ Commented Sep 18, 2016 at 22:32
6
$\begingroup$

If you're not doing a close-up render, consider using particles.

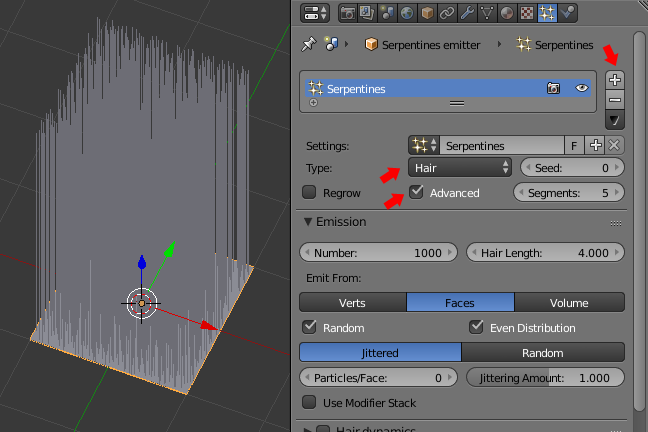
  1. Create a plane (or any other flat shape - it will be the base for the particles). Add a new particle system to the plane and give it a name. Set Type to Hair and make sure Advanced option is selected.

    A new particle system

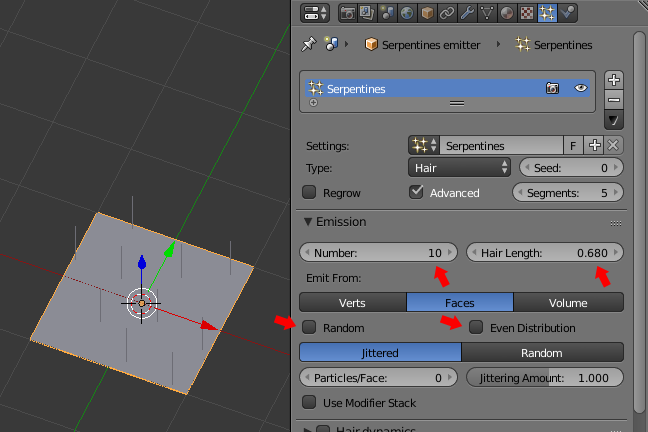
  2. Turn off Random and Even Distribution options (it will matter if you subdivide your plane later). Set the Number of particles to your liking - in this example I will use 10. Set Hair length to whatever you like - I used 0.680.

    Hair particles length and number

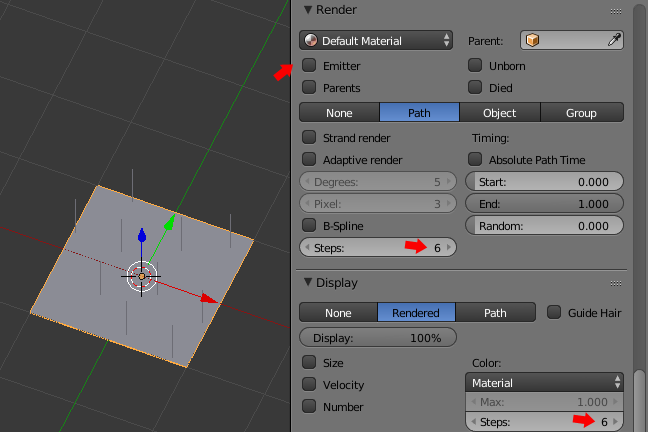
  3. Scroll down to Render and Display settings and increase Steps to 6 in both panels. These settings change the curve resolution of hair particles for rendering and for displaying in the viewport. Basically it makes the hair smoother. Turn off rendering option for the emitter to make sure only the particles are rendered.

    Increase steps

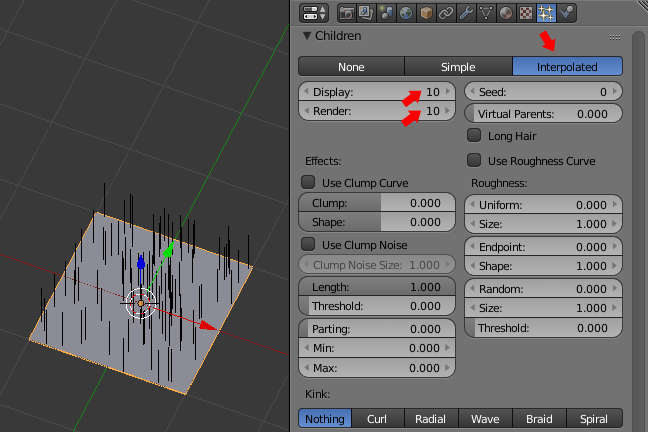
  4. In Children panel enable Interpolated option and set both Display and Render settings to 10. It will add 10 children particles for each parent particle, and the children particles will be emitted between adjacent parents. Once you turn on children the parents are no longer rendered, so we now have 100 children particles (since the initial number was set to 10).

    Enable interpolated option

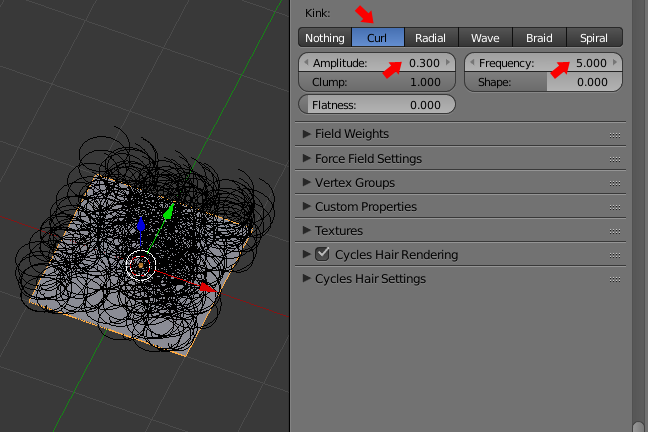
  5. In the Kink section enable Curl option. Set Amplitude to 0.300and Frequency to 5.000. This will create the curls for the serpentines.

    Enable curl option

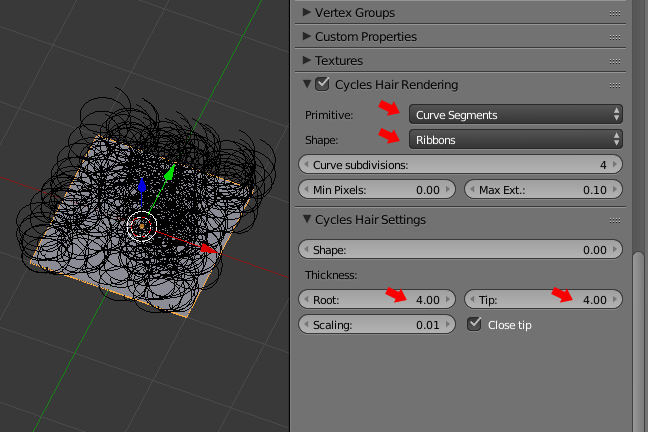
  6. In Cycles Hair Rendering panel set Primitive to Curve Segments and Shape to Ribbons. This way hair particles are rendered as flat ribbons. In Cycles Hair Settings panel set both Root and Tip to 4.00. It will make the ribbons thicker and they will have the same thickness on both ends.

    Create ribbons

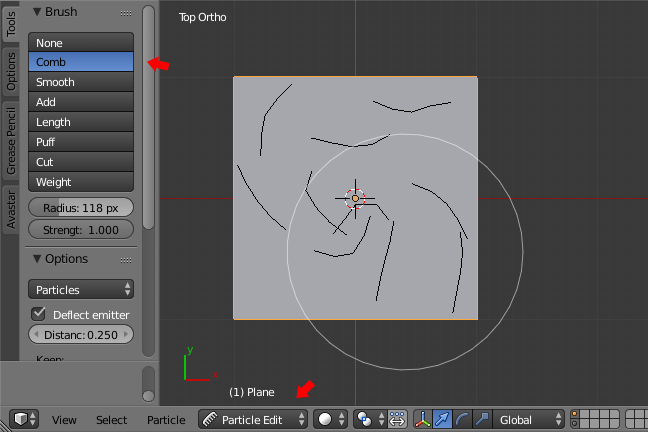
  7. Go to Particle Edit Mode and from the Top Ortho view comb the hair particles in circular motion, so that they lie flat on the ground resembling a vortex (they should look like in the picture). There are only 10 particles to comb, because children particles are enabled, so they will be interpolated across the surface of the plane in relation to the 10 parent particle hair. Go back to Object Mode when finished and you'll see what I mean.

    Comb the particles

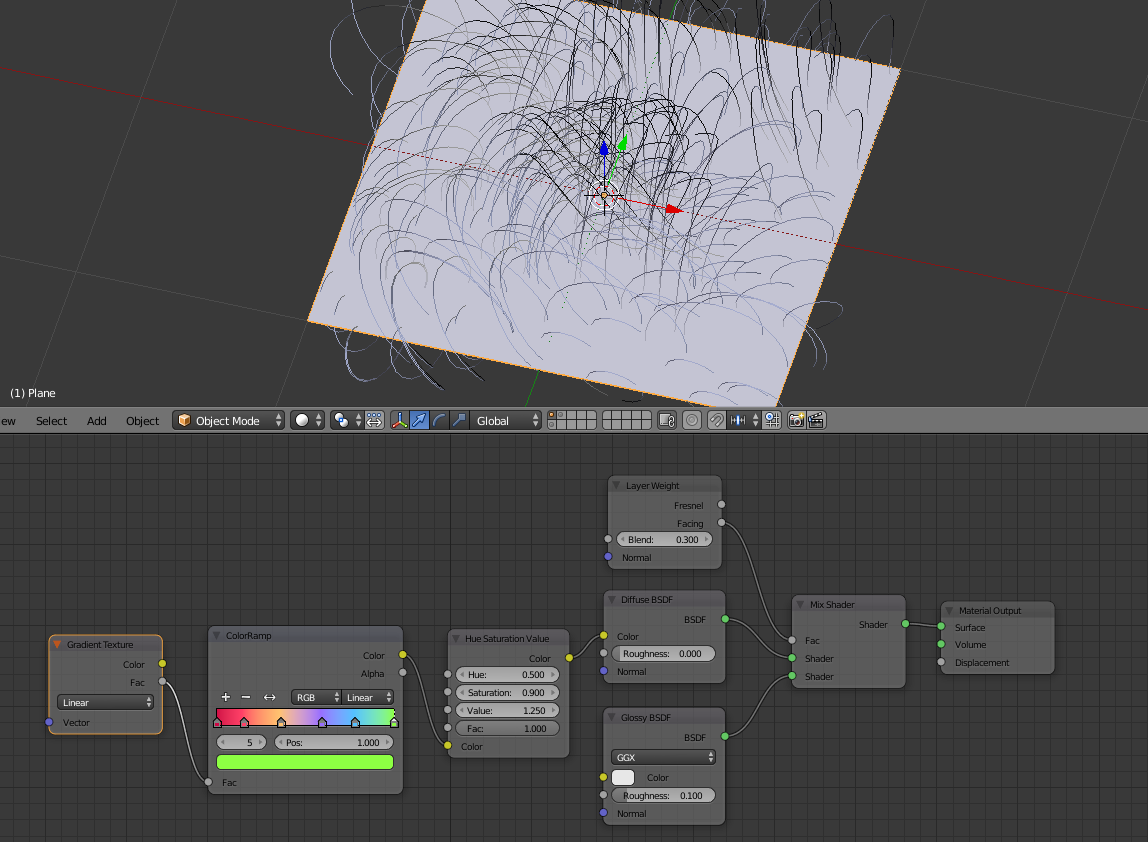
  8. Add a new material and set the nodes like in the picture below. The material adds a black and white linear gradient texture to the emitter plane and gives it colours through the ColorRamp node (you can set any gradient type and any colours you like). The Hue Saturation Value node is for fine-tuning the colours. The ribbons will take the colour from where they grow in the emitter. You can make a texture in a graphic program and use it instead if you want to have more control (just don't forget to unwrap the plane in that case). I made the ribbons a bit glossy but you can easily change that.

    Add a material

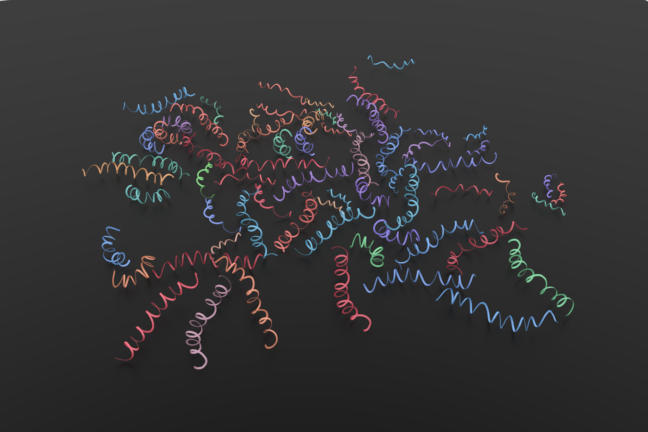
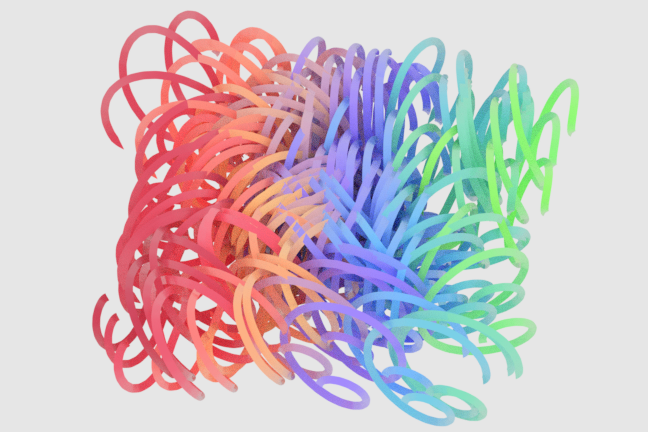
  9. The rendered result looks like this:

    Rendered ribbons

$\endgroup$
2
  • $\begingroup$ Thank you very much!. This is a really great technique, I will surely use it!! $\endgroup$ Commented Sep 18, 2016 at 22:31
  • $\begingroup$ I'm happy you like it :) $\endgroup$
    – Karolina
    Commented Sep 19, 2016 at 6:46

You must log in to answer this question.

Not the answer you're looking for? Browse other questions tagged .