2
$\begingroup$

There's a point your view orbits. I'd like to snap the cursor there but I can't see how to do that, even if I hit the center of the window pixel perfect the depth will be wrong.

I can sorta get it by repeatedly clicking and rotating to make the cursor not move when I rotate it but that's finicky and the original viewpoint is lost

I found adding a cube aligned to the view, make it the camera, pop back out to user view, align the "camera" to that, make it a skinny guesstimated-long-enough pole, then rotate the view and repeat the process, the intersection of the two poles is where I want to put the cursor and the first object's origin is my original viewpoint,

Or I could save the viewpoint by dropping a nonce empty and do the view-snapping trick then the home-in-on-the-cursor dance, …

This seems clearly newbie ignorance biting me here, there has to be an easier way but I just can't see it.

What prompted this is trying to translate and reorient a selection / local scene to the view plane, centered on the view focus and rotated so its Z and X align with the view Y and X.

$\endgroup$
2
  • $\begingroup$ Not an answer to your question I know, but if you're interested in doing the reverse (snapping the view pivot to the cursor), this answer may help: blender.stackexchange.com/a/35066/599 $\endgroup$
    – gandalf3
    Commented Feb 22, 2023 at 23:06
  • $\begingroup$ @gandalf3 Thanks for the pointer, I think that's the 3.4 "center view on cursor" op I have set on ctrl-kpdot, yes? getting the keyboard controls juuuuust right may be a trap for me. $\endgroup$
    – jthill
    Commented Feb 22, 2023 at 23:16

1 Answer 1

3
$\begingroup$

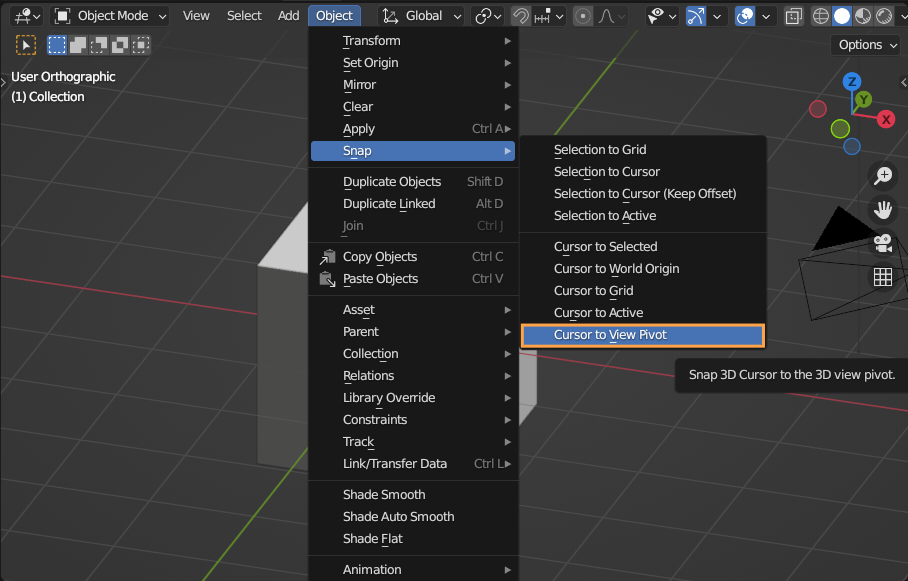
I thought this would make for a fun addon, so I wrote it! You can download the addon here, plus I've copied the source below since it's very short. To install it, download the file or copy the below into a file with a .py extension, then follow the usual steps. It will create an entry in the 3D View > Object > Snap menu:

screenshot showing the 3d view > object > snap menu

bl_info = {
    "name": "Snap 3D Cursor to View Pivot",
    "author": "gandalf3",
    "version": (1, 0),
    "blender": (3, 4, 0),
    "location": "View3D > Object > Snap > Cursor to View Pivot",
    "description": "Snap 3D Cursor to the 3D view pivot",
    "doc_url": "https://blender.stackexchange.com/a/286941",
    "category": "3D View",
}

import bpy

class SnapCursorToViewPivot(bpy.types.Operator):
    """Snap 3D Cursor to the 3D view pivot"""
    bl_idname = "view3d.snap_cursor_to_view_pivot"
    bl_label = "Cursor to View Pivot"

    @classmethod
    def poll(cls, context):
        return context.area is not None and\
               context.area.type == 'VIEW_3D' and\
               context.scene is not None

    def execute(self, context):
        context.scene.cursor.location = context.space_data.region_3d.view_location
        context.scene.cursor.rotation_quaternion = context.space_data.region_3d.view_rotation
        return {'FINISHED'}

def menu_func(self, context):
    self.layout.operator(SnapCursorToViewPivot.bl_idname, text=SnapCursorToViewPivot.bl_label)

def register():
    bpy.utils.register_class(SnapCursorToViewPivot)
    bpy.types.VIEW3D_MT_snap.append(menu_func)
    # uncomment the line below to add an entry to the snap pie menu as well;
    # this menu is already crowded though..
    #bpy.types.VIEW3D_MT_snap_pie.append(menu_func)

def unregister():
    bpy.utils.unregister_class(SnapCursorToViewPivot)
    bpy.types.VIEW3D_MT_snap.remove(menu_func)
    # if you uncomment the line above, don't forget to uncomment this line too!
    #bpy.types.VIEW3D_MT_snap_pie.remove(menu_func)


if __name__ == '__main__':
    register()

Hopefully its useful! I'm not sure I fully understand your use case, but here are some other related tricks which I hope may be helpful:

  • Center view to selection: Numpad .

  • Snap view to front/side/top in selection's local space: ShiftNumpad <1 or 3 or 7> (similar to numpad <1, 3, 7> for global front/side/top; adding Ctrl flips to opposite perspective)

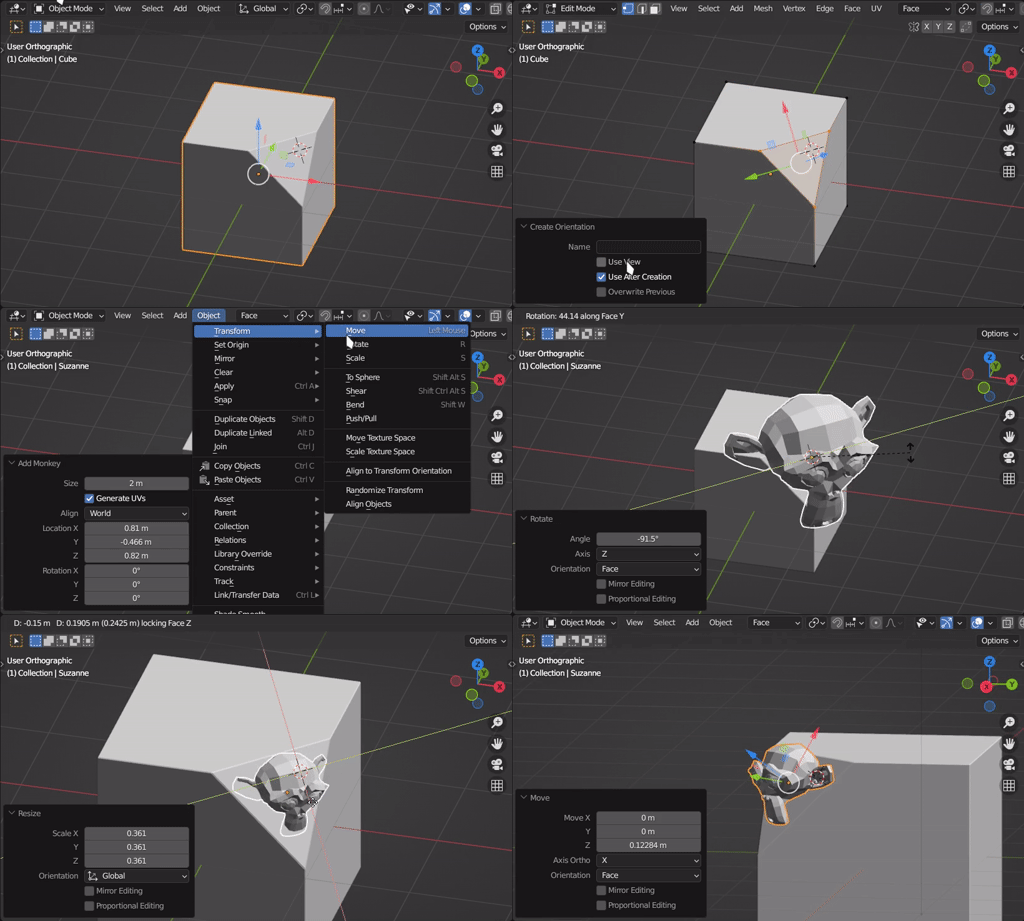
  • 3D View > Object > Transform > Align to Transform Orientation to align the selected object(s) to the current transform orientation.

  • Creating custom transform orientations!

    1. If you want to create the orientation based on an existing object or an edge or face, select it.
    2. Click the transform orientation dropdown in the 3D view header
    3. Click the little plus to the right.
    4. If you want to create the orientation from on the current view orientation, enable Use View in the redo menu (otherwise disable it).
    5. Optionally give it a name via the redo menu
    6. Transform to your heart's content using the usual tools

    Here's an example:

    animated gif showing the steps described above being applied to carefully set a suzanne on a beveled corner of the default cube

$\endgroup$
3
  • 1
    $\begingroup$ Lovely, and with the source tweak the comment points at shift-S,V works everywhere I want it to. $\endgroup$
    – jthill
    Commented Feb 23, 2023 at 1:33
  • 1
    $\begingroup$ Thanks for the custom transforms pointer too! Not sure, actually no, am sure how I missed that, there's a lot. Grossly Excessive Thanks are in order here. $\endgroup$
    – jthill
    Commented Feb 23, 2023 at 1:57
  • $\begingroup$ For the use case, really pretty simple: wanted to place an intersection, rotate to get the city view I want, rotate to point kinda at the mountains, pan to get the view I want from the intersection, a few rinse/repeat rounds and the blender view's where I want the crossing. Probably could have done it with flying but this way felt quicker. $\endgroup$
    – jthill
    Commented Feb 23, 2023 at 2:11

You must log in to answer this question.

Not the answer you're looking for? Browse other questions tagged .