60
$\begingroup$

Most people's question in this area is how to reduce repeating patterns, however I want to create them.

I'm creating 2d rendered tiles for my game, and I want to create procedural materials for my tiles that will seamlessly match. For that I need the cycles procedural textures to repeat on a predictable interval.

I've looked at similar threads, and they only deal with simple gradients, or images, not things like voronoi, musgrave, noise.
I haven't been able to figure out how to scale/manupilate with math, the procedural nodes to any degree of repetition.

$\endgroup$
6
  • 3
    $\begingroup$ My dissatisfaction with the answers so far are that the textures are CLEARLY mirrored. It seems rather clumsy. $\endgroup$
    – Mutant Bob
    Commented Apr 9, 2016 at 20:28
  • $\begingroup$ @MutantBob I agree, please check out my answer for an OSL based solution $\endgroup$ Commented Aug 23, 2019 at 7:44
  • 1
    $\begingroup$ @SleepyMolecule What you described sure sounds like what i was looking for, can you post screenshots of a shading thing and add it to your answer? i'll mark it as correct if it is what i'thinking. I wont have time to use blender to check your answer for a while. $\endgroup$
    – Enetheru
    Commented Aug 23, 2019 at 16:40
  • $\begingroup$ @Enetheru screen shot of node setup and output added, enjoy $\endgroup$ Commented Aug 23, 2019 at 18:47
  • $\begingroup$ nice questioning $\endgroup$ Commented Aug 24, 2019 at 5:05

5 Answers 5

17
$\begingroup$

SleepyMolecule’s answer shows a way to get a seamlessly repeating pattern without mirroring, but unfortunately it uses OSL, and therefore can’t be used for Cycles GPU rendering. But Blender 2.81 added a 4D option to the Noise Texture node, so the same idea can now be used without recourse to OSL, and the resulting node setup can be used for both CPU and GPU Cycles rendering (and also for Eevee).

Here’s an example of a shader node setup for this, applied to a horizontal plane.

(The number in the Scale node is 2π, which can be entered as 2*pi. This scaling changes the repeat distance from 2π to 1. The Hue Saturation Value is inserted just to give better coloration, so that the pattern is clearer.)

The above uses a Noise Texture node, but a Musgrave Texture or Voronoi Texture node can be used instead, as they also now have 4D options. (But the Voronoi Texture exhibits mirroring in some modes. I don’t know why.)

$\endgroup$
3
  • $\begingroup$ Thanks for the updated answer, I have updated to make it the preferred answer. $\endgroup$
    – Enetheru
    Commented Mar 4, 2020 at 3:10
  • $\begingroup$ The mirroring can be overcome by adding an offset to some of the coordinates. It is odd though and shouldn't be the default behaviour. I suspect it has something to do with orientation in the 4D space (two components share the same values at the origin?), but I'm no expert. $\endgroup$ Commented Mar 22, 2020 at 19:03
  • $\begingroup$ One should be aware that this works only if the plane is facing upward. Otherwise the result are stripes instead of spots. They certainly tile and could be useful for something but may not be what you are looking for $\endgroup$
    – AnthoJack
    Commented Apr 13, 2020 at 9:49
81
$\begingroup$

You can use the math Modulo node on mapping vectors to create tilling for procedural textures:
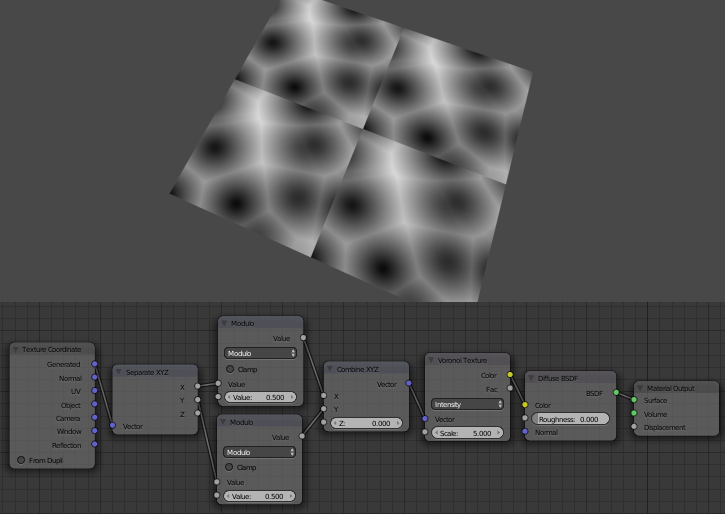
enter image description here

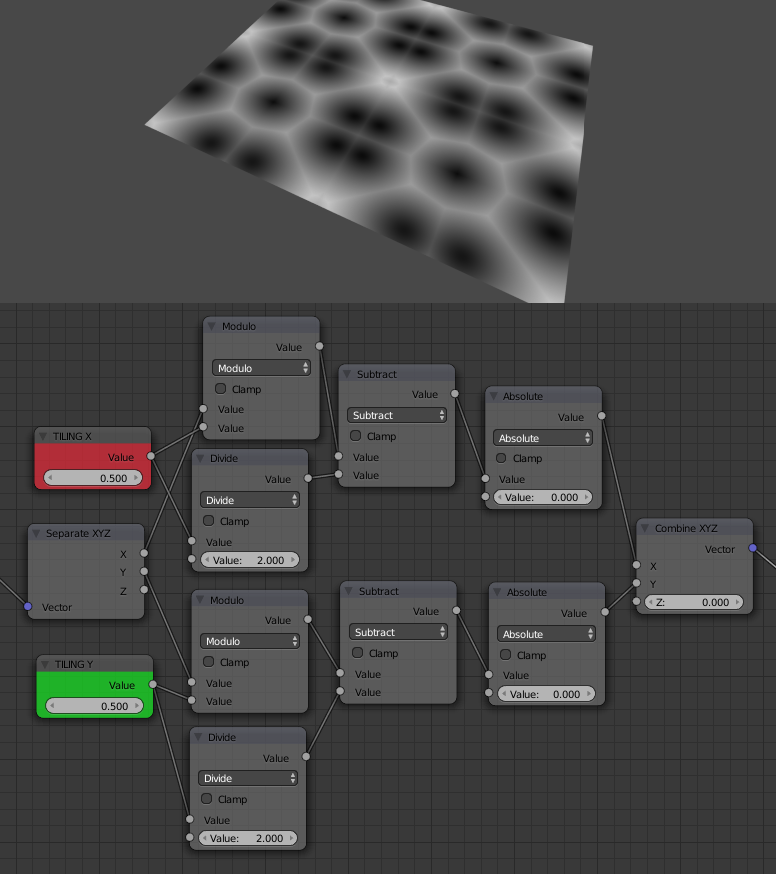
To tile them seamlessly you need to flip tiles in X and Y axis:
enter image description here

For the Tilling X and Y nodes use values between 0 and 1. And to tile them in 3D just copy the setup into Z channel.


Why Mapping node does not add tilling to procedural textures:

Mapping node does adjust tilling for Image textures. This is because image has finite dimensions and repeats itself - the tilling is already "build-in". The Mapping node only zooms, translates and rotates this tilled image.

Since procedural textures are infinite, they have no borders and are not tilled. The Mapping node will just transform them but not tile them.


How and why the math nodes work:

Texture mapping does transform texture space to object space - you can visualize it like this:
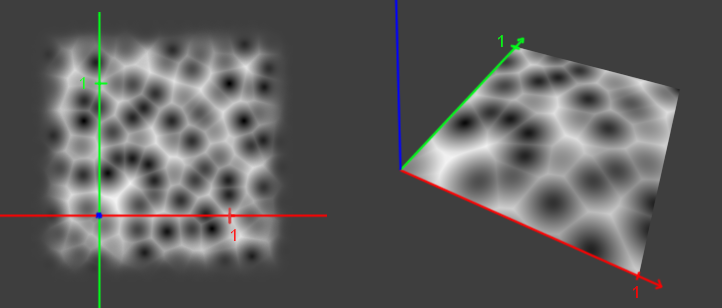
enter image description here

This is for Generated mapping, other types will be mapped differently. Generated mapping will map the <0,1> interval to object bounding box. Therefore it stretches with scaling the mesh, but it does not rotate with mesh rotating (edit mode). It does rotate with object since generated mapping will be always aligned with object's local coords. To bind the texture to mesh UV mapping must be chosen and mesh unwrapped to tangent space.

When we split the mapping vectors into XYZ channels, we get access to each axis and can manipulate it:

enter image description here

Lets focus only on single channel (all apply the same principles). Now we output what we get (in the marked rectangle). This can be visualized with a graph function:
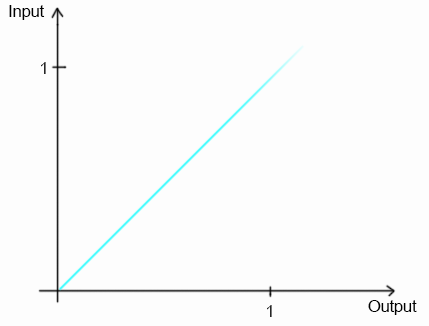
enter image description here

What we need for tilling though is this graph:
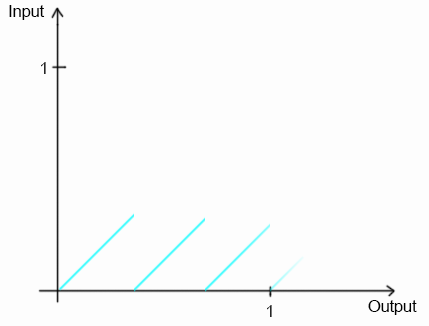
enter image description here

This is a graph of a modulo function (precisely modulo 0.33..) and will create 3 tiles on each axis. It is mapping the output to the same input locations repeatedly.

To have it tile seamlessly and flip every odd tile lower the graph of half the curve height and make the values absolute:

enter image description here

You get double the tiles naturally.


There are many effects you can do with this:

Texture pixelation with rounding node: How to pixelate a texture in Cycles?

Image blurring with noising the vectors: Motion blur on texture

Staggered mapping with rounding and offsetting: Staggered Texture Mapping

Etc..

$\endgroup$
18
  • $\begingroup$ It would be cool if you could explain it a bit more... instead of showing what works, could you explain how $\endgroup$ Commented Mar 6, 2015 at 15:50
  • $\begingroup$ By performing the same action on the z axis you can get it to tile around a cube $\endgroup$ Commented Mar 6, 2015 at 15:53
  • 1
    $\begingroup$ @GiantCowFilms yep I can explain it a bit more but its for a long answer - has to do with constructing transforming functions with math nodes. Maybe best to ask it as a separate question? Something like How mapping vectors work and how to transform them with math nodes. I have a feeling it will be a popular question. $\endgroup$ Commented Mar 6, 2015 at 16:09
  • 7
    $\begingroup$ @Jerryno you are a texture wizard! $\endgroup$
    – Chebhou
    Commented Mar 6, 2015 at 23:45
  • 4
    $\begingroup$ This is honestly one of the best answers I have ever seen on Blender.SE, an instant +1 $\endgroup$
    – J Sargent
    Commented Mar 7, 2015 at 0:23
25
$\begingroup$

Jerryno answer is great but there is another way to achieve that with some simple trigonometry.

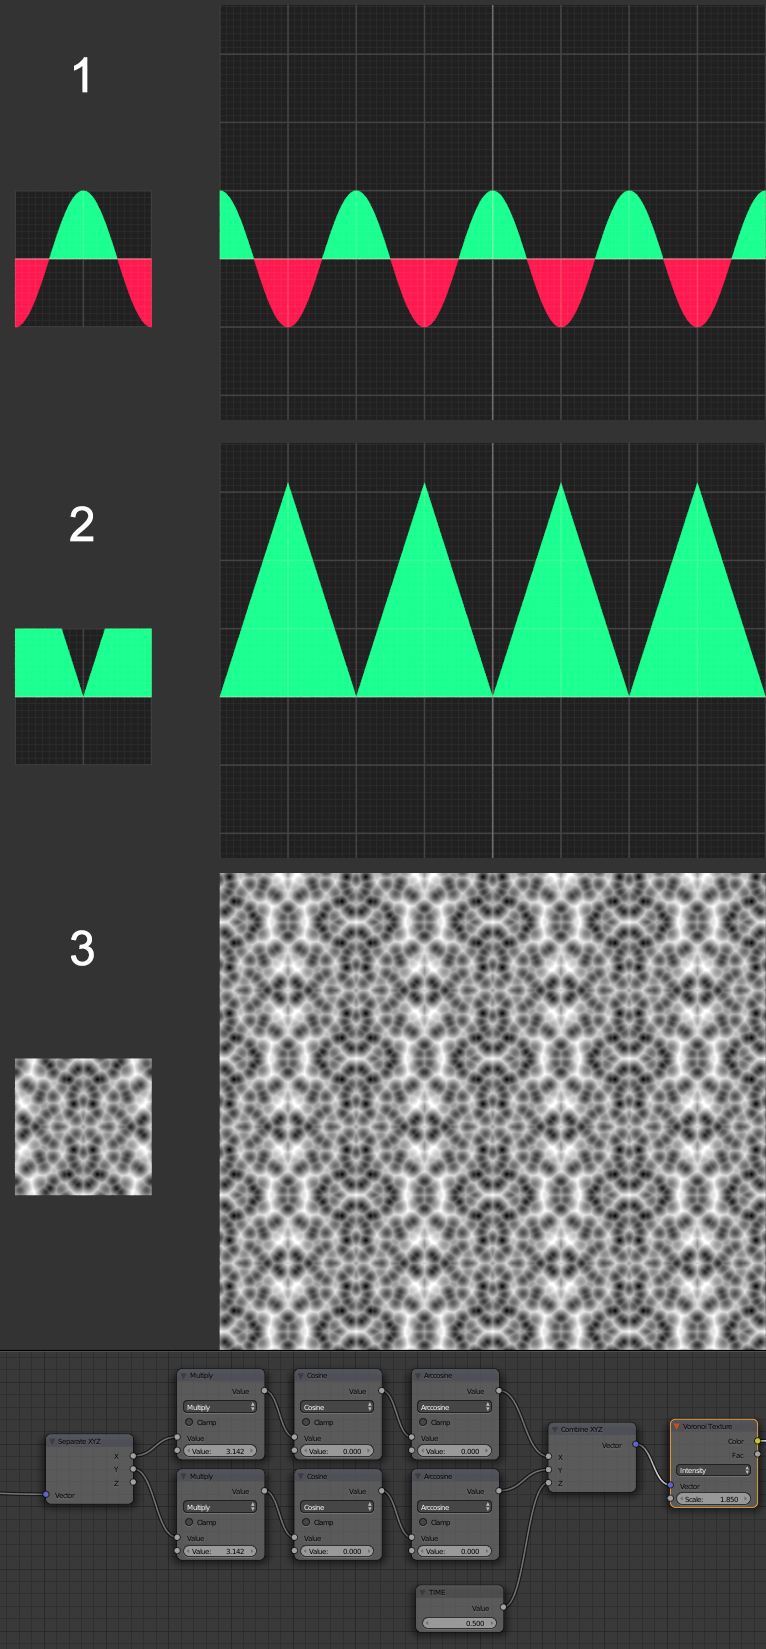
1) Use Cosine operation on coordinates multiplied by Pi (just type "pi" in node value slider). This will create sine wave that wraps on integer values.

2) Then use Arccosine operation to create Saw-like wave from it.

3) Complete setup. Quite simple as you see.

Bonus thing- Use Z value in Combine XYZ node as time input to modify your texture!

node setup

$\endgroup$
2
  • 3
    $\begingroup$ arccos(cos(theta)) is a lot of transcendental operations just to create a triangle wave. $\endgroup$
    – Mutant Bob
    Commented Apr 9, 2016 at 20:30
  • $\begingroup$ @MutantBob - Transcendent textures FtW! $\endgroup$ Commented Apr 8 at 18:16
7
$\begingroup$

To wrap a 2d texture seamlessly the 2d coordinates need to become circular in higher dimensional space. Think of it like painting a torus and then cutting it open and folding it flat, only without the distortion.

Fortunately the OSL noise functions support more than 3 dimensions.

By taking the X and Y components and remapping them we can sample 4D noise in to a 2D loop

shader noise(
 point Point = P,
    float Wrap = 1,
    float Scale = 1,
 output color Perlin2d = 0.8,
    )
{
    vector mx =0;
    vector my =0;

    point map(float c)
    {
        point z = 0;
        c = c / Wrap;
        z[0] = sin(c * M_2PI)*Scale;
        z[1] = cos(c * M_2PI)*Scale;
        return z;
    }

    color res2d(point _p)
    {
        point z1 = map( _p[0] );
        point z2 = map( _p[1] );
        z1[2] = z2[0];
        float z3 = z2[1];
        return noise("perlin", z1, z3);
    }

    Perlin2d = res2d(Point);

}

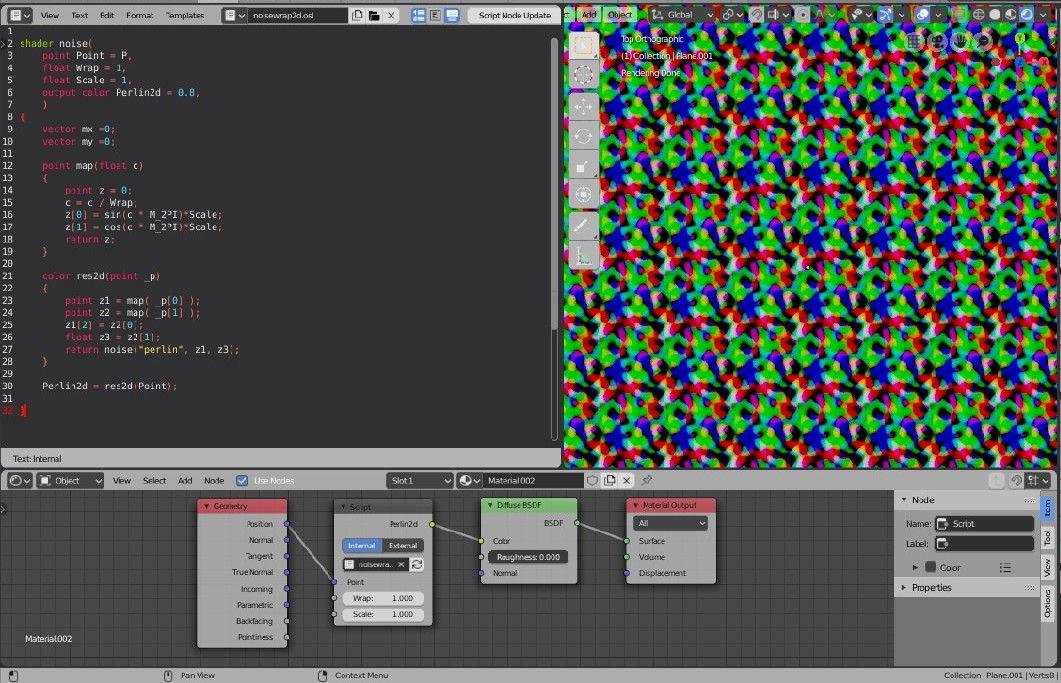
With the wrap and scale values we can change the area it covers and the detail of the texture. You may change the 'seed' by adding to the final coordinates (just before the noise function) effectively sliding the object through 4D space.

screen shot

$\endgroup$
3
  • $\begingroup$ Add a screenshot when you get a chance. $\endgroup$
    – Mutant Bob
    Commented Aug 23, 2019 at 14:15
  • 1
    $\begingroup$ Thanks @SleepyMolecule, this is exactly what I was thinking. repeated seamless texture without mirroring. Marked as correct answer. $\endgroup$
    – Enetheru
    Commented Aug 25, 2019 at 6:55
  • 1
    $\begingroup$ This is now possible on the GPU, in nodes, using 4D textures. $\endgroup$
    – Robin Betts
    Commented Feb 4, 2021 at 19:15
2
$\begingroup$

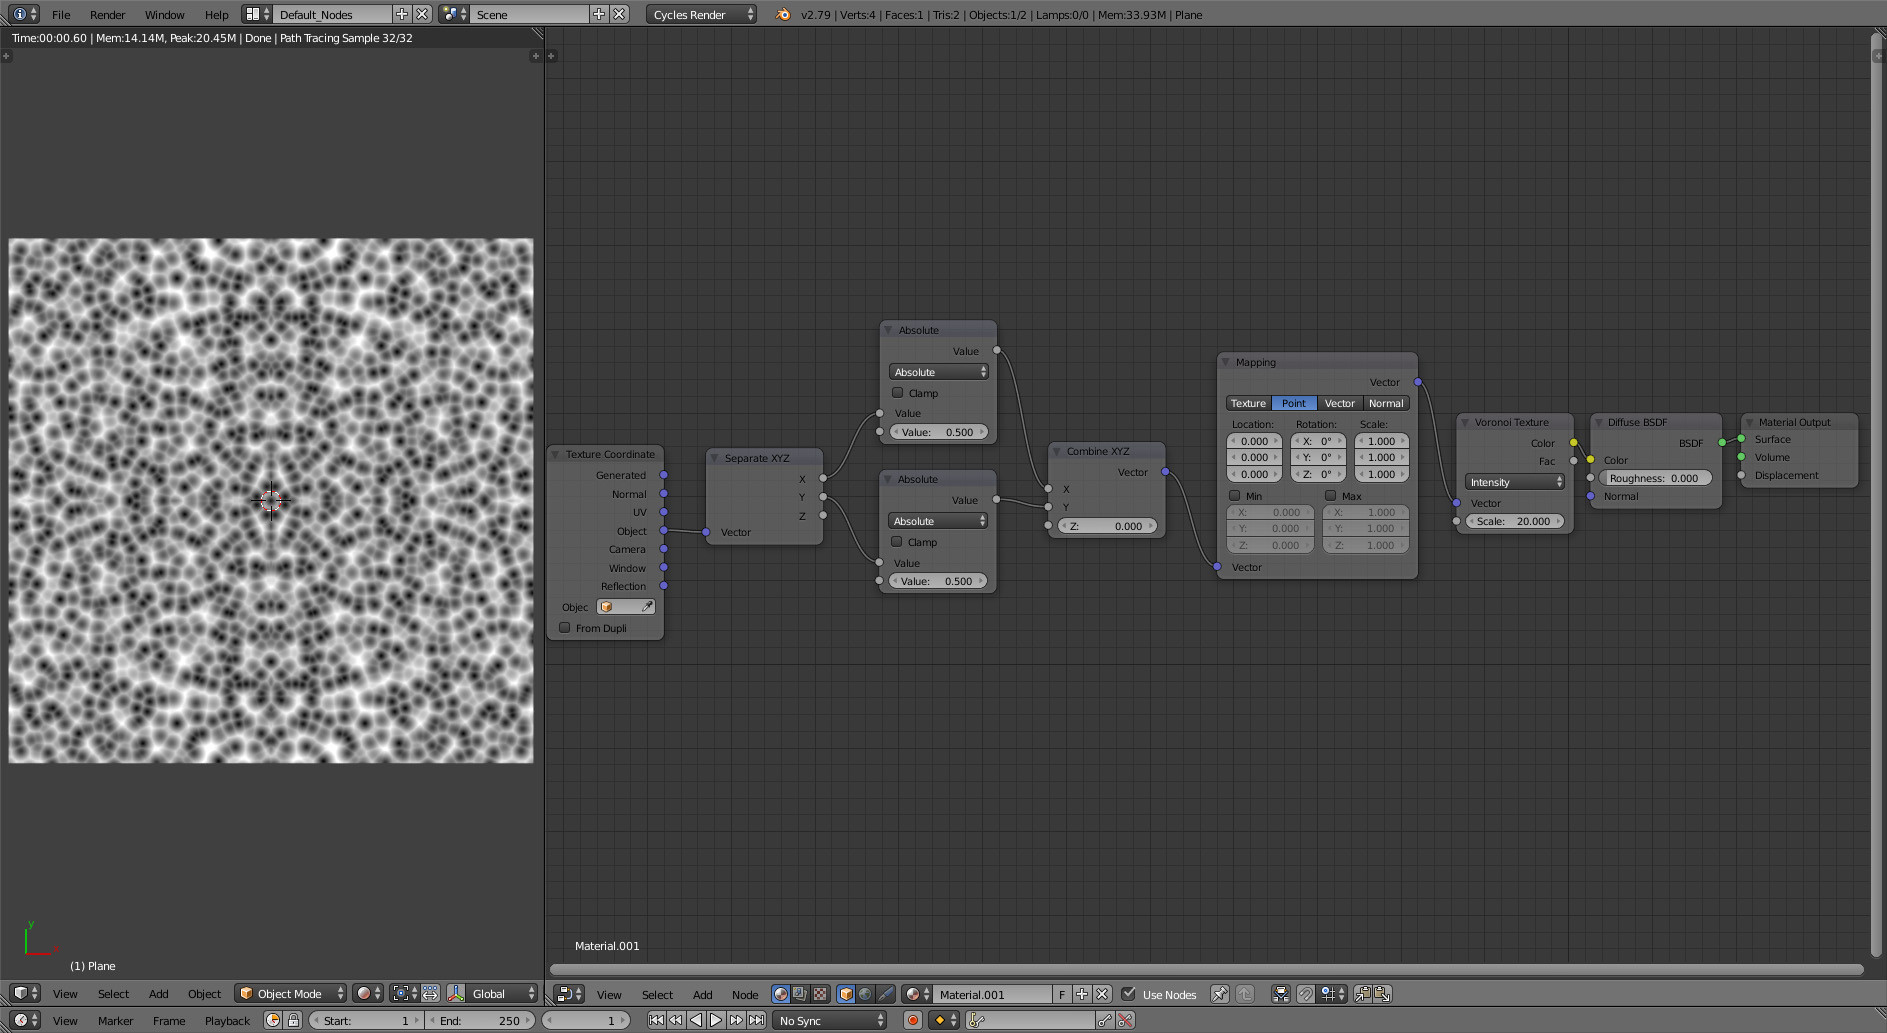
Also tossing in a couple absolute nodes will do the mirrored tile trick, but sorry don't know of a solution for non-mirrored tiles besides photoshopping out the seams yourself.

Node Setup

$\endgroup$

You must log in to answer this question.

Not the answer you're looking for? Browse other questions tagged .