3
$\begingroup$

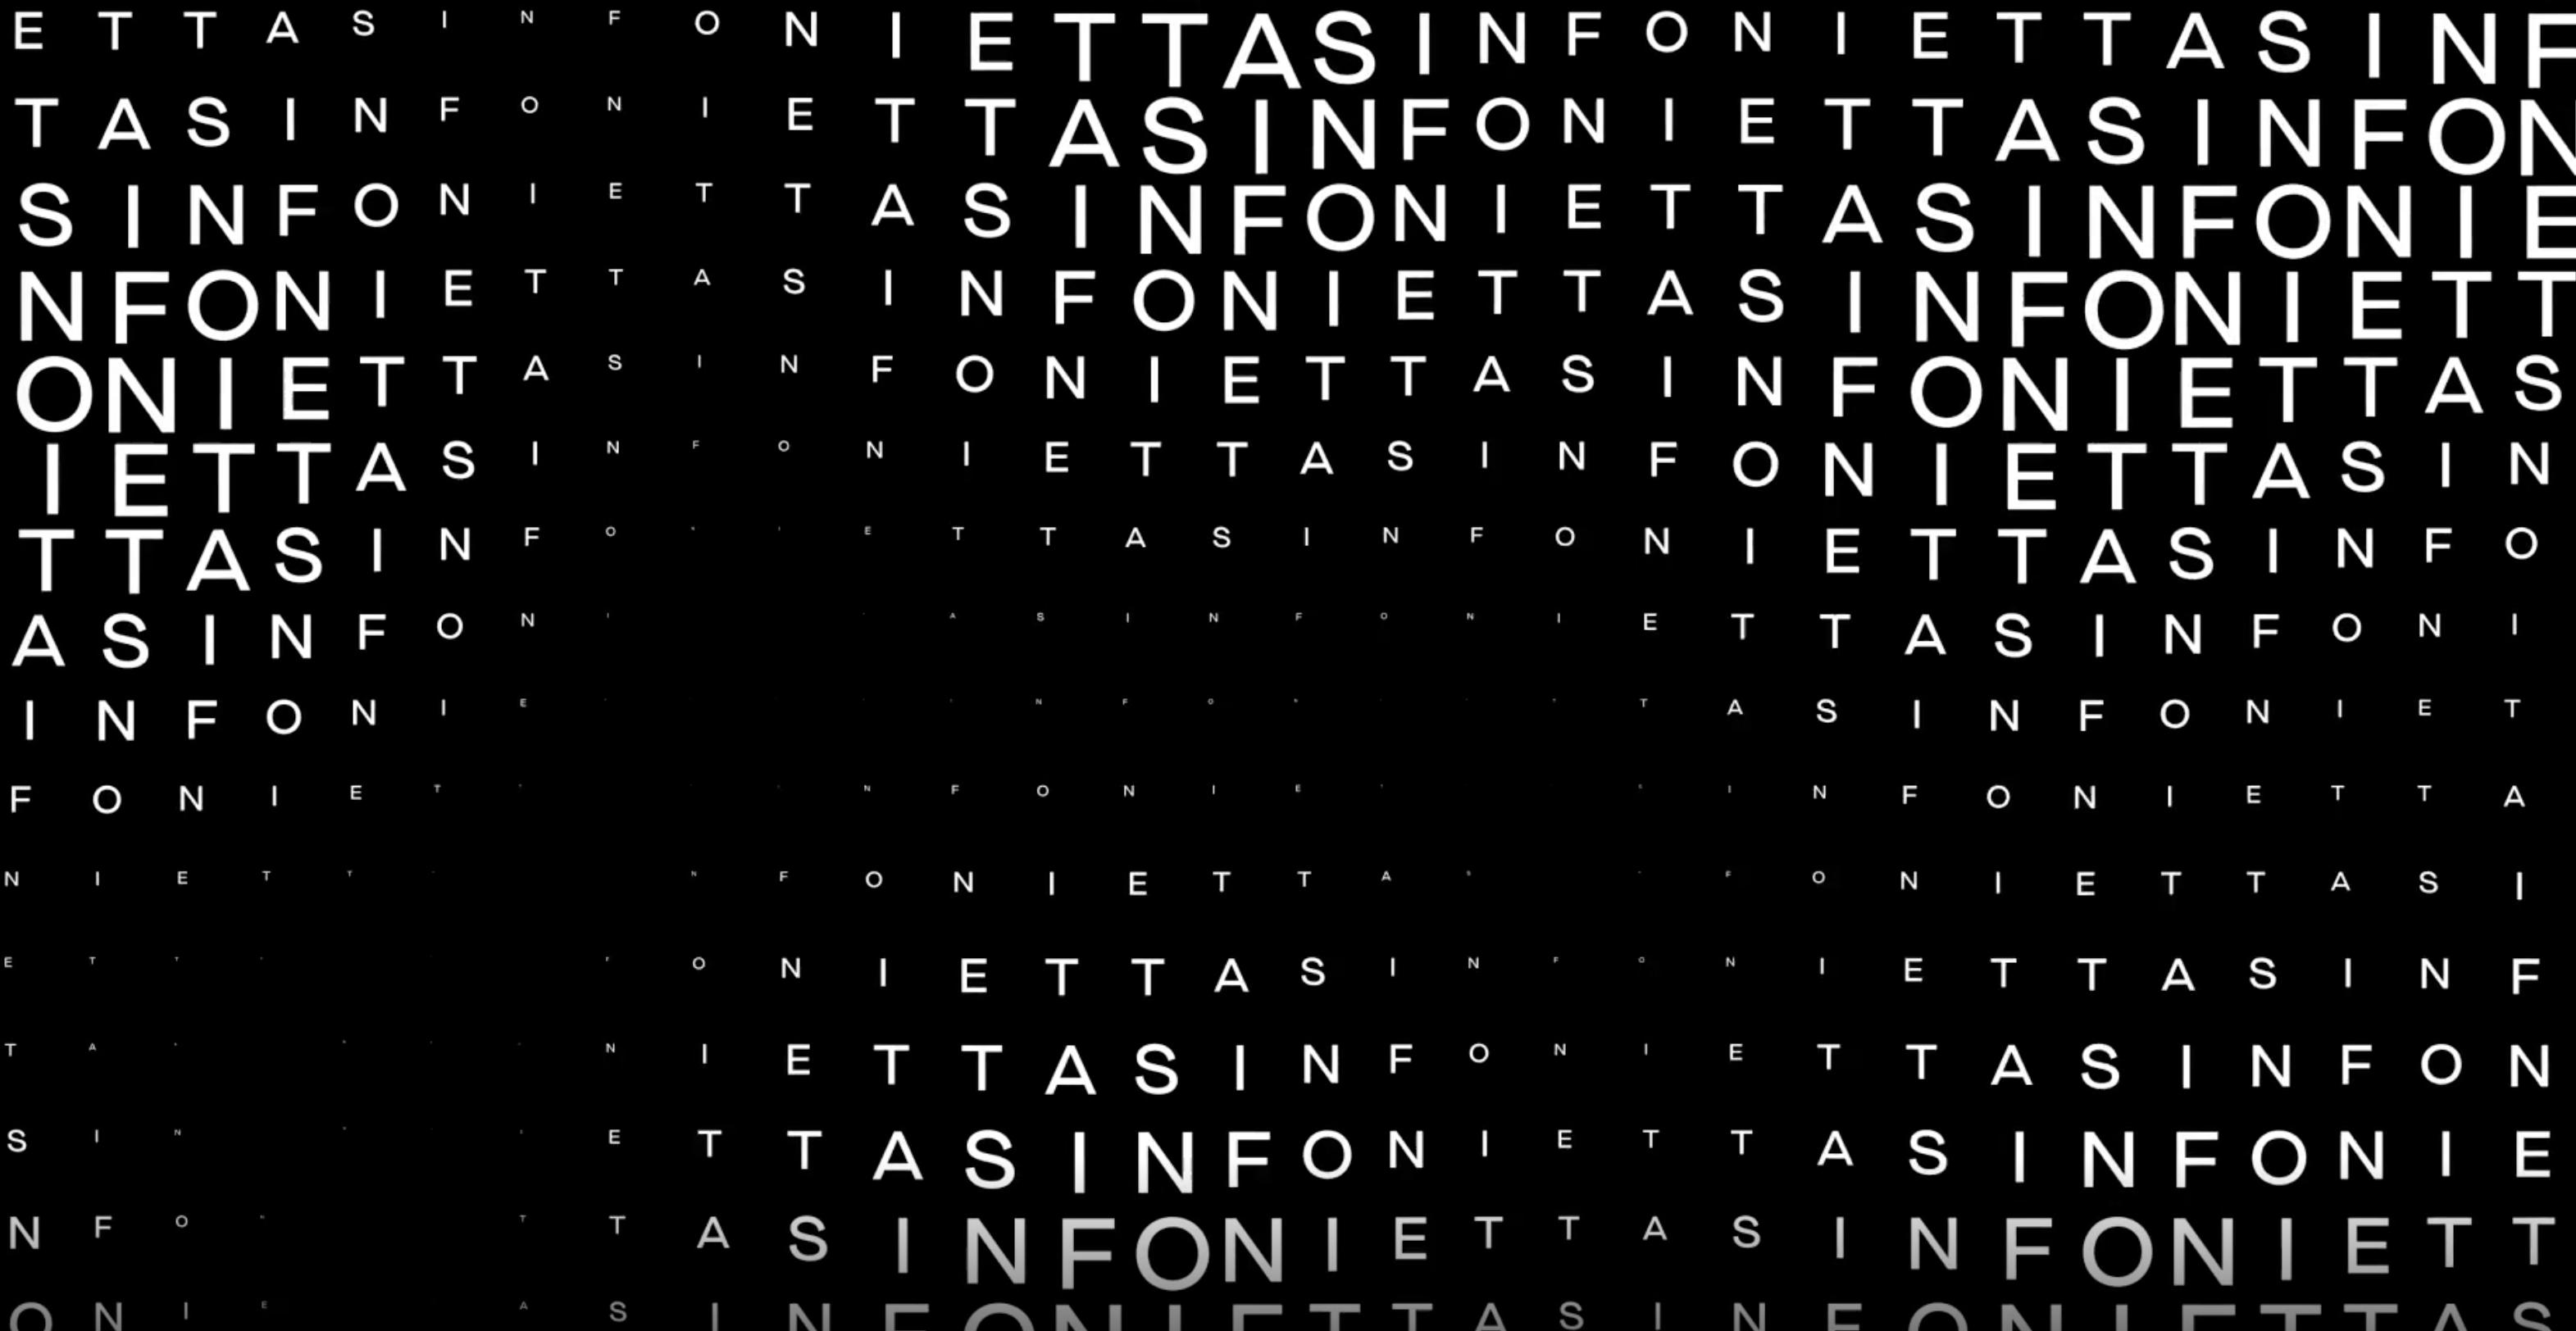
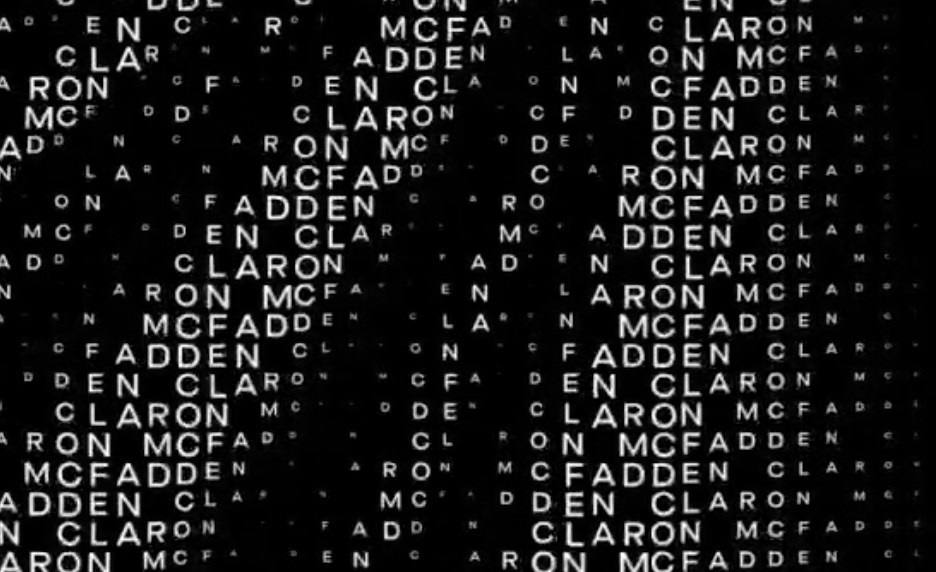
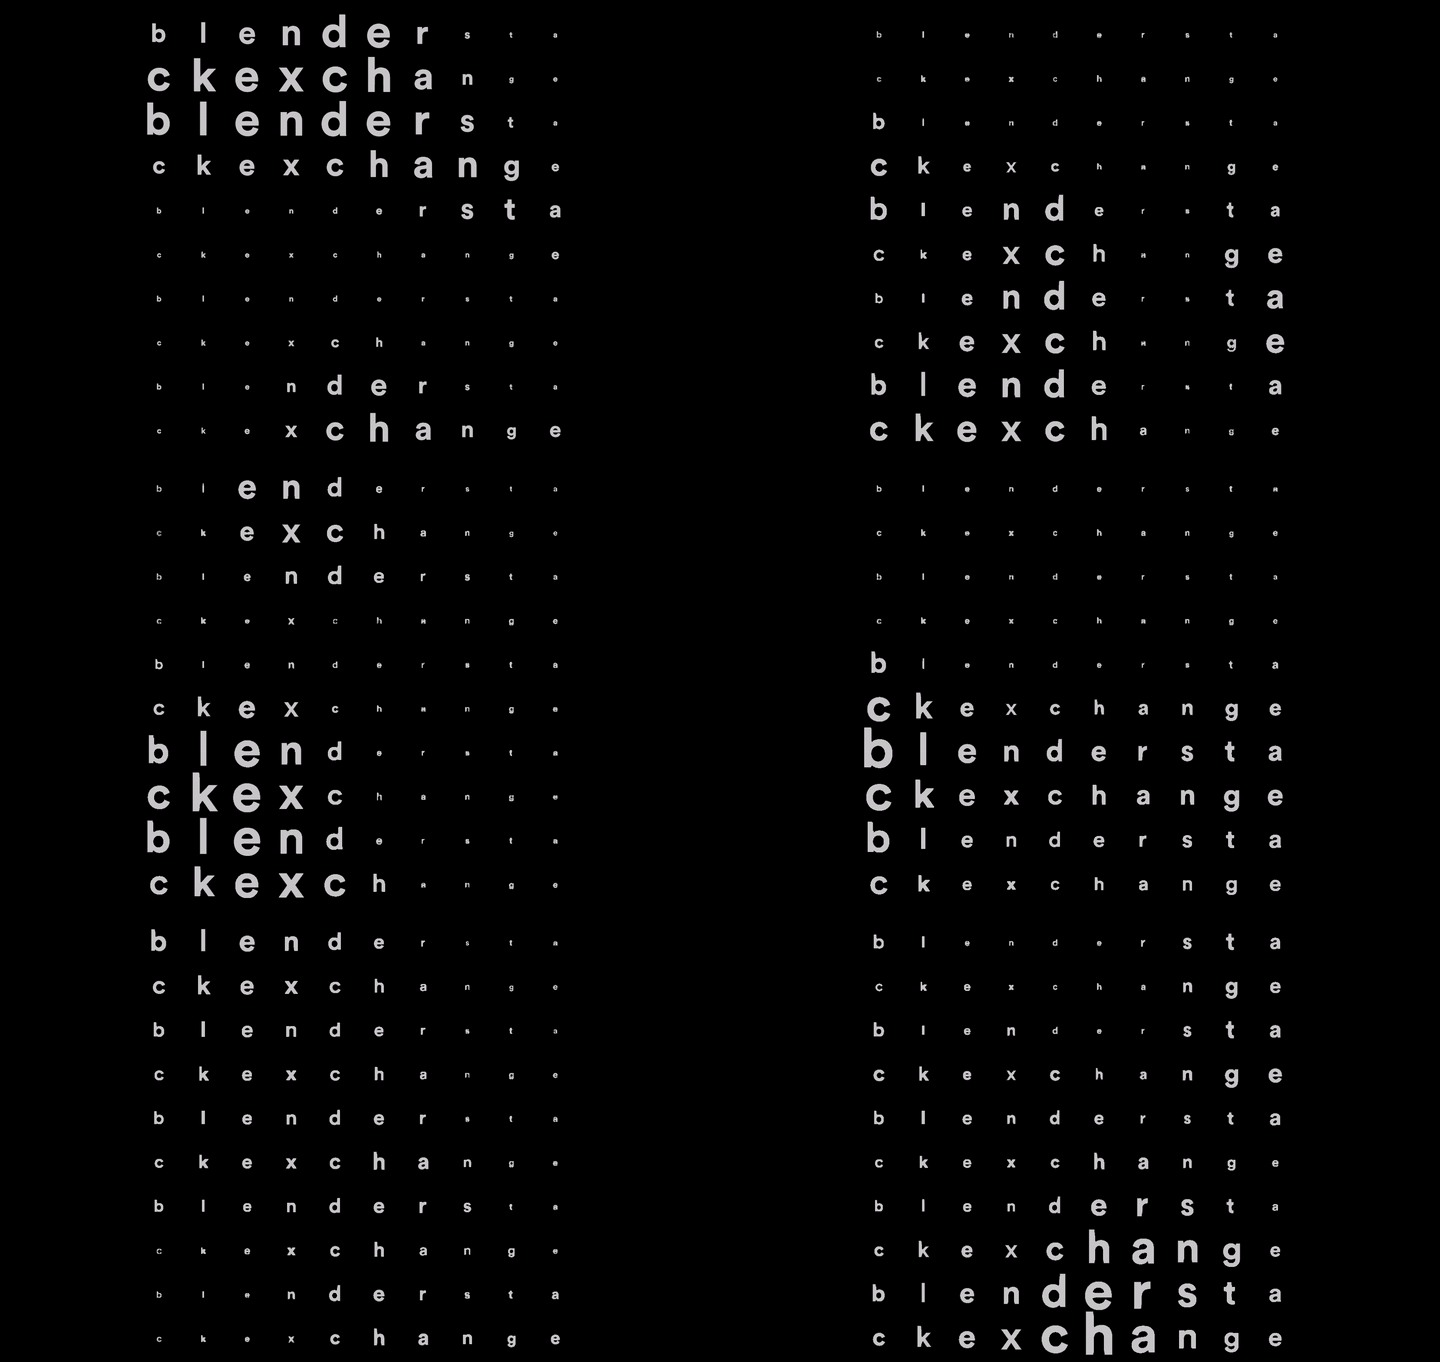
I'm fairly new to Blender so this might be a really simple question. I want to animate each letter in a text with an effector (different shapes and patterns) in a similar way to these references:

enter image description here

https://studiodumbar.com/media/pages/work/amsterdam-sinfonietta-identity/1549645332-1586263695/as_case_motionsinfonietta_intro.mp4

enter image description here

https://studiodumbar.com/media/pages/work/amsterdam-sinfonietta-identity/1331194541-1586263695/as_case_andriessen-moore_detail.mp4

The closest I've come to any tutorials is this: https://www.youtube.com/watch?v=LtKmb4E7CuY&ab_channel=BlueFoxCreation but I have no idea how to animate each letter in a text this way.

Would be greatly appreciated if anybody could help me out.

$\endgroup$
8
  • 1
    $\begingroup$ The use of images in your question would be appreciated. Please do that. Its your choice. Video references outside of BSE are less preferable. Can you show your current work? $\endgroup$ Commented Jan 21, 2021 at 23:32
  • $\begingroup$ Are you trying to animate individual characters or masses of characters in Blender? Can you please state whether or not you have used drivers in Blender? For example would you understand some part of this reference blender.stackexchange.com/questions/135382/…. Please note there are tutorials on drivers here on BSE and ... on the famous video website that has a name that rhymes with noonoob $\endgroup$ Commented Jan 21, 2021 at 23:34
  • 1
    $\begingroup$ The best choice are Animation nodes, but since I'm not able to handle it, my way would be letters as square images in collection used as particles on grid scaled by texture as effector. $\endgroup$
    – vklidu
    Commented Jan 21, 2021 at 23:42
  • $\begingroup$ All those effects are probably distance calculations. Blender has resident ways to calculate that. $\endgroup$ Commented Jan 22, 2021 at 0:13
  • $\begingroup$ @atomicbezierslinger Added reference images. I have tried to play around in Blender but I haven't come close to doing anything that's similar to the effect I'm trying to achieve. $\endgroup$ Commented Jan 22, 2021 at 7:33

2 Answers 2

5
$\begingroup$

Animation Nodes

Animation Nodes is a blender add-on for visual scripting. See the Docs for more info. As you haven't worked with Animation Nodes before, I'll be a bit more specific i nmy explanations.

This is an all-AN-solution, if you don't care about creating the text object inside AN, you can skip the first 2 Steps and just create it by hand.

Text Input

We have different options to get our text into animation nodes including but not limited to:

  • Text Block Reader reads a text block in Blender. Best for multiline text.
  • Text Input if you only have a few words
  • Random Text thats what I am using here, so I don' have to think about words.
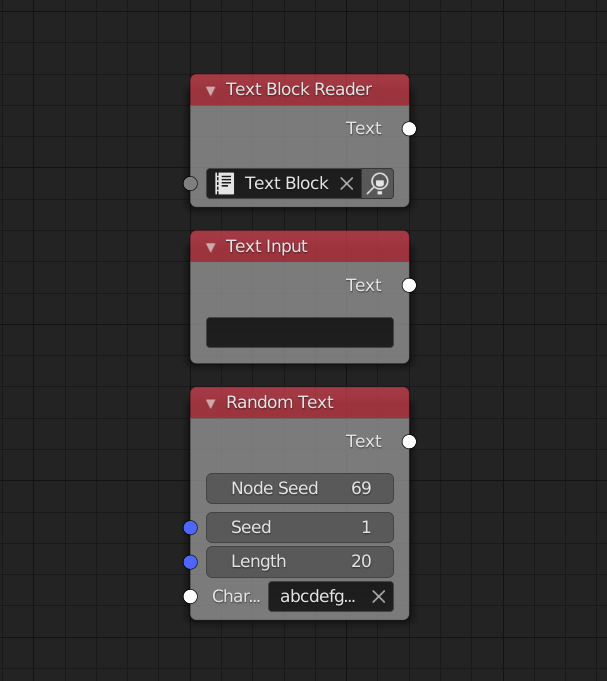
enter image description here

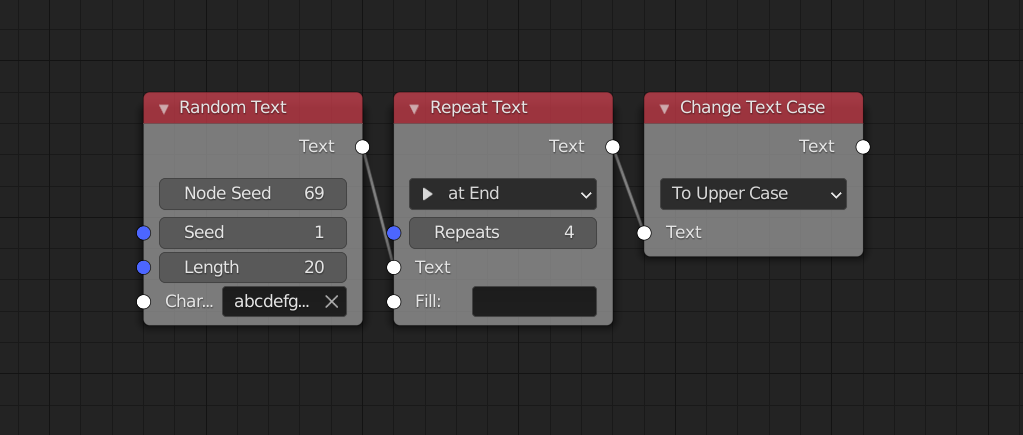
After you have typed in your text, linked a file or created a random string you have the possibility to process the text further. Repeat it, trim it, change case etc. Press shift + a and look through the different text nodes, I think they are easy enough to understand.

I'll go with some uppercase repetition similar to your example.
enter image description here

Creating A Text Object

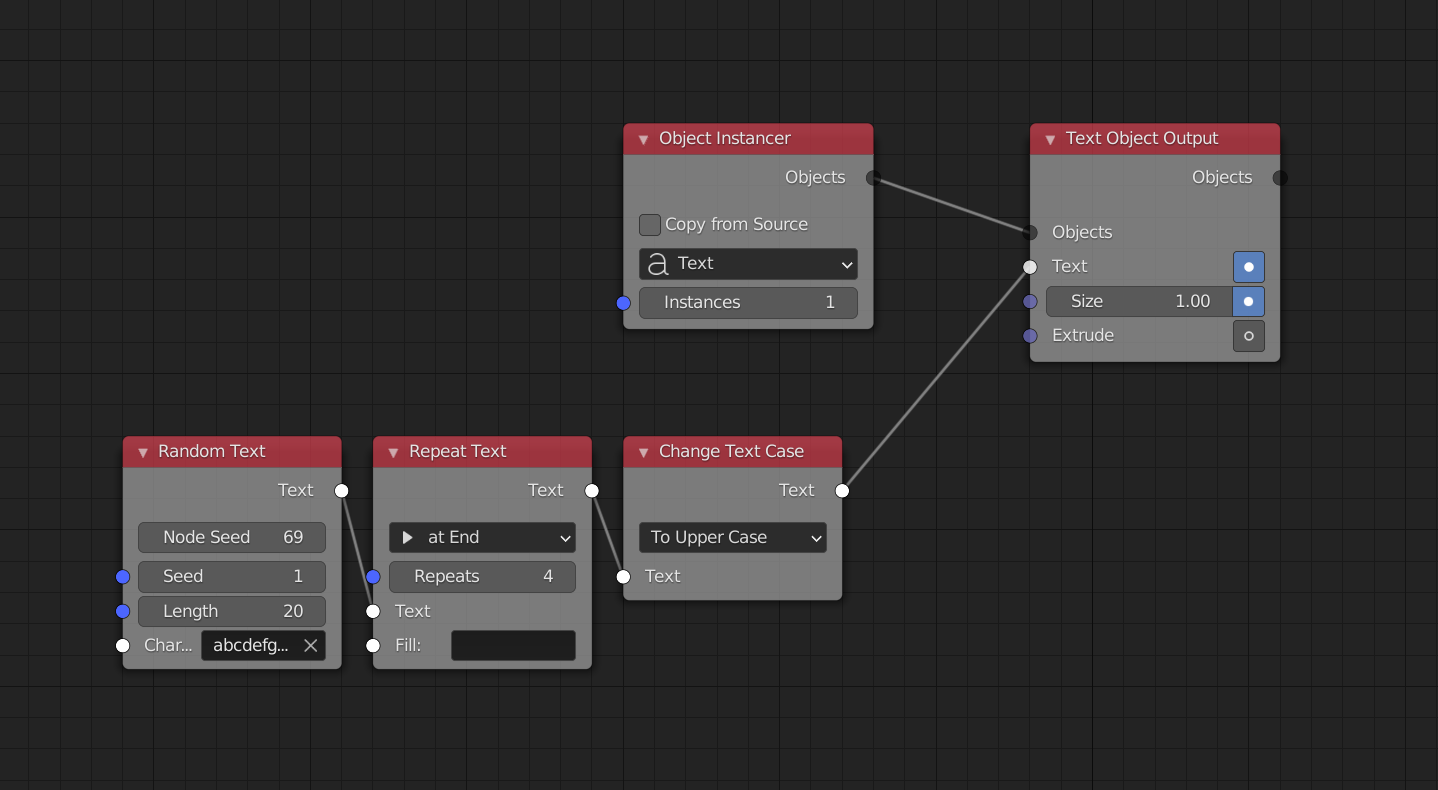
We need to tell Blender, that we want a text object in the scene. We use an object instancer to create that object and an object output node to fill it with our text.
enter image description here

Separating the Text

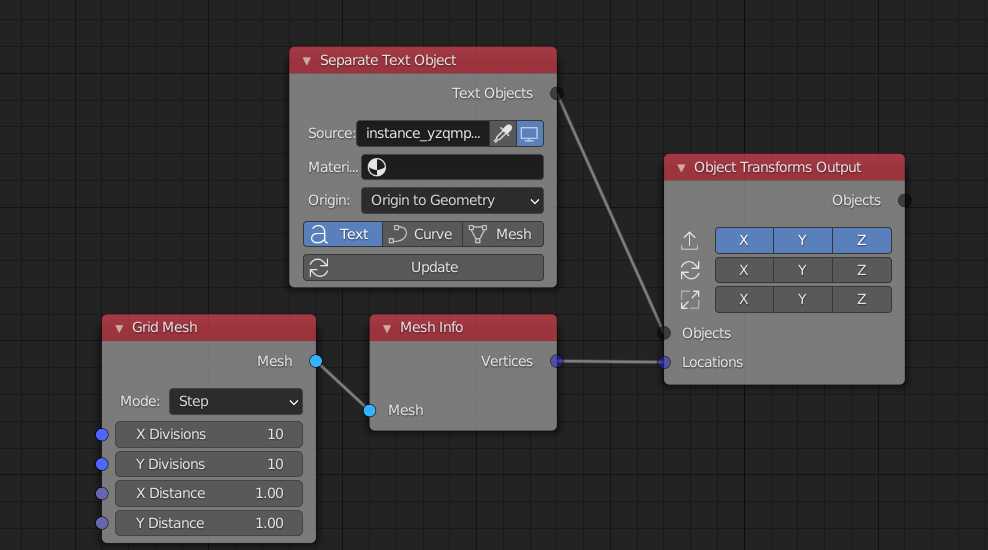
Thats probably the most difficult part. Add a Seperate Text Object Node, select the Text Object you just created and click update.

enter image description here

Text Grid

Add a Grid Mesh Generator, that creates an easy to control grid for us. We use the vertex positions (through the Mesh Info Node) of this grid to align our letters with an Object Transforms Output. We won't actually see the mesh in the viewport or the renders.
enter image description here

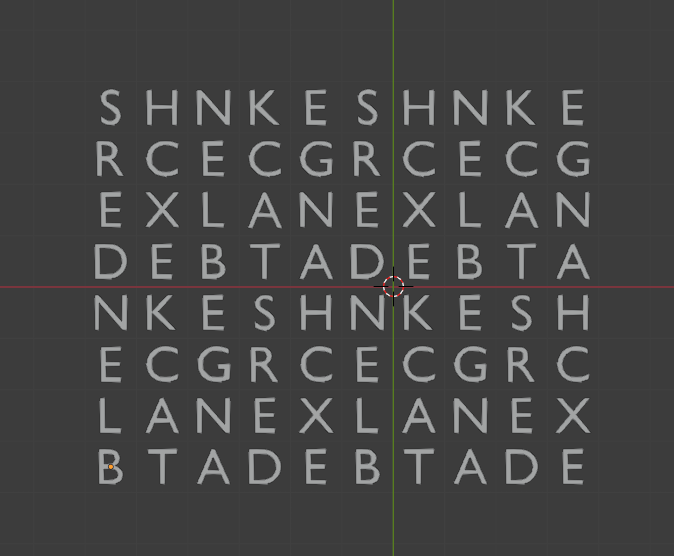
If we didn't care about the order of our text that would have been it. Unfortunately...
enter image description here

The vertex indices start in the bottom left and go up, we want them to start in the top left and go right. SO we need another step:

Ordering the grid vertices

We rotate the grid by 90deg with a Transform Matrix and a Compose Matrix node and reverse the vertex list with a Reverse List node. Great.
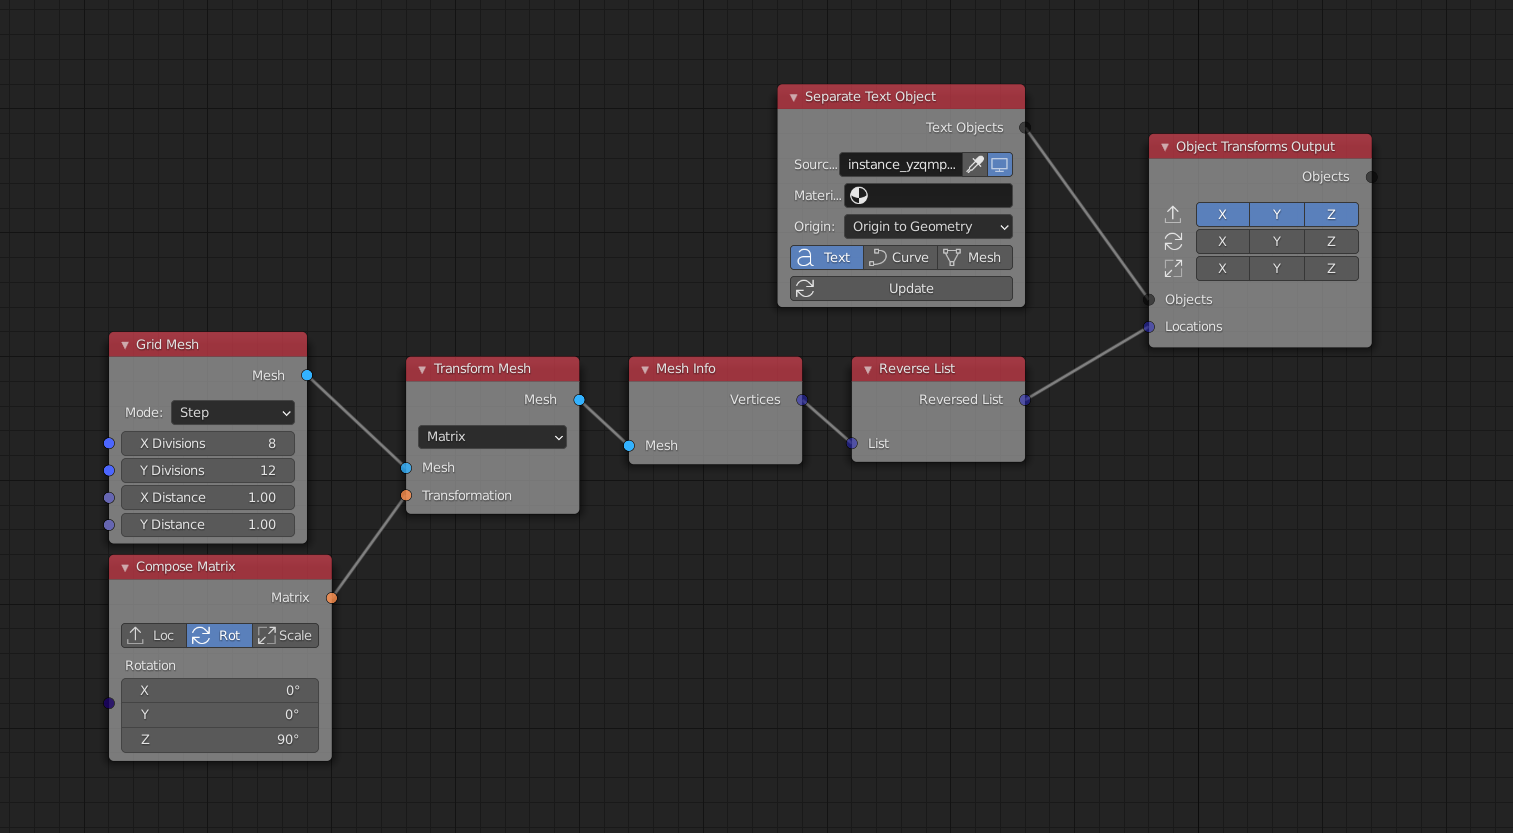
enter image description here

This was basically just the Animation Nodes Setup. There are a lot of different ways with Animation Nodes to achieve the scaling, I'll show only one. But maybe that helps you experiment a bit.

Scaling each Letter

This is one possible Node Setup:
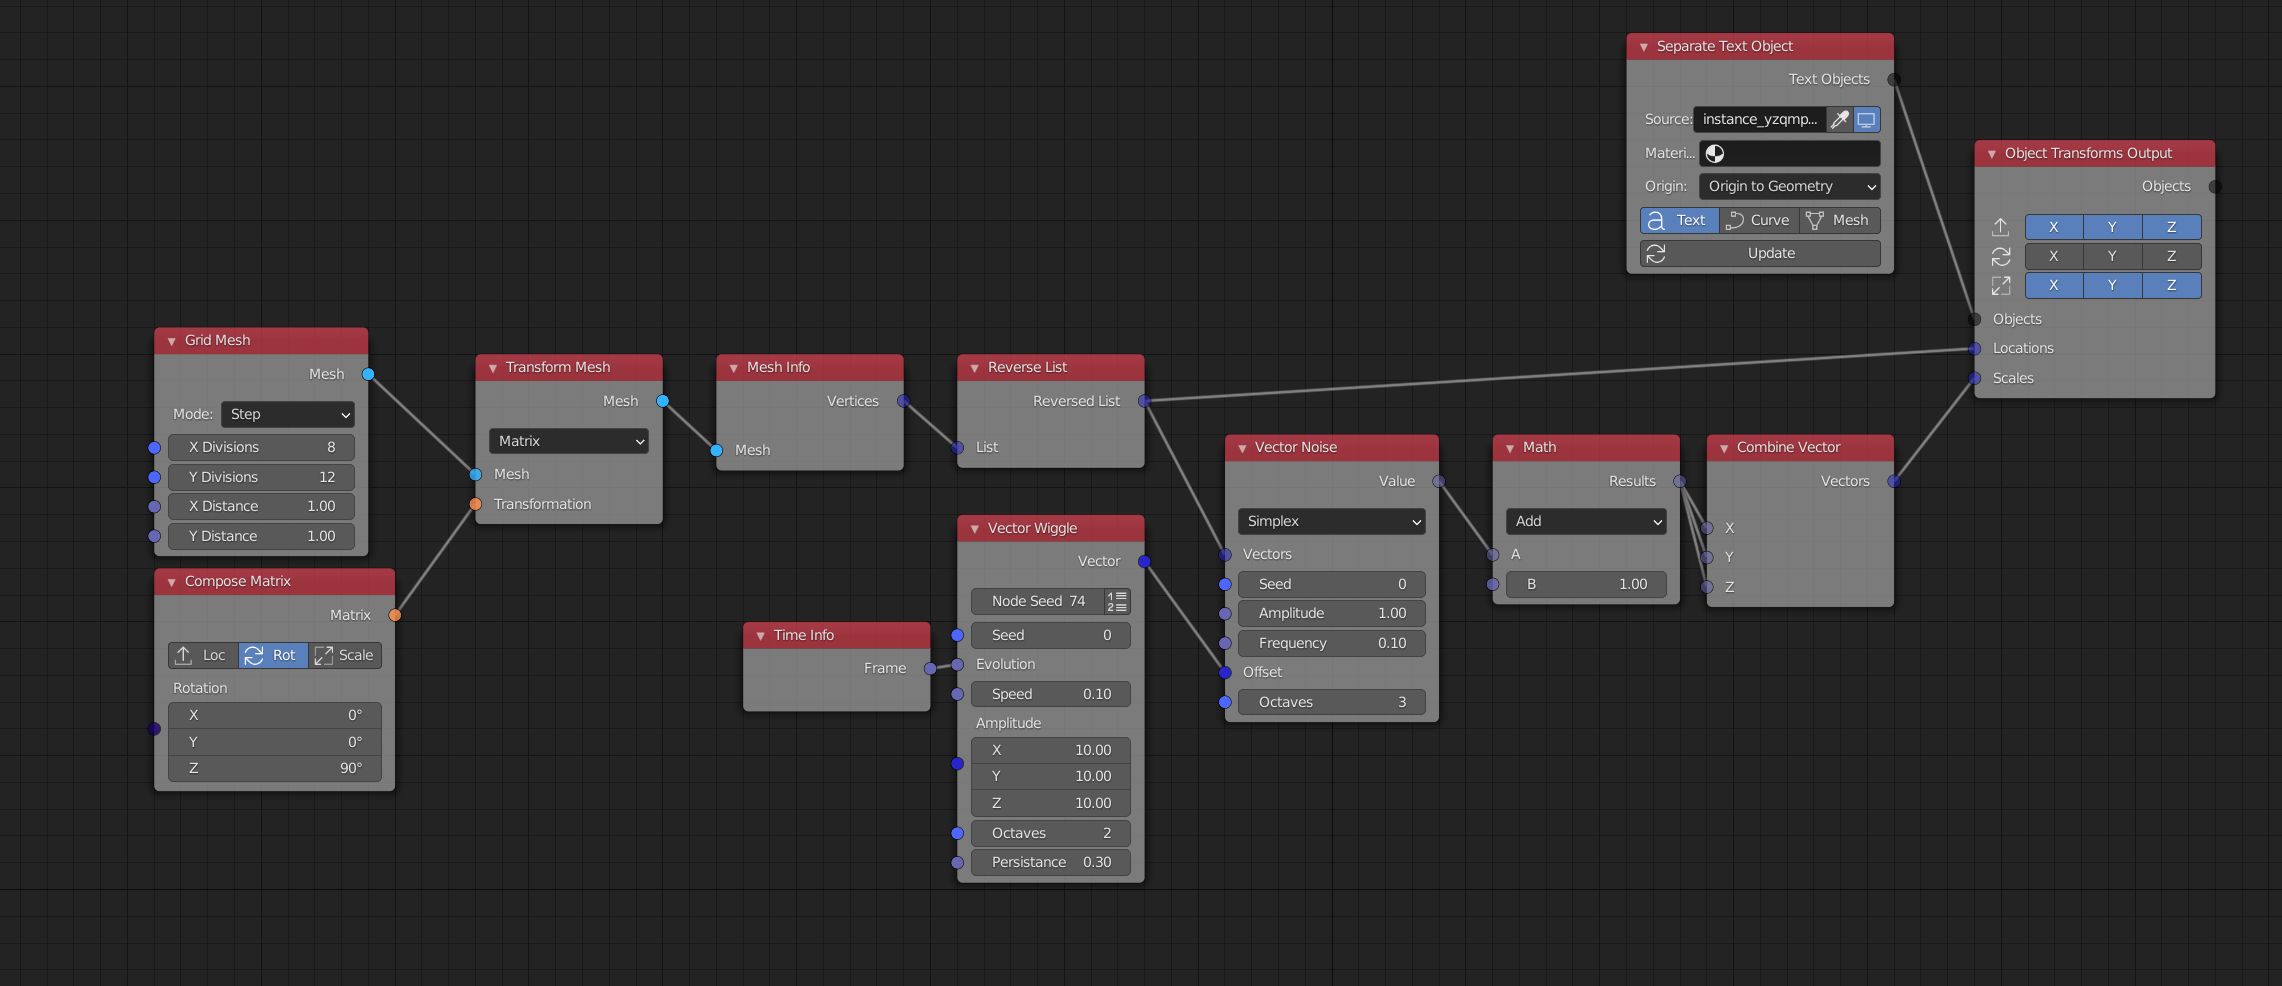
enter image description here

What is happening here?

We use the vertex location to create a random value for each location using a Vector Noise node. As we dont want our letters to scale different in each direction, we are happy with 1D noise. The Vector Noise node outputs negative numbers, so we add 1 to always kepp them positive. you could use a Map Range node so you'd have more controll over min and max values instead. We then compose a vector out of the noise value. The same value for X,Y and Z because again: we want the scaling to be uniform. To animate the noise I use a Vector Wiggle Node in combination with a Time Info node to change the offset of the Vector Noise.

That's it. If you have any questions, let me know. (Thats a long answer, but in the end you need 15 nodes. Thats managable imo.)

enter image description here

$\endgroup$
9
  • $\begingroup$ What comment? Glad you learnt sth new or at least copied the node tree. :) Create sth cool! $\endgroup$
    – bstnhnsl
    Commented Jan 22, 2021 at 12:58
  • $\begingroup$ Awesome! Thanks a lot! I think this is exactly what I need to get started. I'll try and experiment a bit and then I might have a few additional question :) $\endgroup$ Commented Jan 22, 2021 at 14:14
  • 1
    $\begingroup$ Great. I just realised, you don’t need the reverse list node, if you rotate the grid mesh clockwise (-90deg). $\endgroup$
    – bstnhnsl
    Commented Jan 22, 2021 at 15:33
  • 1
    $\begingroup$ somehow i got a mistake in my screenshot. that shouldn’t have worked. the text input should go into the fill socket, not the text socket. my bad. $\endgroup$
    – bstnhnsl
    Commented Jan 22, 2021 at 18:18
  • $\begingroup$ Worked great for smaller amounts of text, but my computer simply can't handle it when I scale it to something that looks like the examples I posted. Thanks anyway! $\endgroup$ Commented Jan 24, 2021 at 16:32
4
$\begingroup$

Particle system

It's old fashioned way, but still working:

  • Add Text object, type your words, Convert to Mesh, Separate by Loose Parts, move them into a new Collection
  • Add Plane, add Particle System, source Faces > Grid, render as Collection, under Field Weights set Gravity zero
  • go down in properties to Textures, create a new one, go to texture properties, set any you like (I used Distorted Noise), Influence > enable Size

enter image description here

Note:

  • You would have select all letters and search for Origin to Geometry with Pivot Point > Bounding Box option and tall letters position manually (took me a minute with enabled Options > Transform > Origin).
  • Letters separated into individual objects get (for some reason) reverted sequential numbering. So particle system starts with last letter. To revert it you can rename objects manually or use this script (thanks to p2or) - Copy script from the link, paste into a new blender's Text Editor, Run the script (Alt+P) with cursor in Text editor. Select all letters in viewport and press Ctrl+R . It brings a dialog window, type "name_###r" :)

$\endgroup$
4
  • $\begingroup$ Awesome thanks! This looks like a great place to start. Any way to animate the text layer without converting to mesh or is this just something that you have to work around in blender? $\endgroup$ Commented Jan 22, 2021 at 8:26
  • $\begingroup$ Its actually way easier in animation nodes. with no manual converting. and you can change the text on the go, link a file etc. I'm on it. $\endgroup$
    – bstnhnsl
    Commented Jan 22, 2021 at 9:08
  • $\begingroup$ Hehe You just beat me to exactly the same answer! You can ensure the origins go to the right place for (un-kerned) letters by having the Pivot point set to 'Bounding Box' when you call up Origin to Geometry.. no need to do it by hand, although I did have to do them one letter at a time.. don't know why.. @bstnhnsl.. also look forward to AN approach. $\endgroup$
    – Robin Betts
    Commented Jan 22, 2021 at 9:56
  • $\begingroup$ Great it works for you. I would like to ask you delete your comments here that doesn't make a sense for followers now, all important I put into the answer. Thank you to keep this site organised. About Deform Modifier - comments are not meant to be a chat, also only one question per post is allowed. Please create a new one if you didnt find answer. Anyway I'm not sure what are you asking for. $\endgroup$
    – vklidu
    Commented Jan 25, 2021 at 16:41

You must log in to answer this question.

Not the answer you're looking for? Browse other questions tagged .