2
$\begingroup$

I have split a plane in half by using the Loop Cut tool and now I have two faces which both share an edge. When I select just one of the faces and press R+Y to rotate it, it rotates around an axis which goes through its center of area. This causes the other face to follow the shared edge as the first one rotates and sort of stretch.

I am not sure how to make my selection so that Blender knows to rotate the face around the shared edge. What I am after is rotation one of the faces around an edge shared with the other as if you were opening and closing a book, its spine being the shared edge.

I read some answers, but most that I could find deal with rotating an object around on of its edges. I also couldn't get some of them to work. This is different from what I want to achieve, I am trying to rotate one face within a mesh without affecting the rotation, location or shape of the other faces of the mesh.

I am using Blender 2.80 beta.

$\endgroup$
2
  • 1
    $\begingroup$ have a look at Shape Keys. These hold different vertices locations for a single mesh and allow you to animate between them. $\endgroup$
    – rob
    Commented Jan 28, 2019 at 16:02
  • $\begingroup$ Sorry I was not able to figure out how to go from having a shape key to rotating a face around it. I must be missing something because there is definitely a gap in my understanding of how to apply shape keys to my problem. Could you walk me through it a bit more in an answer? $\endgroup$ Commented Jan 28, 2019 at 21:00

2 Answers 2

1
$\begingroup$

Select the edge, set the 3d cursor to it (Shift+S, 4); Set the cursor as the pivot point for rotation (Dot); then select your face, and create a new custom transform orientation, it will give you the correct gizmo axes for rotation (if your edge matches any of the world axes you can skip this step); rotate as you wish. :-)
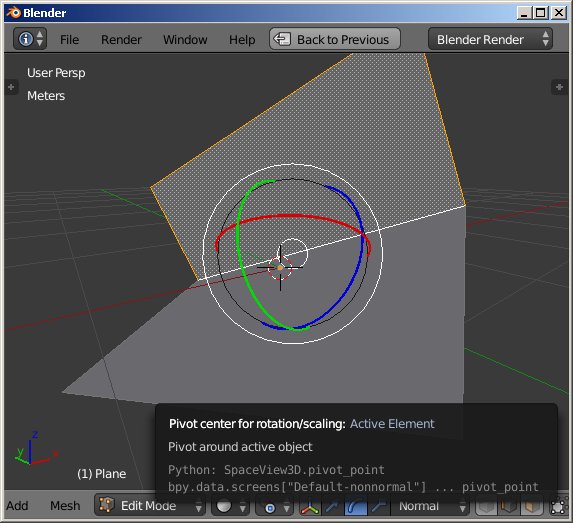
You can also use the "Active element" as your pivot point. In this case you have to select all the edges of your plane to rotate, and the "hinge" edge should be selected last (to become that active element).
And for the simple plane you can also use "Normal" as your transform orientation (it works great in this case, and you have not to deal with creating custom transform orientations).
enter image description here

$\endgroup$
3
  • $\begingroup$ I got stuck at "new custom transform orientation". Ctrl+Alt+space changes the window so it only shows the viewport and I cannot find the Properties panel where I could do this manually. $\endgroup$ Commented Jan 28, 2019 at 20:52
  • $\begingroup$ I tried the active element method and when selecting the last edge, the whole face becomes selected (but I do have the selection method set to edges only). I press dot and select active element, but the pressing R+Y it rotates the whole edge around its Y axis coming through the center of its area still, not the last selected edge. I am probably missing something. $\endgroup$ Commented Jan 28, 2019 at 20:54
  • 1
    $\begingroup$ Maybe you use wrong dot. The numpad dot centers active object in the viewport, but the dot on the main keyboard switches the pivot rotation to the 3d cursor. It applies to 2.7, I don't know what shortcuts the 2.8 has. In the last case, when you use edge select mode, don't press dot, but select tour "pivot center for rotation/scale" = "Active element" instead. $\endgroup$
    – Mechanic
    Commented Jan 29, 2019 at 8:13
1
$\begingroup$

One way, using a Custom Orientation, to rotate elements around any edge...

  • Set Pivot to 'Active Element'
  • Select the edge you want to be the axis of rotation
  • CtrlAltSpace create a custom orientation from the edge (or pair of vertices). Check 'Use after Creation', and, if you don't want orientations hanging around, 'Overwrite Previous'
  • Select the elements you want to rotate, and lastly, to make it active, the axis-edge, or one of its vertices.
  • Use RYY to rotate the elements around the edge. (hitting Y twice to go from Global to the secondary orientation, in this case, the one you created)
$\endgroup$
4
  • $\begingroup$ I tried your method as well as Mechanic's and in both cases Ctrl+Alt+space switches the window into a viewport-only view instead of creating a custom orientation. I am not sure how to create one through the UI. Is it possible this shortcut changed in Blender 2.80 beta? I am using the new keymapping. $\endgroup$ Commented Jan 28, 2019 at 20:57
  • 1
    $\begingroup$ @TomášHübelbauer Aaah, looking around, you're right, I haven't really started using 2.8 in anger The specific keyboard shortcut has gone. There's a + in the header orientations menu , now. and I think you would have to add to Quick Favorites, if you used them a lot $\endgroup$
    – Robin Betts
    Commented Jan 28, 2019 at 21:56
  • $\begingroup$ Can you describe where the Orientations menu is or attach a screenshot of it? $\endgroup$ Commented Jan 28, 2019 at 22:06
  • $\begingroup$ @TomášHübelbauer Leftmost dropdown, top center of 3D view, '+' sign. $\endgroup$
    – Robin Betts
    Commented Jan 28, 2019 at 22:20

You must log in to answer this question.

Not the answer you're looking for? Browse other questions tagged .